
Dairy-Free Creamed Corn is a delightful dish that brings comfort and joy to any table. As someone who has always cherished the rich, creamy texture of traditional creamed corn, I was thrilled to discover a dairy-free version that captures all the flavor without the lactose. This recipe not only caters to those with dietary restrictions but also celebrates the sweet, natural goodness of corn, which has been a staple in many cultures for centuries. People love Dairy-Free Creamed Corn for its velvety consistency and the way it complements a variety of meals, from barbecues to holiday feasts. Plus, its incredibly easy to prepare, making it a go-to side dish for busy weeknights or special occasions. Join me as we explore this deliciously creamy, dairy-free alternative that everyone will adore!

Ingredients:
- 4 cups fresh or frozen corn kernels
- 1 cup unsweetened almond milk (or any dairy-free milk of your choice)
- 1 tablespoon coconut oil (or olive oil)
- 1 medium onion, finely chopped
- 2 cloves garlic, minced
- 1 teaspoon salt (adjust to taste)
- 1/2 teaspoon black pepper
- 1/2 teaspoon smoked paprika (optional, for a smoky flavor)
- 1 tablespoon maple syrup (optional, for sweetness)
- 2 tablespoons fresh parsley, chopped (for garnish)
Preparing the Corn
1. If youre using fresh corn, start by shucking the corn and removing the kernels from the cob. I find it easiest to stand the cob upright in a bowl and slice downwards with a sharp knife. This way, the kernels fall into the bowl without making a mess. If youre using frozen corn, simply measure out 4 cups and set it aside. 2. Next, rinse the corn kernels under cold water if youre using frozen corn. This helps to remove any ice crystals and ensures they cook evenly.Cooking the Base
3. In a large skillet or saucepan, heat the coconut oil over medium heat. Once the oil is melted and shimmering, add the finely chopped onion. Sauté the onion for about 5-7 minutes, or until it becomes translucent and slightly golden. This step is crucial as it builds the flavor base for our creamed corn. 4. Add the minced garlic to the skillet and sauté for an additional 1-2 minutes. Be careful not to burn the garlic, as it can turn bitter. The aroma will be heavenly at this point!Adding the Corn
5. Now, its time to add the corn kernels to the skillet. Stir them in and let them cook for about 5 minutes, allowing them to soften and absorb the flavors from the onion and garlic. 6. Pour in the almond milk (or your chosen dairy-free milk) and stir well to combine. The mixture will look a bit soupy at this stage, but dont worry; it will thicken as it cooks.Seasoning the Mixture
7. Add the salt, black pepper, and smoked paprika (if using) to the skillet. Stir everything together, ensuring the corn is well-coated with the seasonings. If you like a touch of sweetness, now is the time to add the maple syrup. It balances the flavors beautifully! 8. Bring the mixture to a gentle simmer. Reduce the heat to low and let it cook for about 10-15 minutes, stirring occasionally. This allows the corn to become tender and the flavors to meld together. If you prefer a creamier texture, you can use a potato masher to mash some of the corn kernels as it cooks.Thickening the Creamed Corn
9. If you want your creamed corn to be thicker, you can create a slurry. In a small bowl, mix 1 tablespoon of cornstarch with 2 tablespoons of cold water until smooth. Add this mixture to the skillet and stir well. Continue to cook for another 2-3 minutes until the sauce thickens to your desired consistency. 10. Taste the creamed corn and adjust the seasoning if necessary. You might want to add a bit more salt or pepper, depending on your preference.Finishing Touches
11. Once the creamed corn has reached your desired thickness, remove it from the heat. Stir in the chopped fresh parsley for a pop of color and freshness. This step not only enhances the flavor but also makes the dish visually appealing. 12. Serve the dairy-free creamed corn warm. Its perfect as a side dish for any meal, whether its a holiday feast or a casual weeknight dinner. I love pairing it with grilled vegetables or alongside a hearty vegan protein.Storage and Reheating
13. If you have leftovers (which is rare because its so delicious!), let the creamed corn cool completely before transferring it to an airtight container. It can be stored in the refrigerator for up to 3 days. 14. To reheat, simply warm it up in a saucepan over low heat, adding a splash of almond milk if it has thickened too much. Stir occasionally until heated through.Variations and Tips
15. Feel free to customize this recipe to suit your taste! You can add diced bell peppers or jalapeños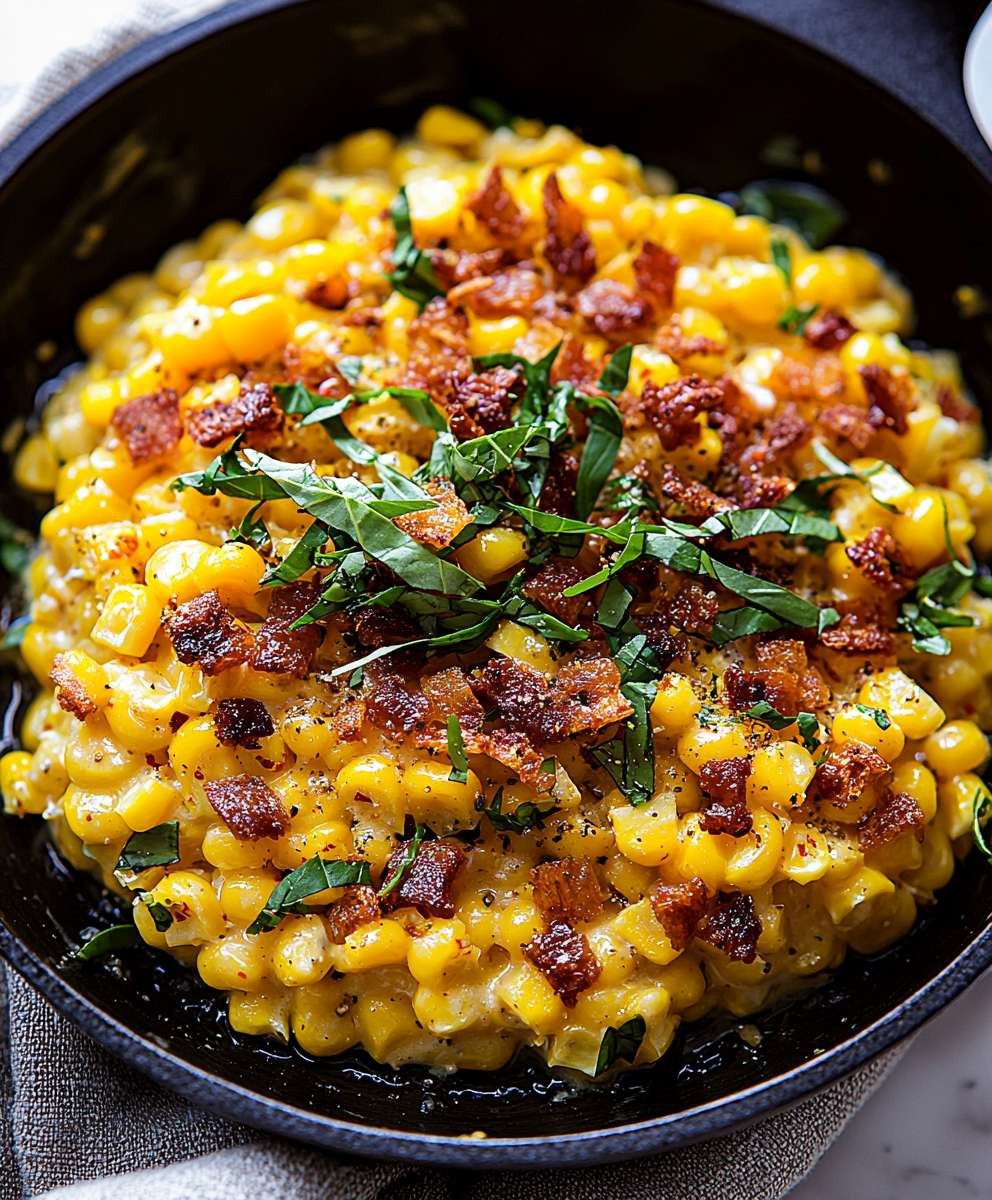
Conclusion:
In summary, this Dairy-Free Creamed Corn recipe is an absolute must-try for anyone looking to enjoy a creamy, comforting side dish without the dairy. The combination of sweet corn, rich coconut milk, and a hint of seasoning creates a delightful flavor profile that will have your taste buds dancing. Whether you’re serving it at a family gathering, a holiday feast, or just a cozy weeknight dinner, this dish is sure to impress. For serving suggestions, consider pairing this creamed corn with grilled chicken, roasted vegetables, or even as a topping for baked potatoes. You can also experiment with variations by adding spices like smoked paprika for a smoky twist or fresh herbs like cilantro or chives for a burst of freshness. If you’re feeling adventurous, try mixing in some sautéed onions or bell peppers for added texture and flavor. I encourage you to give this Dairy-Free Creamed Corn recipe a try and make it your own! Once you do, I would love to hear about your experience. Share your thoughts, any variations you tried, or even a photo of your delicious creation. Let’s spread the joy of cooking and inspire others to enjoy this delightful dish! Print
Dairy-Free Creamed Corn: A Delicious and Easy Recipe for Everyone
- Total Time: 40 minutes
- Yield: 4 servings 1x
Description
This creamy, dairy-free creamed corn combines sweet corn with aromatic onions and garlic, making it a delightful side dish for any occasion. Easy to prepare and customizable, its perfect alongside grilled vegetables or hearty vegan proteins. Enjoy the rich flavors and creamy texture that everyone will love!
Ingredients
- 4 cups fresh or frozen corn kernels
- 1 cup unsweetened almond milk (or any dairy-free milk of your choice)
- 1 tablespoon coconut oil (or olive oil)
- 1 medium onion, finely chopped
- 2 cloves garlic, minced
- 1 teaspoon salt (adjust to taste)
- 1/2 teaspoon black pepper
- 1/2 teaspoon smoked paprika (optional, for a smoky flavor)
- 1 tablespoon maple syrup (optional, for sweetness)
- 2 tablespoons fresh parsley, chopped (for garnish)
Instructions
- If using fresh corn, shuck the corn and remove the kernels from the cob. Stand the cob upright in a bowl and slice downwards with a sharp knife. If using frozen corn, measure out 4 cups and set aside.
- Rinse the corn kernels under cold water if using frozen corn to remove ice crystals.
- In a large skillet or saucepan, heat the coconut oil over medium heat. Once melted, add the finely chopped onion and sauté for 5-7 minutes until translucent and slightly golden.
- Add the minced garlic and sauté for an additional 1-2 minutes, being careful not to burn it.
- Stir in the corn kernels and cook for about 5 minutes, allowing them to soften and absorb the flavors.
- Pour in the almond milk and stir well. The mixture will be soupy at this stage.
- Add salt, black pepper, and smoked paprika (if using). Stir to coat the corn with the seasonings. Add maple syrup if desired.
- Bring to a gentle simmer, reduce heat to low, and cook for 10-15 minutes, stirring occasionally. Mash some corn kernels for a creamier texture if preferred.
- For a thicker consistency, mix 1 tablespoon of cornstarch with 2 tablespoons of cold water until smooth, then add to the skillet. Cook for another 2-3 minutes until thickened.
- Taste and adjust seasoning if necessary.
- Remove from heat and stir in chopped parsley for freshness.
- Serve warm as a side dish, perfect with grilled vegetables or a hearty vegan protein.
Notes
- Leftovers can be stored in an airtight container in the refrigerator for up to 3 days.
- To reheat, warm in a saucepan over low heat, adding a splash of almond milk if it thickens too much.
- Prep Time: 15 minutes
- Cook Time: 25 minutes


Leave a Comment