
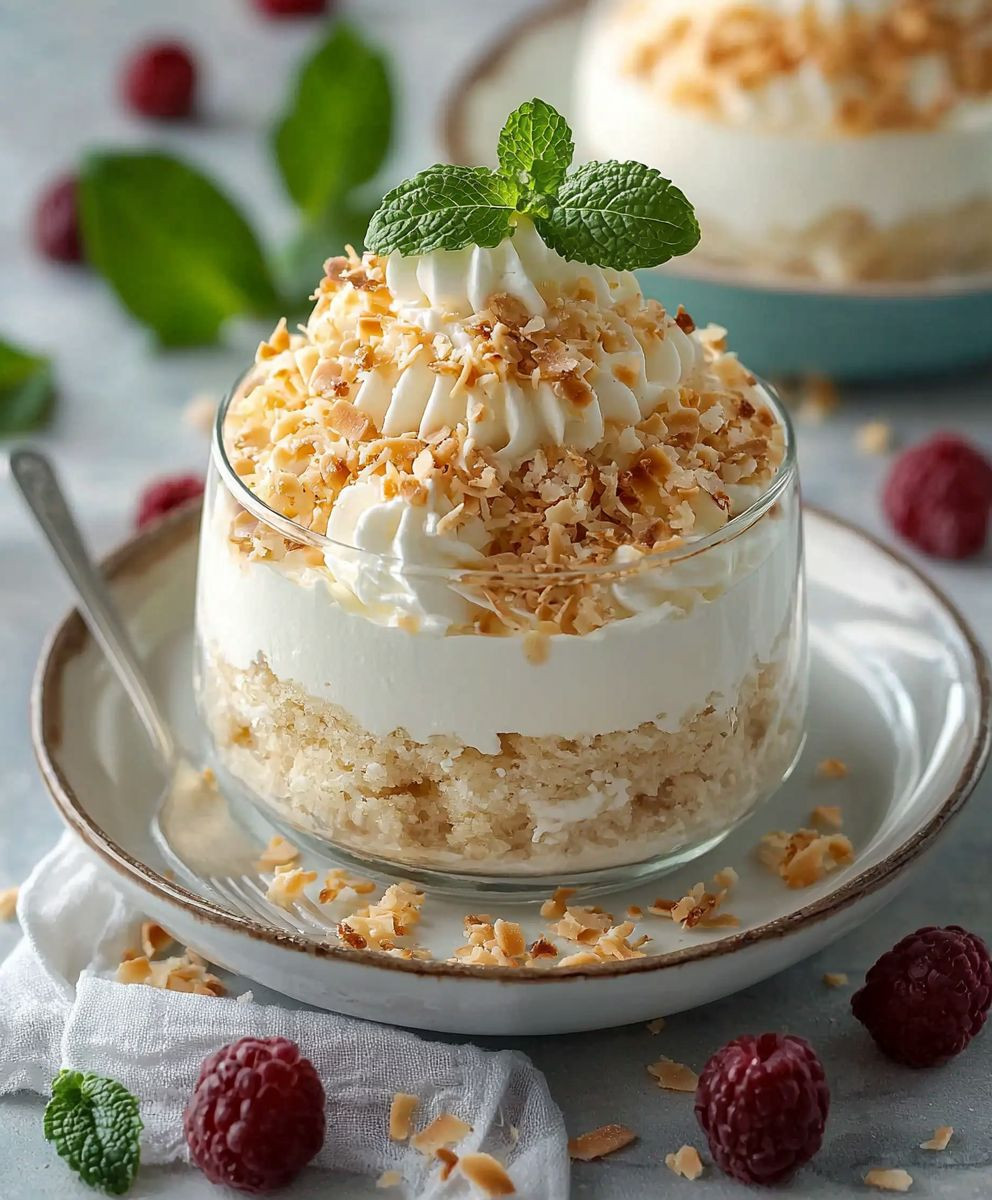
Coconut Cream Lush Dessert: Prepare to be transported to a tropical paradise with every single bite! This isn’t just a dessert; it’s a layered symphony of textures and flavors that will have everyone begging for seconds. Imagine a buttery, crumbly crust, followed by a creamy, dreamy coconut layer, topped with a fluffy, cloud-like whipped topping and toasted coconut flakes. Sounds divine, right?
While the exact origins of layered desserts like this are debated, they gained immense popularity in the mid-20th century, becoming a staple at potlucks and family gatherings across America. The beauty of a “lush” is its adaptability and the sheer joy it brings to those who share it. It’s a dessert that speaks of comfort, home, and simple pleasures.
People adore this Coconut Cream Lush Dessert for so many reasons. The combination of textures the crunch of the crust, the smoothness of the cream, and the lightness of the whipped topping is simply irresistible. The taste is a perfect balance of sweet and subtly tropical, thanks to the coconut. Plus, it’s incredibly easy to make ahead of time, making it the perfect dessert for any occasion. Whether you’re a seasoned baker or a kitchen novice, this recipe is guaranteed to impress. So, let’s get started and create a little slice of heaven!

Ingredients:
- For the Crust:
- 1 ½ cups all-purpose flour
- ½ cup (1 stick) cold unsalted butter, cut into cubes
- ¼ cup powdered sugar
- ¼ teaspoon salt
- 3-5 tablespoons ice water
- For the Cream Cheese Layer:
- 8 ounces cream cheese, softened
- 1 cup powdered sugar
- 1 teaspoon vanilla extract
- 8 ounces whipped topping, thawed (like Cool Whip)
- For the Coconut Cream Layer:
- 1 (5.4 ounce) can coconut cream, refrigerated overnight
- 1 (3.4 ounce) package instant coconut cream pudding mix
- 1 cup milk (whole or 2%)
- For the Topping:
- 1 ½ cups sweetened shredded coconut, toasted
- Optional: White chocolate shavings or toasted macadamia nuts for garnish
Preparing the Crust
- Combine Dry Ingredients: In a large bowl, whisk together the flour, powdered sugar, and salt. This ensures that the powdered sugar is evenly distributed throughout the flour, preventing clumps and creating a more tender crust.
- Cut in the Butter: Add the cold, cubed butter to the flour mixture. Using a pastry blender or your fingertips, cut the butter into the flour until the mixture resembles coarse crumbs. The key here is to work quickly so the butter stays cold. Cold butter is crucial for creating flaky layers in the crust. If the butter gets too warm, it will melt and the crust will become tough.
- Add Ice Water: Gradually add the ice water, one tablespoon at a time, mixing gently after each addition. Continue adding water until the dough just comes together. Be careful not to overmix the dough, as this will develop the gluten and result in a tough crust. The dough should be slightly shaggy but hold together when pressed.
- Form the Dough: Gently form the dough into a disc. Wrap it tightly in plastic wrap and refrigerate for at least 30 minutes. This allows the gluten to relax and the butter to firm up, making the dough easier to roll out. Chilling is a very important step, don’t skip it!
- Roll Out the Dough: Preheat your oven to 350°F (175°C). On a lightly floured surface, roll out the chilled dough to fit a 9×13 inch baking dish. You can also use a rolling pin cover to prevent the dough from sticking. If the dough is sticking, add a little more flour to the surface.
- Transfer to Baking Dish: Carefully transfer the rolled-out dough to the baking dish. Press the dough evenly into the bottom and up the sides of the dish. Use a fork to prick the bottom of the crust several times. This will prevent the crust from puffing up during baking.
- Bake the Crust: Bake for 20-25 minutes, or until the crust is lightly golden brown. Keep a close eye on it, as oven temperatures can vary. You want the crust to be cooked through but not overly browned.
- Cool Completely: Remove the crust from the oven and let it cool completely before adding the fillings. This is important because the heat from the crust could melt the cream cheese layer.
Preparing the Cream Cheese Layer
- Beat Cream Cheese: In a large bowl, beat the softened cream cheese with an electric mixer until smooth and creamy. Make sure the cream cheese is truly softened, otherwise you’ll end up with lumps in your filling.
- Add Powdered Sugar and Vanilla: Gradually add the powdered sugar, beating until well combined. Then, stir in the vanilla extract. The vanilla extract enhances the flavor of the cream cheese and adds a touch of sweetness.
- Fold in Whipped Topping: Gently fold in the thawed whipped topping until just combined. Be careful not to overmix, as this can deflate the whipped topping. The whipped topping adds lightness and airiness to the cream cheese layer.
- Spread Over Crust: Spread the cream cheese mixture evenly over the cooled crust. Make sure to spread it all the way to the edges of the crust.
- Refrigerate: Cover the baking dish with plastic wrap and refrigerate for at least 30 minutes to allow the cream cheese layer to set slightly. This will make it easier to spread the coconut cream layer on top.
Preparing the Coconut Cream Layer
- Scoop Coconut Cream: Carefully scoop out the thick coconut cream from the top of the refrigerated can of coconut cream, leaving the watery liquid behind. This is the key to a rich and creamy coconut layer. The refrigeration process separates the cream from the liquid, making it easier to scoop out the thick cream.
- Combine Pudding Mix and Milk: In a separate bowl, whisk together the instant coconut cream pudding mix and milk until smooth. The pudding mix will thicken the milk and create a creamy base for the coconut cream layer.
- Whisk in Coconut Cream: Whisk the coconut cream into the pudding mixture until well combined. The coconut cream adds a rich coconut flavor and enhances the creaminess of the pudding layer.
- Spread Over Cream Cheese Layer: Spread the coconut cream mixture evenly over the chilled cream cheese layer. Again, make sure to spread it all the way to the edges.
- Refrigerate: Cover the baking dish with plastic wrap and refrigerate for at least 4 hours, or preferably overnight, to allow the coconut cream layer to set completely. This is crucial for the dessert to hold its shape when cut.
Toasting the Coconut and Assembling
- Toast Coconut: Preheat your oven to 325°F (160°C). Spread the shredded coconut in a single layer on a baking sheet. Bake for 5-7 minutes, or until lightly golden brown, stirring occasionally to prevent burning. Watch it closely, as coconut can burn quickly. Alternatively, you can toast the coconut in a dry skillet over medium heat, stirring constantly until golden brown.
- Cool Toasted Coconut: Remove the toasted coconut from the oven or skillet and let it cool completely.
- Sprinkle with Toasted Coconut: Sprinkle the cooled toasted coconut evenly over the coconut cream layer. The toasted coconut adds a delicious crunch and nutty flavor to the dessert.
- Optional Garnish: If desired, garnish with white chocolate shavings or toasted macadamia nuts. These add a touch of elegance and enhance the overall flavor profile of the dessert.
- Chill Before Serving: Refrigerate for at least 30 minutes before serving to allow the flavors to meld together.
- Cut and Serve: Cut into squares and serve chilled. Enjoy! This dessert is best served cold, as the layers will hold their shape better and the flavors will be more pronounced.
Conclusion:
This Coconut Cream Lush Dessert is truly a showstopper, and I wholeheartedly believe it deserves a prime spot in your recipe repertoire. From the buttery, crumbly pecan crust to the light and airy layers of cream cheese, coconut pudding, and whipped topping, every bite is an explosion of textures and tropical flavors. It’s the kind of dessert that elicits “oohs” and “aahs” the moment it’s placed on the table, and trust me, it tastes even better than it looks! What makes this recipe a must-try? It’s the perfect balance of sweet and subtly nutty, the ease of preparation (no baking required!), and the sheer versatility it offers. It’s ideal for potlucks, family gatherings, holiday celebrations, or simply a delightful treat to brighten up a weeknight. Plus, who can resist the allure of coconut? But the best part? You can easily customize this Coconut Cream Lush Dessert to suit your preferences and dietary needs.Serving Suggestions and Variations:
* Go Nuts! While the recipe calls for pecans in the crust, feel free to experiment with other nuts like macadamia nuts, walnuts, or even toasted almonds. Each nut will impart a unique flavor profile to the base. * Tropical Twist: Add a layer of diced pineapple or mango between the pudding and whipped topping layers for an extra burst of tropical goodness. A sprinkle of toasted coconut flakes on top adds a beautiful visual appeal and enhances the coconut flavor. * Chocolate Indulgence: For chocolate lovers, consider adding a thin layer of chocolate ganache between the cream cheese and pudding layers. Or, sprinkle chocolate shavings on top for a decadent touch. * Dietary Adaptations: To make this dessert gluten-free, simply substitute the graham crackers in the crust with gluten-free graham crackers or almond flour. You can also use a sugar-free pudding mix and whipped topping to reduce the sugar content. * Individual Servings: For a more elegant presentation, assemble the lush in individual parfait glasses or small bowls. This is perfect for parties or when you want to control portion sizes. * Boozy Boost: For an adult-only version, add a tablespoon or two of coconut rum to the pudding mixture. It will add a subtle kick and enhance the tropical flavors. * Seasonal Fruit: During the summer months, top the lush with fresh berries like strawberries, blueberries, or raspberries for a refreshing and colorful twist. I’ve poured my heart into perfecting this recipe, and I’m confident that you’ll love it as much as I do. It’s a guaranteed crowd-pleaser that will leave everyone wanting more. So, what are you waiting for? Gather your ingredients, put on your apron, and get ready to create a dessert masterpiece. I promise, the effort is minimal, and the reward is immense. I’m incredibly excited to hear about your experience making this Coconut Cream Lush Dessert. Please, don’t hesitate to share your photos, variations, and feedback in the comments below. I’m always eager to learn from your culinary adventures and see how you’ve made this recipe your own. Happy baking (or rather, assembling!) and enjoy every delicious bite! Let me know if you have any questions, and I’ll be happy to help. I can’t wait to see your creations! Print
Coconut Cream Lush Dessert: A Delicious & Easy Recipe
- Total Time: 300 minutes
- Yield: 12–16 servings 1x
Description
Buttery, flaky crust topped with a creamy cream cheese layer, rich coconut cream pudding, and toasted coconut. Perfect make-ahead dessert!
Ingredients
- 1 ½ cups all-purpose flour
- ½ cup (1 stick) cold unsalted butter, cut into cubes
- ¼ cup powdered sugar
- ¼ teaspoon salt
- 3–5 tablespoons ice water
- 8 ounces cream cheese, softened
- 1 cup powdered sugar
- 1 teaspoon vanilla extract
- 8 ounces whipped topping, thawed (like Cool Whip)
- 1 (5.4 ounce) can coconut cream, refrigerated overnight
- 1 (3.4 ounce) package instant coconut cream pudding mix
- 1 cup milk (whole or 2%)
- 1 ½ cups sweetened shredded coconut, toasted
- Optional: White chocolate shavings or toasted macadamia nuts for garnish
Instructions
- In a large bowl, whisk together the flour, powdered sugar, and salt.
- Add the cold, cubed butter to the flour mixture. Using a pastry blender or your fingertips, cut the butter into the flour until the mixture resembles coarse crumbs.
- Gradually add the ice water, one tablespoon at a time, mixing gently after each addition. Continue adding water until the dough just comes together.
- Gently form the dough into a disc. Wrap it tightly in plastic wrap and refrigerate for at least 30 minutes.
- Preheat your oven to 350°F (175°C). On a lightly floured surface, roll out the chilled dough to fit a 9×13 inch baking dish.
- Carefully transfer the rolled-out dough to the baking dish. Press the dough evenly into the bottom and up the sides of the dish. Use a fork to prick the bottom of the crust several times.
- Bake for 20-25 minutes, or until the crust is lightly golden brown.
- Remove the crust from the oven and let it cool completely before adding the fillings.
- In a large bowl, beat the softened cream cheese with an electric mixer until smooth and creamy.
- Gradually add the powdered sugar, beating until well combined. Then, stir in the vanilla extract.
- Gently fold in the thawed whipped topping until just combined.
- Spread the cream cheese mixture evenly over the cooled crust.
- Cover the baking dish with plastic wrap and refrigerate for at least 30 minutes to allow the cream cheese layer to set slightly.
- Carefully scoop out the thick coconut cream from the top of the refrigerated can of coconut cream, leaving the watery liquid behind.
- In a separate bowl, whisk together the instant coconut cream pudding mix and milk until smooth.
- Whisk the coconut cream into the pudding mixture until well combined.
- Spread the coconut cream mixture evenly over the chilled cream cheese layer.
- Cover the baking dish with plastic wrap and refrigerate for at least 4 hours, or preferably overnight, to allow the coconut cream layer to set completely.
- Preheat your oven to 325°F (160°C). Spread the shredded coconut in a single layer on a baking sheet. Bake for 5-7 minutes, or until lightly golden brown, stirring occasionally to prevent burning.
- Remove the toasted coconut from the oven or skillet and let it cool completely.
- Sprinkle the cooled toasted coconut evenly over the coconut cream layer.
- If desired, garnish with white chocolate shavings or toasted macadamia nuts.
- Refrigerate for at least 30 minutes before serving to allow the flavors to meld together.
- Cut into squares and serve chilled. Enjoy!
Notes
- For the flakiest crust, ensure the butter is very cold and avoid overmixing the dough.
- Refrigerating the coconut cream overnight is essential for separating the thick cream from the liquid.
- Watch the coconut carefully while toasting, as it can burn quickly.
- For best results, chill the dessert overnight to allow the flavors to meld together.
- Prep Time: 45 minutes
- Cook Time: 25 minutes


Leave a Comment