
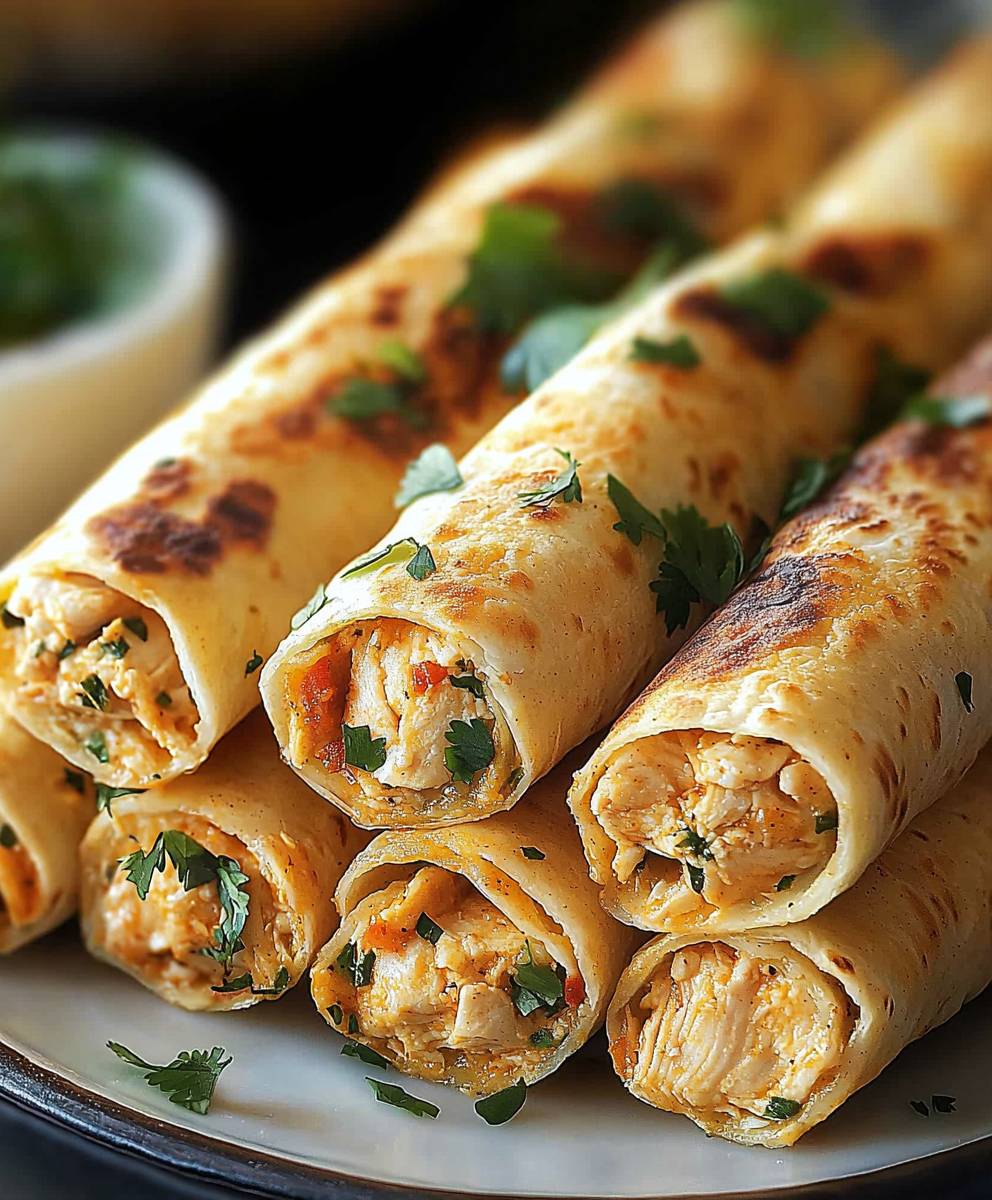
Baked Chicken Taquitos: Crispy, flavorful, and surprisingly easy to make, these little rolls of deliciousness are about to become your new weeknight obsession! Forget ordering takeout; with just a handful of ingredients and a little bit of oven time, you can have a batch of these golden-brown beauties ready to devour.
Taquitos, meaning “little tacos,” have a rich history rooted in Mexican cuisine. While their exact origins are debated, they’ve evolved from humble street food to a beloved dish enjoyed worldwide. Traditionally, taquitos are fried, but our baked version offers a healthier, equally satisfying alternative without sacrificing that irresistible crunch.
What’s not to love about baked chicken taquitos? The combination of tender, seasoned chicken nestled inside a crispy tortilla is simply irresistible. They’re incredibly versatile perfect as an appetizer for your next gathering, a quick and easy lunch, or a fun dinner the whole family will enjoy. Plus, they’re endlessly customizable! Feel free to experiment with different fillings, cheeses, and toppings to create your own signature taquito masterpiece. I personally love adding a dollop of sour cream and a sprinkle of fresh cilantro. Get ready to experience the joy of homemade taquitos you won’t be disappointed!

Ingredients:
- 1 pound boneless, skinless chicken breasts
- 1 tablespoon olive oil
- 1 teaspoon chili powder
- 1/2 teaspoon cumin
- 1/4 teaspoon garlic powder
- 1/4 teaspoon onion powder
- Salt and pepper to taste
- 1 cup shredded cheddar cheese
- 1 cup shredded Monterey Jack cheese
- 1/2 cup cream cheese, softened
- 1/4 cup chopped cilantro
- 1 (10 ounce) can diced tomatoes and green chilies, drained
- 16 corn tortillas
- Cooking spray
Preparing the Chicken Filling
Okay, let’s get started with the heart of our taquitos the chicken filling! This is where all the flavor comes from, so we want to make sure we do it right. Don’t worry, it’s super easy!
- Cook the Chicken: First, we need to cook our chicken. You can do this in a few different ways. My favorite is to simply bake it. Preheat your oven to 375°F (190°C). Drizzle the chicken breasts with olive oil and season them generously with chili powder, cumin, garlic powder, onion powder, salt, and pepper. Bake for about 20-25 minutes, or until the internal temperature reaches 165°F (74°C). Alternatively, you can poach the chicken in simmering water until cooked through, or even use leftover cooked chicken that’s a great shortcut!
- Shred the Chicken: Once the chicken is cool enough to handle, shred it using two forks. You want nice, even shreds so they distribute evenly in the taquitos. If you poached the chicken, it should shred very easily.
- Combine the Chicken with Spices: In a large bowl, combine the shredded chicken with the remaining chili powder, cumin, garlic powder, and onion powder. This ensures that every bite is packed with flavor. Give it a good mix to coat all the chicken.
- Add the Cheeses: Now for the cheesy goodness! Add the shredded cheddar cheese, Monterey Jack cheese, and softened cream cheese to the bowl with the chicken. The cream cheese is key here it helps bind everything together and makes the filling extra creamy.
- Incorporate the Remaining Ingredients: Add the chopped cilantro and drained diced tomatoes and green chilies to the bowl. The cilantro adds a fresh, vibrant flavor, and the diced tomatoes and green chilies give it a little kick. Make sure you drain the tomatoes and green chilies well, otherwise, your filling will be too watery.
- Mix Well: Using a large spoon or your hands (if you’re comfortable!), mix all the ingredients together until they are well combined. You want the cheeses to be evenly distributed throughout the chicken mixture. Taste the filling and adjust the seasonings as needed. Maybe you want a little more chili powder for extra heat, or a pinch more salt to bring out the flavors.
Warming the Tortillas
This step is crucial! If you skip this, your tortillas will crack and break when you try to roll them. Trust me, I’ve been there. Warming them makes them pliable and easy to work with.
- Choose Your Method: There are a few ways to warm your corn tortillas. My preferred method is to wrap them in a damp paper towel and microwave them for about 30-60 seconds, or until they are soft and pliable. You can also warm them in a dry skillet over medium heat for about 15-20 seconds per side, or wrap them in foil and warm them in a preheated oven at 350°F (175°C) for about 10-15 minutes.
- Keep Them Warm: As you warm the tortillas, keep them covered with a clean kitchen towel to prevent them from drying out. This will keep them nice and pliable while you’re assembling the taquitos.
Assembling the Taquitos
Now for the fun part rolling up those delicious taquitos! This is where your patience will be tested, but I promise it’s worth it.
- Prepare Your Work Station: Lay out a warmed tortilla on a clean surface. Have your bowl of chicken filling nearby, as well as a baking sheet lined with parchment paper.
- Fill the Tortilla: Spoon about 2-3 tablespoons of the chicken filling onto the center of the tortilla. Don’t overfill them, or they will be difficult to roll and may burst open during baking.
- Roll Tightly: Fold one side of the tortilla over the filling, then tightly roll it up like a cigar. Make sure you roll it tightly to prevent it from unraveling during baking.
- Place on Baking Sheet: Place the rolled taquito seam-side down on the prepared baking sheet. This will help keep it closed during baking.
- Repeat: Repeat steps 2-4 with the remaining tortillas and filling.
Baking the Taquitos
Almost there! Now we just need to bake these beauties until they are golden brown and crispy.
- Preheat Oven: Preheat your oven to 400°F (200°C).
- Spray with Cooking Spray: Lightly spray the taquitos with cooking spray. This will help them get nice and crispy in the oven.
- Bake: Bake for 15-20 minutes, or until the taquitos are golden brown and crispy. Keep an eye on them, as baking times may vary depending on your oven.
- Let Cool Slightly: Remove the taquitos from the oven and let them cool slightly before serving. This will prevent you from burning your mouth!
Serving Suggestions
These baked chicken taquitos are delicious on their own, but they’re even better with some tasty toppings and sides!
- Sour Cream or Greek Yogurt: A dollop of sour cream or Greek yogurt adds a cool and creamy contrast to the crispy taquitos.
- Guacamole: Guacamole is always a good idea! It adds a rich and flavorful element to the dish.
- Salsa: Choose your favorite salsa mild, medium, or hot to add a spicy kick.
- Pico de Gallo: Pico de gallo is a fresh and vibrant salsa made with tomatoes, onions, cilantro, and lime juice.
- Queso: Warm queso dip is a cheesy and indulgent topping that’s perfect for taquitos.
- Rice and Beans: Serve the taquitos with a side of Mexican rice and refried beans for a complete and satisfying meal.
- Lettuce and Tomato: Shredded lettuce and diced tomatoes add a fresh and crunchy element to the dish.
Tips and Tricks for Perfect Taquitos
Here are a few extra tips and tricks to help you make the best baked chicken taquitos ever!
- Don’t Overfill: As I mentioned before, don’t overfill the tortillas. This is the most common mistake people make, and it can lead to the taquitos bursting open during baking.
- Roll Tightly: Rolling the taquitos tightly is also important for preventing them from unraveling.
- Use Fresh Ingredients: Using fresh ingredients will make a big difference in the flavor of your taquitos.
- Adjust Seasonings to Taste: Don’t be afraid to adjust the seasonings to your liking. If you like things spicy, add more chili powder or a pinch of cayenne pepper.
- Make Ahead: You can assemble the taquitos ahead of time and store them in the refrigerator until you’re ready to bake them. Just add a few extra minutes to the baking time.
- Freeze for Later: Baked taquitos freeze well! Let them cool completely, then wrap them individually in plastic wrap and place them in a freezer bag. When you’re ready to eat them, bake them from frozen at 375°F (190°C) for about 20-25 minutes, or until heated through and crispy.
- Experiment with Fillings: Feel free to experiment with different fillings! You can use ground beef, shredded pork, or even vegetarian fillings like black beans and corn.
Variations
Want to mix things up? Here are some fun variations on this recipe:
- Spicy Taquitos: Add a pinch of cayenne pepper or a chopped jalapeño to the chicken filling for extra heat.
- Black Bean and Corn Taquitos: Substitute the chicken with a mixture of black beans, corn, diced bell peppers, and your favorite spices.
- Sweet Potato Taquitos: Roast sweet potatoes until tender, then mash them and mix them with black beans, corn, and spices for a vegetarian-friendly option
Conclusion:
And there you have it! These Baked Chicken Taquitos are truly a game-changer for weeknight dinners, party appetizers, or even a satisfying lunch. I know, I know, I might be biased, but trust me on this one. The combination of the crispy, golden-brown tortilla, the flavorful, juicy chicken filling, and the customizable toppings makes them utterly irresistible. What makes these taquitos a must-try? First and foremost, they’re incredibly easy to make. Forget spending hours in the kitchen this recipe is designed for efficiency without sacrificing flavor. Secondly, they’re baked, not fried, which means you get all the satisfying crunch without the extra grease and guilt. Plus, baking them makes them a whole lot easier to prepare for a crowd. No more standing over a hot stove, frying batch after batch! But the real magic lies in the versatility. While I’ve shared my go-to recipe, feel free to get creative and adapt it to your own tastes.Serving Suggestions and Variations:
* Dipping Sauces Galore: Don’t limit yourself to just one dipping sauce! Offer a variety, such as sour cream, guacamole, salsa verde, queso, or even a spicy chipotle mayo. Let everyone customize their taquito experience. * Spice It Up: If you like a little heat, add a pinch of cayenne pepper or a dash of your favorite hot sauce to the chicken filling. You could also use a spicier salsa when preparing the chicken. * Veggie Power: Sneak in some extra veggies by adding diced bell peppers, onions, or corn to the chicken mixture. This is a great way to make the taquitos even more nutritious. * Cheese, Please!: Experiment with different types of cheese. Monterey Jack, cheddar, or even a Mexican blend would all work beautifully. * Make-Ahead Magic: These taquitos are perfect for meal prepping. Assemble them ahead of time and store them in the refrigerator until you’re ready to bake. You can even freeze them for longer storage. Just add a few extra minutes to the baking time when cooking from frozen. * Breakfast Taquitos: Scramble some eggs and add them to the chicken filling for a delicious and satisfying breakfast taquito. I truly believe that these Baked Chicken Taquitos will become a staple in your recipe repertoire. They’re quick, easy, delicious, and endlessly customizable. What more could you ask for? So, what are you waiting for? Gather your ingredients, preheat your oven, and get ready to experience taquito perfection. I’m confident that you’ll love them as much as I do. And most importantly, I want to hear about your experience! Did you try the recipe? Did you make any modifications? What were your favorite dipping sauces? Share your thoughts, photos, and feedback in the comments below. I can’t wait to see your creations and hear your stories. Happy cooking! Let me know if you have any questions, and I’ll do my best to answer them. Enjoy your delicious, homemade taquitos! Print
Baked Chicken Taquitos: Easy Recipe & Crispy Perfection
- Total Time: 55 minutes
- Yield: 16 taquitos 1x
Description
Crispy baked chicken taquitos filled with a flavorful mixture of shredded chicken, cheddar, Monterey Jack, and cream cheese, diced tomatoes, green chilies, and cilantro. A quick and easy meal perfect for any night of the week!
Ingredients
- 1 pound boneless, skinless chicken breasts
- 1 tablespoon olive oil
- 1 teaspoon chili powder
- 1/2 teaspoon cumin
- 1/4 teaspoon garlic powder
- 1/4 teaspoon onion powder
- Salt and pepper to taste
- 1 cup shredded cheddar cheese
- 1 cup shredded Monterey Jack cheese
- 1/2 cup cream cheese, softened
- 1/4 cup chopped cilantro
- 1 (10 ounce) can diced tomatoes and green chilies, drained
- 16 corn tortillas
- Cooking spray
Instructions
- Cook the Chicken: Preheat oven to 375°F (190°C). Drizzle chicken breasts with olive oil and season with chili powder, cumin, garlic powder, onion powder, salt, and pepper. Bake for 20-25 minutes, or until the internal temperature reaches 165°F (74°C). Alternatively, poach or use leftover cooked chicken.
- Shred the Chicken: Once cool enough to handle, shred the chicken using two forks.
- Combine with Spices: In a large bowl, combine the shredded chicken with the remaining chili powder, cumin, garlic powder, and onion powder. Mix well.
- Add Cheeses: Add the shredded cheddar cheese, Monterey Jack cheese, and softened cream cheese to the bowl.
- Incorporate Remaining Ingredients: Add the chopped cilantro and drained diced tomatoes and green chilies to the bowl.
- Mix Well: Mix all ingredients together until well combined. Taste and adjust seasonings as needed.
- Warm the Tortillas: Wrap tortillas in a damp paper towel and microwave for 30-60 seconds, or until soft and pliable. Alternatively, warm in a dry skillet or in the oven wrapped in foil. Keep warmed tortillas covered with a clean kitchen towel to prevent drying.
- Assemble the Taquitos: Lay out a warmed tortilla on a clean surface. Spoon about 2-3 tablespoons of the chicken filling onto the center of the tortilla.
- Roll Tightly: Fold one side of the tortilla over the filling, then tightly roll it up like a cigar.
- Place on Baking Sheet: Place the rolled taquito seam-side down on a baking sheet lined with parchment paper.
- Repeat: Repeat steps 8-10 with the remaining tortillas and filling.
- Preheat Oven: Preheat oven to 400°F (200°C).
- Spray with Cooking Spray: Lightly spray the taquitos with cooking spray.
- Bake: Bake for 15-20 minutes, or until the taquitos are golden brown and crispy.
- Let Cool Slightly: Remove the taquitos from the oven and let them cool slightly before serving.
Notes
- Warming the tortillas is crucial to prevent cracking.
- Don’t overfill the tortillas.
- Roll the taquitos tightly to prevent unraveling.
- Adjust seasonings to taste.
- Serve with sour cream, guacamole, salsa, pico de gallo, queso, rice and beans, lettuce, and tomato.
- Taquitos can be assembled ahead of time and stored in the refrigerator until ready to bake.
- Baked taquitos freeze well. Let them cool completely, then wrap them individually in plastic wrap and place them in a freezer bag. When you’re ready to eat them, bake them from frozen at 375°F (190°C) for about 20-25 minutes, or until heated through and crispy.
- Experiment with different fillings like ground beef, shredded pork, or vegetarian fillings like black beans and corn.
- Prep Time: 20 minutes
- Cook Time: 35 minutes


Leave a Comment