
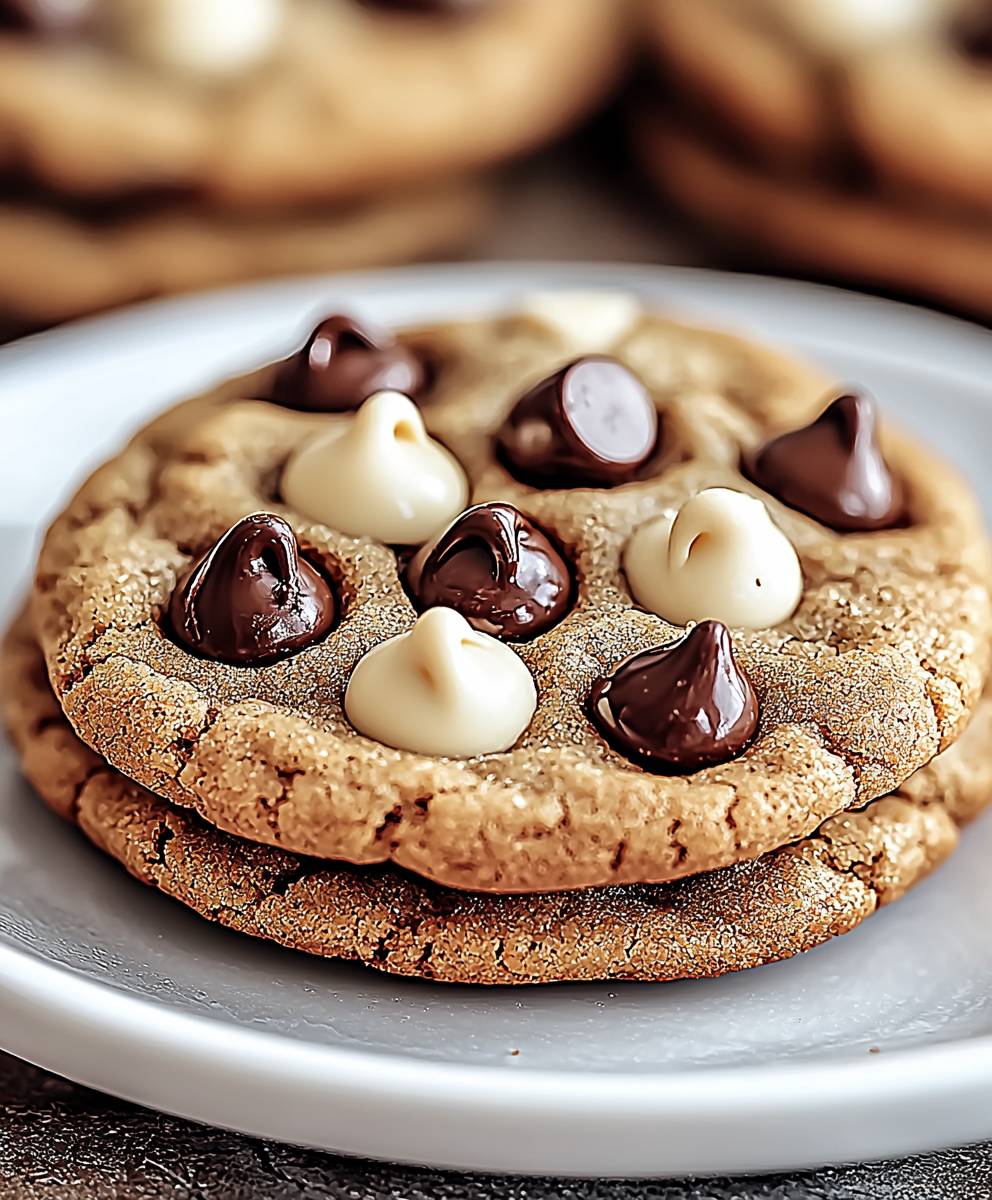
Brown Butter Chocolate Chip cookies: just the name alone conjures up images of warm, gooey goodness, doesn’t it? Forget everything you thought you knew about the classic chocolate chip cookie, because this recipe elevates it to a whole new level of deliciousness. We’re talking about a symphony of nutty, caramelized butter notes dancing with rich, dark chocolate chunks in every single bite.
While the humble chocolate chip cookie might seem like a purely American invention, its roots are surprisingly complex. Ruth Graves Wakefield, of the Toll House Inn in Massachusetts, is credited with its creation in the 1930s. But the real magic happens when you introduce brown butter. This technique, often used in French pastry, adds a depth of flavor that’s simply irresistible. The French call it “beurre noisette,” which translates to “hazelnut butter,” perfectly capturing its nutty aroma and taste.
So, why are brown butter chocolate chip cookies so beloved? It’s a combination of factors. The browning process intensifies the butter’s flavor, creating a richer, more complex taste profile. The texture is also incredible slightly chewy edges with a soft, melt-in-your-mouth center. Plus, let’s be honest, who can resist the comforting combination of butter, sugar, and chocolate? This recipe is surprisingly easy to make, making it perfect for a weeknight treat or a weekend baking project. Get ready to experience chocolate chip cookies like never before!

Ingredients:
- 1 cup (2 sticks) unsalted butter
- 1 1/4 cups packed light brown sugar
- 1 cup granulated sugar
- 2 large eggs
- 1 tablespoon vanilla extract
- 2 1/4 cups all-purpose flour
- 1 teaspoon baking soda
- 1 teaspoon salt
- 2 cups semi-sweet chocolate chips
- Optional: Flaky sea salt, for sprinkling
Browning the Butter: The Key to Flavor
Okay, friends, let’s talk about the star of the show: brown butter. This isn’t just melted butter; it’s butter that’s been cooked until the milk solids toast and turn a beautiful amber color, giving it a nutty, caramel-like flavor that elevates these cookies to a whole new level. Trust me, it’s worth the extra few minutes.
- Melt the butter: Place the butter in a light-colored saucepan over medium heat. A light-colored pan will help you see the color change more easily.
- Watch closely: As the butter melts, it will start to bubble and foam. This is normal. Keep a close eye on it, swirling the pan occasionally to ensure even cooking.
- Look for the color change: The butter will start to turn a golden color, then a deeper amber. You’ll also notice brown specks forming at the bottom of the pan these are the toasted milk solids. This is what we want!
- Listen for the nutty aroma: As the butter browns, it will release a wonderful nutty aroma. This is another sign that it’s ready.
- Remove from heat: As soon as the butter is browned and smells nutty, immediately remove the pan from the heat. Pour the browned butter into a heatproof bowl and let it cool slightly. It’s important to stop the cooking process to prevent the butter from burning.
Making the Cookie Dough
Now that we have our beautiful brown butter, it’s time to make the cookie dough. This is where the magic really happens!
- Combine sugars and brown butter: In a large bowl (or the bowl of your stand mixer), combine the cooled brown butter, brown sugar, and granulated sugar. Beat on medium speed until light and fluffy, about 2-3 minutes.
- Add eggs and vanilla: Beat in the eggs one at a time, then stir in the vanilla extract. Make sure each egg is fully incorporated before adding the next.
- Whisk dry ingredients: In a separate bowl, whisk together the flour, baking soda, and salt. This ensures that the baking soda and salt are evenly distributed throughout the flour.
- Gradually add dry ingredients to wet ingredients: Gradually add the dry ingredients to the wet ingredients, mixing on low speed until just combined. Be careful not to overmix, as this can result in tough cookies.
- Stir in chocolate chips: Gently fold in the chocolate chips until they are evenly distributed throughout the dough.
- Chill the dough (Important!): Cover the bowl with plastic wrap and chill the dough in the refrigerator for at least 30 minutes, or up to 24 hours. Chilling the dough helps to prevent the cookies from spreading too much during baking and also allows the flavors to meld together. I usually chill mine for at least 2 hours for the best results.
Baking the Cookies
Almost there! Now for the fun part baking these delicious cookies.
- Preheat oven: Preheat your oven to 375°F (190°C). Line a baking sheet with parchment paper. Parchment paper prevents the cookies from sticking and makes cleanup a breeze.
- Scoop the dough: Use a cookie scoop or spoon to drop rounded tablespoons of dough onto the prepared baking sheet, leaving about 2 inches between each cookie.
- Sprinkle with sea salt (optional): If desired, sprinkle the tops of the cookies with flaky sea salt before baking. This adds a nice salty-sweet contrast to the cookies.
- Bake: Bake for 9-11 minutes, or until the edges are golden brown and the centers are still slightly soft. The baking time may vary depending on your oven, so keep a close eye on them.
- Cool: Remove the baking sheet from the oven and let the cookies cool on the baking sheet for a few minutes before transferring them to a wire rack to cool completely.
Tips and Tricks for Perfect Brown Butter Chocolate Chip Cookies
Here are a few extra tips to ensure your cookies turn out perfectly every time:
- Don’t skip the chilling step: Chilling the dough is crucial for preventing the cookies from spreading too much and for developing the flavors.
- Use a cookie scoop: A cookie scoop will help you create uniform cookies that bake evenly.
- Don’t overbake: Overbaked cookies will be dry and crumbly. Bake them until the edges are golden brown and the centers are still slightly soft.
- Adjust baking time for altitude: If you live at a high altitude, you may need to adjust the baking time. Start by reducing the baking time by a minute or two and see how the cookies turn out.
- Experiment with different chocolate: Feel free to experiment with different types of chocolate chips, such as dark chocolate, milk chocolate, or even white chocolate.
- Add nuts: For extra flavor and texture, add chopped nuts, such as walnuts, pecans, or macadamia nuts, to the dough.
- Store properly: Store the cookies in an airtight container at room temperature for up to 3 days.
Troubleshooting
Sometimes things don’t go exactly as planned. Here are some common issues and how to fix them:
- Cookies are too flat: This could be due to several factors, such as using too much butter, not chilling the dough long enough, or using old baking soda. Make sure to use the correct amount of butter, chill the dough for at least 30 minutes, and use fresh baking soda.
- Cookies are too dry: This could be due to overbaking or using too much flour. Make sure to bake the cookies until the edges are golden brown and the centers are still slightly soft, and measure the flour accurately.
- Cookies are too hard: This could be due to overmixing the dough or using too much sugar. Be careful not to overmix the dough, and use the correct amount of sugar.
Variations
Want to mix things up a bit? Here are some fun variations you can try:
- Brown Butter Oatmeal Chocolate Chip Cookies: Add 1 cup of rolled oats to the dough for a chewy and hearty cookie.
- Brown Butter Peanut Butter Chocolate Chip Cookies: Add 1/2 cup of peanut butter to the dough for a delicious peanut butter flavor.
- Brown Butter Pretzel Chocolate Chip Cookies: Add 1 cup of crushed pretzels to the dough for a salty and crunchy cookie.
- Brown Butter Espresso Chocolate Chip Cookies: Add 1 teaspoon of instant espresso powder to the dough for a coffee-flavored cookie.
Serving Suggestions
These cookies are delicious on their own, but here are a few ideas for serving them:
- With a glass of milk: A classic pairing!
- With a scoop of ice cream: Warm cookies and cold ice cream are a match made in heaven.
- As part of a cookie platter: These cookies are a great addition to any cookie platter.
- As a gift: Package the cookies in a pretty box or tin and give them as a gift to friends and family.
Enjoy!
I hope you enjoy these Brown Butter Chocolate Chip Cookies as much as I do! They’re the perfect treat for any occasion.
Conclusion:
And there you have it! These Brown Butter Chocolate Chip cookies are more than just a recipe; they’re an experience. The nutty depth of the browned butter, combined with the rich, melty chocolate chips, creates a symphony of flavors that will have you reaching for another before you even finish the first. Trust me, the extra step of browning the butter is absolutely worth it it elevates these cookies from ordinary to extraordinary. Why is this recipe a must-try? Because it’s simple enough for a weeknight bake, yet sophisticated enough to impress even the most discerning cookie connoisseur. It’s the perfect balance of chewy edges and a soft, gooey center, a texture that’s simply irresistible. Plus, the aroma that fills your kitchen while these bake is pure bliss! But the best part? This recipe is incredibly versatile. Feel free to experiment with different types of chocolate chips dark chocolate for a more intense flavor, white chocolate for a sweeter treat, or even a mix of both! You could also add chopped nuts, like walnuts or pecans, for extra crunch and flavor. A sprinkle of sea salt on top before baking enhances the sweetness and adds a delightful salty-sweet contrast. Looking for serving suggestions? These cookies are divine on their own, warm from the oven with a glass of cold milk. But they’re also fantastic crumbled over ice cream, used as the base for an ice cream sandwich, or even dipped in melted chocolate for an extra decadent treat. For a truly special occasion, try pairing them with a scoop of vanilla bean ice cream and a drizzle of caramel sauce. I’ve made these cookies countless times, and they’re always a hit. They’re perfect for sharing with friends and family, bringing to potlucks, or simply enjoying as a little indulgence for yourself. They also make a thoughtful and delicious homemade gift. I truly believe that everyone should have a go-to chocolate chip cookie recipe, and I’m confident that this Brown Butter Chocolate Chip recipe will become yours. It’s a recipe that’s sure to bring joy and satisfaction to both the baker and the eater. So, what are you waiting for? Preheat your oven, gather your ingredients, and get ready to bake the best chocolate chip cookies you’ve ever tasted! I’m so excited for you to try this recipe and experience the magic of browned butter for yourself. Once you’ve made these cookies, I’d absolutely love to hear about your experience! Did you make any variations? What did you think of the flavor and texture? Share your photos and stories in the comments below. Let’s spread the cookie love and inspire others to bake up a batch of these delicious treats. Happy baking! I can’t wait to see what you create! Don’t forget to tag me in your photos so I can see your amazing creations! Print
Brown Butter Chocolate Chip: The Ultimate Guide to Baking Perfection
- Total Time: 23 minutes
- Yield: 24 cookies 1x
Description
Classic chocolate chip cookies elevated with nutty brown butter.
Ingredients
- 1 cup (2 sticks) unsalted butter
- 1 1/4 cups (250g) packed dark brown sugar
- 1/2 cup (100g) granulated sugar
- 2 large eggs
- 1 tablespoon vanilla extract
- 2 1/4 cups (281g) all-purpose flour
- 1 teaspoon baking soda
- 1 teaspoon salt
- 1 1/2 cups (255g) chocolate chips
Instructions
“`html
- Melt the butter in a saucepan over medium heat.
- Continue cooking, swirling occasionally, until the butter turns golden brown and has a nutty aroma (about 5-7 minutes).
- Remove from heat and let cool slightly.
- In a large bowl, whisk together the brown butter, granulated sugar, and brown sugar until well combined.
- Beat in the egg and vanilla extract until smooth.
- In a separate bowl, whisk together the flour, baking soda, and salt.
- Gradually add the dry ingredients to the wet ingredients, mixing until just combined.
- Fold in the chocolate chips.
- Cover the dough and chill in the refrigerator for at least 30 minutes (or up to 24 hours).
- Preheat oven to 375°F (190°C).
- Roll the dough into balls and place them on a baking sheet lined with parchment paper.
- Bake for 9-11 minutes, or until the edges are golden brown and the centers are still slightly soft.
- Let cool on the baking sheet for a few minutes before transferring to a wire rack to cool completely.
“`
Notes
“`html
- For the best flavor, use high-quality chocolate.
- The browned butter can be made ahead of time and stored in the refrigerator for up to a week.
- Be careful not to overbake the cookies, as they will continue to firm up as they cool.
“`
- Prep Time: 15 minutes
- Cook Time: 12 minutes
Leave a Comment