
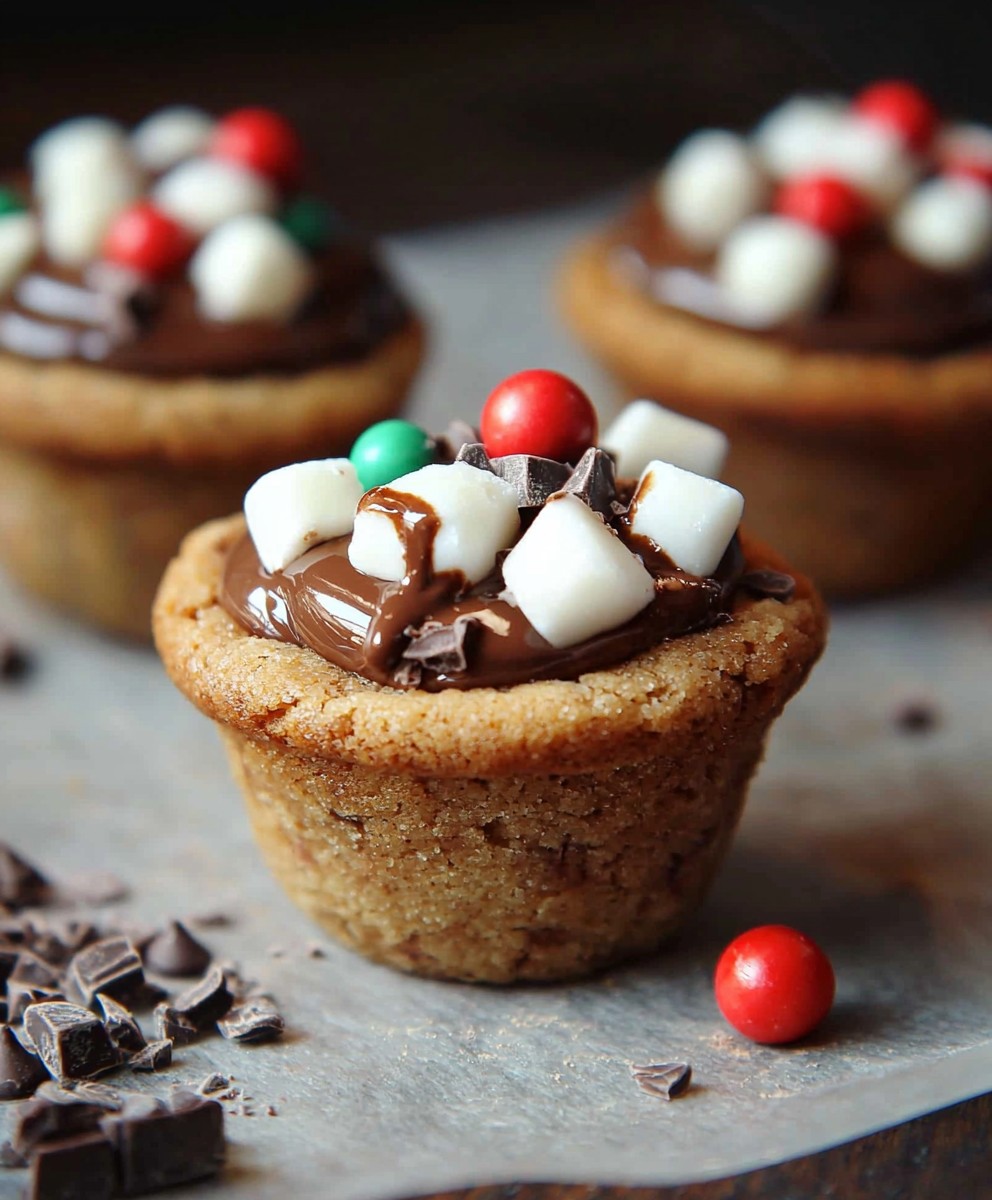
Hot Chocolate Cookie Cups: Prepare to be amazed! Imagine the comforting warmth of hot chocolate combined with the satisfying crunch of a perfectly baked cookie. These aren’t just cookies; they’re miniature edible mugs filled with a rich, decadent hot chocolate ganache. It’s a dessert experience that’s both nostalgic and utterly irresistible.
While the exact origins of cookie cups are somewhat shrouded in mystery, the concept of combining cookies and creamy fillings has been around for ages. Think of the classic thumbprint cookie, a distant relative perhaps? But these Hot Chocolate Cookie Cups take the idea to a whole new level of deliciousness. They’re a modern twist on a beloved winter beverage, perfect for cozy nights in or festive holiday gatherings.
What makes these cookie cups so universally loved? It’s the delightful combination of textures and flavors. The buttery, slightly crisp cookie base provides the perfect contrast to the smooth, velvety hot chocolate filling. Plus, they’re incredibly convenient! No need for a mug just grab a cookie cup and enjoy. The rich chocolate flavor is deeply satisfying, and the presentation is simply adorable. Get ready to impress your friends and family with these delightful treats!

Ingredients:
- For the Cookie Cups:
- 1 cup (2 sticks) unsalted butter, softened
- 1 cup granulated sugar
- 1 cup packed light brown sugar
- 2 large eggs
- 1 teaspoon vanilla extract
- 2 1/4 cups all-purpose flour
- 1 teaspoon baking soda
- 1 teaspoon salt
- 1 cup unsweetened cocoa powder
- 1 cup hot chocolate mix (like Swiss Miss)
- 1 cup semi-sweet chocolate chips
- For the Hot Chocolate Filling:
- 1 1/2 cups heavy cream
- 6 ounces semi-sweet chocolate, finely chopped
- 1/4 cup hot chocolate mix (like Swiss Miss)
- 1/4 teaspoon salt
- For the Marshmallow Topping (Optional):
- 1 (7 ounce) jar marshmallow creme
- Mini marshmallows, for garnish
- Chocolate shavings, for garnish
Preparing the Cookie Dough:
- Cream the Butter and Sugars: In a large bowl (or the bowl of a stand mixer), cream together the softened butter, granulated sugar, and brown sugar until light and fluffy. This usually takes about 3-5 minutes. Make sure to scrape down the sides of the bowl occasionally to ensure everything is evenly mixed. This step is crucial for a tender cookie!
- Add the Eggs and Vanilla: Beat in the eggs one at a time, mixing well after each addition. Then, stir in the vanilla extract. Don’t overmix at this stage; just combine until everything is incorporated.
- Combine Dry Ingredients: In a separate medium bowl, whisk together the flour, baking soda, salt, cocoa powder, and hot chocolate mix. Whisking ensures that the baking soda and cocoa powder are evenly distributed throughout the flour, which is important for the texture and flavor of the cookies.
- Gradually Add Dry Ingredients to Wet Ingredients: Gradually add the dry ingredients to the wet ingredients, mixing on low speed until just combined. Be careful not to overmix, as this can lead to tough cookies. Overmixing develops the gluten in the flour, resulting in a chewier, less tender cookie.
- Stir in Chocolate Chips: Fold in the semi-sweet chocolate chips. I like to use a rubber spatula for this step to avoid overmixing.
- Chill the Dough: Cover the bowl with plastic wrap and chill the dough in the refrigerator for at least 30 minutes. This chilling time allows the gluten to relax, which helps prevent the cookies from spreading too much in the oven. It also makes the dough easier to handle. You can chill it for longer, even overnight, if needed.
Forming and Baking the Cookie Cups:
- Preheat Oven and Prepare Muffin Tin: Preheat your oven to 350°F (175°C). Grease a 12-cup muffin tin very well. You can also use muffin liners, but the cookies might not form as defined of a cup shape.
- Scoop the Dough: Scoop rounded tablespoons of cookie dough and press them into the bottom and up the sides of each muffin cup. I find that using a cookie scoop helps to ensure that each cup has the same amount of dough.
- Bake the Cookie Cups: Bake for 12-15 minutes, or until the edges are set and the centers are slightly soft. The baking time may vary depending on your oven, so keep a close eye on them.
- Create the Cup Shape: As soon as the cookie cups come out of the oven, use the back of a spoon or a small measuring cup to gently press down the centers of each cookie cup to create a well. Be careful not to press too hard and crack the cookies. This step is important for creating the space for the hot chocolate filling.
- Cool Completely: Let the cookie cups cool completely in the muffin tin before removing them. This will help them to firm up and prevent them from breaking. Once cooled, gently loosen the edges with a knife or spatula and carefully remove them from the muffin tin.
Making the Hot Chocolate Filling:
- Heat the Heavy Cream: In a medium saucepan, heat the heavy cream over medium heat until it just begins to simmer. Do not boil.
- Pour Over Chocolate: Remove the saucepan from the heat and pour the hot cream over the finely chopped chocolate. Let it sit for about 1 minute to allow the chocolate to melt.
- Whisk Until Smooth: Whisk the mixture until the chocolate is completely melted and the filling is smooth and glossy.
- Add Hot Chocolate Mix and Salt: Stir in the hot chocolate mix and salt. The hot chocolate mix adds extra flavor and sweetness to the filling, while the salt helps to balance the sweetness.
- Chill the Filling: Cover the bowl with plastic wrap and chill the filling in the refrigerator for at least 1 hour, or until it has thickened to a spreadable consistency. This chilling time is essential for the filling to set up properly.
Assembling the Hot Chocolate Cookie Cups:
- Fill the Cookie Cups: Once the hot chocolate filling has chilled and thickened, spoon or pipe it into the cooled cookie cups. You can use a piping bag for a neater presentation, but a spoon works just as well.
- Add Marshmallow Topping (Optional): If desired, top the filled cookie cups with marshmallow creme. You can either spread it on with a knife or pipe it on using a piping bag.
- Garnish: Garnish with mini marshmallows and chocolate shavings. Get creative with your toppings! You can also use sprinkles, crushed peppermint candies, or any other festive toppings you like.
- Serve and Enjoy: Serve the hot chocolate cookie cups immediately or store them in an airtight container in the refrigerator for up to 3 days. They are best enjoyed chilled or at room temperature.
Tips for Success:
- Use Room Temperature Ingredients: Using room temperature butter and eggs will help the ingredients to combine more easily and create a smoother batter.
- Don’t Overmix the Dough: Overmixing the dough can lead to tough cookies. Mix until just combined.
- Chill the Dough: Chilling the dough is essential for preventing the cookies from spreading too much in the oven.
- Don’t Overbake the Cookies: Overbaking the cookies will make them dry and crumbly. Bake until the edges are set and the centers are slightly soft.
- Cool Completely Before Removing: Let the cookie cups cool completely in the muffin tin before removing them to prevent them from breaking.
- Chill the Filling: Chilling the hot chocolate filling is essential for it to thicken to a spreadable consistency.
Variations:
- Peppermint Hot Chocolate Cookie Cups: Add 1/2 teaspoon of peppermint extract to the cookie dough and garnish with crushed peppermint candies.
- Salted Caramel Hot Chocolate Cookie Cups: Drizzle the filled cookie cups with salted caramel sauce.
- Mexican Hot Chocolate Cookie Cups: Add 1/2 teaspoon of cinnamon and 1/4 teaspoon of cayenne pepper to the cookie dough.
- White Chocolate Hot Chocolate Cookie Cups: Use white chocolate chips instead of semi-sweet chocolate chips in the cookie dough and white chocolate for the filling.
Storage Instructions:
Store the hot chocolate cookie cups in an airtight container in the refrigerator for up to 3 days. They are best enjoyed chilled or at room temperature.
Conclusion:
So, there you have it! These Hot Chocolate Cookie Cups are more than just a dessert; they’re a little pocket of happiness, a warm hug on a chilly day, and a guaranteed crowd-pleaser all rolled into one adorable, edible package. I truly believe this recipe is a must-try, and here’s why: the combination of the rich, fudgy cookie base with the creamy, decadent hot chocolate filling is simply divine. It’s the perfect balance of textures and flavors, creating a symphony in your mouth that will leave you wanting more. Plus, they’re surprisingly easy to make, even for beginner bakers! You don’t need any fancy equipment or complicated techniques, just a few simple ingredients and a little bit of love.
But the best part? The possibilities are endless! Feel free to get creative with your toppings. A sprinkle of crushed peppermint candies adds a festive touch, especially during the holidays. Mini marshmallows are a classic choice, of course, but don’t be afraid to experiment with different flavors like toasted coconut or even a drizzle of caramel sauce. For a more sophisticated twist, try adding a pinch of sea salt to the cookie dough or a splash of coffee liqueur to the hot chocolate filling. And if you’re feeling adventurous, why not try making different flavored cookie cups? Chocolate chip cookie dough, peanut butter cookie dough, or even gingerbread cookie dough would all be delicious variations.
Serving suggestions? These Hot Chocolate Cookie Cups are perfect for any occasion. Serve them warm with a scoop of vanilla ice cream for an extra indulgent treat. Pack them in lunchboxes for a sweet surprise. Bring them to your next potluck or holiday gathering and watch them disappear in minutes. They also make a thoughtful and delicious homemade gift for friends and family. Imagine the joy on their faces when they receive a batch of these delightful little treats! You can even create a hot chocolate cookie cup bar with different toppings and fillings for a fun and interactive dessert experience.
I’ve poured my heart and soul into perfecting this recipe, and I’m confident that you’ll love it as much as I do. But the real magic happens when you make it your own. Don’t be afraid to experiment with different ingredients, toppings, and variations to create a Hot Chocolate Cookie Cup that’s uniquely yours. The most important thing is to have fun and enjoy the process!
So, what are you waiting for? Grab your apron, preheat your oven, and get ready to bake up a batch of these irresistible Hot Chocolate Cookie Cups. I promise you won’t regret it! And when you do, please, please, please share your experience with me! I’d love to see your creations and hear about your favorite variations. Tag me in your photos on social media, leave a comment below, or send me an email. I can’t wait to see what you come up with! Happy baking!
I’m truly excited for you to try this recipe and experience the joy of these delightful treats. Remember, baking is all about sharing love and creating memories, and these Hot Chocolate Cookie Cups are the perfect way to do just that. Enjoy!
Hot Chocolate Cookie Cups: A Delicious & Easy Recipe
Chocolate cookie cups filled with a rich hot chocolate ganache and topped with marshmallows.
Ingredients
175g weiche Butter
100g Zucker
1 Pck. Vanillezucker
1 Ei
225g Mehl
25g Kakaopulver
1/2 TL Backpulver
1 Prise Salz
100g Zartbitterschokolade, gehackt
Mini Marshmallows
- 175g weiche Butter
- 100g Zucker
- 1 Pck. Vanillezucker
- 1 Ei
- 225g Mehl
- 25g Kakaopulver
- 1/2 TL Backpulver
- 1 Prise Salz
- 100g Zartbitterschokolade, gehackt
- Mini Marshmallows
Instructions
- Preheat oven to 350 degrees F (175 degrees C).
- In a large bowl, cream together the butter, brown sugar, and white sugar until smooth.
- Beat in the eggs one at a time, then stir in the vanilla.
- Dissolve the cocoa in the hot water and add to the batter. Mix well.
- Combine the flour, baking soda, and salt; stir into the cocoa mixture until just combined.
- Drop by rounded teaspoonfuls into ungreased mini muffin cups.
- Bake for 10 to 12 minutes, or until edges are firm.
- Remove from oven and immediately press a chocolate star into the center of each cookie cup.
- Cool completely before removing from muffin cups.
Notes
- For best results, use high-quality chocolate.
- Store in an airtight container at room temperature.
- These cookie cups are best enjoyed within 2-3 days.
Leave a Comment