
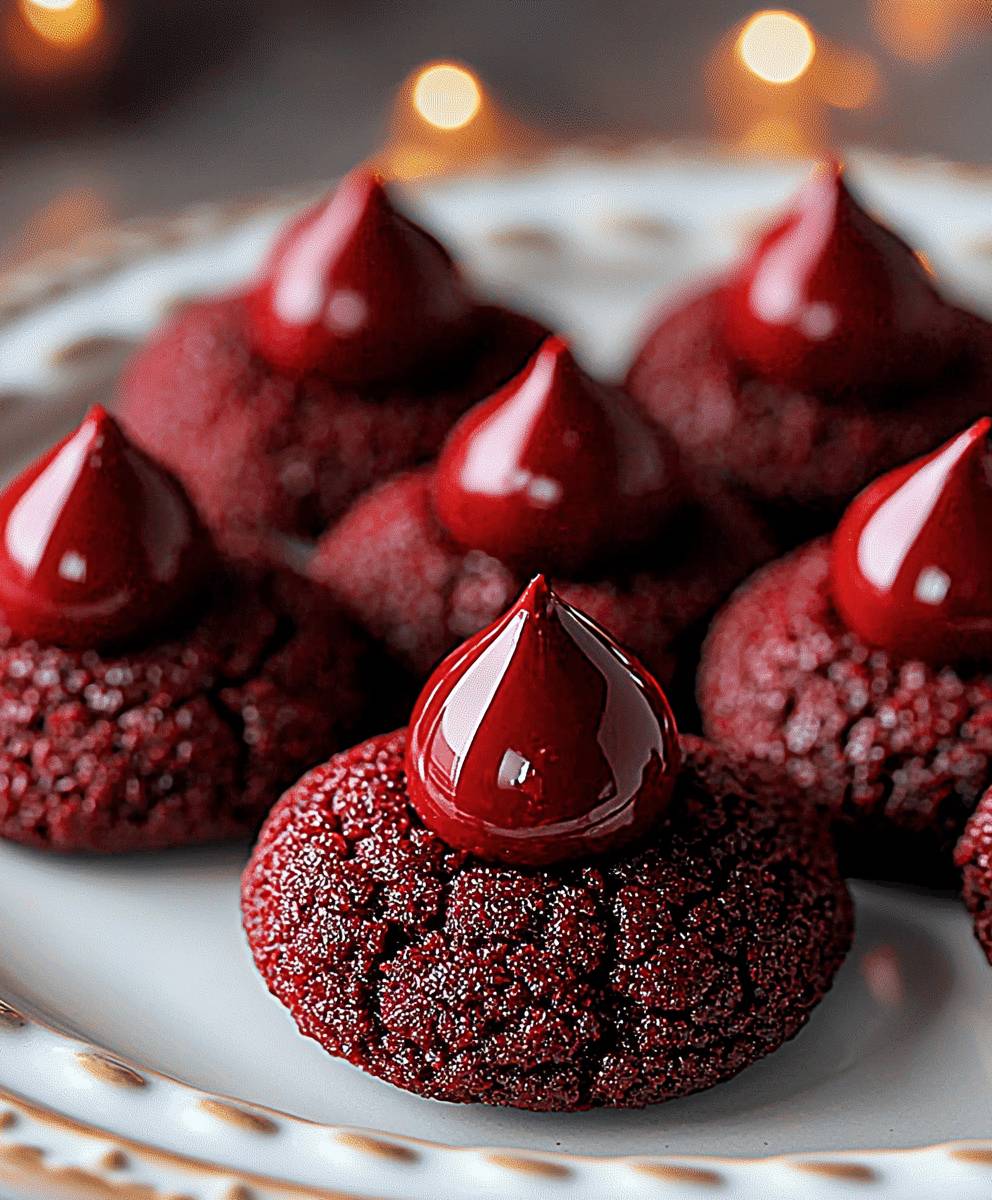
Red Velvet Blossom Cookies: Prepare to be enchanted! Imagine biting into a soft, chewy cookie, its vibrant red hue hinting at the decadent flavors within, crowned with a single, perfect chocolate kiss. These aren’t just cookies; they’re miniature masterpieces, guaranteed to brighten any day and disappear from the plate in record time.
While the exact origins of the blossom cookie are debated, the addition of red velvet to the mix elevates this classic treat to a whole new level of indulgence. Red velvet itself has a fascinating history, rumored to have originated during the Depression era as a way to make cakes more appealing with the addition of beet juice. Today, its distinctive color and subtle cocoa flavor are beloved worldwide.
What makes these Red Velvet Blossom Cookies so irresistible? It’s the perfect combination of textures and tastes. The slightly tangy red velvet cookie base provides a delightful contrast to the sweet, creamy chocolate kiss. They’re also incredibly easy to make, making them perfect for baking with kids or whipping up a batch for a last-minute gathering. Plus, their festive appearance makes them ideal for holidays and celebrations. Get ready to experience cookie perfection!

Ingredients:
- For the Red Velvet Cookies:
- 2 1/2 cups all-purpose flour
- 1 teaspoon baking soda
- 1 teaspoon salt
- 1/2 cup (1 stick) unsalted butter, softened
- 1 1/2 cups granulated sugar
- 2 large eggs
- 1 teaspoon vanilla extract
- 1 ounce (2 tablespoons) red food coloring
- 1 teaspoon white vinegar
- 1 cup buttermilk
- 1/4 cup unsweetened cocoa powder
- For the Cream Cheese Filling:
- 8 ounces cream cheese, softened
- 1/2 cup (1 stick) unsalted butter, softened
- 3 cups powdered sugar
- 1 teaspoon vanilla extract
- 2 tablespoons milk or heavy cream (more if needed for consistency)
- For Decoration:
- Granulated sugar, for coating
Preparing the Red Velvet Cookie Dough
- Combine Dry Ingredients: In a medium bowl, whisk together the flour, baking soda, salt, and cocoa powder. Make sure everything is evenly distributed. This step is crucial for ensuring the cookies rise properly and have a consistent flavor. I like to whisk for at least 30 seconds to really get it all mixed up.
- Cream Butter and Sugar: In a large bowl (or the bowl of a stand mixer), cream together the softened butter and granulated sugar until light and fluffy. This usually takes about 3-5 minutes on medium speed. Don’t rush this step! The air you incorporate here is what will give your cookies a nice, soft texture. Scrape down the sides of the bowl occasionally to ensure everything is evenly creamed.
- Add Eggs and Vanilla: Beat in the eggs one at a time, mixing well after each addition. Then, stir in the vanilla extract. Again, make sure everything is fully incorporated before moving on. You don’t want any streaks of egg yolk in your batter!
- Mix Wet Ingredients: In a separate small bowl, combine the red food coloring, white vinegar, and buttermilk. The vinegar helps to activate the red food coloring and gives the cookies that classic red velvet tang.
- Alternate Wet and Dry Ingredients: Gradually add the dry ingredients to the wet ingredients, alternating with the buttermilk mixture, beginning and ending with the dry ingredients. Mix until just combined. Be careful not to overmix the dough, as this can result in tough cookies. I usually add about 1/3 of the dry ingredients, then 1/2 of the buttermilk mixture, then another 1/3 of the dry ingredients, the remaining buttermilk mixture, and finally the last 1/3 of the dry ingredients.
- Chill the Dough: Cover the bowl with plastic wrap and refrigerate the dough for at least 1 hour, or preferably 2-3 hours. Chilling the dough is essential for preventing the cookies from spreading too much during baking. It also allows the flavors to meld together. You can even chill the dough overnight if you want to bake the cookies the next day.
Baking the Red Velvet Cookies
- Preheat Oven: Preheat your oven to 350°F (175°C). Line baking sheets with parchment paper or silicone baking mats. Parchment paper helps prevent the cookies from sticking and makes cleanup a breeze.
- Shape the Cookies: Roll the chilled dough into 1-inch balls. Roll each ball in granulated sugar to coat completely. The sugar coating adds a nice sparkle and a slightly crunchy texture to the cookies.
- Arrange on Baking Sheets: Place the sugared dough balls onto the prepared baking sheets, leaving about 2 inches between each cookie to allow for spreading.
- Bake: Bake for 9-11 minutes, or until the edges are set and the centers are slightly soft. Be careful not to overbake the cookies, as they will continue to firm up as they cool. The baking time may vary depending on your oven, so keep a close eye on them.
- Cool: Let the cookies cool on the baking sheets for a few minutes before transferring them to a wire rack to cool completely.
Preparing the Cream Cheese Filling
- Cream Cheese and Butter: In a large bowl (or the bowl of a stand mixer), cream together the softened cream cheese and butter until smooth and creamy. Make sure both the cream cheese and butter are at room temperature for the best results. This will prevent lumps in your filling.
- Add Powdered Sugar: Gradually add the powdered sugar, one cup at a time, mixing well after each addition. Start on low speed to prevent the powdered sugar from flying everywhere!
- Add Vanilla and Milk: Stir in the vanilla extract and milk (or heavy cream). Add more milk or cream, one tablespoon at a time, until the filling reaches your desired consistency. You want it to be thick enough to hold its shape but still spreadable.
- Whip Until Fluffy: Beat the filling on medium-high speed for 2-3 minutes, or until it is light and fluffy. This will help to incorporate air into the filling and make it even more delicious.
Assembling the Red Velvet Blossom Cookies
- Choose Your Cookies: Once the cookies are completely cooled, select pairs of cookies that are similar in size and shape.
- Pipe or Spread Filling: Place a generous dollop of cream cheese filling on the bottom of one cookie. You can use a piping bag fitted with a large round tip for a more professional look, or simply spread the filling with a knife or spatula.
- Top with Second Cookie: Gently top with the second cookie, pressing down slightly to sandwich the filling in between.
- Chill (Optional): For best results, chill the assembled cookies in the refrigerator for at least 30 minutes before serving. This will help the filling to firm up and prevent it from squeezing out when you bite into the cookies.
- Serve and Enjoy: Serve the Red Velvet Blossom Cookies and enjoy! These cookies are perfect for holidays, parties, or any special occasion. They are sure to be a crowd-pleaser!
Tips for Success
- Don’t Overmix: Overmixing the cookie dough will result in tough cookies. Mix until just combined.
- Chill the Dough: Chilling the dough is crucial for preventing the cookies from spreading too much.
- Use Room Temperature Ingredients: Using room temperature butter and cream cheese will ensure a smooth and creamy filling.
- Adjust Sweetness: If you prefer a less sweet filling, you can reduce the amount of powdered sugar.
- Storage: Store the assembled cookies in an airtight container in the refrigerator for up to 3 days.
Variations
- Chocolate Chips: Add 1/2 cup of chocolate chips to the cookie dough for a chocolatey twist.
- Nuts: Add 1/2 cup of chopped nuts (such as pecans or walnuts) to the cookie dough.
- Different Filling: Try using a different filling, such as vanilla buttercream or chocolate ganache.
- Sprinkles: Decorate the cookies with sprinkles for a festive touch.
Troubleshooting
- Cookies are spreading too much: Make sure you are chilling the dough for long enough. You can also try adding a tablespoon or two of flour to the dough.
- Cookies are too dry: Be careful not to overbake the cookies.
- Filling is too runny: Add more powdered sugar to thicken the filling.
- Filling is too thick: Add more milk or cream to thin the filling.
Conclusion:
And there you have it! These Red Velvet Blossom Cookies are more than just a pretty face; they’re a delightful explosion of flavor and texture that will have everyone reaching for seconds (and thirds!). The slight tang of the red velvet, combined with the creamy sweetness of the Hershey’s Kiss, creates a truly irresistible combination. Trust me, these cookies are a guaranteed crowd-pleaser, perfect for holiday gatherings, bake sales, or simply a special treat for yourself.
But why are these cookies a must-try? It’s simple: they’re easy to make, visually stunning, and utterly delicious. The recipe is straightforward, even for novice bakers, and the results are consistently impressive. Imagine the look on your friends’ and family’s faces when you present them with a platter of these vibrant, blossom-topped beauties. They’ll think you spent hours slaving away in the kitchen, when in reality, you whipped them up in no time!
Beyond their ease and visual appeal, the taste is what truly sets these Red Velvet Blossom Cookies apart. The moist, slightly chewy texture of the cookie base complements the smooth, melt-in-your-mouth chocolate perfectly. It’s a symphony of flavors and textures that will tantalize your taste buds and leave you craving more.
Now, let’s talk about serving suggestions and variations. While these cookies are fantastic on their own, there are plenty of ways to customize them to your liking. For a festive touch, try using different colored sprinkles to match the occasion. Red and green for Christmas, pastel colors for Easter, or even team colors for a game day celebration!
If you’re feeling adventurous, you can experiment with different types of Hershey’s Kisses. Dark chocolate, caramel-filled, or even the limited-edition flavors would all be delicious additions. You could also try using a different type of chocolate candy altogether, such as a miniature peanut butter cup or a chocolate-covered caramel.
For a truly decadent treat, try serving these cookies with a scoop of vanilla ice cream or a dollop of whipped cream. They’re also fantastic paired with a glass of cold milk or a warm cup of coffee. And if you have any leftovers (though I highly doubt you will!), they’re delicious crumbled over yogurt or used as a topping for ice cream sundaes.
Serving Suggestions:
- Serve with vanilla ice cream
- Pair with a glass of cold milk
- Enjoy with a warm cup of coffee
- Crumble over yogurt
- Use as a topping for ice cream sundaes
Variations:
- Use different colored sprinkles
- Experiment with different types of Hershey’s Kisses
- Try using a miniature peanut butter cup
- Add chopped nuts to the cookie dough
- Drizzle with white chocolate
I truly believe that these Red Velvet Blossom Cookies will become a new favorite in your household. They’re the perfect combination of ease, beauty, and deliciousness, making them ideal for any occasion. So, what are you waiting for? Grab your ingredients, preheat your oven, and get baking!
I’m so excited for you to try this recipe and experience the joy of these delightful cookies for yourself. And I would absolutely love to hear about your experience! Please, don’t hesitate to share your photos, tips, and variations in the comments below. Did you make any substitutions? Did you try a different type of chocolate? What did your family and friends think? Your feedback is invaluable and helps me continue to create and share delicious recipes that you’ll love. Happy baking!
Red Velvet Blossom Cookies: The Ultimate Recipe and Baking Guide
Soft and chewy red velvet cookies with a cream cheese frosting center, shaped like a beautiful blossom. Perfect for holidays or any special occasion!
Ingredients
- 1 box (14.1 ounces) red velvet cake mix
- 1/3 cup oil
- 2 large eggs
- 1/4 cup all-purpose flour
- 1/4 cup powdered sugar
Instructions
- Preheat oven to 375°F (190°C).
- In a medium bowl, whisk together flour, cocoa powder, baking soda, and salt.
- In a separate large bowl, cream together butter, shortening, and sugar until light and fluffy.
- Beat in egg and vanilla extract.
- Gradually add the dry ingredients to the wet ingredients, mixing until just combined.
- Shape dough into 1-inch balls.
- Roll each ball in red sugar.
- Place cookies 2 inches apart on ungreased baking sheets.
- Bake for 8-10 minutes, or until edges are set.
- Immediately press a chocolate blossom candy into the center of each cookie.
- Let cookies cool on baking sheets for a few minutes before transferring to a wire rack to cool completely.
Notes
- For best results, chill the dough for at least 2 hours.
- If the dough becomes too sticky while rolling, lightly flour your hands and the work surface.
- Store cookies in an airtight container at room temperature for up to 3 days.

Leave a Comment