
Skillet Chocolate Chip Cookie: Prepare to abandon all preconceived notions about single-serving desserts! Imagine sinking your spoon into a warm, gooey, chocolate-studded masterpiece, fresh from the oven and begging to be devoured. This isn’t just any cookie; it’s a giant, shareable (or not!), deeply satisfying treat that’s as fun to make as it is to eat.
While the exact origins of the skillet cookie are debated, its rise in popularity is undoubtedly linked to our collective craving for comfort food and the desire for easy, impressive desserts. Think of it as the ultimate evolution of the classic chocolate chip cookie, amplified and presented in a rustic, charming way. Its a modern twist on a timeless favorite!
What makes the Skillet Chocolate Chip Cookie so irresistible? It’s the perfect combination of textures: a slightly crisp edge giving way to a soft, almost molten center. The rich, buttery flavor, punctuated by bursts of melted chocolate, is simply divine. Plus, the convenience factor is undeniable. Forget portioning out individual cookies; this recipe comes together quickly in one pan, making it ideal for weeknight cravings or impromptu gatherings. So, grab your skillet, and let’s bake up some happiness!

Ingredients:
- For the Crust:
- 36 Oreo cookies (from a regular-sized package), finely crushed
- 6 tablespoons (3 ounces) unsalted butter, melted
- For the Filling:
- 8 ounces cream cheese, softened
- 1 (14 ounce) can sweetened condensed milk
- 1 teaspoon vanilla extract
- 1/2 cup heavy cream, whipped to stiff peaks
- 10 Oreo cookies, coarsely chopped
- For the Topping (Optional):
- Whipped cream or Cool Whip
- Additional Oreo cookies, halved or quartered
Preparing the Oreo Cookie Crust
Okay, let’s start with the foundation of our delicious Oreo Pie the crust! This is super easy, and honestly, the best part (besides eating it, of course!).
- Crush the Oreos: The first step is to crush those Oreos! You have a couple of options here. My personal favorite is using a food processor. Just toss the whole cookies in (yes, the cream filling too!) and pulse until you have fine crumbs. If you don’t have a food processor, no worries! You can put the cookies in a large zip-top bag, seal it tightly, and then use a rolling pin to crush them. Just make sure you get them nice and fine, or the crust won’t hold together as well.
- Melt the Butter: While you’re crushing the cookies, go ahead and melt the butter. You can do this in the microwave in 30-second intervals, stirring in between, or in a small saucepan over low heat. Just be careful not to burn it!
- Combine the Crumbs and Butter: Now, in a medium bowl, combine the crushed Oreo crumbs and the melted butter. Mix them together really well until all the crumbs are moistened. The mixture should resemble wet sand. This is what will hold your crust together.
- Press into the Pie Plate: Take a 9-inch pie plate (glass or metal works fine) and pour the Oreo crumb mixture into it. Use the bottom of a measuring cup or your fingers to press the crumbs evenly into the bottom and up the sides of the pie plate. Make sure the crust is firmly packed, especially along the edges. This will prevent it from crumbling when you slice the pie later.
- Chill the Crust: Once you’ve pressed the crust into the pie plate, cover it with plastic wrap and pop it into the refrigerator to chill for at least 30 minutes. This will help the crust set and become nice and firm. You can even chill it for longer, like an hour or two, if you have the time.
Making the Creamy Oreo Filling
Now for the star of the show the creamy, dreamy Oreo filling! This part is so simple, you’ll be amazed at how quickly it comes together.
- Soften the Cream Cheese: This is crucial! Make sure your cream cheese is softened to room temperature before you start. If it’s still cold and hard, you’ll end up with a lumpy filling. You can leave it out on the counter for an hour or two, or you can microwave it in 15-second intervals, stirring in between, until it’s soft.
- Beat the Cream Cheese: In a large bowl, use an electric mixer (handheld or stand mixer) to beat the softened cream cheese until it’s smooth and creamy. This usually takes about 2-3 minutes. Make sure there are no lumps!
- Add the Sweetened Condensed Milk: Gradually pour in the sweetened condensed milk, beating on low speed until it’s fully incorporated. Be careful not to overmix at this stage, as it can make the filling too thin.
- Stir in the Vanilla Extract: Add the vanilla extract and stir until it’s evenly distributed. Vanilla extract enhances the flavor of the filling and adds a touch of warmth.
- Fold in the Whipped Cream: In a separate bowl, whip the heavy cream to stiff peaks. You can use an electric mixer or a whisk. Be careful not to overwhip the cream, or it will turn into butter! Gently fold the whipped cream into the cream cheese mixture. This will make the filling light and airy.
- Add the Chopped Oreos: Coarsely chop the remaining 10 Oreo cookies. You can do this by hand with a knife or in a food processor. Gently fold the chopped Oreos into the filling. This will add a delicious Oreo crunch to every bite.
Assembling and Chilling the Pie
Almost there! Now it’s time to put everything together and let the magic happen in the refrigerator.
- Pour the Filling into the Crust: Remove the chilled Oreo crust from the refrigerator. Pour the creamy Oreo filling into the crust, spreading it evenly with a spatula.
- Chill the Pie: Cover the pie with plastic wrap and refrigerate for at least 4 hours, or preferably overnight. This will allow the filling to set completely and the flavors to meld together. The longer you chill it, the better it will taste!
Adding the Finishing Touches (Optional)
This step is totally optional, but it adds a beautiful presentation and extra deliciousness to your Oreo Pie.
- Add Whipped Cream: Before serving, top the pie with whipped cream or Cool Whip. You can spread it evenly over the top or pipe it on in decorative swirls.
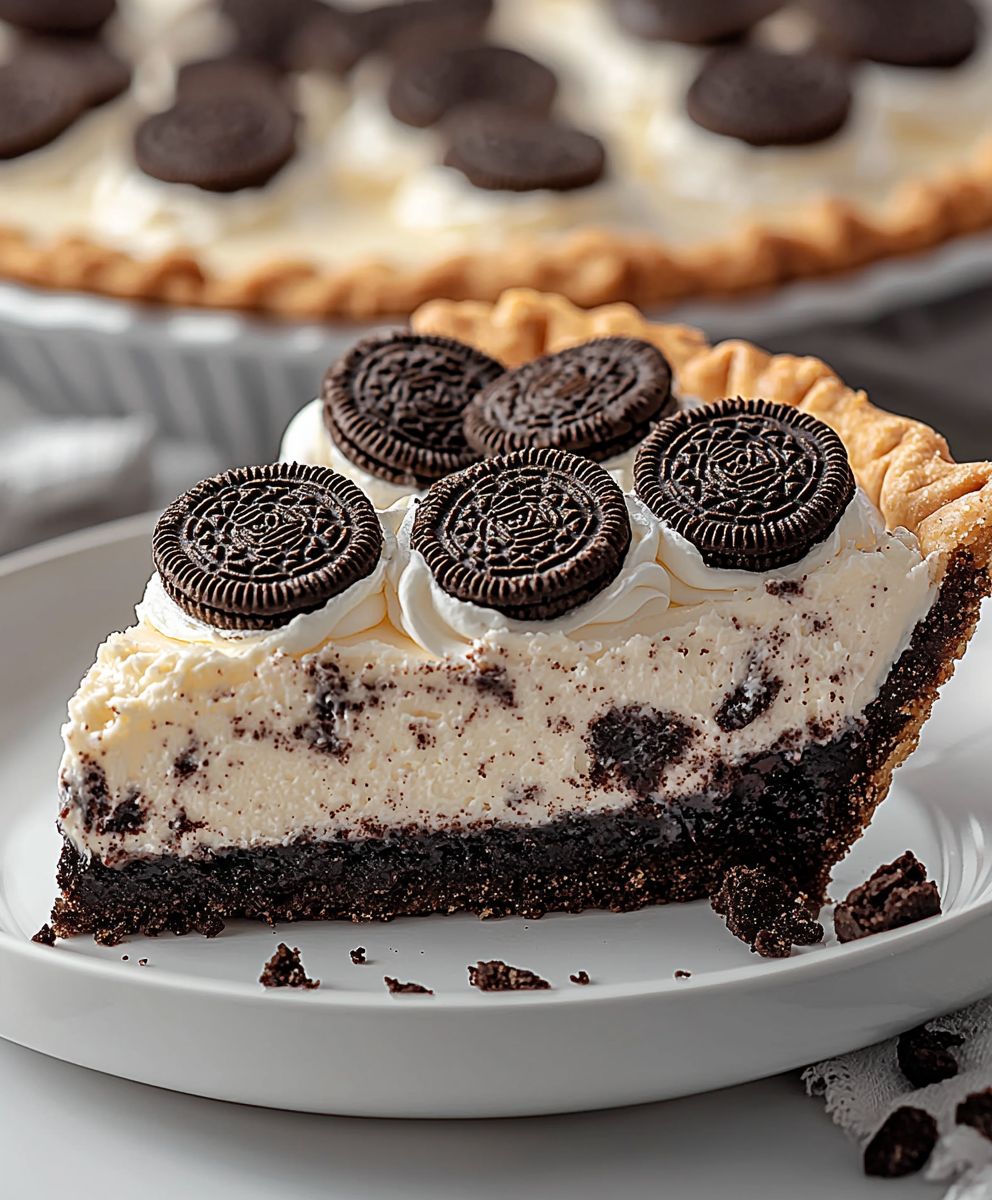
- Garnish with Oreos: Garnish the pie with additional Oreo cookies, halved or quartered. You can arrange them in a circle around the edge of the pie or sprinkle them randomly over the top.
- Serve and Enjoy!: Slice the pie and serve immediately. Store any leftovers in the refrigerator.
Tips and Variations:
- Double Stuffed Oreos: For an even more decadent pie, use Double Stuffed Oreos for the crust and filling.
- Chocolate Ganache: Drizzle a layer of chocolate ganache over the filling before chilling for an extra layer of chocolatey goodness. To make the ganache, heat 1/2 cup of heavy cream until simmering. Pour over 4 ounces of chopped semi-sweet chocolate. Let sit for a minute, then whisk until smooth.
- Peanut Butter: Add a layer of peanut butter to the bottom of the crust before adding the filling for a peanut butter Oreo pie.
- Mint Oreos: Use Mint Oreos for a refreshing twist.
- Individual Pies: Make individual Oreo pies by using mini graham cracker crusts instead of a 9-inch pie plate.
- Freezing: This pie freezes well! Wrap it tightly in plastic wrap and then in foil. Freeze for up to 2 months. Thaw in the refrigerator overnight before serving.
Enjoy your homemade Oreo Pie! I hope you love it as much as I do!
Conclusion:
This Oreo Pie isn’t just a dessert; it’s a guaranteed crowd-pleaser, a nostalgic trip down memory lane, and, frankly, a ridiculously easy way to impress your friends and family. I’ve made this pie countless times, and it’s always the first thing to disappear at any gathering. The creamy, dreamy filling combined with the crunchy Oreo crust is a textural and flavor sensation that’s simply irresistible. Trust me, you need this in your life.
But why is this particular Oreo Pie recipe a must-try? It’s all about the balance. We’ve perfected the ratio of cream cheese to whipped topping to ensure a light, airy filling that isn’t overly sweet or heavy. The Oreo crust, made with just the right amount of butter, provides the perfect sturdy base and that signature chocolatey crunch. Plus, the entire thing comes together in under 30 minutes no baking required! What’s not to love?
Now, let’s talk serving suggestions and variations because, while this pie is perfect as is, there’s always room for a little personalization. For a classic presentation, simply slice and serve chilled. A dollop of whipped cream and a sprinkle of crushed Oreos on top elevate the experience even further.
But if you’re feeling adventurous, consider these variations:
* Peanut Butter Oreo Pie: Swirl a generous amount of peanut butter into the filling before chilling. The salty-sweet combination is divine!
* Mint Chocolate Oreo Pie: Add a few drops of peppermint extract to the filling and garnish with chopped Andes mints. This is especially festive around the holidays.
* Coffee Oreo Pie: Dissolve a teaspoon of instant coffee in a tablespoon of hot water and add it to the filling for a subtle coffee flavor that complements the chocolate beautifully.
* Double Stuffed Oreo Pie: Use Double Stuffed Oreos for the crust and filling for an extra creamy and decadent treat.
* Individual Oreo Pies: Press the Oreo crust mixture into individual ramekins or muffin tins for adorable single-serving pies.
Don’t be afraid to experiment and make this recipe your own! The possibilities are endless. You could even try using different flavors of Oreos for the crust and filling think Golden Oreos, Birthday Cake Oreos, or even limited-edition flavors.
I truly believe that this Oreo Pie recipe is a winner. It’s simple, delicious, and always a hit. I’m so confident that you’ll love it, and I can’t wait to hear about your experience.
So, what are you waiting for? Head to the kitchen, gather your ingredients, and prepare to create a dessert masterpiece. Once you’ve made it, please come back and share your photos and comments. I’d love to know what variations you tried and how your family and friends enjoyed it. Did you add a secret ingredient? Did you create a stunning presentation? Let me know! Your feedback is invaluable, and it helps me continue to improve and share the best possible recipes. Happy baking (or rather, no-baking)! I hope this Oreo Pie becomes a staple in your dessert repertoire, just like it is in mine. Enjoy!
Oreo Pie: The Ultimate No-Bake Dessert Recipe
A no-bake Oreo pie with a creamy Oreo filling and a decadent chocolate ganache topping. Perfect for a quick and easy dessert.
Ingredients
- 36 Oreo cookies, divided
- 6 tablespoons (3 ounces) unsalted butter, melted
- 8 ounces cream cheese, softened
- 1/2 cup granulated sugar
- 1 teaspoon vanilla extract
- 3 cups heavy cream, divided
- 1/4 cup powdered sugar
Instructions
- Crush the Oreo cookies into fine crumbs.
- Mix the Oreo crumbs with melted butter and press into the bottom of a pie dish to form the crust.
- In a large bowl, beat the cream cheese until smooth.
- Gradually add the powdered sugar and vanilla extract, and continue beating until well combined.
- In a separate bowl, whip the heavy cream until stiff peaks form.
- Gently fold the whipped cream into the cream cheese mixture.
- Spread the filling evenly over the Oreo crust.
- Refrigerate for at least 4 hours, or preferably overnight, to allow the pie to set.
- Before serving, garnish with additional Oreo cookie crumbs or chocolate shavings, if desired.
Notes
- For best results, chill the pie for at least 4 hours before serving.
- You can substitute any flavor of Oreo cookies for the chocolate Oreos.
- If you don’t have a food processor, you can crush the Oreo cookies in a resealable bag using a rolling pin.
“`


Leave a Comment