
Focus Keyword: Homemade Chicken Noodle Soup
“`html
Homemade Chicken Noodle Soup: is there anything more comforting on a chilly day? I think not! This isn’t just a recipe; it’s a warm hug in a bowl, a nostalgic trip to childhood memories, and a surefire way to soothe the soul. Forget the canned stuff we’re diving headfirst into creating a truly exceptional soup from scratch, and trust me, the difference is astounding.
Chicken noodle soup has a rich history, with variations appearing in cultures worldwide for centuries. It’s often considered a remedy for colds and flu, and for good reason! The warm broth, tender chicken, and nourishing vegetables provide essential nutrients and hydration, helping you feel better when you’re under the weather. But beyond its medicinal properties, it’s the simple, comforting flavors that make it a beloved dish.
People adore homemade chicken noodle soup for its incredible taste and satisfying texture. The savory broth, the perfectly cooked noodles, the tender chicken, and the vibrant vegetables all come together in perfect harmony. Plus, it’s incredibly versatile! You can customize it with your favorite vegetables, herbs, and spices to create a soup that’s uniquely your own. And let’s be honest, there’s something deeply satisfying about creating something so delicious and nourishing from simple ingredients. So, let’s get cooking!
“`

Ingredients:
- 1 (12-ounce) can Dr Pepper
- 1 cup heavy cream
- 1/2 cup whole milk
- 3/4 cup granulated sugar
- 1/4 teaspoon salt
- 1 teaspoon vanilla extract
- Optional: 1/4 cup Dr Pepper syrup (for extra flavor and color)
- Optional: Chocolate shavings or whipped cream for garnish
Preparing the Dr Pepper Base:
- First, we need to reduce the Dr Pepper to concentrate its flavor. Pour the entire can of Dr Pepper into a medium saucepan.
- Place the saucepan over medium heat. You’ll want to bring it to a gentle simmer, not a rolling boil. Keep a close eye on it, as it can easily boil over.
- Let the Dr Pepper simmer for about 20-30 minutes, or until it has reduced to about 1/2 cup. You’ll notice it becoming thicker and more syrupy. The color will also deepen. This reduction process is crucial for intensifying the Dr Pepper flavor in the ice cream.
- Once reduced, remove the saucepan from the heat and let the Dr Pepper concentrate cool completely. This is important because adding hot liquid to the cream and milk mixture can cause it to curdle. You can speed up the cooling process by transferring the concentrate to a heat-safe bowl and placing it in the refrigerator.
Creating the Ice Cream Custard:
- In a separate medium bowl, whisk together the heavy cream, whole milk, granulated sugar, and salt. Make sure the sugar is fully dissolved. This will ensure a smooth and creamy ice cream texture.
- Add the cooled Dr Pepper concentrate to the cream mixture. Also, add the vanilla extract and the optional Dr Pepper syrup (if using). The syrup will enhance both the flavor and the color of the ice cream.
- Whisk everything together until well combined. The mixture should be homogenous and have a light brown color.
- At this point, give the mixture a taste. If you want a stronger Dr Pepper flavor, you can add a few more drops of the Dr Pepper syrup. Remember that the flavor will be slightly muted once frozen, so it’s better to err on the side of slightly stronger flavor.
Churning the Ice Cream:
- Pour the Dr Pepper ice cream base into your ice cream maker. Make sure your ice cream maker bowl has been properly pre-chilled according to the manufacturer’s instructions. This is essential for achieving the right consistency.
- Turn on your ice cream maker and churn the mixture according to the manufacturer’s instructions. The churning time will vary depending on your machine, but it usually takes about 20-30 minutes.
- Keep an eye on the ice cream as it churns. It’s ready when it has a soft-serve consistency. It should be thick and creamy, but not completely solid.
Freezing and Hardening:
- Once the ice cream has reached the soft-serve stage, transfer it to an airtight container. A freezer-safe container is ideal.
- Gently press a piece of plastic wrap directly onto the surface of the ice cream. This will help prevent ice crystals from forming and keep the ice cream smooth.
- Seal the container tightly and place it in the freezer for at least 4-6 hours, or preferably overnight, to allow the ice cream to harden completely. This hardening process is crucial for achieving the desired scoopable consistency.
Serving and Enjoying:
- Before serving, let the ice cream sit at room temperature for about 5-10 minutes to soften slightly. This will make it easier to scoop.
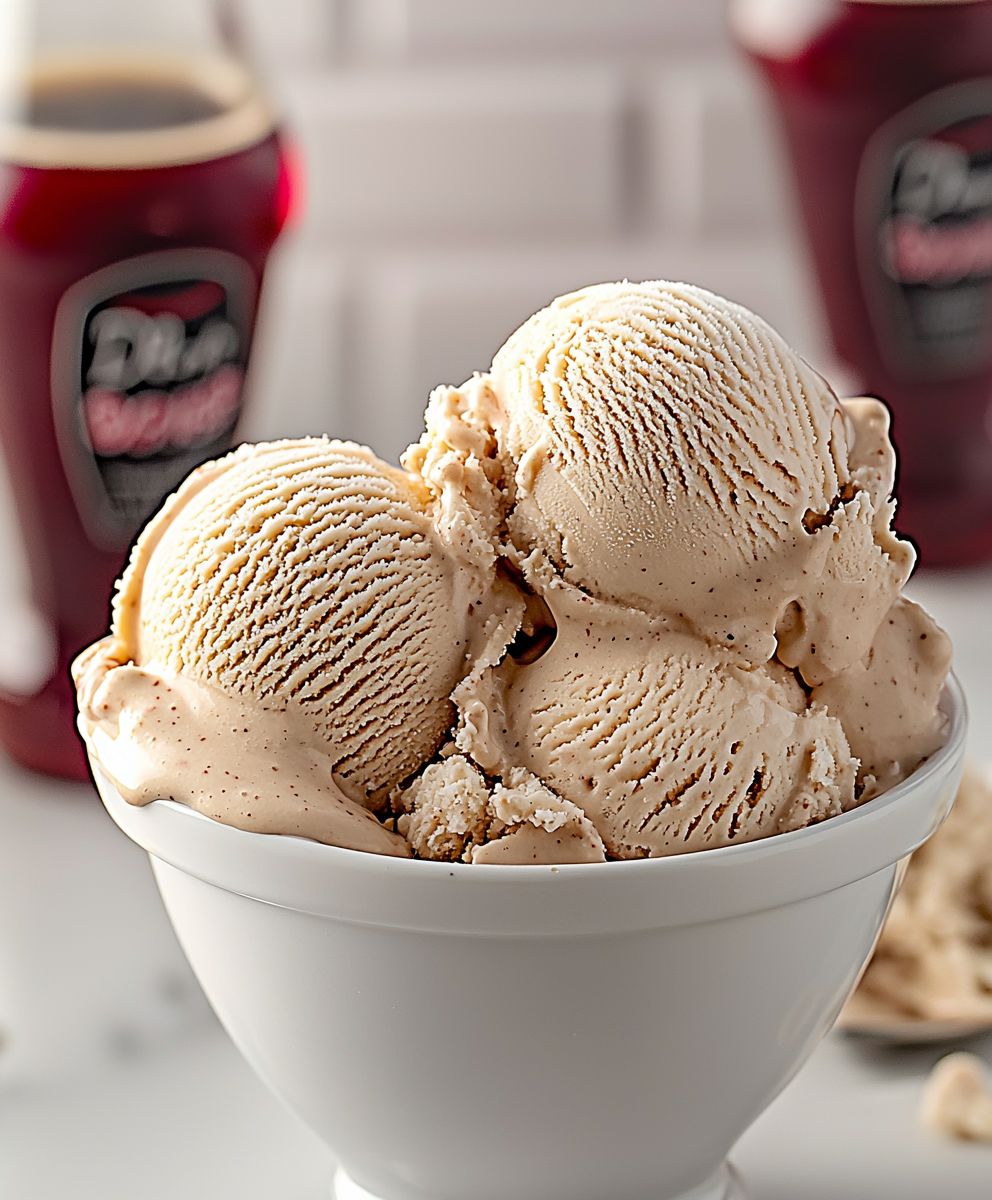
- Scoop the Dr Pepper ice cream into bowls or cones.
- Garnish with chocolate shavings or whipped cream, if desired. These additions will enhance the presentation and add extra flavor.
- Serve immediately and enjoy your homemade Dr Pepper ice cream!
Tips and Variations:
- For a richer flavor: Use half-and-half instead of whole milk. This will add more fat and create a creamier texture.
- For a more intense Dr Pepper flavor: Add a tablespoon of Dr Pepper extract to the ice cream base. Be careful not to add too much, as it can be overpowering.
- For a chocolatey twist: Add 1/4 cup of cocoa powder to the cream mixture. This will create a Dr Pepper chocolate ice cream.
- For a crunchy texture: Stir in chopped chocolate-covered pretzels or crushed Oreos after churning.
- To prevent ice crystals: Make sure your ice cream maker bowl is properly pre-chilled and avoid over-churning the ice cream.
- Storage: Store the ice cream in an airtight container in the freezer for up to 2 weeks. After that, the texture may start to deteriorate.
- Vegan Option: Substitute the heavy cream and whole milk with coconut cream and almond milk. Ensure the sugar is vegan-friendly. The taste will be slightly different, but still delicious!
Troubleshooting:
- Ice cream is too icy: This is usually caused by not enough fat in the mixture or by over-churning. Make sure to use high-quality heavy cream and avoid churning the ice cream for too long.
- Ice cream is too hard: This can be caused by freezing the ice cream for too long or by not enough sugar in the mixture. Let the ice cream sit at room temperature for a few minutes before serving.
- Ice cream is not thick enough: This can be caused by not reducing the Dr Pepper enough or by not churning the ice cream for long enough. Make sure to reduce the Dr Pepper to about 1/2 cup and churn the ice cream until it reaches a soft-serve consistency.
- Ice cream tastes bland: This can be caused by not using enough Dr Pepper or vanilla extract. Add a little more of each to the mixture until you reach the desired flavor.
Nutritional Information (Approximate):
(Note: Nutritional information is an estimate and may vary based on specific ingredients and portion sizes.)
- Calories: 250-300 per serving
- Fat: 15-20g
- Saturated Fat: 10-12g
- Cholesterol: 50-60mg
- Sodium: 50-70mg
- Carbohydrates: 25-30g
- Sugar: 20-25g
- Protein: 2-3g
Equipment You’ll Need:
- Medium saucepan
- Medium bowl
- Whisk
- Ice cream maker
- Airtight container
- Freezer
- Measuring cups and spoons
Why This Recipe Works:
The key to this Dr Pepper ice cream recipe is the reduction of the Dr Pepper soda. By simmering it down, we concentrate the unique blend of flavors that make Dr Pepper so distinctive. This concentrated flavor is then balanced with the richness of heavy cream and whole milk, creating a smooth and creamy ice cream that truly captures the essence of Dr Pepper. The addition of vanilla extract enhances the overall flavor profile, while the optional Dr Pepper syrup adds an extra boost of flavor and color. The result is a refreshing and surprisingly delicious ice cream that’s perfect for Dr Pepper lovers of all ages.
Serving Suggestions:
- Serve as a standalone dessert on a hot day.
- Pair with chocolate brownies or cookies for a decadent treat.
- Use it to make Dr Pepper ice cream floats.
- Top with whipped cream, chocolate shavings, or maraschino cherries.
- Serve in waffle cones or sugar cones for a classic ice cream experience.
Conclusion:
So there you have it! This Dr Pepper Ice Cream recipe is more than just a novelty; it’s a surprisingly delicious and refreshing treat that will have everyone asking for seconds. The unique blend of spices and cherry notes from the Dr Pepper, combined with the creamy richness of the ice cream, creates a flavor profile that’s both familiar and excitingly new. I truly believe this is a must-try recipe for anyone who loves ice cream and isn’t afraid to experiment with bold flavors.
Why is it a must-try? Because it’s incredibly easy to make, requires minimal ingredients, and delivers a huge flavor punch. Forget boring vanilla or predictable chocolate this ice cream is a conversation starter, a palate pleaser, and a guaranteed crowd-pleaser. Plus, it’s a fantastic way to use up any leftover Dr Pepper you might have lurking in the fridge (though, let’s be honest, is there ever *really* leftover Dr Pepper?).
But the fun doesn’t stop there! This recipe is also incredibly versatile. Looking for serving suggestions? Try scooping it into a waffle cone for a classic treat, or pair it with warm brownies for a decadent dessert. For a truly indulgent experience, top it with whipped cream, a drizzle of chocolate syrup, and a maraschino cherry. You could even crumble some chocolate cookies on top for added texture and flavor.
And if you’re feeling adventurous, here are a few variations to consider:
* Dr Pepper Float Ice Cream: Swirl in some Dr Pepper reduction (simmer Dr Pepper until it thickens) for an even more intense Dr Pepper flavor and a beautiful ripple effect.
* Spiced Dr Pepper Ice Cream: Add a pinch of cinnamon, nutmeg, or cloves to the ice cream base for a warmer, more complex flavor.
* Dr Pepper Chocolate Chunk Ice Cream: Fold in some dark chocolate chunks for a delightful contrast of flavors and textures.
* Dr Pepper Cherry Swirl Ice Cream: Add a swirl of cherry pie filling or cherry preserves for an extra burst of cherry goodness.
* Vegan Dr Pepper Ice Cream: Substitute the heavy cream and milk with coconut cream and almond milk for a delicious dairy-free version. Just be sure to use a high-fat coconut cream for the best texture.
I’m confident that you’ll love this Dr Pepper Ice Cream as much as I do. It’s the perfect treat for a hot summer day, a fun party, or simply a sweet indulgence any time of year. The unique flavor is sure to impress your friends and family, and the easy preparation makes it a recipe you’ll want to make again and again.
So, what are you waiting for? Gather your ingredients, dust off your ice cream maker (or get ready for the no-churn method!), and get ready to experience the magic of Dr Pepper in ice cream form. I can’t wait to hear what you think!
Please, please, please try this recipe and let me know how it turns out! Share your photos, your variations, and your honest opinions in the comments below. Did you add any special toppings? Did you try any of the variations I suggested? I’m eager to hear all about your Dr Pepper Ice Cream adventures! Happy ice cream making!
Dr Pepper Ice Cream: A Deliciously Unique Dessert Recipe
A unique and refreshing ice cream infused with the distinct flavor of Dr Pepper. Perfect for a hot day or a fun twist on a classic dessert.
Ingredients
- 1 cup heavy cream
- 1 cup whole milk
- ¾ cup granulated sugar
- ? teaspoon fine sea salt
- 1 cup Dr Pepper, flat
Instructions
- In a saucepan, combine the Dr Pepper and sugar.
- Bring to a simmer over medium heat, stirring until the sugar dissolves.
- Remove from heat and let cool completely.
- Stir in the heavy cream and vanilla extract.
- Pour the mixture into an ice cream maker and churn according to the manufacturer’s instructions.
- Transfer the ice cream to an airtight container and freeze for at least 2 hours before serving.
“`
Notes
- For a richer flavor, use Dr Pepper Zero Sugar.
- Churning time may vary depending on your ice cream maker.
- Store in an airtight container in the freezer for up to 2 weeks.
“`


Leave a Comment