
Olive bacon cheese bread just the name alone conjures up images of warm, crusty perfection, doesn’t it? Imagine sinking your teeth into a slice of this savory delight, the salty bacon mingling with the briny olives and the creamy, melted cheese, all nestled within a soft, yielding bread. It’s an explosion of flavor that’s simply irresistible!
While its exact origins are shrouded in a bit of mystery, similar savory breads have been enjoyed throughout the Mediterranean for centuries. Think of the focaccia of Italy or the olive breads found in Greece they all share a common ancestor in the simple, yet satisfying, combination of bread, olives, and flavorful additions. This particular iteration, the olive bacon cheese bread, takes that tradition and elevates it with the smoky goodness of bacon and the comforting richness of cheese.
But what is it about this bread that makes it so universally appealing? Perhaps it’s the perfect balance of salty, savory, and cheesy notes. Or maybe it’s the satisfying texture the crisp crust giving way to a soft, chewy interior. Whatever the reason, this bread is a crowd-pleaser. It’s fantastic as an appetizer, a side dish, or even as a satisfying snack. Plus, it’s surprisingly easy to make, making it a perfect choice for both experienced bakers and those just starting out in the kitchen. Get ready to experience a taste sensation that will have you coming back for more!

Ingredients:
- 1 loaf of French bread, sliced into 1-inch thick pieces
- 1 cup mayonnaise
- 1/2 cup grated Parmesan cheese
- 1/4 cup grated cheddar cheese
- 1/4 cup grated mozzarella cheese
- 2 tablespoons finely chopped green onions
- 1 tablespoon Dijon mustard
- 1 teaspoon garlic powder
- 1/2 teaspoon onion powder
- 1/4 teaspoon black pepper
- Pinch of red pepper flakes (optional)
- 2 tablespoons butter, melted
- Fresh parsley, chopped (for garnish)
Preparing the Cheese Mixture:
Okay, let’s get started! The key to amazing Sizzler Cheese Toast is the flavorful cheese mixture. This is where all the magic happens, so pay close attention to the ratios and don’t be afraid to adjust to your own taste!
- Combine the base ingredients: In a medium-sized bowl, add the mayonnaise, Parmesan cheese, cheddar cheese, and mozzarella cheese. Make sure your cheeses are finely grated for even distribution and a smooth, creamy texture. I like to use a combination of cheddar and mozzarella for that classic cheesy pull, but feel free to experiment with other cheeses like Gruyere or Monterey Jack for a different flavor profile.
- Add the flavor boosters: Now, it’s time to add the ingredients that will really make this cheese toast sing! Add the finely chopped green onions, Dijon mustard, garlic powder, onion powder, and black pepper to the bowl. The green onions add a nice fresh bite, while the Dijon mustard provides a subtle tang that cuts through the richness of the cheese. The garlic and onion powder are essential for that savory, umami flavor we all love.
- Spice it up (optional): If you like a little kick, add a pinch of red pepper flakes to the mixture. This is totally optional, but it adds a nice warmth that complements the other flavors. Start with a small pinch and add more to taste.
- Mix everything together: Using a spatula or spoon, thoroughly mix all the ingredients together until they are well combined and form a smooth, creamy paste. Make sure there are no lumps of cheese or mayonnaise. The mixture should be easily spreadable.
- Taste and adjust: This is the most important step! Taste the cheese mixture and adjust the seasonings to your liking. If you want more garlic flavor, add a little more garlic powder. If you want more tang, add a little more Dijon mustard. Don’t be afraid to experiment and make it your own!
Preparing the Bread:
Next, we need to get the bread ready. The type of bread you use is important for the overall texture and flavor of the cheese toast. I highly recommend using a good quality French bread loaf.
- Slice the bread: Using a serrated knife, slice the French bread loaf into 1-inch thick pieces. You want the slices to be thick enough to hold the cheese mixture without becoming soggy, but not so thick that they are difficult to bite into.
- Arrange the bread slices: Place the bread slices on a baking sheet lined with parchment paper. This will prevent the bread from sticking to the baking sheet and make cleanup easier.
Assembling and Baking the Cheese Toast:
Now for the fun part assembling and baking the cheese toast! This is where all your hard work comes together to create a delicious and satisfying snack or appetizer.
- Spread the cheese mixture: Using a butter knife or spatula, evenly spread the cheese mixture over each bread slice. Make sure to cover the entire surface of the bread with a generous layer of the cheese mixture. Don’t be shy the more cheese, the better!
- Brush with melted butter: In a small bowl, melt the butter in the microwave or on the stovetop. Brush the melted butter over the cheese-covered bread slices. The melted butter will help the cheese toast brown evenly and add a rich, buttery flavor.
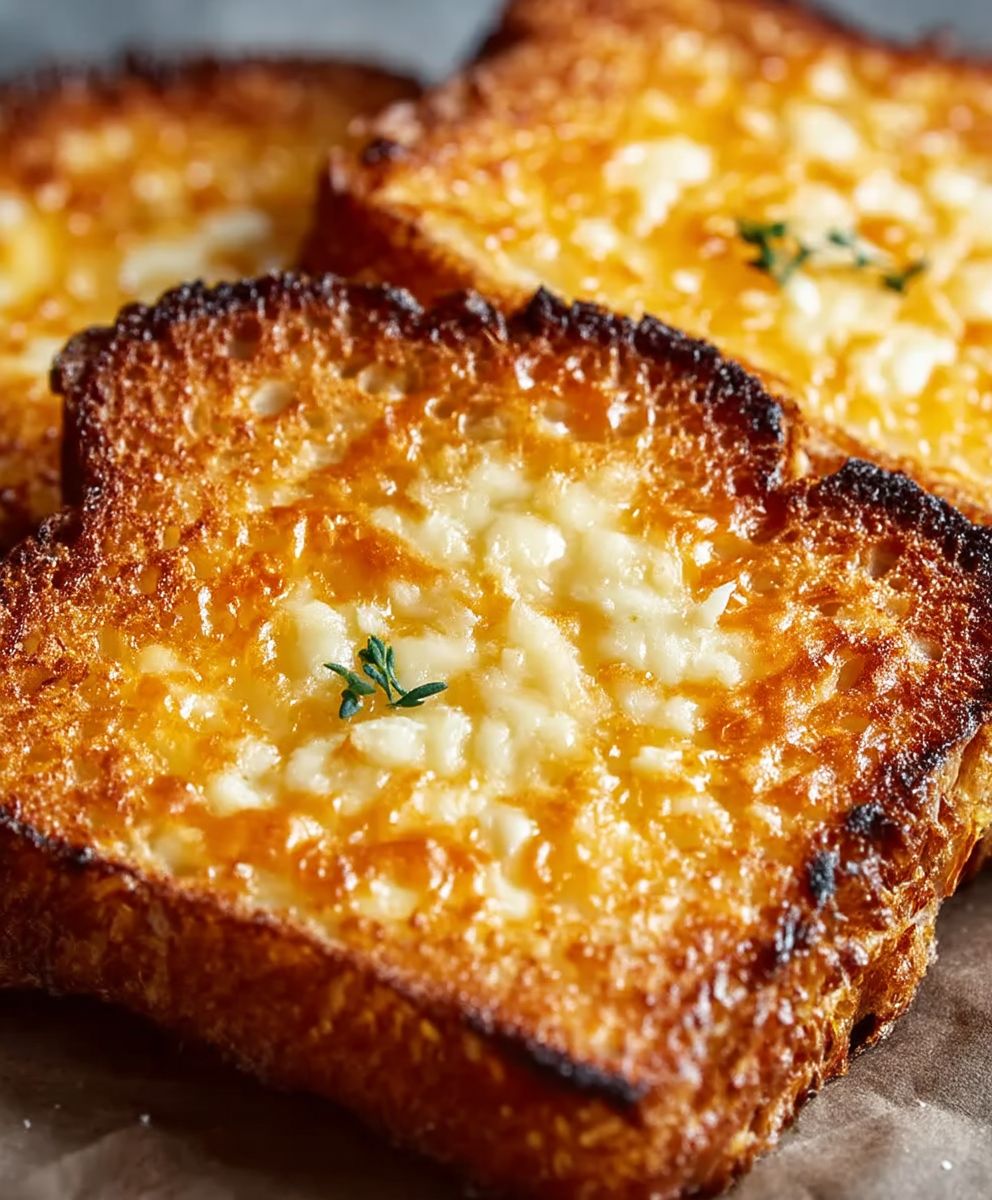
- Bake the cheese toast: Preheat your oven to 375°F (190°C). Bake the cheese toast for 12-15 minutes, or until the cheese is melted, bubbly, and lightly golden brown. Keep a close eye on the cheese toast while it’s baking to prevent it from burning. The baking time may vary depending on your oven.
- Broil for extra browning (optional): If you want the cheese toast to be extra golden brown and bubbly, you can broil it for the last 1-2 minutes of baking time. Be very careful when broiling, as the cheese toast can burn quickly. Watch it closely and remove it from the oven as soon as it reaches your desired level of browning.
Serving and Enjoying:
Finally, it’s time to serve and enjoy your homemade Sizzler Cheese Toast! This is the best part, so get ready to savor the delicious flavors and textures.
- Garnish with fresh parsley: Once the cheese toast is out of the oven, sprinkle it with freshly chopped parsley for a pop of color and freshness. The parsley adds a nice visual appeal and a subtle herbaceous flavor that complements the cheesy goodness.
- Serve immediately: Serve the cheese toast immediately while it’s still warm and the cheese is melted and gooey. The cheese toast is best enjoyed fresh out of the oven.
- Cut into smaller pieces (optional): If you’re serving the cheese toast as an appetizer, you can cut each slice into smaller pieces for easier sharing.
- Pair with your favorite sides: Sizzler Cheese Toast is delicious on its own, but it also pairs well with a variety of sides. Try serving it with a bowl of tomato soup, a fresh salad, or a side of marinara sauce for dipping.
- Enjoy! Now, sit back, relax, and enjoy your homemade Sizzler Cheese Toast! This is a classic comfort food that’s sure to please everyone.
Tips and Variations:
Want to take your Sizzler Cheese Toast to the next level? Here are a few tips and variations to try:
- Use different types of bread: While French bread is the classic choice, you can also use other types of bread, such as sourdough, Italian bread, or even baguette slices. Each type of bread will give the cheese toast a slightly different texture and flavor.
- Add different cheeses: Experiment with different types of cheeses to create your own unique flavor combinations. Try adding Gruyere, Monterey Jack, provolone, or even a sprinkle of blue cheese for a bolder flavor.
- Add different toppings: Get creative with your toppings! Try adding chopped bacon, diced tomatoes, sliced mushrooms, or even a sprinkle of everything bagel seasoning.
- Make it spicy: If you like a little heat, add a pinch of cayenne pepper or a few drops of hot sauce to the cheese mixture.
- Make it vegetarian: For a vegetarian version, simply omit the bacon or any other meat toppings.
- Make it gluten-free: Use gluten-free bread to make this recipe gluten-free.
- Make it ahead of time: You can prepare the cheese mixture ahead of time and store it in the refrigerator for up to 2 days. When you’re ready to bake the cheese toast, simply spread the cheese mixture on the bread slices and bake as directed.
- Reheat leftovers: Leftover cheese toast can be reheated in the oven or microwave. To reheat in the oven, bake at 350°F (175°C) for 5-10 minutes, or until heated through. To reheat in the microwave, microwave for 30-60 seconds, or until heated through.
Storage Instructions:
Store leftover cheese toast in an airtight container in the refrigerator for up to 2 days. Reheat as described above.
Nutritional Information (Approximate):
Please note that the nutritional information is an estimate and may vary depending on the specific ingredients used.
- Calories: Approximately 250-300 per slice
- Fat: 15-20 grams
- Protein: 10-15 grams
- Carbohydrates: 20-25 grams
Enjoy your delicious homemade Sizzler Cheese Toast!
Conclusion:
And there you have it! This Sizzler Cheese Toast recipe is truly a must-try for anyone craving a quick, satisfying, and utterly delicious snack or light meal. It’s more than just cheese on toast; it’s a nostalgic trip back to those beloved Sizzler days, reimagined for your home kitchen. The combination of the perfectly toasted bread, the creamy, cheesy topping, and that hint of garlic creates a symphony of flavors that will have you reaching for another slice before you even realize it.
What makes this recipe so special? It’s the simplicity, the speed, and the sheer comfort it provides. In just minutes, you can transform ordinary bread into something extraordinary. It’s perfect for a lazy weekend brunch, a quick after-school snack for the kids, or even a late-night craving. Plus, it’s incredibly versatile!
Think of this recipe as a blank canvas for your culinary creativity. Want to kick things up a notch? Try adding a sprinkle of red pepper flakes for a touch of heat. Or, for a more savory flavor, incorporate some finely chopped cooked bacon or ham into the cheese mixture. If you’re feeling adventurous, experiment with different types of cheese! A blend of Gruyere and Parmesan would add a sophisticated twist, while a sharp cheddar would provide a bolder, more pronounced flavor.
Serving suggestions are endless. Enjoy your Sizzler Cheese Toast as is, or pair it with a bowl of warm tomato soup for a classic and comforting combination. It also makes a fantastic side dish for salads or pasta dishes. For a more substantial meal, top it with a fried egg or some grilled vegetables. The possibilities are truly limitless!
But the real magic of this recipe lies in its ability to evoke memories and create new ones. It’s a dish that’s meant to be shared, enjoyed, and savored. So gather your family and friends, fire up the oven, and get ready to experience the joy of homemade Sizzler Cheese Toast.
I’m confident that you’ll love this recipe as much as I do. It’s a guaranteed crowd-pleaser that’s sure to become a staple in your kitchen. And the best part? It’s so easy to make that even the most novice cook can whip it up in no time.
So, what are you waiting for? Go ahead and give this recipe a try! I’m eager to hear about your experience. Did you make any variations? What did you serve it with? What did your family think? Share your photos and stories in the comments below. I can’t wait to see your creations and hear your feedback. Happy cooking, and enjoy your delicious homemade Sizzler Cheese Toast! I hope this recipe brings as much joy to your table as it has to mine. Don’t forget to rate the recipe and share it with your friends and family who might enjoy a taste of cheesy nostalgia! Let’s spread the cheesy goodness far and wide!
Sizzler Cheese Toast: The Ultimate Guide to Making It at Home
Cheesy, garlicky toast with a hint of spice, broiled to bubbly perfection.
Ingredients
- Bread slices
- Butter
- Processed cheese slices
- Green chilies, finely chopped
- Coriander leaves, finely chopped
- Salt to taste
- Black pepper powder to taste
Instructions
- Preheat your oven’s broiler.
- Combine mayonnaise, Parmesan cheese, and garlic powder in a small bowl.
- Spread the mixture evenly on the bread slices.
- Place the bread slices on a baking sheet.
- Broil for 2-3 minutes, or until golden brown and bubbly. Watch carefully to prevent burning.
- Remove from oven and serve immediately.
Notes
- Adjust the amount of cheese and garlic to your preference.
- For a spicier kick, add a pinch of red pepper flakes.
- Serve immediately for the best flavor and texture.


Leave a Comment