
Marshmallow Swirl Chocolate Cookies: Prepare to embark on a baking adventure that will redefine your definition of cookie perfection! Imagine sinking your teeth into a rich, decadent chocolate cookie, only to be met with a gooey, melt-in-your-mouth marshmallow swirl. It’s a symphony of textures and flavors that will have you reaching for seconds (and thirds!).
While the exact origins of swirling marshmallows into cookies remain shrouded in delicious mystery, the combination of chocolate and marshmallow has a long and beloved history. Think s’mores around a campfire, hot chocolate topped with fluffy marshmallows these pairings evoke feelings of warmth, comfort, and pure indulgence. These Marshmallow Swirl Chocolate Cookies tap into that same nostalgic magic, elevating the classic chocolate cookie to a whole new level of irresistible goodness.
What makes these cookies so universally adored? It’s the delightful contrast! The deep, fudgy chocolate provides a satisfying richness, while the marshmallow swirl adds a playful sweetness and a wonderfully soft, almost ethereal texture. They’re surprisingly easy to make, perfect for a weekend baking project, and guaranteed to impress friends and family. Plus, who can resist the allure of a warm, freshly baked cookie with a gooey marshmallow center? Get ready to experience cookie bliss!

Ingredients:
- 1 package (0.25 ounce) active dry yeast
- 1/4 cup warm water (105-115 degrees F)
- 1 cup warm milk (105-115 degrees F)
- 1/4 cup granulated sugar
- 1 teaspoon salt
- 1/4 cup melted unsalted butter, plus more for greasing
- 3 1/4 – 3 3/4 cups all-purpose flour, plus more for dusting
Garlic Butter Topping:
- 1/2 cup (1 stick) unsalted butter, softened
- 6 cloves garlic, minced
- 1/4 cup chopped fresh parsley
- 1/4 teaspoon garlic powder
- 1/4 teaspoon salt
- Pinch of red pepper flakes (optional)
Instructions:
Preparing the Dough:
- Activate the Yeast: In a small bowl, dissolve the yeast in the warm water. Make sure the water isn’t too hot, or it will kill the yeast. Let it stand for 5-10 minutes, or until foamy. This indicates that the yeast is active and ready to use. If it doesn’t foam, your yeast might be old and you’ll need to get a fresh packet.
- Combine Wet Ingredients: In a large bowl (or the bowl of a stand mixer), combine the warm milk, sugar, salt, and melted butter. Stir until the sugar and salt are dissolved.
- Add Yeast Mixture: Pour the foamy yeast mixture into the milk mixture and stir to combine.
- Gradually Add Flour: Gradually add the flour, one cup at a time, mixing well after each addition. If using a stand mixer, use the dough hook attachment. Start with 3 1/4 cups of flour. You may need to add more, depending on the humidity and the type of flour you’re using. The dough should be soft and slightly sticky, but not so sticky that it’s impossible to handle.
- Knead the Dough: Turn the dough out onto a lightly floured surface and knead for 5-7 minutes, or until smooth and elastic. If using a stand mixer, knead with the dough hook for 5-7 minutes on medium speed. The dough should be smooth and pull away from the sides of the bowl. Add flour, a tablespoon at a time, if the dough is too sticky.
- First Rise: Place the dough in a lightly greased bowl, turning to coat all sides. Cover the bowl with plastic wrap or a clean kitchen towel. Let rise in a warm place for 1-1.5 hours, or until doubled in size. A warm place can be inside your oven (turned off!), on top of the refrigerator, or in a sunny spot in your kitchen. The warmer the environment, the faster the dough will rise.
Shaping and Second Rise:
- Punch Down the Dough: Once the dough has doubled, gently punch it down to release the air.
- Divide the Dough: Turn the dough out onto a lightly floured surface. Divide the dough into 12 equal pieces. I find it easiest to use a kitchen scale to ensure they’re all roughly the same size, but you can also just eyeball it.
- Shape the Rolls: Roll each piece of dough into a ball. You can do this by cupping your hand over the dough and rolling it in a circular motion on the counter. Make sure the surface is lightly floured to prevent sticking.
- Arrange in Baking Dish: Place the rolls in a greased 9×13 inch baking dish. Arrange them evenly, leaving a little space between each roll for them to expand during the second rise.
- Second Rise: Cover the baking dish with plastic wrap or a clean kitchen towel. Let rise in a warm place for 30-45 minutes, or until the rolls have almost doubled in size. They should be puffy and soft to the touch.
Preparing the Garlic Butter Topping:
- Combine Ingredients: While the rolls are rising for the second time, prepare the garlic butter topping. In a small bowl, combine the softened butter, minced garlic, chopped parsley, garlic powder, salt, and red pepper flakes (if using). Mix well until all ingredients are evenly distributed. Make sure your butter is truly softened, or it will be difficult to mix everything together.
Baking the Rolls:
- Preheat Oven: Preheat oven to 375 degrees F (190 degrees C).
- Brush with Garlic Butter: Once the rolls have finished their second rise, brush the tops generously with the garlic butter topping. Make sure to get into all the nooks and crannies!
- Bake: Bake for 20-25 minutes, or until the rolls are golden brown and cooked through. Keep an eye on them, as baking times can vary depending on your oven. If the tops are browning too quickly, you can tent the baking dish with foil.
- Cool Slightly: Remove the rolls from the oven and let them cool in the baking dish for a few minutes before serving.
Serving:
- Serve Warm: Serve the garlic rolls warm. They are best enjoyed fresh out of the oven!
- Optional: For an extra touch, you can brush the rolls with a little more melted butter after they come out of the oven.
Tips and Variations:
Using Instant Yeast:
If you’re using instant yeast (also known as rapid rise yeast), you can skip the step of activating the yeast in water. Simply add the instant yeast directly to the dry ingredients.
Adding Cheese:
For cheesy garlic rolls, sprinkle shredded Parmesan cheese or mozzarella cheese over the rolls before baking. You can also add a layer of cheese inside the rolls before shaping them.
Herb Variations:
Experiment with different herbs in the garlic butter topping. Try adding rosemary, thyme, or oregano for a different flavor profile.
Spicy Garlic Rolls:
Increase the amount of red pepper flakes in the garlic butter topping for a spicier kick.
Make Ahead Instructions:
You can prepare the dough ahead of time and store it in the refrigerator for up to 24 hours. After the first rise, punch down the dough, wrap it tightly in plastic wrap, and refrigerate. When ready to bake, let the dough come to room temperature for about 30 minutes before shaping and proceeding with the recipe.
Freezing Instructions:
Baked garlic rolls can be frozen for up to 2 months. Let the rolls cool completely before wrapping them tightly in plastic wrap and then placing them in a freezer-safe bag. To reheat, thaw the rolls overnight in the refrigerator and then warm them in a 350 degrees F (175 degrees C) oven for 10-15 minutes, or until heated through.
Troubleshooting:
Dough not rising: Make sure your yeast is fresh and that the water and milk are not too hot. Also, ensure that the environment is warm enough for the dough to rise properly.
Rolls are too dense: Avoid adding too much flour to the dough. The dough should be soft and slightly sticky. Over-kneading can also result in dense rolls.
Rolls are browning too quickly: Tent the baking dish with foil to prevent the tops from burning.
Why This Recipe Works:
This recipe is a classic for a reason! The combination of soft, fluffy rolls and flavorful garlic butter is simply irresistible. The use of warm milk and butter in the dough creates a tender crumb, while the garlic butter topping adds a rich, savory flavor. The double rise ensures that the rolls are light and airy. Plus, the recipe is easy to customize with different herbs, cheeses, or spices to suit your taste.
Serving Suggestions:
Garlic rolls are a perfect accompaniment to pasta dishes, soups, salads, or any meal that calls for a delicious bread side. They are also great as a snack or appetizer. Serve them with a side of marinara sauce for dipping.
Nutritional Information (approximate, per roll):
Calories: 250-300
Fat: 10-15g
Carbohydrates: 30-40g
Protein: 5-7g
Equipment Needed:
Conclusion:
Okay, friends, let’s be honest you’ve scrolled this far because you’re intrigued by the promise of warm, fluffy, garlicky goodness. And I’m here to tell you, these Garlic Rolls are *absolutely* worth the effort. They’re not just bread; they’re an experience. The aroma alone will have your family gathering in the kitchen, practically drooling. The soft, pillowy texture combined with that intense garlic butter it’s pure comfort food elevated to an art form.
But why are these rolls a must-try? It’s simple: they’re incredibly versatile and ridiculously delicious. Forget those store-bought rolls that taste vaguely of cardboard. These are made with love (and a generous amount of garlic!), and you can taste the difference in every single bite. Plus, they’re surprisingly easy to make. I know baking can seem intimidating, but this recipe is designed for success, even if you’re a beginner. I’ve broken down each step to be as clear and straightforward as possible, so you can confidently create a batch of these heavenly rolls.
Now, let’s talk serving suggestions. These Garlic Rolls are the perfect accompaniment to just about any meal. Imagine them alongside a hearty bowl of pasta, soaking up all that delicious sauce. Or picture them gracing your Thanksgiving table, adding a touch of homemade warmth to the festivities. They’re also fantastic with soups, salads, or even just enjoyed on their own as a satisfying snack.
And don’t be afraid to get creative! Want to add a little extra flavor? Try sprinkling some grated Parmesan cheese on top before baking. Or, for a spicier kick, add a pinch of red pepper flakes to the garlic butter. You could even stuff them with mozzarella cheese before baking for an extra gooey treat. The possibilities are endless!
Here are a few more ideas to get your culinary juices flowing:
* Herb Infusion: Add fresh herbs like rosemary, thyme, or oregano to the garlic butter for a more complex flavor profile.
* Cheese Lover’s Delight: Incorporate shredded cheddar, provolone, or even a little bit of blue cheese into the dough for a cheesy surprise.
* Spicy Garlic Bombs: Mix in some finely chopped jalapeños or a dash of hot sauce to the garlic butter for a fiery kick.
* Sweet and Savory: Drizzle a touch of honey over the baked rolls for a delightful sweet and savory combination.
I truly believe that these Garlic Rolls will become a staple in your kitchen. They’re perfect for weeknight dinners, special occasions, or just when you need a little bit of comfort food in your life. So, what are you waiting for? Gather your ingredients, preheat your oven, and get ready to experience the magic of homemade garlic rolls.
I’m so excited for you to try this recipe! And more importantly, I want to hear about your experience. Did you make any variations? What did you serve them with? What did your family think? Please, please, please come back and leave a comment below. Share your photos on social media and tag me I can’t wait to see your creations! Happy baking, and enjoy every single garlicky bite! I promise, you won’t regret it. These Garlic Rolls are a guaranteed crowd-pleaser.
Garlic Rolls: The Ultimate Guide to Baking Delicious Rolls
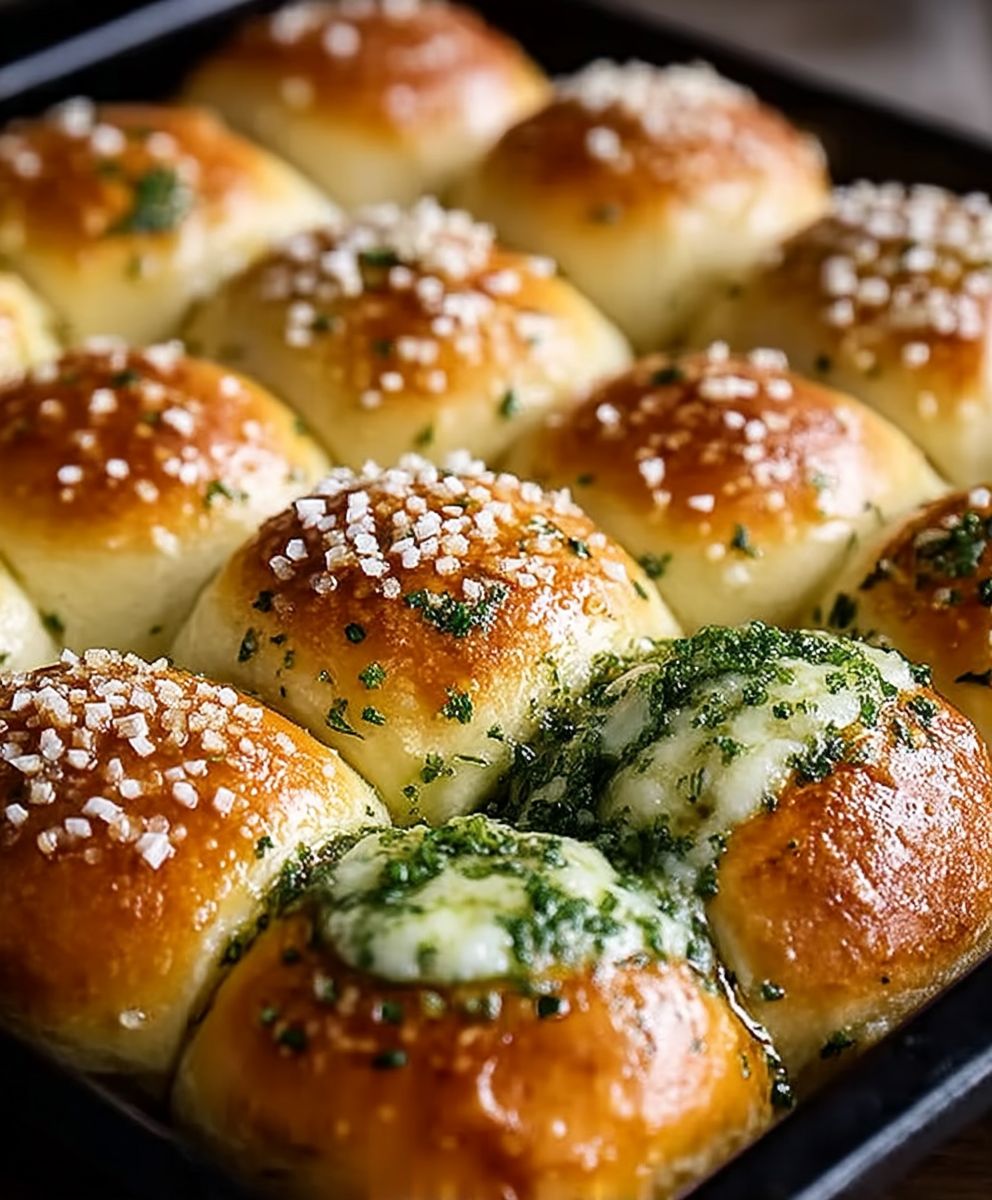
Fluffy, buttery rolls infused with garlic and herbs, perfect as a side or snack.
Ingredients
500 g Mehl (Type 550)
10 g Salz
5 g Trockenhefe
350 ml Wasser
3 Zehen Knoblauch, gehackt
2 EL Olivenöl
- 500 g Mehl (Type 550)
- 10 g Salz
- 5 g Trockenhefe
- 350 ml Wasser
- 3 Zehen Knoblauch, gehackt
- 2 EL Olivenöl
Instructions
- In einer großen Schüssel Mehl, Salz und Hefe vermengen.
- Wasser hinzufügen und zu einem Teig verrühren.
- Knoblauch und Olivenöl unterrühren.
- Teig 12 Stunden
Notes
- For best results, use a stand mixer with a dough hook.
- The dough can be made ahead of time and refrigerated for up to 24 hours.
- If you don’t have fresh herbs, you can use dried herbs. Use about 1 teaspoon of each dried herb.
- These rolls are best served warm.


Leave a Comment