
Lemon Lavender Bars: Prepare to be transported to a sun-drenched lavender field with every single bite! These aren’t just dessert; they’re an experience, a delicate dance between tart citrus and soothing floral notes that will leave you craving more. Have you ever imagined a dessert that could simultaneously invigorate and calm your senses? Well, look no further!
The combination of lemon and lavender might seem unconventional, but its roots trace back to Provençal cuisine, where lavender is celebrated not just for its fragrance but also for its subtle, herbaceous flavor. For centuries, cooks in the South of France have artfully incorporated lavender into both sweet and savory dishes, creating a culinary tradition that is both elegant and comforting. This recipe for Lemon Lavender Bars is my modern take on that classic pairing.
What makes these bars so irresistible? It’s the perfect balance of flavors. The bright, zesty lemon curd provides a tangy counterpoint to the sweet, floral lavender-infused shortbread crust. The texture is equally delightful a buttery, crumbly base topped with a smooth, creamy filling. Plus, they are surprisingly easy to make! Whether you’re looking for a show-stopping dessert for a special occasion or a simple treat to brighten your day, these bars are guaranteed to impress. Trust me, once you try them, you’ll understand why everyone raves about this delightful combination!

Ingredients:
- 1 (14 ounce) can sweetened condensed milk
- 6 tablespoons unsalted butter, softened
- 1/4 teaspoon salt
- 1 teaspoon vanilla extract
- 3 cups powdered sugar, plus more for dusting
- 12 ounces high-quality white chocolate, finely chopped
- Food coloring (gel or liquid), various colors
- Sprinkles, for decorating
- Optional: Flavored extracts (e.g., peppermint, orange, raspberry)
Preparing the Truffle Base:
- In a large, microwave-safe bowl, combine the sweetened condensed milk, softened butter, and salt. Make sure the butter is truly softened; this will help it incorporate smoothly and prevent lumps in your truffle base.
- Microwave the mixture on high for 1 minute. Remove from the microwave and stir well. The butter should be melting into the condensed milk.
- Microwave for another 30 seconds. Stir again. Repeat this process in 30-second intervals, stirring each time, until the mixture is smooth and the butter is completely melted. Be careful not to overheat the mixture, as it can scorch.
- Stir in the vanilla extract. This adds a lovely depth of flavor to the truffle base. If you’re using any other flavored extracts, add them now as well. A little goes a long way, so start with 1/4 teaspoon and adjust to your taste.
- Gradually add the powdered sugar, one cup at a time, mixing well after each addition. The mixture will become very thick and sticky. This is normal! Keep mixing until all the powdered sugar is incorporated and the mixture is smooth.
- Once the powdered sugar is fully incorporated, the truffle base is ready. It will be quite soft at this point, so it needs to chill before we can shape it.
Chilling and Dividing the Truffle Base:
- Line a baking sheet with parchment paper. This will prevent the truffle base from sticking and make it easier to remove later.
- Spread the truffle base evenly onto the prepared baking sheet. Use a spatula to smooth the surface.
- Cover the baking sheet tightly with plastic wrap, pressing the plastic wrap directly onto the surface of the truffle base. This will prevent a skin from forming on top.
- Refrigerate the truffle base for at least 2 hours, or preferably overnight. This allows it to firm up enough to be easily shaped. The longer it chills, the easier it will be to work with.
- Once the truffle base is thoroughly chilled, remove it from the refrigerator.
- Divide the truffle base into as many portions as you want different colors for your Easter egg truffles. I usually aim for at least 3-4 different colors to create a nice variety.
- Place each portion of the truffle base into a separate small bowl.
Coloring the Truffle Base:
- Add a few drops of food coloring to each bowl of truffle base. Start with a small amount, as you can always add more to deepen the color. Gel food coloring is generally preferred because it’s more concentrated and won’t change the consistency of the truffle base as much as liquid food coloring.
- Mix the food coloring into the truffle base until it’s evenly distributed. Use a spoon or your hands (wearing gloves is recommended to avoid staining your fingers) to thoroughly incorporate the color.
- If you want a deeper color, add a few more drops of food coloring and mix again. Continue adding food coloring until you achieve your desired shade.
- Repeat this process for each bowl of truffle base, using different colors for each.
Shaping the Easter Egg Truffles:
- Take a small amount of the colored truffle base and roll it into an oval shape, resembling a miniature Easter egg. The size is up to you, but I find that about 1 inch long is a good size.
- Place the shaped truffle onto a parchment-lined baking sheet.
- Repeat this process with the remaining colored truffle base, shaping each piece into an oval and placing it on the baking sheet.
- If the truffle base becomes too soft to handle, return it to the refrigerator for a few minutes to firm up.
- Once all the truffles are shaped, return the baking sheet to the refrigerator for at least 30 minutes to allow them to firm up completely before dipping.
Melting the White Chocolate:
- Place the finely chopped white chocolate in a heat-safe bowl.
- Melt the white chocolate using one of two methods:
- Microwave Method: Microwave the white chocolate in 30-second intervals, stirring well after each interval, until it’s completely melted and smooth. Be very careful not to overheat the white chocolate, as it can seize up and become grainy.
- Double Boiler Method: Fill a saucepan with about an inch of water and bring it to a simmer. Place the bowl of white chocolate over the simmering water, making sure the bottom of the bowl doesn’t touch the water. Stir the white chocolate constantly until it’s completely melted and smooth.
- Once the white chocolate is melted, remove it from the heat.
- If the melted white chocolate is too thick, you can add a teaspoon of vegetable shortening or coconut oil to thin it out. Stir well until the shortening or oil is fully incorporated.
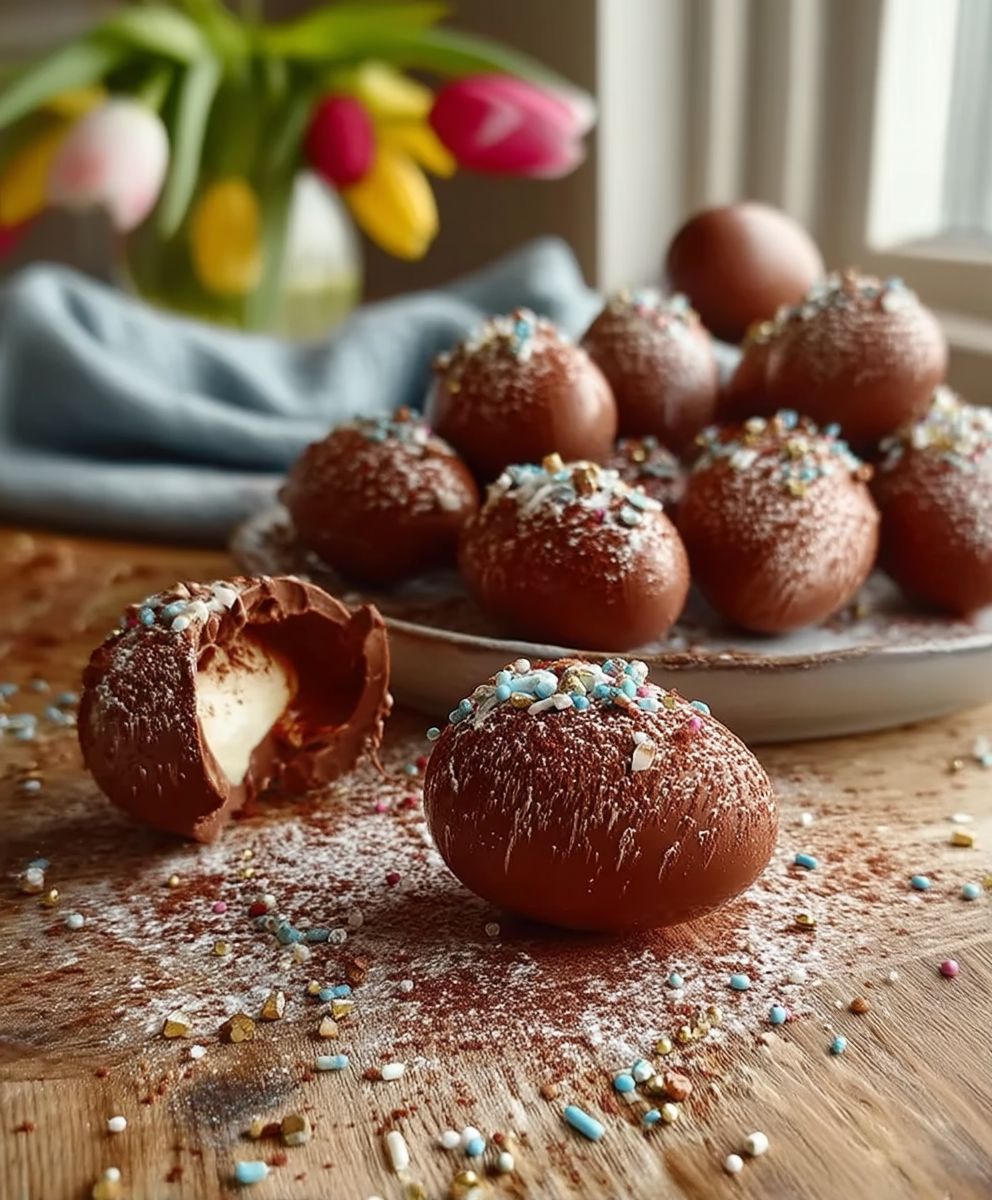
Dipping and Decorating the Truffles:
- Remove the chilled truffle eggs from the refrigerator.
- Using a fork or dipping tools, carefully dip each truffle egg into the melted white chocolate, ensuring it’s completely coated.
- Lift the truffle egg out of the chocolate and gently tap the fork or dipping tool against the side of the bowl to remove any excess chocolate.
- Place the dipped truffle egg back onto the parchment-lined baking sheet.
- Immediately sprinkle the truffle egg with sprinkles or other decorations while the chocolate is still wet. This will ensure that the decorations adhere properly.
- Repeat this process for all the truffle eggs.
- If the white chocolate starts to thicken during the dipping process, you can gently reheat it in the microwave or over the double boiler.
Setting and Storing the Truffles:
- Once all the truffle eggs are dipped and decorated, return the baking sheet to the refrigerator for at least 30 minutes to allow the chocolate to set completely.
- Once the chocolate is set, the Easter egg truffles are ready to be enjoyed!
- Store the truffles in an airtight container in the refrigerator for up to a week. They can also be frozen for longer storage.
Tips for Success:
- Use high-quality white chocolate for the best flavor and texture.
- Don’t overheat the white chocolate, as it can seize up.
- Work quickly when dipping and decorating the truffles, as the chocolate will set quickly.
- Get creative with your decorations! Use different colors of sprinkles, edible glitter, or even melted chocolate to create unique designs.
- If you want to add a little extra flavor, try dipping the truffles in different types of chocolate, such as milk chocolate or dark chocolate.
Variations:
- Peanut Butter Truffles: Add 1/2 cup of peanut butter to the truffle base for a delicious peanut butter flavor.
- Chocolate Chip Truffles: Stir in 1/2 cup of mini chocolate chips to the truffle base for a chocolate chip surprise.
- Coconut Truffles: Roll the dipped truffles in shredded coconut for a tropical twist.
- Nutella Truffles: Add 1/4 cup of Nutella to the truffle base for a hazelnut chocolate flavor.
Conclusion:
And there you have it! These Easter egg truffles are truly a must-try this season. They’re not only incredibly easy to make, requiring minimal baking skills and readily available ingredients, but they also deliver a decadent, melt-in-your-mouth experience that will impress everyone. Forget store-bought chocolates this year; these homemade truffles are far superior in taste and offer a personal touch that makes them perfect for gifting or sharing with loved ones.
Think about it: rich, creamy chocolate ganache, infused with your favorite flavors, all nestled inside a beautifully decorated Easter egg shell. What’s not to love? The possibilities are endless! You can customize the ganache with different extracts like peppermint, orange, or even a hint of coffee for a mocha twist. For a more sophisticated flavor profile, consider adding a splash of your favorite liqueur, such as Grand Marnier or Frangelico. And don’t forget the toppings! Sprinkles are always a classic, but you could also use chopped nuts, shredded coconut, or even crushed cookies for added texture and flavor.
Serving Suggestions and Variations:
These Easter egg truffles are delightful on their own, but they can also be incorporated into other desserts. Imagine crumbling them over ice cream, using them as a topping for cupcakes, or even melting them down to create a decadent chocolate sauce. For a truly impressive presentation, arrange them on a tiered dessert stand alongside other Easter treats like macarons and mini cheesecakes.
Here are a few more ideas to spark your creativity:
* White Chocolate Raspberry Truffles: Use white chocolate for the ganache and swirl in raspberry jam for a fruity and tangy twist.
* Peanut Butter Cup Truffles: Incorporate peanut butter into the ganache and top with chopped peanut butter cups.
* Salted Caramel Truffles: Add a pinch of sea salt to the ganache and drizzle with caramel sauce.
* Vegan Easter Egg Truffles: Use dairy-free chocolate and coconut cream to create a vegan-friendly version.
Why You Should Make These Easter Egg Truffles:
I know there are countless Easter recipes out there, but I truly believe that these Easter egg truffles stand out from the crowd. They’re not only delicious and versatile, but they’re also a fun and engaging activity to do with kids. Imagine the joy on their faces as they decorate their own truffles with colorful sprinkles and edible glitter! Plus, making these truffles is a great way to use up any leftover Easter candy you might have lying around.
A Final Word:
So, what are you waiting for? Gather your ingredients, put on your apron, and get ready to create some Easter magic! I promise you won’t be disappointed. These Easter egg truffles are guaranteed to be a hit with everyone who tries them.
I’m so excited for you to try this recipe! Once you do, please come back and share your experience in the comments below. I’d love to hear about your variations, your successes, and any tips you might have for other readers. Don’t forget to snap a picture of your beautiful Easter egg truffles and tag me on social media! Happy baking, and Happy Easter!
Easter Egg Truffles: A Delicious and Easy Recipe
Creamy chocolate truffles decorated to resemble Easter eggs. Perfect for a festive treat!
Ingredients
- 12 ounces cream cheese, softened
- 1/2 cup butter, softened
- 3 cups powdered sugar
- 1 teaspoon vanilla extract
- 1/4 teaspoon salt
- 12 ounces chocolate candy coating, melted
- Sprinkles, for decoration
Instructions
- Melt the chocolate in a heatproof bowl set over a pan of simmering water, ensuring the bowl doesn’t touch the water.
- Remove from the heat and stir in the cream and butter until smooth.
- Stir in any flavorings, such as vanilla extract or orange zest.
- Let the mixture cool slightly, then cover and chill in the refrigerator for at least 2 hours, or until firm enough to handle.
- Once firm, roll the truffle mixture into small balls.
- Melt the coating chocolate in a separate heatproof bowl as before.
- Dip each truffle ball into the melted coating chocolate, ensuring it’s fully covered.
- Place the dipped truffles on a parchment-lined baking sheet.
- Decorate with sprinkles, chopped nuts, or a drizzle of contrasting chocolate.
- Let the truffles set completely before serving.
“`
Notes
- Store in an airtight container in the refrigerator for up to 1 week.
- For a richer flavor, use dark chocolate with a higher cocoa content.
- If the mixture is too soft to roll, chill it in the refrigerator for 30 minutes before shaping.
- Get creative with your decorations! Use different colors of sprinkles, edible glitter, or chopped nuts.


Leave a Comment