
Pineapple Chicken Bake: Prepare to be transported to a tropical paradise with this surprisingly simple and utterly delicious dish! Forget boring weeknight dinners; this recipe is a flavor explosion that will have your family begging for more. Imagine tender, juicy chicken bathed in a sweet and tangy sauce, all topped with a golden, bubbly crust. Sounds divine, right?
While the exact origins of Pineapple Chicken Bake are a bit hazy, its popularity likely stems from the mid-20th century, a time when canned pineapple became widely available and home cooks were experimenting with new and exciting flavor combinations. The combination of savory chicken and sweet pineapple offers a delightful contrast that tantalizes the taste buds.
What makes this dish so beloved? It’s the perfect balance of sweet, savory, and tangy. The pineapple adds a bright, tropical sweetness that complements the savory chicken beautifully. The creamy sauce brings everything together, creating a comforting and satisfying meal. Plus, it’s incredibly easy to make! With minimal prep time and simple ingredients, this Pineapple Chicken Bake is a lifesaver on busy weeknights. It’s a guaranteed crowd-pleaser that’s sure to become a family favorite.

Ingredients:
- For the Mac and Cheese:
- 1 pound elbow macaroni
- 6 tablespoons unsalted butter
- 1/2 cup all-purpose flour
- 4 cups whole milk
- 1 teaspoon salt
- 1/2 teaspoon black pepper
- 1/4 teaspoon nutmeg
- 1/4 teaspoon garlic powder
- 1/4 teaspoon onion powder
- 1 pound sharp cheddar cheese, shredded
- 8 ounces Monterey Jack cheese, shredded
- 4 ounces Gruyere cheese, shredded
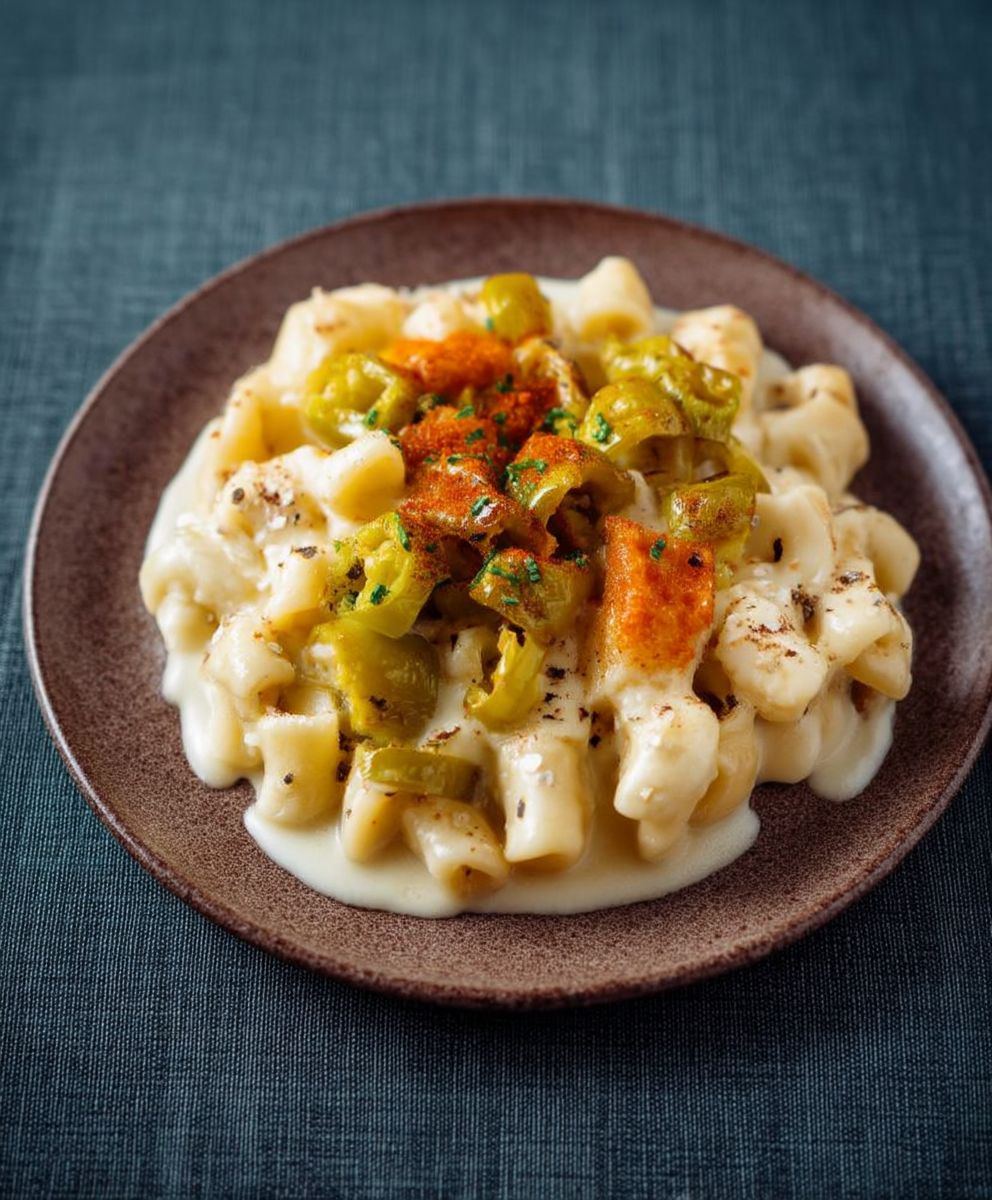
- 1 (4 ounce) can diced green chiles, mild or hot, drained (or about 1 cup fresh roasted and diced Hatch chiles)
- For the Topping (Optional):
- 1/2 cup panko breadcrumbs
- 2 tablespoons melted butter
- 1/4 cup grated Parmesan cheese
Preparing the Macaroni
- Cook the macaroni: Bring a large pot of salted water to a boil. Add the elbow macaroni and cook according to package directions, until al dente. It’s crucial not to overcook the pasta, as it will continue to cook in the cheese sauce. Al dente pasta holds its shape better and provides a more pleasant texture in the final dish.
- Drain the macaroni: Once the macaroni is cooked, drain it well in a colander. Don’t rinse the pasta unless you want to cool it down quickly. We want the pasta to retain some of its starch, as this will help the cheese sauce cling to it.
Making the Cheese Sauce
- Make the roux: In a large, heavy-bottomed saucepan or Dutch oven, melt the butter over medium heat. Once the butter is melted and shimmering, whisk in the flour. Cook, whisking constantly, for 2-3 minutes. This creates a roux, which is the base of our cheese sauce. It’s important to cook the roux long enough to cook out the raw flour taste, but be careful not to burn it. The roux should be a pale golden color.
- Add the milk: Gradually whisk in the milk, about 1 cup at a time, ensuring each addition is fully incorporated before adding more. This prevents lumps from forming. Continue whisking until the sauce is smooth and thickened. This process usually takes about 5-7 minutes. The sauce should be thick enough to coat the back of a spoon.
- Season the sauce: Stir in the salt, pepper, nutmeg, garlic powder, and onion powder. Taste and adjust seasonings as needed. The nutmeg adds a subtle warmth and complexity to the sauce, while the garlic and onion powders enhance the savory flavor.
- Melt the cheese: Reduce the heat to low. Gradually add the shredded cheddar, Monterey Jack, and Gruyere cheeses, stirring constantly until the cheese is completely melted and the sauce is smooth and creamy. Adding the cheese gradually ensures that it melts evenly and doesn’t clump together. If the sauce becomes too thick, you can add a splash of milk to thin it out.
- Incorporate the chiles: Stir in the drained diced green chiles (or roasted Hatch chiles). Be sure to distribute them evenly throughout the sauce. If you’re using fresh roasted Hatch chiles, make sure they are peeled, seeded, and diced before adding them to the sauce.
Combining and Baking (Optional)
- Combine macaroni and cheese sauce: Add the drained macaroni to the cheese sauce and stir gently to coat. Make sure all the macaroni is evenly coated in the cheesy goodness.
- Prepare the topping (optional): In a small bowl, combine the panko breadcrumbs, melted butter, and grated Parmesan cheese. Mix well. This topping adds a delightful crunch and nutty flavor to the mac and cheese.
- Transfer to baking dish (optional): Pour the mac and cheese into a greased 9×13 inch baking dish. Spread it evenly.
- Add the topping (optional): Sprinkle the panko breadcrumb mixture evenly over the top of the mac and cheese.
- Bake (optional): Bake in a preheated oven at 350°F (175°C) for 20-25 minutes, or until the topping is golden brown and the mac and cheese is bubbly. If the topping starts to brown too quickly, you can tent the dish with aluminum foil.
- Broil (optional): For an extra crispy topping, broil for the last 1-2 minutes, watching carefully to prevent burning.
- Let it rest: Remove from the oven and let stand for 5-10 minutes before serving. This allows the cheese sauce to set slightly and prevents it from being too runny.
Serving Suggestions
This Hatch Chile Mac and Cheese is delicious on its own, but it also pairs well with a variety of sides. Here are a few suggestions:
- Salad: A simple green salad with a vinaigrette dressing provides a refreshing contrast to the richness of the mac and cheese.
- Roasted vegetables: Roasted broccoli, asparagus, or Brussels sprouts are all great options.
- Grilled chicken or steak: For a heartier meal, serve the mac and cheese alongside grilled chicken or steak.
- Pulled pork: The smoky flavor of pulled pork complements the cheesy, spicy mac and cheese perfectly.
Tips and Variations
- Cheese variations: Feel free to experiment with different types of cheese. Pepper jack, smoked gouda, or even a little bit of blue cheese can add interesting flavors.
- Spice level: Adjust the amount of green chiles to your liking. If you prefer a milder mac and cheese, use mild chiles or reduce the amount. For a spicier version, use hot chiles or add a pinch of cayenne pepper to the cheese sauce.
- Add-ins: Consider adding other ingredients to the mac and cheese, such as cooked bacon, sausage, or vegetables.
- Make it ahead: You can prepare the mac and cheese ahead of time and bake it later. Simply assemble the dish and store it in the refrigerator until you’re ready to bake. You may need to add a few extra minutes to the baking time if the dish is cold.
- Stovetop only: If you prefer, you can skip the baking step and serve the mac and cheese directly from the stovetop. Just make sure the cheese is fully melted and the sauce is smooth and creamy.
- Gluten-free option: Use gluten-free elbow macaroni and a gluten-free all-purpose flour blend to make this dish gluten-free.
- Vegan option: Use plant-based milk, vegan butter, and vegan cheese shreds to make this dish vegan. You may need to adjust the seasonings to taste.
Troubleshooting
- Lumpy cheese sauce: If your cheese sauce is lumpy, try whisking it vigorously over low heat. You can also use an immersion blender to smooth it out.
- Thick cheese sauce: If your cheese sauce is too thick, add a splash of milk to thin it out.
- Thin cheese sauce: If your cheese sauce is too thin, continue cooking it over low heat, stirring constantly, until it thickens. You can also add a slurry of cornstarch and water (1 tablespoon cornstarch mixed with 2 tablespoons cold water) to the sauce to help thicken it.
- Dry mac and cheese: If your mac and cheese is dry, add a little bit of milk or cream to moisten it.
- Burnt topping: If the topping starts to burn, tent the dish with aluminum foil.
Nutritional Information (Approximate)
Please note that the nutritional information is an estimate and may vary depending on the specific ingredients used and portion sizes.
- Calories: Approximately 600-800 per serving
- Fat: Approximately 30-40 grams per serving
- Protein: Approximately 25-35 grams per serving
- Carbohydrates: Approximately 50-70 grams per serving
Enjoy your delicious homemade Hatch Chile Mac and Cheese!
Conclusion:
This Hatch Chile Mac and Cheese isn’t just another mac and cheese recipe; it’s a flavor explosion waiting to happen! The creamy, cheesy base, punctuated by the smoky heat of roasted Hatch chiles, creates a symphony of textures and tastes that will leave you craving more. Its the perfect comfort food with a kick, and trust me, once you try it, you’ll understand why I’m so excited to share it with you.
Why is this a must-try? Because it elevates a classic dish to a whole new level. The Hatch chiles add a depth of flavor that pre-shredded cheese and powdered cheese sauce simply can’t replicate. It’s a gourmet experience that’s surprisingly easy to achieve at home. Plus, it’s incredibly versatile!
Serving Suggestions and Variations:
Think of this Hatch Chile Mac and Cheese as a blank canvas for your culinary creativity. Here are a few ideas to get you started:
* Make it a meal: Add grilled chicken, pulled pork, or crispy bacon for a heartier dish. A sprinkle of breadcrumbs on top and a quick bake in the oven adds a delightful crunch.
* Spice it up (or down): If you’re a heat seeker, use hot Hatch chiles or add a pinch of cayenne pepper. For a milder version, use mild Hatch chiles or mix them with a bit of sweet bell pepper.
* Get cheesy: Experiment with different cheeses! Gruyere, fontina, or even a touch of smoked gouda would be fantastic additions.
* Veggie boost: Stir in some roasted vegetables like broccoli, cauliflower, or butternut squash for added nutrients and flavor.
* Side dish superstar: Serve it alongside grilled steak, BBQ ribs, or even a simple salad for a complete and satisfying meal.
* Leftover magic: Cold mac and cheese fritters are a delicious way to use up any leftovers. Just form into patties, coat in breadcrumbs, and fry until golden brown.
This recipe is more than just a set of instructions; it’s an invitation to experiment and create your own signature version of Hatch Chile Mac and Cheese. Don’t be afraid to get creative and put your own spin on it! I truly believe that this will become a staple in your kitchen, a go-to recipe for weeknight dinners, potlucks, and everything in between.
I’m so confident that you’ll love this recipe, and I can’t wait to hear about your experience. Did you add any special ingredients? Did you try a different cheese combination? Did you serve it with a particular side dish? Please, share your photos and stories in the comments below! Your feedback is invaluable, and it helps me continue to create recipes that you’ll love. So, gather your ingredients, fire up your oven, and get ready to indulge in the ultimate comfort food experience. Happy cooking, and enjoy every cheesy, spicy bite of this incredible Hatch Chile Mac and Cheese! I hope you love it as much as I do!
Hatch Chile Mac and Cheese: The Ultimate Spicy Comfort Food
Creamy mac and cheese elevated with roasted Hatch chiles for a spicy, cheesy kick.
Ingredients
**Prep time:** 15 minutes
**Cook time:** 30 minutes
**Ingredients:**
* 1 pound elbow macaroni
* 6 tablespoons butter, divided
* 1/2 cup all-purpose flour
* 3 cups milk
* 1 teaspoon salt
* 1/2 teaspoon black pepper
* 1/4 teaspoon cayenne pepper
* 4 cups shredded cheddar cheese, divided
* 1 (4 ounce) can diced green chiles
* 1 (4 ounce) can diced Hatch chiles
* 1 cup panko bread crumbs
- 1 pound elbow macaroni
- 6 tablespoons butter, divided
- 1/2 cup all-purpose flour
- 3 cups milk
- 1 teaspoon salt
- 1/2 teaspoon black pepper
- 1/4 teaspoon cayenne pepper
- 4 cups shredded cheddar cheese, divided
- 1 (4 ounce) can diced green chiles
- 1 (4 ounce) can diced Hatch chiles
- 1 cup panko bread crumbs
Instructions
- Preheat oven to 350 degrees.
- Cook pasta according to package directions.
- While pasta is cooking, melt butter in a saucepan over medium heat.
- Whisk in flour until smooth.
- Gradually whisk in milk until smooth.
- Bring to a simmer, stirring constantly.
- Reduce heat to low and simmer for 5 minutes, stirring occasionally.
- Remove from heat and stir in cheddar cheese, Monterey Jack cheese, and salt.
- Stir in cooked pasta and hatch chiles.
- Pour into a greased 9×13 inch baking dish.
- Bake for 20 minutes, or until golden brown and bubbly.
- Let cool for a few minutes before serving.
Notes
- For a spicier mac, leave the seeds and membranes in one or two of the chiles.
- If you dont have access to Hatch chiles, you can use roasted Anaheim peppers or poblano peppers instead.
- The mac and cheese can be stored in the refrigerator for up to 3 days. Reheat in the microwave or oven until warmed through.

Leave a Comment