
Crumbl Confetti Cookies: Prepare to be amazed! Imagine biting into a soft, chewy cookie bursting with vibrant sprinkles and a sweet, creamy frosting that melts in your mouth. That’s precisely the experience you’ll have with these delightful treats. I’ve cracked the code to recreating the famous Crumbl Confetti Cookies right in your own kitchen, and trust me, you won’t be disappointed.
Confetti cookies, in general, have a whimsical charm that evokes feelings of celebration and joy. While the exact origins are debated, the idea of adding colorful sprinkles to baked goods has been around for decades, bringing a touch of fun to everything from birthday cakes to simple sugar cookies. Crumbl Cookies has elevated this classic treat with their signature oversized cookies and decadent frosting, creating a sensation that has cookie lovers lining up at their stores.
What makes these Crumbl Confetti Cookies so irresistible? It’s the perfect combination of textures and flavors. The soft, slightly underbaked cookie provides a delightful chew, while the creamy, sweet frosting adds a luxurious richness. And, of course, the sprinkles add a playful crunch and a visual appeal that’s hard to resist. Plus, let’s be honest, who can say no to a giant cookie that’s practically begging to be devoured? Get ready to bake up a batch of happiness!

Ingredients:
- 1 ½ cups all-purpose flour
- 1 teaspoon baking soda
- ½ teaspoon baking powder
- ½ teaspoon salt
- ½ cup (1 stick) unsalted butter, softened
- ¾ cup creamy peanut butter
- ¾ cup granulated sugar
- ¾ cup packed brown sugar
- 1 large egg
- 2 tablespoons milk
- 1 teaspoon vanilla extract
- Granulated sugar, for rolling
- Approximately 48 milk chocolate kisses, unwrapped
Preparing the Dough:
Okay, let’s get started! First things first, we need to get our dry ingredients ready. This helps ensure everything is evenly distributed throughout the dough, giving us that perfect texture and flavor in every bite.
- In a medium bowl, whisk together the flour, baking soda, baking powder, and salt. Make sure you whisk it really well you don’t want any clumps of baking soda hiding in there! Set this aside for now.
Now, for the fun part creaming together the butter and sugars! This is where the magic happens, creating a light and fluffy base for our peanut butter blossoms.
- In a large bowl (or the bowl of your stand mixer), cream together the softened butter, peanut butter, granulated sugar, and brown sugar until light and fluffy. This usually takes about 3-5 minutes. You’ll know it’s ready when the mixture is noticeably lighter in color and has a smooth, almost whipped texture. Don’t rush this step; it’s crucial for the cookies’ tenderness.
Next, we’ll add the wet ingredients. Be sure to scrape down the sides of the bowl to ensure everything is incorporated evenly.
- Beat in the egg, milk, and vanilla extract until well combined. Again, scrape down the sides of the bowl to make sure everything is mixing properly.
Time to bring the wet and dry ingredients together! We’ll do this gradually to prevent overmixing, which can lead to tough cookies. No one wants tough cookies!
- Gradually add the dry ingredients to the wet ingredients, mixing on low speed until just combined. Be careful not to overmix! Overmixing develops the gluten in the flour, resulting in a tougher cookie. Stop mixing as soon as the flour is incorporated.
Now, we need to chill the dough. This is important because it allows the gluten to relax, preventing the cookies from spreading too much in the oven. It also makes the dough easier to handle.
- Cover the bowl with plastic wrap and chill the dough in the refrigerator for at least 30 minutes. You can chill it for longer, even overnight, if you prefer. Just make sure to let it sit at room temperature for a few minutes before rolling if it’s been chilled for a long time.
Shaping and Baking the Cookies:
Alright, the dough is chilled, and we’re ready to roll! This is where the cookies really start to take shape (literally!).
- Preheat your oven to 375°F (190°C). Line baking sheets with parchment paper. Parchment paper is your best friend here it prevents the cookies from sticking and makes cleanup a breeze.
Now, let’s form those little balls of peanut butter goodness!
- Roll the dough into 1-inch balls. This is about a tablespoon of dough per cookie.
Time for the sugar coating! This adds a touch of sweetness and a lovely sparkle to the finished cookies.
- Roll each ball in granulated sugar, coating it evenly.
Arrange the cookies on the prepared baking sheets, leaving about 2 inches between each cookie to allow for spreading.
- Place the sugared dough balls on the prepared baking sheets.
Now, it’s baking time! Keep a close eye on them to prevent burning.
- Bake for 8-10 minutes, or until the edges are lightly golden brown. The centers will still look soft, but that’s okay they’ll firm up as they cool.
Adding the Chocolate Kisses:
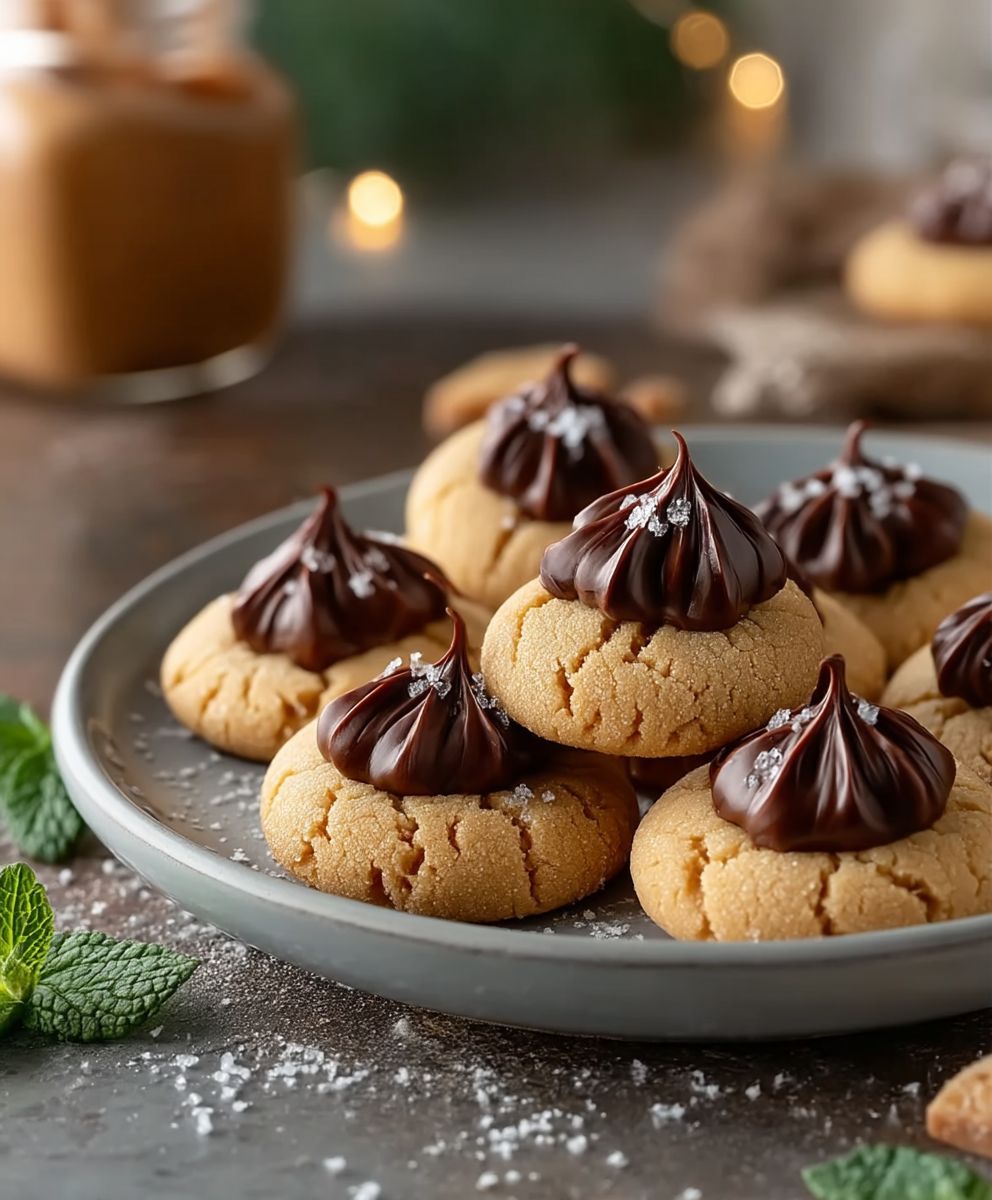
This is the most important part adding the chocolate kisses! This is what makes these cookies Peanut Butter Blossoms, after all.
- Remove the baking sheets from the oven and immediately press a milk chocolate kiss into the center of each cookie. Press firmly but gently, so you don’t crack the cookie.
Let the cookies cool completely on the baking sheets before transferring them to a wire rack. This allows the chocolate to set and prevents the cookies from breaking.
- Let the cookies cool on the baking sheets for a few minutes before transferring them to a wire rack to cool completely. This helps the chocolate kisses set and prevents the cookies from breaking.
And that’s it! You’ve made Peanut Butter Blossoms! Enjoy!
Conclusion:
And there you have it! These aren’t just any cookies; they’re Peanut Butter Blossoms, little bites of pure, unadulterated joy that are guaranteed to disappear faster than you can say “peanut butter.” Seriously, if you’re looking for a recipe that’s both incredibly easy to make and delivers a massive dose of nostalgic deliciousness, then look no further. This is *the* cookie recipe you’ve been searching for.
But why are these Peanut Butter Blossoms a must-try? Well, beyond the obvious (they taste amazing!), they’re incredibly versatile. The soft, chewy peanut butter cookie base perfectly complements the sweet, melty chocolate kiss on top, creating a symphony of flavors and textures that will have everyone begging for more. Plus, they’re surprisingly simple to make, even for novice bakers. The dough comes together quickly, and the shaping is fun and easy perfect for getting the kids involved!
Serving Suggestions and Variations:
While these cookies are divine on their own, there are plenty of ways to customize them to your liking. For a festive touch, try using different colored sprinkles or sanding sugar. Red and green for Christmas, pastel colors for Easter, or even team colors for game day! You could also experiment with different types of chocolate kisses. Milk chocolate is classic, but dark chocolate, caramel-filled, or even peppermint kisses would be equally delicious.
Looking for a little extra flair? Consider adding a pinch of sea salt to the tops of the cookies before baking. The salt enhances the sweetness of the peanut butter and chocolate, creating a truly irresistible flavor combination. Or, for a richer, more decadent cookie, try using brown butter in the dough. The nutty, caramelized flavor of brown butter will take these blossoms to a whole new level.
If you’re feeling adventurous, you could even try making these cookies with different nut butters. Almond butter, cashew butter, or even sunflower seed butter would all work beautifully. Just be sure to adjust the baking time as needed, as different nut butters can affect the texture of the cookies.
For serving, these Peanut Butter Blossoms are perfect for any occasion. They’re a great addition to holiday cookie platters, potlucks, or bake sales. They also make a thoughtful homemade gift for friends and family. And, of course, they’re the perfect treat to enjoy with a glass of milk or a cup of coffee.
Your Turn to Bake!
I truly believe that everyone should have a go-to peanut butter cookie recipe, and this one is mine. It’s reliable, delicious, and always a crowd-pleaser. So, what are you waiting for? Preheat your oven, gather your ingredients, and get ready to bake up a batch of these irresistible Peanut Butter Blossoms.
I’m so excited for you to try this recipe! Once you do, I’d love to hear about your experience. Did you make any variations? What did your family and friends think? Share your photos and stories in the comments below. Happy baking! I hope you enjoy these as much as my family and I do. Don’t forget to share this recipe with your friends and family so they can enjoy these delightful treats too!
Peanut Butter Blossoms: The Ultimate Guide to Perfect Cookies
Classic peanut butter cookies topped with a chocolate kiss. Soft, chewy, and perfect for holidays or any occasion.
Ingredients
- 1 1/2 cups all-purpose flour
- 1 teaspoon baking soda
- 1/2 teaspoon salt
- 1/2 cup (1 stick) unsalted butter, softened
- 3/4 cup creamy peanut butter
- 1/2 cup granulated sugar
- 1/2 cup packed brown sugar
- 1 large egg
- 2 tablespoons milk
- 1 teaspoon vanilla extract
- Granulated sugar, for rolling
- Milk chocolate kisses, unwrapped
Instructions
- Preheat oven to 375 degrees F (190 degrees C).
- In a medium bowl, cream together the butter, peanut butter, white sugar, and brown sugar until smooth.
- Beat in the egg and vanilla.
- In a separate bowl, whisk together the flour, baking soda, and salt.
- Gradually add the dry ingredients to the creamed mixture and mix well.
- Roll dough into 1 inch balls.
- Roll balls in sugar.
- Place on ungreased cookie sheets.
- Bake for 8 to 10 minutes.
- Remove from oven and immediately press a chocolate kiss into the center of each cookie.
- Return to oven for 2 minutes.
- Remove from oven and place cookies on wire racks to cool.
Notes
- For easy rolling, chill dough for 30 minutes.
- Roll dough balls in colored sprinkles or sanding sugar for a festive look.
- Store cookies in an airtight container at room temperature.
“`
Leave a Comment