
Easy Coq au Vin, the classic French braise, reimagined for your busy weeknights! Forget spending hours slaving over a hot stove; this simplified version delivers all the rich, comforting flavors of the traditional dish in a fraction of the time. Imagine tender chicken, infused with the deep, earthy notes of red wine, mushrooms, and bacon, all simmered to perfection in a luscious, velvety sauce. Are you drooling yet?
Coq au Vin, meaning “rooster in wine,” has a history as rich and complex as its flavor profile. While its exact origins are debated, it’s often associated with the Burgundy region of France, where winemaking is a way of life. Legend has it that the dish was created to showcase the region’s exceptional wines, transforming tougher cuts of rooster into a culinary masterpiece. Over time, it evolved into a symbol of French culinary heritage, enjoyed in homes and restaurants alike.
But what makes Easy Coq au Vin so universally loved? It’s the perfect combination of rustic charm and sophisticated flavor. The tender chicken practically melts in your mouth, while the savory sauce coats your palate with a symphony of tastes. Plus, it’s incredibly satisfying and comforting, making it the ideal dish for a chilly evening. And let’s be honest, who can resist the allure of bacon and red wine? This recipe makes it easy to enjoy a taste of France without spending all day in the kitchen.

Ingredients:
- For the Cake:
- 2 cups granulated sugar
- 1 3/4 cups all-purpose flour
- 3/4 cup unsweetened cocoa powder
- 1 1/2 teaspoons baking powder
- 1 1/2 teaspoons baking soda
- 1 teaspoon salt
- 1 cup buttermilk
- 1/2 cup vegetable oil
- 2 large eggs
- 2 teaspoons vanilla extract
- 1 cup boiling water
- 2 ounces (squares) unsweetened chocolate, melted and cooled
- For the Chocolate Buttercream Frosting:
- 1 cup (2 sticks) unsalted butter, softened
- 3 cups powdered sugar
- 3/4 cup unsweetened cocoa powder
- 1/2 cup milk
- 1 teaspoon vanilla extract
- Pinch of salt
Preparing the Cake Batter:
- Preheat and Prep: First things first, let’s get our oven ready! Preheat it to 350°F (175°C). Grease and flour two 9-inch round cake pans. I like to use baking spray with flour already in it it’s a lifesaver! You can also line the bottoms with parchment paper circles for extra insurance against sticking.
- Dry Ingredients Unite: In a large bowl, whisk together the sugar, flour, cocoa powder, baking powder, baking soda, and salt. Make sure everything is evenly distributed. This step is crucial for a consistent rise and flavor.
- Wet Ingredients Join the Party: In a separate bowl, combine the buttermilk, oil, eggs, and vanilla extract. Whisk until well blended. Don’t worry if it looks a little thin; that’s perfectly normal.
- The Grand Mixing: Gradually add the wet ingredients to the dry ingredients, mixing on low speed until just combined. Be careful not to overmix at this stage. Overmixing can lead to a tough cake.
- Boiling Water Magic: In a small bowl, combine the boiling water and the melted and cooled unsweetened chocolate. Stir until smooth. This hot water helps to “bloom” the cocoa powder, intensifying the chocolate flavor and creating a moist cake.
- Final Incorporation: Slowly pour the chocolate mixture into the batter, mixing on low speed until just combined. The batter will be quite thin, but don’t panic! That’s exactly what we want for a super moist Devil’s Food Cake.
- Divide and Conquer: Divide the batter evenly between the prepared cake pans. I find using a kitchen scale helps ensure even layers.
Baking the Cakes:
- Into the Oven: Bake for 30-35 minutes, or until a wooden skewer inserted into the center comes out clean or with just a few moist crumbs. Keep a close eye on them, as baking times can vary depending on your oven.
- Cooling Time: Let the cakes cool in the pans for 10 minutes before inverting them onto a wire rack to cool completely. This prevents them from sticking and allows them to cool evenly. Make sure they are completely cool before frosting! Warm cake + frosting = a melty mess.
Making the Chocolate Buttercream Frosting:
- Butter Up: In a large bowl (or the bowl of your stand mixer), beat the softened butter on medium speed until light and fluffy. This usually takes about 3-5 minutes. Don’t skimp on this step; it’s essential for a smooth and creamy frosting.
- Sugar Rush: Gradually add the powdered sugar, one cup at a time, beating on low speed until combined. Be sure to scrape down the sides of the bowl occasionally to ensure everything is evenly incorporated.
- Cocoa Power: Add the cocoa powder and mix on low speed until combined. Again, scrape down the sides of the bowl as needed.
- Liquid Assets: Gradually add the milk, one tablespoon at a time, beating on medium speed until the frosting reaches your desired consistency. You might need a little more or less milk depending on the humidity and the consistency of your butter.
- Vanilla Kiss: Stir in the vanilla extract and salt. Beat on medium speed for another minute or two until the frosting is light and fluffy.
Assembling the Devil’s Food Cake:
- Level Up: If your cake layers are uneven, use a long serrated knife to carefully trim the tops to create a flat surface. This will make stacking and frosting much easier.
- First Layer: Place one cake layer on a serving plate or cake stand.
- Frosting Time: Spread a generous layer of chocolate buttercream frosting evenly over the first cake layer.
- Second Layer: Carefully place the second cake layer on top of the frosting.
- Crumb Coat: Apply a thin layer of frosting over the entire cake. This is called a crumb coat, and it helps to seal in any loose crumbs and create a smooth surface for the final layer of frosting. Refrigerate the cake for 15-20 minutes to allow the crumb coat to set.
- Final Frosting: Apply the remaining frosting to the cake, swirling it decoratively or smoothing it out with a spatula. Get creative!
- Chill Out: Refrigerate the frosted cake for at least 30 minutes before serving. This allows the frosting to set and makes it easier to slice.
Tips for the Perfect Devil’s Food Cake:
- Room Temperature is Key: Make sure your butter and eggs are at room temperature for optimal mixing and a smoother batter.
- Don’t Overbake: Overbaking will result in a dry cake. Use a toothpick or cake tester to check for doneness.
- Cool Completely: Ensure the cakes are completely cool before frosting to prevent the frosting from melting.
- Adjust Sweetness: If you prefer a less sweet frosting, reduce the amount of powdered sugar.
- Get Creative with Decorations: Decorate your cake with chocolate shavings, sprinkles, fresh berries, or anything else your heart desires!
Variations:
- Mocha Devil’s Food Cake: Add 1-2 tablespoons of instant espresso powder to the boiling water for a mocha flavor.
- Peanut Butter Frosting: Substitute some of the butter in the frosting with peanut butter for a peanut butter chocolate combination.
- Raspberry Filling: Add a layer of raspberry jam or fresh raspberries between the cake layers for a fruity twist.
Storage:
- Store leftover cake in an airtight container in the refrigerator for up to 3 days.
- You can also freeze the cake layers (unfrosted) for up to 2 months. Wrap them tightly in plastic wrap and then in foil. Thaw completely before frosting.
Conclusion:
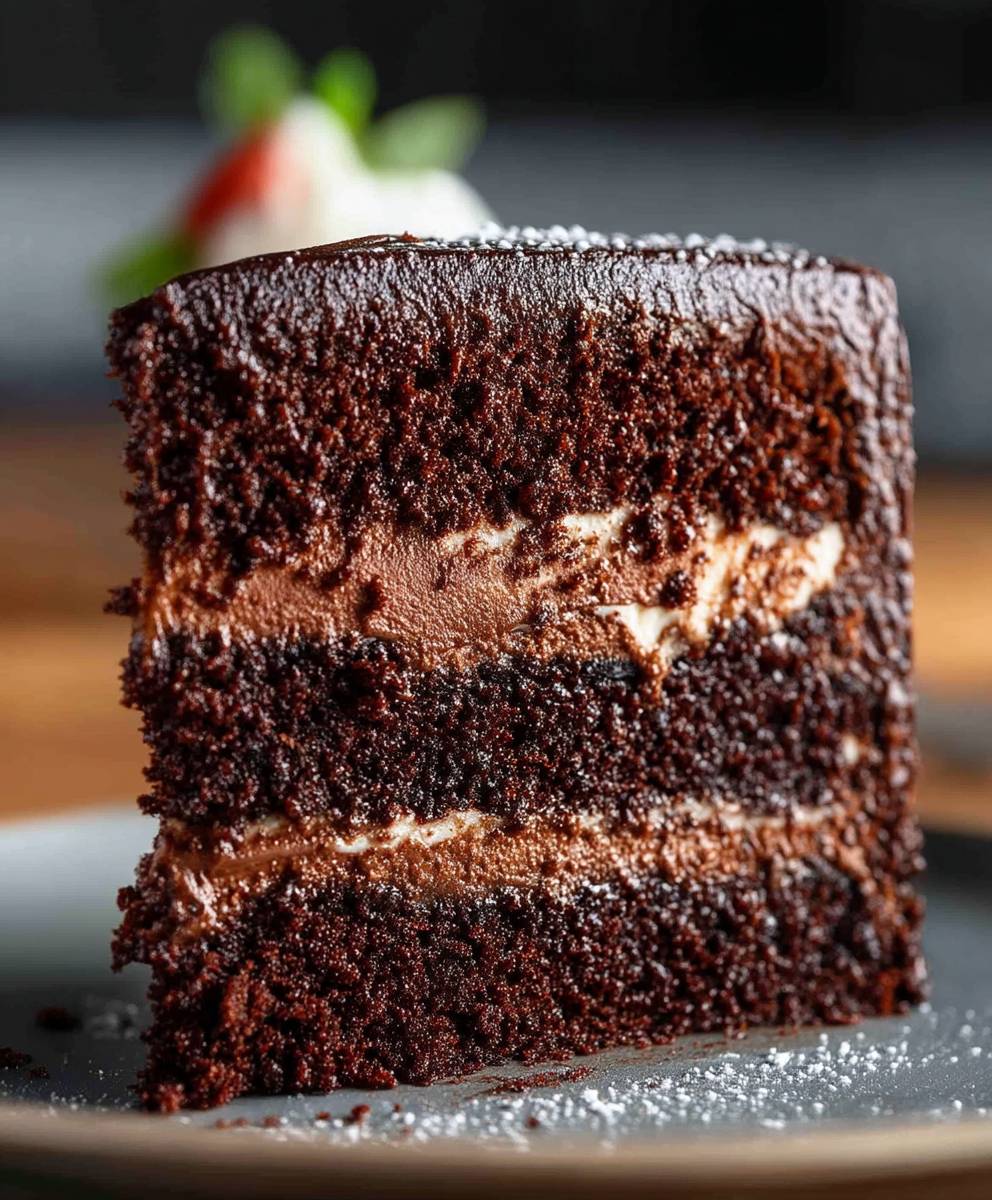
So, there you have it! This Devil’s Food Cake recipe isn’t just another cake; it’s a decadent, deeply chocolatey experience that’s surprisingly easy to create. From the rich, moist crumb to the intensely flavored frosting, every bite is a little slice of heaven. I truly believe this will become your go-to recipe for birthdays, holidays, or simply when you need a chocolate fix that’s a cut above the rest.
What makes this cake a must-try? It’s the perfect balance of flavors and textures. The buttermilk and coffee enhance the chocolate, creating a depth of flavor you won’t find in ordinary chocolate cakes. The cake itself is incredibly moist, thanks to the oil and buttermilk, and the frosting is smooth, creamy, and intensely chocolatey without being overly sweet. It’s a crowd-pleaser, guaranteed to impress even the most discerning dessert connoisseurs.
But the best part? It’s incredibly versatile! While the recipe as written is divine, feel free to experiment and make it your own.
Serving Suggestions and Variations:
* Classic Presentation: Serve slices of the cake with a scoop of vanilla ice cream or a dollop of whipped cream. A sprinkle of cocoa powder or chocolate shavings adds a touch of elegance.
* Berry Bliss: Fresh raspberries or strawberries pair beautifully with the rich chocolate flavor. Arrange them artfully on top of the cake or serve them alongside each slice.
* Coffee Kick: For an extra coffee boost, add a tablespoon of instant espresso powder to the frosting. This will intensify the chocolate flavor and add a subtle coffee aroma.
* Mint Chocolate Magic: Add a few drops of peppermint extract to the frosting for a refreshing twist. Garnish with crushed peppermint candies for a festive touch.
* Salted Caramel Delight: Drizzle salted caramel sauce over each slice for a sweet and salty indulgence.
* Mini Cakes or Cupcakes: This recipe can easily be adapted to make mini cakes or cupcakes. Adjust the baking time accordingly.
* Layer it Up: Create a trifle by layering the cake with chocolate mousse, whipped cream, and berries.
* Frosting Fun: While the chocolate frosting is a classic, don’t be afraid to experiment with other frostings. Cream cheese frosting, peanut butter frosting, or even a simple glaze would all be delicious.
I’m so excited for you to try this recipe! I know you’ll love it as much as I do. It’s a labor of love, but the results are well worth the effort. The aroma that fills your kitchen as it bakes, the anticipation as you frost it, and the pure joy of that first bite it’s all part of the experience.
So, go ahead, preheat your oven, gather your ingredients, and get ready to bake the best Devil’s Food Cake you’ve ever tasted. And when you do, please, please, please share your experience! I’d love to hear how it turned out, what variations you tried, and what your family and friends thought. Tag me in your photos on social media, leave a comment below, or send me an email. I can’t wait to see your creations! Happy baking!
Devils Food Cake: The Ultimate Guide to Baking Perfection
Rich, moist chocolate cake with a deep, reddish hue. Perfect for celebrations or a decadent treat.
Ingredients
- 2 cups all-purpose flour
- ¾ cup unsweetened cocoa powder
- 1 ½ teaspoons baking powder
- 1 ½ teaspoons baking soda
- 1 teaspoon salt
- 1 ¾ cups granulated sugar
- ¾ cup unsalted butter, softened
- 2 large eggs
- 1 teaspoon vanilla extract
- 1 cup buttermilk
- ¾ cup hot coffee
Instructions
- Preheat oven to 350 degrees F (175 degrees C). Grease and flour two 9 inch round pans.
- In a large bowl, cream together the butter, sugar, and brown sugar until light and fluffy. Beat in the eggs one at a time, then stir in the vanilla.
- Combine the flour, cocoa, baking soda, baking powder, and salt; add to the creamed mixture alternately with the buttermilk, beginning and ending with flour mixture. Beat in the boiling water.
- Pour batter into prepared pans.
- Bake for 30 to 35 minutes, or until a toothpick inserted into the center comes out clean.
- Let cool in the pans for 10 minutes, then turn out onto a wire rack to cool completely.
- Frost with your favorite frosting.
Notes
- For best results, use Dutch-processed cocoa powder.
- Cake layers can be baked a day ahead, cooled, wrapped tightly, and stored at room temperature.
- Frosting can be made a day ahead, stored in an airtight container in the refrigerator, and rewhipped before using.
“`


Leave a Comment