
Pork Chops Apples Squash the very name conjures up images of cozy autumn evenings and the comforting aroma of a home-cooked meal, doesn’t it? Imagine biting into a perfectly seared pork chop, its savory juices mingling with the sweet, caramelized apples and the earthy sweetness of roasted squash. It’s a symphony of flavors that will tantalize your taste buds and leave you feeling utterly satisfied.
This delightful combination isn’t just a modern culinary creation; it’s a dish with roots that stretch back centuries. The pairing of pork and apples, in particular, has been a staple in European cuisine for ages, a testament to the way the sweetness of the fruit beautifully complements the richness of the pork. Adding squash to the mix brings a distinctly autumnal flair, celebrating the bounty of the harvest season.
But what is it about Pork Chops Apples Squash that makes it so universally loved? It’s the perfect balance of sweet and savory, the satisfying textures, and the sheer ease of preparation. This isn’t a fussy, complicated recipe; it’s a dish that you can whip up on a weeknight and still impress your family or guests. The tender pork, the soft apples, and the slightly caramelized squash create a harmonious blend that’s both comforting and sophisticated. So, are you ready to experience the magic of this classic combination? Let’s get cooking!

Ingredients:
- 12-14 pound beef brisket, point and flat
- 1/4 cup kosher salt
- 2 tablespoons coarse black pepper
- 1 tablespoon granulated garlic
- 1 tablespoon onion powder
- 1 teaspoon smoked paprika
- 1/2 teaspoon cayenne pepper (optional, for a little kick)
- 1 cup beef broth (for wrapping, optional)
- Wood chips or chunks for smoking (oak, hickory, or a blend)
- Mustard (optional, as a binder)
Preparing the Brisket:
Okay, let’s get started! Preparing the brisket is the most crucial step, so pay close attention. We want to trim it properly and season it generously.
- Trimming the Brisket: This is where you’ll spend some time. Lay the brisket fat-side up on a large cutting board. You’ll notice a thick layer of hard fat. We need to trim this down to about 1/4 inch thickness. This allows the smoke to penetrate the meat and renders properly during cooking. Use a sharp knife (a boning knife works great) and carefully slice away the excess fat. Don’t be afraid to remove a good amount; you want a nice, even layer.
- Shaping the Brisket: Look for any hard pieces of fat or silver skin (a thin, membrane-like layer) on the underside of the brisket. Remove these as well, as they won’t render and can make the brisket tough. You might also want to trim the edges to create a more uniform shape. This helps the brisket cook evenly.
- Applying the Binder (Optional): Some people like to use a binder to help the rub adhere to the brisket. Yellow mustard is a popular choice because it adds a subtle tang and doesn’t affect the final flavor much. If you’re using mustard, spread a thin layer all over the brisket. Don’t worry, you won’t taste it in the end!
- Mixing the Rub: In a small bowl, combine the kosher salt, black pepper, granulated garlic, onion powder, smoked paprika, and cayenne pepper (if using). Mix well to ensure all the spices are evenly distributed. This is your Texas-style brisket rub simple but effective!
- Applying the Rub: Now, generously apply the rub to all sides of the brisket. Don’t be shy! Press the rub into the meat to help it adhere. Make sure every inch of the brisket is covered. This is what’s going to create that beautiful bark and delicious flavor.
- Resting the Brisket: Once the brisket is seasoned, wrap it tightly in plastic wrap and place it in the refrigerator for at least 2 hours, or preferably overnight. This allows the rub to penetrate the meat and helps to tenderize it. The longer it sits, the better the flavor will be!
Smoking the Brisket:
Now for the fun part smoking! This is where patience is key. Low and slow is the name of the game.
- Preparing the Smoker: Get your smoker ready. I prefer using a wood-burning smoker, but a pellet smoker or charcoal smoker will work too. Aim for a consistent temperature of 225-250°F (107-121°C). Use a reliable thermometer to monitor the temperature.
- Adding Wood: Add your chosen wood chips or chunks to the smoker. Oak and hickory are classic choices for brisket, but you can experiment with other woods like pecan or mesquite. Follow your smoker’s instructions for adding wood.
- Placing the Brisket: Once the smoker is up to temperature and producing a clean smoke (thin, blue smoke is ideal), place the brisket directly on the smoker grate, fat-side up. This allows the fat to render and baste the meat as it cooks.
- Maintaining Temperature and Smoke: Maintain a consistent temperature of 225-250°F (107-121°C) throughout the cooking process. Add wood as needed to maintain a steady stream of smoke. Check the water pan (if your smoker has one) and refill it as necessary to keep the humidity up.
- Monitoring the Internal Temperature: Use a meat thermometer to monitor the internal temperature of the brisket. We’re aiming for an internal temperature of around 203°F (95°C), but the most important thing is the tenderness.
- The Stall: You’ll likely encounter “the stall” a period where the internal temperature of the brisket plateaus for several hours. Don’t panic! This is normal. It’s caused by evaporative cooling. Just be patient and maintain the smoker temperature.
Wrapping the Brisket (The Texas Crutch):
Wrapping the brisket, often called the “Texas crutch,” helps to push through the stall and retain moisture. This step is optional, but I highly recommend it for a more tender and juicy brisket.
- When to Wrap: Wrap the brisket when it reaches an internal temperature of around 160-170°F (71-77°C) or when the bark has formed to your liking. The bark should be a deep, dark mahogany color.
- Wrapping Options: You can wrap the brisket in butcher paper (pink butcher paper is preferred) or aluminum foil. Butcher paper allows the brisket to breathe a little more, resulting in a slightly firmer bark. Foil will cook the brisket faster and make it more tender, but the bark may be softer.
- Wrapping Procedure: Place the brisket on a large sheet of butcher paper or foil. If using beef broth, pour about 1/2 cup of beef broth over the brisket. Wrap the brisket tightly, creating a sealed package.
- Returning to the Smoker: Place the wrapped brisket back on the smoker, seam-side down. Continue cooking until the internal temperature reaches around 203°F (95°C).
Resting the Brisket:
Resting is just as important as cooking! This allows the juices to redistribute throughout the meat, resulting in a more tender and flavorful brisket. Don’t skip this step!
- Checking for Tenderness: Use a probe thermometer or a toothpick to check for tenderness. The probe should slide into the brisket with little to no resistance. If it feels tough, continue cooking for another 30 minutes and check again.
- Removing from the Smoker: Once the brisket is tender, remove it from the smoker.
- Resting Options: There are a couple of ways to rest the brisket. The best way is to wrap it in a towel and place it in a cooler for 2-4 hours. This allows the brisket to rest slowly and evenly. Alternatively, you can rest it at room temperature for at least 1 hour.
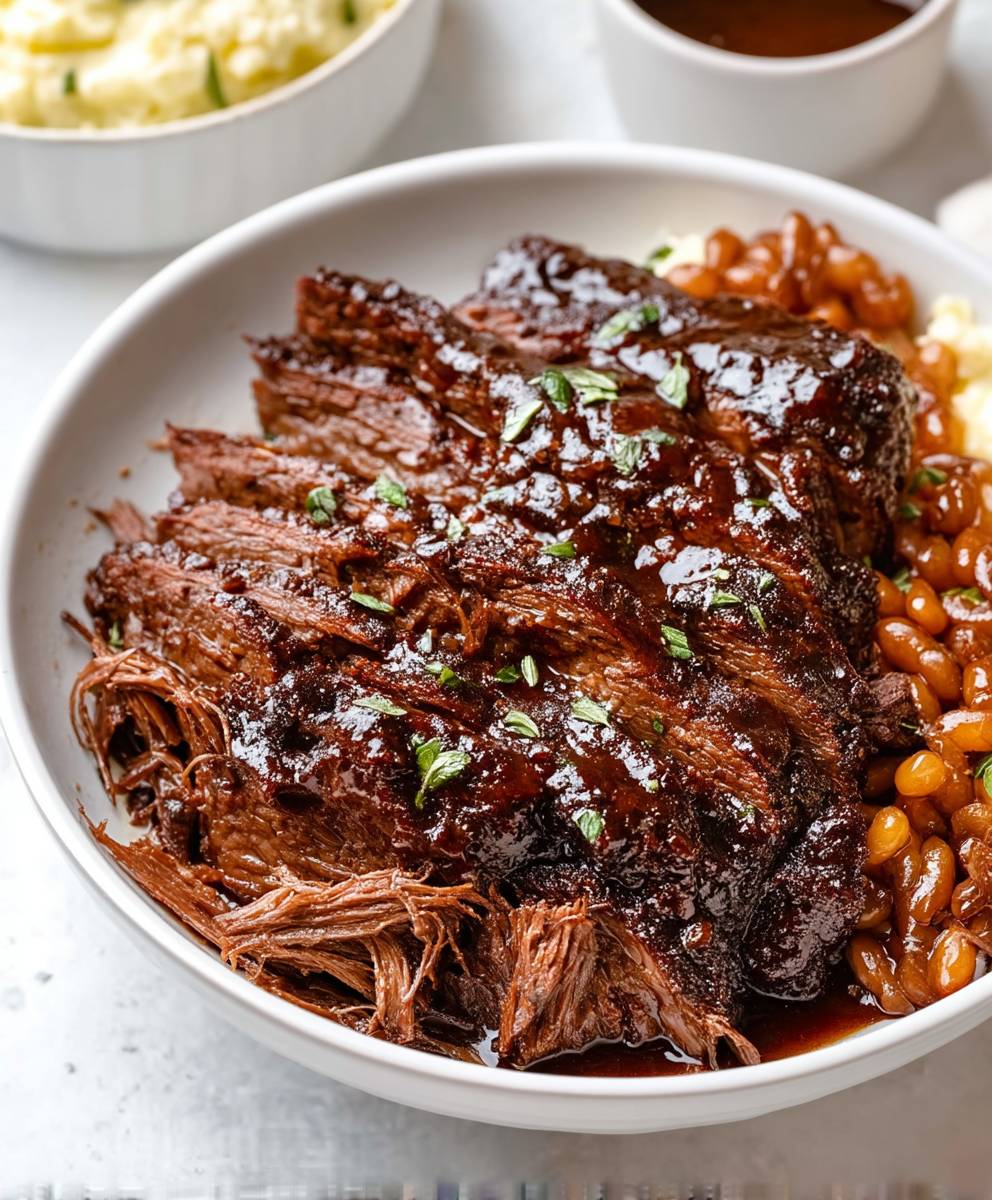
Slicing and Serving:
Finally, the moment we’ve all been waiting for slicing and serving! This is where you get to show off your hard work.
- Unwrapping the Brisket: Carefully unwrap the brisket, reserving any juices that have accumulated in the wrapping.
- Identifying the Grain: The most important thing when slicing brisket is to slice against the grain. Look closely at the brisket to identify the direction of the muscle fibers. The grain usually runs in different directions in the point and the flat.
- Separating the Point and Flat (Optional): If you want, you can separate the point (the thicker, fattier end) from the flat (the leaner end). This makes it easier to slice against the grain.
- Slicing the Brisket: Using a sharp slicing knife, slice the brisket against the grain into 1/4-inch thick slices. Thicker slices can be tough, while thinner slices can fall apart.
- Serving: Arrange the sliced brisket on a platter. Drizzle with the reserved juices from the wrapping. Serve immediately and enjoy!
Serving Suggestions:
- Serve with your favorite barbecue sides, such as coleslaw, potato salad, baked beans, and mac and cheese.
- Make brisket sandwiches on toasted buns with your favorite barbecue sauce.
- Use leftover brisket to make tacos, nachos, or chili.
Enjoy your perfectly smoked Texas Beef Brisket!
Conclusion:
So, there you have it! This Texas Beef Brisket recipe isn’t just another recipe; it’s a journey into the heart of authentic barbecue. From the careful selection of the brisket to the low and slow cooking process, every step is designed to deliver an unforgettable culinary experience. Trust me, the hours you invest will be richly rewarded with tender, smoky, and utterly delicious brisket that will have everyone begging for more.
Why is this a must-try? Because it’s more than just meat; it’s a celebration of flavor and tradition. The deep, smoky notes, the melt-in-your-mouth texture, and the satisfying bark it all comes together to create a symphony of taste that will transport you straight to a Texas barbecue joint. Plus, mastering this recipe will earn you serious bragging rights among your friends and family. You’ll be the go-to person for all things barbecue!
But the fun doesn’t stop there! This Texas Beef Brisket is incredibly versatile. Serve it up classic style with your favorite barbecue sides like creamy coleslaw, tangy potato salad, and sweet cornbread. Or, get creative and use it in sandwiches, tacos, or even brisket chili. Imagine tender, smoky brisket piled high on a toasted bun with a drizzle of barbecue sauce and a sprinkle of pickled onions pure heaven! For a lighter option, try slicing it thinly and adding it to a vibrant salad with a zesty vinaigrette.
And speaking of variations, feel free to experiment with different wood chips to customize the smoky flavor. Hickory is a classic choice, but mesquite, oak, or even fruit woods like apple or cherry can add unique nuances. You can also adjust the spice rub to your liking. Add a touch of cayenne pepper for a little heat, or incorporate some brown sugar for a hint of sweetness. The possibilities are endless!
Don’t be intimidated by the length of the cooking time. While it requires patience, the process itself is relatively hands-off. Just set it and forget it (almost!), and let the smoker work its magic. The key is to maintain a consistent temperature and resist the urge to peek too often. Trust the process, and you’ll be amazed at the results.
I truly believe that anyone can make amazing brisket with this recipe. It’s all about following the steps, using quality ingredients, and having a little bit of barbecue love. So, gather your ingredients, fire up your smoker, and get ready to embark on a culinary adventure. I’m confident that you’ll create a brisket that will impress even the most discerning barbecue aficionados.
Now, it’s your turn! I’m so excited for you to try this recipe and experience the joy of homemade Texas Beef Brisket. Once you’ve given it a go, I’d love to hear about your experience. Share your photos, tips, and variations in the comments below. Let’s build a community of brisket lovers and inspire each other to create even more delicious barbecue masterpieces. Happy smoking!
I can’t wait to see what you create! Remember, the best brisket is the one you make yourself. So, get out there and start smoking!
Texas Beef Brisket: The Ultimate Guide to Smoking Perfection
Tender, smoky, and flavorful Texas-style beef brisket, slow-cooked to perfection.
Ingredients
- 1 (12-14 pound) beef brisket, with a 1/4-inch fat cap
- 1/4 cup yellow mustard
- 1/2 cup Texas-style brisket rub (see below)
- 1/4 cup coarse black pepper
- 1/4 cup kosher salt
- 2 tablespoons granulated garlic
- 2 tablespoons smoked paprika
- 1 tablespoon chili powder
- 1 teaspoon cayenne pepper
Instructions
- Trim the brisket, leaving about 1/4 inch of fat.
- Mix the salt, pepper, garlic powder, onion powder, paprika, and cayenne pepper in a bowl.
- Rub the spice mixture all over the brisket.
- Wrap the brisket tightly in plastic wrap and refrigerate for at least 6 hours, or preferably overnight.
- Preheat your smoker to 225°F (107°C).
- Remove the brisket from the refrigerator 1 hour before smoking.
- Place the brisket in the smoker, fat-side up.
- Smoke for 12-14 hours, or until the internal temperature reaches 203°F (95°C).
- Wrap the brisket in butcher paper when the internal temperature reaches 170°F (77°C).
- Let the brisket rest for at least 1 hour before slicing.
- Slice against the grain and serve.
“`
Notes
- Use a very sharp knife to trim the brisket.
- Don’t trim all the fat off the brisket; leave about 1/4 inch of fat on the brisket.
- Use a simple rub of salt, pepper, and garlic powder.
- Smoke the brisket at 225 degrees F for 12-14 hours, or until it reaches an internal temperature of 203 degrees F.
- Wrap the brisket in butcher paper after about 6 hours of smoking.
- Let the brisket rest for at least 2 hours before slicing.
- Slice the brisket against the grain.
“`


Leave a Comment