
Lemon Garlic Chicken Wings: Prepare to be amazed! Imagine sinking your teeth into crispy, golden-brown chicken wings, bursting with the bright, zesty flavor of lemon and the savory punch of garlic. These aren’t your average wings; they’re a flavor explosion that will leave you craving more.
Chicken wings, a staple of American cuisine, have humble beginnings. Often considered a throwaway part of the chicken, they were transformed into a culinary sensation in 1964 at the Anchor Bar in Buffalo, New York. Teressa Bellissimo, the bar’s owner, created the now-iconic Buffalo wing, and the rest, as they say, is history. While Buffalo wings reign supreme, there’s always room for innovation, and that’s where our Lemon Garlic Chicken Wings truly shine.
What makes these wings so irresistible? It’s the perfect balance of tangy and savory. The lemon juice tenderizes the chicken, infusing it with a bright citrus note, while the garlic adds a depth of flavor that’s both comforting and addictive. People love this dish because it’s incredibly easy to make, perfect for game day, parties, or even a quick weeknight dinner. Plus, who can resist the satisfying crunch of perfectly cooked chicken skin? Get ready to elevate your wing game with this simple yet sensational recipe!

Ingredients:
- For the Chicken Marinade:
- 1.5 lbs boneless, skinless chicken thighs, cut into 1-inch cubes
- 1 tablespoon soy sauce
- 1 tablespoon Shaoxing rice wine (or dry sherry)
- 1 tablespoon cornstarch
- 1 teaspoon sugar
- 1/2 teaspoon salt
- 1/4 teaspoon white pepper
- 1 tablespoon vegetable oil
- For the Kung Pao Sauce:
- 2 tablespoons soy sauce
- 2 tablespoons Chinkiang vinegar (or balsamic vinegar)
- 1 tablespoon Shaoxing rice wine (or dry sherry)
- 1 tablespoon sugar
- 1 tablespoon cornstarch
- 1 teaspoon sesame oil
- 1/2 teaspoon ground Sichuan peppercorns (or black pepper, lightly crushed)
- 1/4 cup chicken broth (or water)
- Other Ingredients:
- 2 tablespoons vegetable oil, divided
- 1/2 cup dried red chilies, cut into 1-inch pieces (remove seeds for less heat)
- 1 cup roasted peanuts, unsalted
- 4 cloves garlic, minced
- 1 inch ginger, minced
- 2 green onions, white and green parts, chopped
- 1/2 cup diced bell pepper (any color, or a mix)
- 1/4 cup water chestnuts, sliced (optional)
Marinating the Chicken:
- In a medium bowl, combine the cubed chicken thighs with soy sauce, Shaoxing rice wine (or dry sherry), cornstarch, sugar, salt, and white pepper.
- Mix well with your hands, ensuring that each piece of chicken is coated evenly.
- Add the vegetable oil to the chicken mixture. This helps to seal in the moisture and prevent the chicken from sticking together during cooking.
- Mix again and let the chicken marinate for at least 20 minutes, or up to 1 hour in the refrigerator. The longer it marinates, the more flavorful and tender it will become. I usually aim for at least 30 minutes if I have the time.
Preparing the Kung Pao Sauce:
- In a small bowl, whisk together the soy sauce, Chinkiang vinegar (or balsamic vinegar), Shaoxing rice wine (or dry sherry), sugar, cornstarch, sesame oil, ground Sichuan peppercorns (or black pepper), and chicken broth (or water).
- Stir well until the cornstarch is completely dissolved and the sauce is smooth. This is important to prevent lumps from forming during cooking.
- Taste the sauce and adjust the seasonings as needed. You can add more sugar for sweetness, vinegar for tanginess, or soy sauce for saltiness. Remember that the sauce will intensify in flavor as it cooks, so don’t overdo it.
- Set the sauce aside for later use.
Cooking the Kung Pao Chicken:
- Heat a wok or large skillet over high heat. Make sure the wok is screaming hot before adding the oil. This is crucial for achieving that signature wok hei flavor.
- Add 1 tablespoon of vegetable oil to the hot wok. Swirl the oil around to coat the surface.
- Add the marinated chicken to the wok in a single layer. Avoid overcrowding the wok, as this will lower the temperature and prevent the chicken from browning properly. If necessary, cook the chicken in batches.
- Stir-fry the chicken for 3-4 minutes, or until it is lightly browned on all sides and almost cooked through. Don’t worry about cooking it completely at this stage, as it will continue to cook in the sauce later.
- Remove the chicken from the wok and set it aside.
- Add the remaining 1 tablespoon of vegetable oil to the wok.
- Add the dried red chilies to the wok and stir-fry for about 30 seconds, or until they are fragrant and slightly darkened. Be careful not to burn them, as this will make them bitter.
- Add the minced garlic and ginger to the wok and stir-fry for another 15-20 seconds, or until they are fragrant.
- Add the diced bell pepper and water chestnuts (if using) to the wok and stir-fry for 1-2 minutes, or until they are slightly softened.
- Pour the Kung Pao sauce into the wok and bring it to a simmer.
- Cook the sauce for 1-2 minutes, or until it has thickened slightly. Stir constantly to prevent it from sticking to the bottom of the wok.
- Return the cooked chicken to the wok and stir to coat it evenly with the sauce.
- Add the roasted peanuts and chopped green onions to the wok and stir to combine.
- Cook for another 1-2 minutes, or until the chicken is cooked through and the sauce has thickened to your desired consistency.
- Taste the Kung Pao chicken and adjust the seasonings as needed. You can add more soy sauce for saltiness, vinegar for tanginess, or sugar for sweetness.
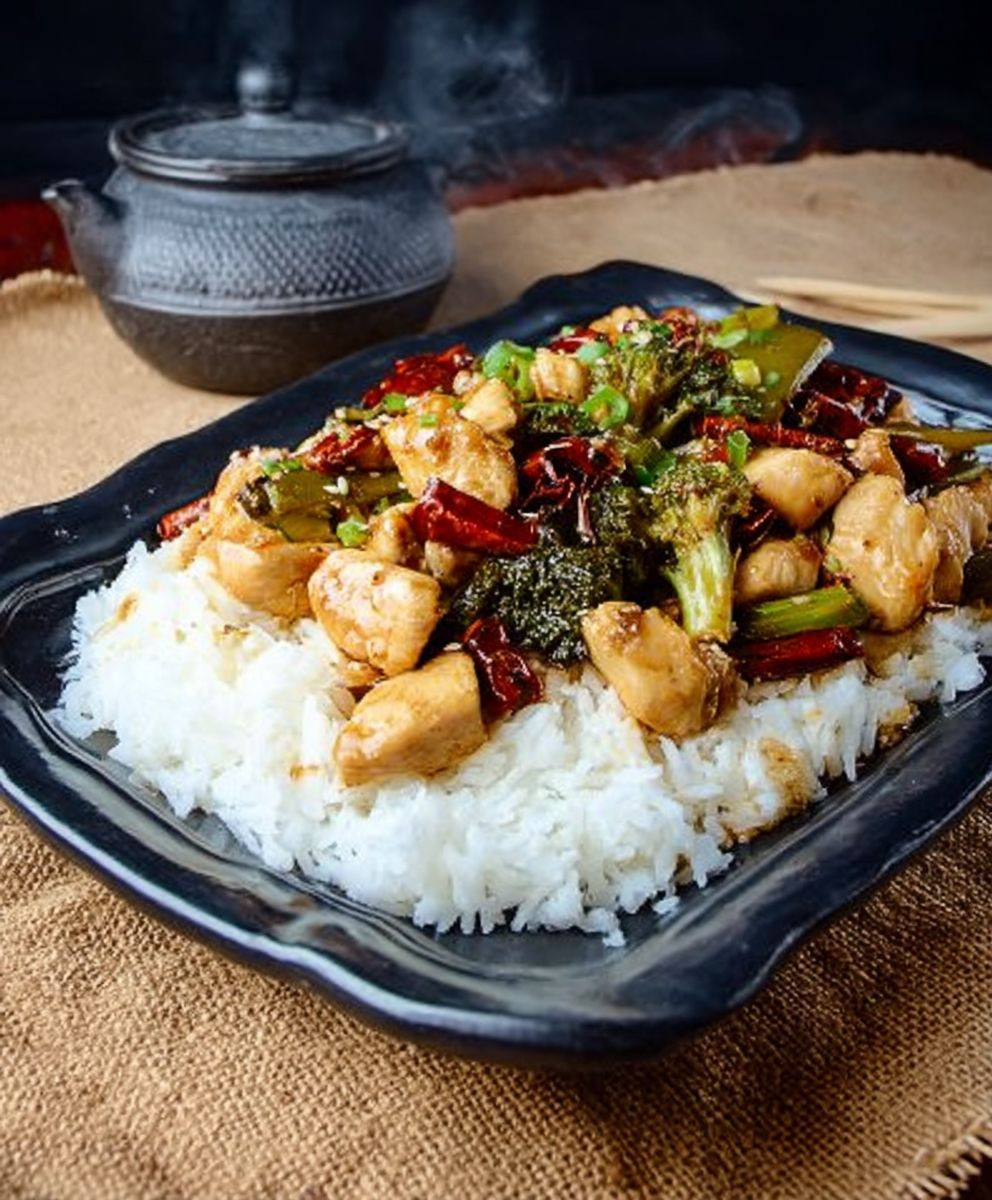
Serving the Kung Pao Chicken:
- Remove the Kung Pao chicken from the wok and transfer it to a serving dish.
- Garnish with extra chopped green onions and roasted peanuts, if desired.
- Serve immediately with steamed rice. Kung Pao chicken is best enjoyed hot and fresh.
Tips for the Best Kung Pao Chicken:
- Use high heat: The key to authentic Kung Pao chicken is cooking it over high heat in a wok. This helps to create that signature wok hei flavor and ensures that the chicken and vegetables are cooked quickly and evenly.
- Don’t overcrowd the wok: When stir-frying the chicken, avoid overcrowding the wok. This will lower the temperature and prevent the chicken from browning properly. If necessary, cook the chicken in batches.
- Adjust the spice level: The amount of dried red chilies you use will determine the spice level of the Kung Pao chicken. If you prefer a milder dish, remove the seeds from the chilies or use fewer chilies.
- Use fresh ingredients: Fresh ingredients will always result in a better-tasting dish. Use fresh garlic, ginger, and green onions for the best flavor.
- Marinate the chicken: Marinating the chicken helps to tenderize it and infuse it with flavor. Don’t skip this step!
- Don’t overcook the chicken: Overcooked chicken will be dry and tough. Cook the chicken until it is just cooked through and still slightly tender.
- Adjust the sauce to your liking: The Kung Pao sauce can be adjusted to your liking. Add more sugar for sweetness, vinegar for tanginess, or soy sauce for saltiness.
- Serve immediately: Kung Pao chicken is best enjoyed hot and fresh. Serve it immediately after cooking for the best flavor and texture.
Variations:
- Vegetarian Kung Pao: Substitute the chicken with tofu, tempeh, or vegetables such as mushrooms, broccoli, or cauliflower.
- Kung Pao Shrimp: Substitute the chicken with shrimp. Reduce the cooking time accordingly.
- Kung Pao Beef: Substitute the chicken with beef. Slice the beef thinly against the grain for best results.
- Kung Pao Cashews: Substitute the peanuts with cashews.
- Kung Pao Noodles: Serve the Kung Pao chicken over noodles instead of rice.
Storing Leftovers:
Leftover Kung Pao chicken can be stored in an airtight container in the refrigerator for up to 3 days. Reheat in a wok or skillet over medium heat until heated through. You may need to add a little water or chicken broth to the wok to prevent the chicken from drying out.
Enjoy!
I hope you enjoy this recipe for Kung Pao chicken! It’s a delicious and easy dish to make at home, and it’s sure to impress your family and friends. Don’t be afraid to experiment with the ingredients and adjust the recipe to your liking. Happy cooking!
Conclusion:
Okay, friends, let’s be honest: you’ve scrolled through countless recipes, haven’t you? But trust me on this one. This Kung Pao Chicken recipe isn’t just another weeknight dinner; it’s a flavor explosion waiting to happen. The perfect balance of sweet, savory, spicy, and nutty will have you reaching for seconds (and maybe thirds!). It’s quick enough for a busy weeknight, yet impressive enough to serve to guests. What more could you ask for?
What makes this recipe a must-try? It’s all about the layers of flavor. The tender chicken, marinated to perfection, gets a beautiful sear in the wok (or your favorite skillet). Then comes the magic: the vibrant sauce, bursting with the tang of vinegar, the sweetness of sugar, the umami of soy sauce, and that signature Sichuan peppercorn tingle. And let’s not forget the crunchy peanuts and the fiery kick of dried chilies. It’s a symphony of textures and tastes that will tantalize your taste buds.
But the best part? It’s incredibly versatile! Serve it over fluffy white rice for a classic presentation. Or, for a healthier option, try it with quinoa or brown rice. Feeling adventurous? Toss it with some stir-fried noodles for a complete meal. And don’t be afraid to experiment with the vegetables. Bell peppers, zucchini, and water chestnuts all work beautifully in this dish. If you’re not a fan of peanuts, cashews or almonds make a great substitute. For those who prefer a milder flavor, simply reduce the amount of dried chilies or omit them altogether. You can even add a touch of honey for extra sweetness, or a splash of sesame oil for a richer, nuttier flavor. The possibilities are endless!
Serving Suggestions and Variations:
- Serve over steamed jasmine rice, brown rice, or quinoa.
- Toss with stir-fried noodles (lo mein or chow mein work well).
- Add extra vegetables like bell peppers, zucchini, or water chestnuts.
- Substitute cashews or almonds for peanuts.
- Adjust the amount of dried chilies to control the spice level.
- Garnish with extra chopped peanuts and green onions.
- For a vegetarian option, substitute the chicken with tofu or tempeh.
I’ve poured my heart and soul into perfecting this Kung Pao Chicken recipe, and I’m confident that you’ll love it as much as I do. It’s a guaranteed crowd-pleaser, and it’s sure to become a staple in your recipe repertoire. So, what are you waiting for? Gather your ingredients, put on your apron, and get cooking! I promise, you won’t regret it.
And now, for the most important part: I want to hear from you! Once you’ve tried this recipe, please come back and share your experience in the comments below. Did you make any modifications? What did you think of the flavor? What did your family and friends say? Your feedback is invaluable, and it helps me to continue creating delicious and easy-to-follow recipes that you’ll love. So, don’t be shy let me know what you think! Happy cooking!
I can’t wait to hear about your Kung Pao Chicken adventures! Enjoy!
Kung Pao Chicken: The Ultimate Recipe and Guide
Stir-fried chicken with peanuts, vegetables, and a spicy, savory sauce.
Ingredients
- 1 pound boneless, skinless chicken thighs, cut into 1-inch cubes
- 2 tablespoons soy sauce
- 1 tablespoon rice wine or dry sherry
- 1 tablespoon cornstarch
- 1 teaspoon sugar
- 1/2 teaspoon ground white pepper
- 2 tablespoons vegetable oil
- 1/2 cup peanuts, roasted and salted
- 4-10 dried red chilies, depending on spice preference
- 1 teaspoon Sichuan peppercorns
- 4 cloves garlic, minced
- 1-inch piece of ginger, minced
- 2 scallions, white and green parts, chopped
- 2 tablespoons soy sauce
- 2 tablespoons Chinkiang vinegar or balsamic vinegar
- 1 tablespoon sugar
- 1 tablespoon sesame oil
- 1 teaspoon cornstarch
- 1/4 cup water
Instructions
- In einer großen Schüssel Mehl, Salz und Hefe vermengen.
- Wasser hinzufügen und zu einem Teig verrühren.
- Knoblauch und Olivenöl unterrühren.
- Teig 12 Stunden
“`
Notes
- Adjust the amount of chili peppers to your preference.
- Serve immediately for the best texture.
- Garnish with extra peanuts and green onions for added flavor.
Leave a Comment