
Strawberry dessert dreams do come true! Imagine sinking your teeth into a sweet, vibrant treat bursting with the fresh, juicy flavor of sun-ripened strawberries. Is your mouth watering yet? Because mine certainly is! Today, we’re diving headfirst into the wonderful world of strawberry desserts, exploring a recipe that’s not only incredibly delicious but also surprisingly simple to make.
Strawberries have been cherished for centuries, with evidence of their consumption dating back to ancient Rome. While the modern garden strawberry we know and love is a relatively recent hybrid, its wild ancestors have always held a special place in culinary history. They represent the arrival of spring, the promise of warmer days, and the simple pleasures of nature’s bounty. From elegant Victorian tea parties to casual summer picnics, strawberries have consistently graced tables around the globe, bringing joy and sweetness to every occasion.
But what is it about strawberry dessert that makes it so universally appealing? Perhaps it’s the perfect balance of sweet and tart, the delightful pop of color, or the incredibly versatile nature of the fruit itself. Whether you prefer a creamy strawberry shortcake, a refreshing strawberry sorbet, or a decadent strawberry cheesecake, there’s a strawberry dessert out there for everyone. And let’s be honest, who can resist the allure of a dessert that’s both delicious and visually stunning? So, let’s get started and create a strawberry masterpiece that will impress your friends and family!

Ingredients:
- For the Biscoff Crust:
- 250g Biscoff cookies
- 100g unsalted butter, melted
- 1/4 teaspoon ground cinnamon (optional, for extra warmth)
- For the Pumpkin Cheesecake Filling:
- 900g cream cheese, softened to room temperature
- 200g granulated sugar
- 100g packed light brown sugar
- 2 large eggs
- 2 large egg yolks
- 240ml (1 cup) pumpkin puree (not pumpkin pie filling!)
- 60ml (1/4 cup) heavy cream
- 2 tablespoons cornstarch
- 2 teaspoons pumpkin pie spice
- 1 teaspoon vanilla extract
- 1/4 teaspoon salt
- For the Biscoff Swirl (Optional, but highly recommended!):
- 150g Biscoff spread, melted
- For the Biscoff Topping (Optional, but adds a beautiful finish!):
- 100g Biscoff cookies, crushed
- Biscoff cookies, whole, for decoration
Preparing the Biscoff Crust
Okay, let’s get started with the foundation of our masterpiece the Biscoff crust! This is super easy and adds so much flavor.
- Crush the Biscoff Cookies: The first thing you’ll want to do is crush those delicious Biscoff cookies. You can do this in a food processor until they’re finely ground. If you don’t have a food processor, no worries! Just place the cookies in a large zip-top bag, seal it tightly, and use a rolling pin to crush them into fine crumbs. Make sure there are no large chunks left.
- Melt the Butter: Next, melt the unsalted butter in a microwave-safe bowl or in a saucepan over low heat. You want it completely melted but not browned.
- Combine the Crumbs and Butter: In a medium bowl, combine the crushed Biscoff cookies and the melted butter. If you’re using the cinnamon, add it now. Mix everything together until the crumbs are evenly moistened and resemble wet sand. This is important for the crust to hold together properly.
- Press into the Pan: Press the mixture firmly into the bottom of a 9-inch springform pan. I like to use the bottom of a measuring cup or a flat-bottomed glass to really pack it down evenly. Make sure the crust is compact and reaches all the way to the edges of the pan. This will prevent it from crumbling when you slice the cheesecake later.
- Pre-bake the Crust (Optional, but Recommended): For a sturdier crust, pre-bake it in a preheated oven at 175°C (350°F) for about 8-10 minutes. This helps to set the crust and prevent it from becoming soggy. Let the crust cool completely before adding the filling. If you skip this step, just make sure to chill the crust in the fridge for at least 30 minutes before adding the filling.
Making the Pumpkin Cheesecake Filling
Now for the star of the show the creamy, dreamy pumpkin cheesecake filling! This part requires a little more attention to detail, but trust me, it’s worth it.
- Soften the Cream Cheese: This is crucial! Make sure your cream cheese is completely softened to room temperature. This will prevent lumps in your cheesecake. If you’re short on time, you can carefully microwave it in 15-second intervals, but be very careful not to melt it.
- Beat the Cream Cheese and Sugars: In a large bowl (or the bowl of your stand mixer), beat the softened cream cheese with the granulated sugar and brown sugar until smooth and creamy. Be careful not to overbeat, as this can incorporate too much air into the batter, which can cause cracks in the cheesecake.
- Add the Eggs and Egg Yolks: Add the eggs one at a time, beating well after each addition. Then, add the egg yolks and beat until just combined. The egg yolks add richness and help to create a smooth, decadent texture.
- Incorporate the Pumpkin Puree and Heavy Cream: Add the pumpkin puree and heavy cream to the bowl and mix until well combined. Make sure you’re using pumpkin puree, not pumpkin pie filling, which already has spices and sugar added.
- Add the Dry Ingredients: In a separate small bowl, whisk together the cornstarch, pumpkin pie spice, and salt. This ensures that the spices are evenly distributed throughout the batter. Add the dry ingredients to the wet ingredients and mix until just combined. The cornstarch helps to stabilize the cheesecake and prevent it from cracking.
- Add the Vanilla Extract: Stir in the vanilla extract.
Creating the Biscoff Swirl (Optional)
This is where we add that extra touch of Biscoff magic! The swirl not only looks beautiful but also adds a concentrated burst of Biscoff flavor.
- Melt the Biscoff Spread: Melt the Biscoff spread in a microwave-safe bowl or in a saucepan over low heat until it’s smooth and pourable. Be careful not to overheat it.
- Pour the Cheesecake Filling: Pour about half of the cheesecake filling into the prepared crust.
- Drizzle the Biscoff Spread: Drizzle half of the melted Biscoff spread over the filling in a swirling pattern. You can use a spoon or a piping bag for this.
- Add the Remaining Filling: Pour the remaining cheesecake filling over the Biscoff swirl.
- Drizzle the Remaining Biscoff Spread: Drizzle the remaining melted Biscoff spread over the top of the cheesecake filling in a swirling pattern.
- Create the Swirl: Use a knife or a skewer to gently swirl the Biscoff spread into the cheesecake filling. Be careful not to overmix, as this can muddy the swirl.
Baking the Cheesecake
Baking is the most crucial part of making a cheesecake. We want a perfectly cooked cheesecake that’s creamy and doesn’t crack. A water bath is key to achieving this!
- Prepare the Water Bath: Wrap the bottom of the springform pan tightly with heavy-duty aluminum foil. This will prevent water from seeping into the cheesecake. Place the wrapped springform pan inside a larger roasting pan.
- Pour in the Cheesecake Filling: Carefully pour the cheesecake filling into the prepared crust.
- Add Hot Water: Pour hot water into the roasting pan until it reaches about halfway up the sides of the springform pan. The water bath creates a humid environment that helps the cheesecake bake evenly and prevents it from cracking.
- Bake the Cheesecake: Bake in a preheated oven at 160°C (320°F) for 70-80 minutes, or until the edges of the cheesecake are set but the center is still slightly jiggly. The jiggle should be a slight wobble, not a liquid slosh.
- Turn Off the Oven and Let Cool: Turn off the oven and prop the oven door open slightly with a wooden spoon. Let the cheesecake cool in the oven for 1 hour. This gradual cooling process helps to prevent cracking.
- Chill the Cheesecake: Remove the cheesecake from the water bath and let it cool completely on a wire rack. Then, cover it with plastic wrap and chill it in the refrigerator for at least 6 hours, or preferably overnight. This allows the cheesecake to set completely and develop its full flavor.
Adding the Biscoff Topping (Optional)
This final touch adds a beautiful presentation and even more Biscoff goodness!
- Crush the Biscoff Cookies: If you haven’t already, crush the remaining Biscoff cookies. You can use a food processor or a zip-top bag and a rolling pin.
- Remove the Cheesecake from the Pan: Carefully remove the chilled cheesecake from the springform pan. Run a thin knife around the edges of the cheesecake to loosen it from the pan.
- Add the Crushed Cookies: Sprinkle the crushed Biscoff cookies evenly over the top of the cheesecake.
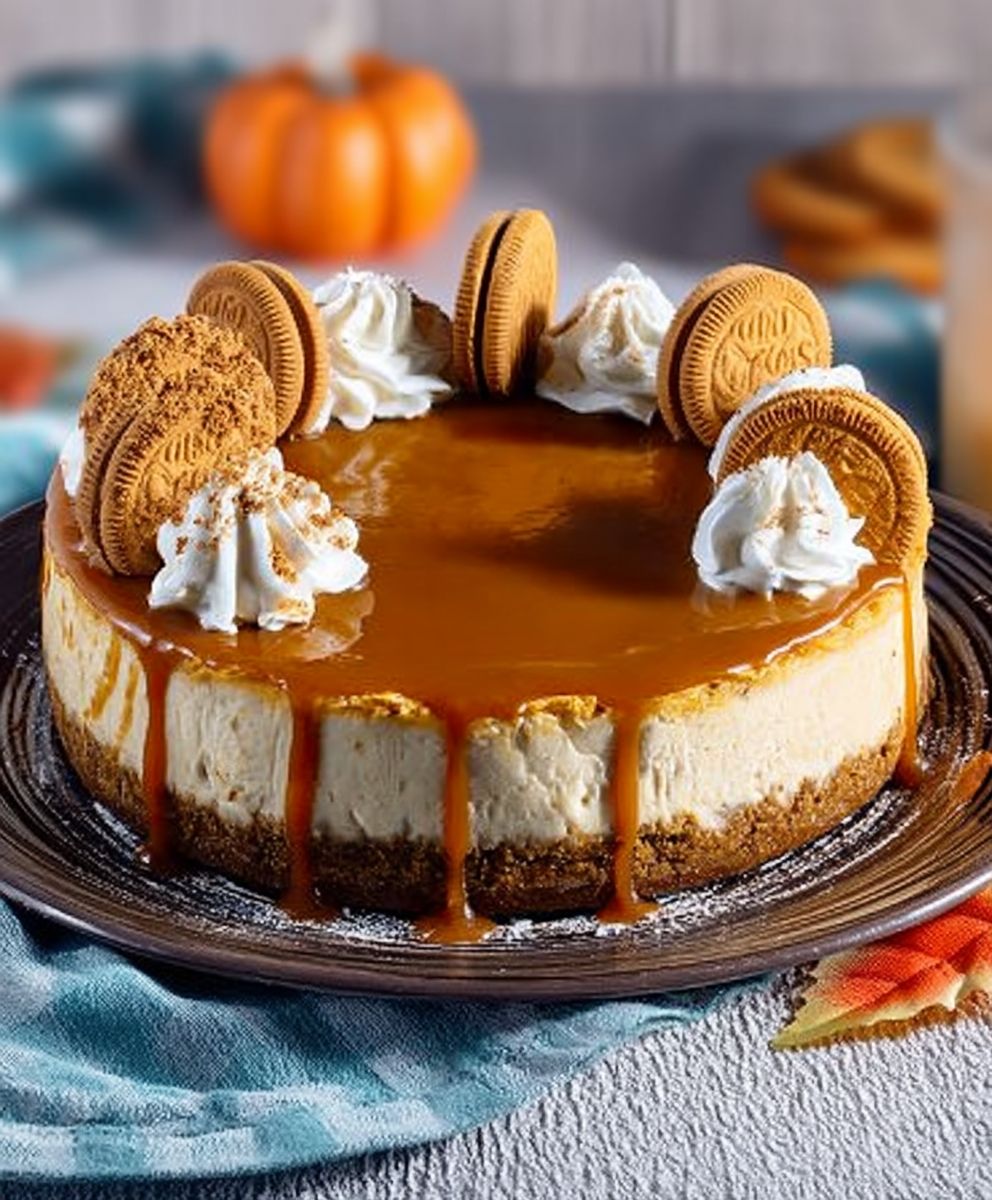
- Decorate with Whole Cookies: Arrange whole Biscoff cookies around the edge of the cheesecake for a beautiful and elegant presentation.
And there you have it! Your Biscoff Pumpkin Cheesecake is ready to be enjoyed. Slice
Conclusion:
This Biscoff Pumpkin Cheesecake isn’t just a dessert; it’s an experience. The creamy, spiced pumpkin filling, the crunchy Biscoff crust, and that decadent swirl of Biscoff spread on top it all comes together in a symphony of flavors and textures that will leave you and your guests absolutely speechless. I truly believe this recipe is a must-try, especially as the leaves begin to turn and the air gets that crisp, autumnal bite. It’s the perfect centerpiece for your Thanksgiving table, a delightful treat for a fall gathering, or simply a comforting indulgence on a cozy evening.
But the beauty of this recipe lies not only in its deliciousness but also in its versatility. Feel free to experiment with different toppings! A sprinkle of chopped pecans or walnuts would add a delightful nutty crunch. A drizzle of salted caramel would elevate the sweetness and create an even more decadent experience. For a lighter touch, consider topping it with a dollop of whipped cream and a dusting of cinnamon.
If you’re feeling adventurous, you could even try variations on the crust. While the Biscoff crust is undeniably divine, a graham cracker crust would also work beautifully, providing a classic and familiar base for the pumpkin cheesecake. Or, for a gluten-free option, use gluten-free Biscoff cookies or a blend of almond flour and spices.
Serving suggestions? This cheesecake is fantastic on its own, but it also pairs wonderfully with a cup of hot coffee or tea. A scoop of vanilla ice cream on the side would add a cool and creamy contrast to the rich cheesecake. And for a truly special occasion, consider serving it with a glass of dessert wine, such as a late-harvest Riesling or a Moscato d’Asti.
I know that making a cheesecake can seem a little daunting, but trust me, this recipe is surprisingly easy to follow. I’ve broken down each step into clear and concise instructions, so even if you’re a novice baker, you can create a masterpiece that will impress everyone. And the best part? The aroma that will fill your kitchen as this Biscoff Pumpkin Cheesecake bakes is simply heavenly.
So, what are you waiting for? Gather your ingredients, preheat your oven, and get ready to embark on a baking adventure that will tantalize your taste buds and fill your heart with joy. I’m confident that this recipe will become a new favorite in your household, a go-to dessert for special occasions and everyday indulgences alike.
I’m so excited for you to try this recipe! And I would absolutely love to hear about your experience. Did you make any variations? Did you have any challenges? What did your family and friends think? Please, share your photos and stories in the comments below. Your feedback is invaluable, and it helps me to continue creating recipes that you’ll love. Happy baking! I can’t wait to see your creations!
Biscoff Pumpkin Cheesecake: The Ultimate Fall Dessert Recipe
A creamy, no-bake cheesecake with pumpkin puree and Biscoff cookie butter, topped with a Biscoff crumble.
Ingredients
- 1 1/2 cups (150g) Biscoff cookie crumbs
- 5 tablespoons (70g) unsalted butter, melted
- 24 ounces (680g) cream cheese, softened
- 1 1/2 cups (300g) granulated sugar
- 1 1/2 cups (340g) pumpkin puree
- 1/4 cup (60ml) heavy cream
- 3 large eggs
- 1 teaspoon vanilla extract
- 1 teaspoon pumpkin pie spice
- 1/4 teaspoon salt
- Biscoff cookies, for garnish (optional)
- Whipped cream, for serving (optional)
Instructions
- Preheat oven to 350 degrees F (175 degrees C).
- Crush Biscoff cookies into fine crumbs using a food processor or by placing them in a resealable bag and crushing with a rolling pin.
- In a medium bowl, combine Biscoff crumbs and melted butter. Press the mixture into the bottom of a 9-inch springform pan.
- Bake the crust for 8-10 minutes, then let it cool completely.
- In a large bowl, beat cream cheese and sugar until smooth and creamy.
- Add pumpkin puree, eggs, vanilla extract, pumpkin pie spice, and salt. Mix until well combined.
- Pour the pumpkin cheesecake filling over the cooled Biscoff crust.
- Bake for 55-70 minutes, or until the edges are set but the center still has a slight jiggle.
- Turn off the oven and let the cheesecake cool inside the oven with the door slightly ajar for 1 hour. This helps prevent cracking.
- After 1 hour, remove the cheesecake from the oven and let it cool completely at room temperature.
- Cover the cheesecake and refrigerate for at least 4 hours, or preferably overnight, to allow it to set completely.
- Before serving, spread Biscoff spread evenly over the top of the cheesecake.
- Garnish with additional crushed Biscoff cookies, if desired.
- Slice and serve. Enjoy!
“`
Notes
- Store in the refrigerator for up to 3 days.
- To make your own pumpkin puree, roast a pie pumpkin at 400°F (200°C) until tender, then blend until smooth.
- For a smoother cheesecake, ensure your cream cheese is at room temperature before mixing.

Leave a Comment