
Focus Keyword: Homemade Chicken Noodle Soup
“`html
Homemade Chicken Noodle Soup: Is there anything more comforting on a chilly day, or when you’re feeling under the weather? I think not! This isn’t just a recipe; it’s a warm hug in a bowl, a nostalgic trip back to childhood, and a powerful remedy all rolled into one delicious dish.
Chicken noodle soup boasts a history as rich and flavorful as the broth itself. While its exact origins are debated, variations of this restorative soup have been enjoyed for centuries across numerous cultures. Many believe its healing properties were recognized long ago, with grandmothers everywhere passing down their secret recipes for generations. Its more than just food; its a tradition!
What makes homemade chicken noodle soup so universally loved? Its the perfect combination of savory, tender chicken, soft noodles, and a deeply flavorful broth. The aroma alone is enough to soothe the soul! Plus, it’s incredibly versatile. You can customize it with your favorite vegetables, herbs, and spices to create a soup that’s uniquely your own. Whether you’re craving a classic comfort food or need a little pick-me-up, this recipe is guaranteed to satisfy. So, let’s get cooking and create a pot of pure, unadulterated comfort!
“`

Ingredients:
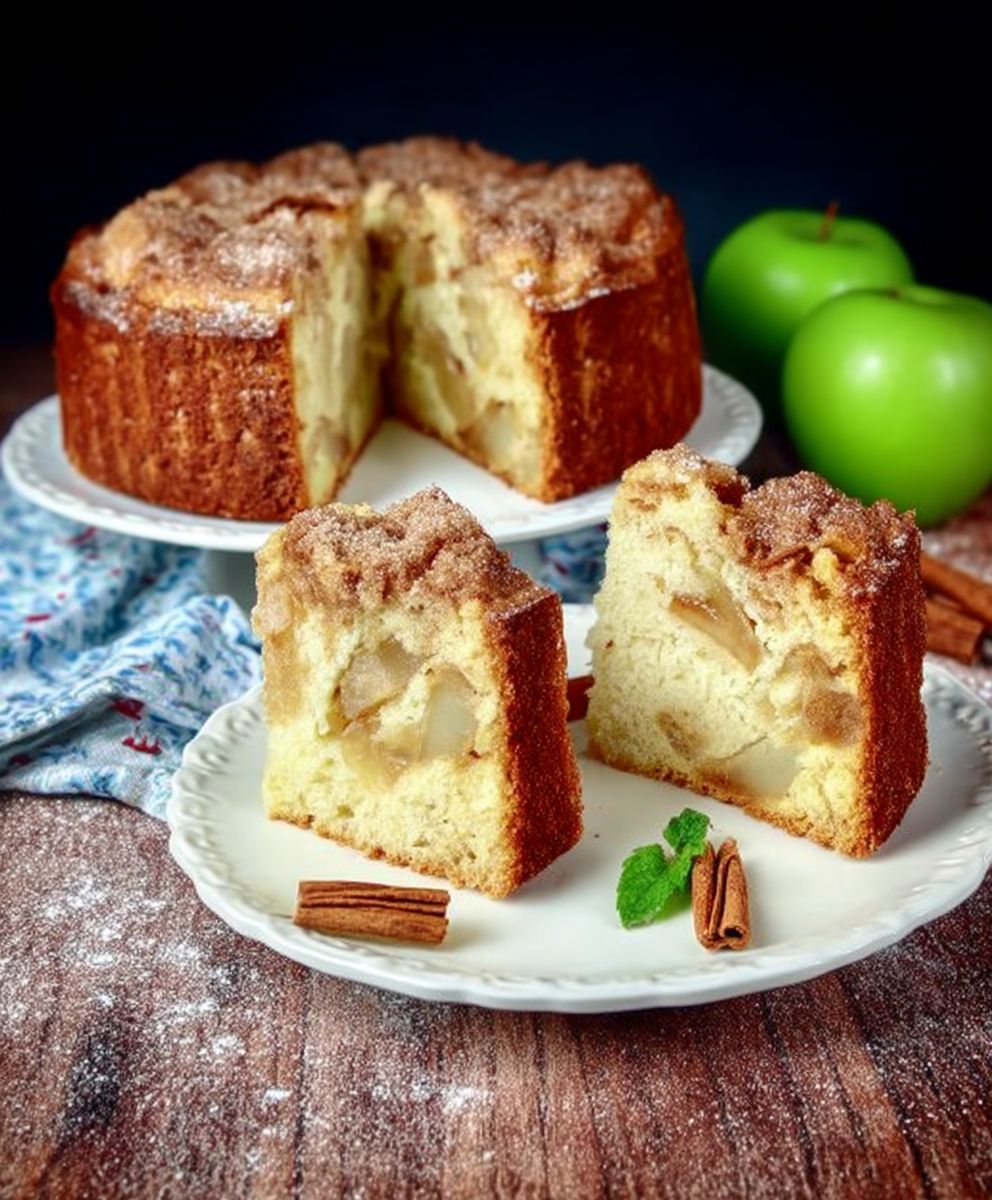
- 6 medium Granny Smith apples, peeled, cored, and chopped
- 2 cups all-purpose flour
- 2 teaspoons baking powder
- 1 teaspoon baking soda
- 1 teaspoon ground cinnamon
- 1/2 teaspoon ground nutmeg
- 1/4 teaspoon salt
- 1 cup granulated sugar
- 1/2 cup packed light brown sugar
- 1 cup vegetable oil
- 2 large eggs
- 2 teaspoons vanilla extract
- 1 cup chopped walnuts or pecans (optional)
- Powdered sugar, for dusting (optional)
Preparing the Apples:
Okay, let’s get started with the heart of our cake the apples! This step is crucial because the apples are what make this cake so moist and delicious. Don’t skimp on the quality of your apples; Granny Smiths are ideal because their tartness balances the sweetness of the cake perfectly, but you can experiment with other varieties if you like. Just make sure they hold their shape well during baking.
- Peel, core, and chop the apples: First, peel all six apples. I find a good vegetable peeler makes this task much easier. Then, core them. You can use an apple corer if you have one, or simply cut around the core with a knife. Finally, chop the apples into bite-sized pieces, about 1/2 inch to 3/4 inch in size. Don’t chop them too small, or they’ll disappear into the cake. We want to have nice chunks of apple in every bite!
- Prevent browning (optional): Apples tend to brown quickly once they’re cut. If you’re not ready to move on to the next step immediately, you can toss the chopped apples with a tablespoon of lemon juice to prevent them from browning. This isn’t strictly necessary, but it will keep your apples looking their best.
Preparing the Dry Ingredients:
Now, let’s move on to the dry ingredients. This step is all about ensuring that everything is evenly distributed, which will result in a cake that rises properly and has a consistent texture. Don’t skip the sifting or whisking; it really does make a difference!
- Combine the dry ingredients: In a large bowl, whisk together the flour, baking powder, baking soda, cinnamon, nutmeg, and salt. Whisking is important here because it helps to aerate the flour and ensures that the baking powder and baking soda are evenly distributed. This will help the cake rise properly.
- Make sure everything is well combined: Whisk for at least 30 seconds to ensure that all the dry ingredients are thoroughly combined. You don’t want any pockets of baking powder or baking soda in your cake!
Preparing the Wet Ingredients:
Next up, the wet ingredients! This is where the magic happens, as the wet ingredients bind everything together and create the batter that will transform into our delicious cake. Make sure your eggs are at room temperature for the best results.
- Combine the sugars and oil: In a separate large bowl, combine the granulated sugar, brown sugar, and vegetable oil. Mix well with a whisk or an electric mixer until the mixture is smooth and creamy. The brown sugar adds a lovely depth of flavor to the cake, so don’t skip it!
- Add the eggs and vanilla: Add the eggs one at a time, mixing well after each addition. Then, stir in the vanilla extract. The vanilla extract enhances the flavor of the cake and adds a touch of warmth.
Combining Wet and Dry Ingredients:
This is the crucial step where we bring everything together! Be careful not to overmix the batter, as this can result in a tough cake. We want a light and tender crumb, so gentle mixing is key.
- Gradually add the dry ingredients to the wet ingredients: Gradually add the dry ingredients to the wet ingredients, mixing on low speed until just combined. Be careful not to overmix! Overmixing develops the gluten in the flour, which can result in a tough cake.
- Fold in the apples and nuts (if using): Gently fold in the chopped apples and walnuts or pecans (if using). Make sure the apples are evenly distributed throughout the batter.
Baking the Cake:
Now for the exciting part baking! The aroma of this cake baking is simply heavenly. Make sure your oven is properly preheated for the best results.
- Preheat the oven: Preheat your oven to 350°F (175°C).
- Prepare the baking pan: Grease and flour a 9×13 inch baking pan. This will prevent the cake from sticking to the pan and make it easier to remove after baking. You can also use baking spray with flour.
- Pour the batter into the pan: Pour the batter into the prepared baking pan and spread it evenly.
- Bake the cake: Bake for 45-55 minutes, or until a wooden skewer inserted into the center comes out clean. The baking time may vary depending on your oven, so start checking the cake after 45 minutes.
- Cool the cake: Let the cake cool in the pan for 10-15 minutes before inverting it onto a wire rack to cool completely. This will prevent the cake from breaking apart when you remove it from the pan.
Serving and Storing:
Finally, the moment we’ve all been waiting for serving and enjoying our delicious Granny’s Apple Cake! This cake is wonderful on its own, but it’s also delicious with a scoop of vanilla ice cream or a dollop of whipped cream.
- Dust with powdered sugar (optional): Once the cake is completely cool, dust it with powdered sugar, if desired. This adds a touch of sweetness and makes the cake look even more appealing.
- Slice and serve: Slice the cake and serve. Enjoy!
- Storing the cake: Store any leftover cake in an airtight container at room temperature for up to 3 days. You can also store it in the refrigerator for up to a week.
Tips for Success:
- Use room temperature ingredients: Using room temperature ingredients, especially the eggs, will help the batter come together more smoothly and result in a more tender cake.
- Don’t overmix the batter: Overmixing the batter can develop the gluten in the flour, which can result in a tough cake. Mix until just combined.
- Check for doneness with a wooden skewer: Insert a wooden skewer into the center of the cake. If it comes out clean, the cake is done. If it comes out with wet batter on it, continue baking for a few more minutes and check again.
- Let the cake cool completely before frosting: If you’re planning to frost the cake, make sure it’s completely cool before applying the frosting. Otherwise, the frosting will melt.
Variations:
- Add spices: Experiment with different spices, such as cardamom, ginger, or cloves.
- Use different nuts: Try using different nuts, such as almonds, pecans, or macadamia nuts.
- Add dried fruit: Add dried fruit, such as raisins, cranberries, or chopped dates.
- Make it gluten-free: Use a gluten-free flour blend to make this cake gluten-free.
Conclusion:
This isn’t just another apple cake recipe; it’s a slice of history, a warm hug on a plate, and a guaranteed crowd-pleaser. I truly believe that Granny’s apple cake is a must-try for anyone who appreciates simple, honest, and utterly delicious baking. The moist, tender crumb, the sweet-tart apples, and the subtle spice blend create a symphony of flavors that will transport you back to simpler times. It’s the kind of cake that makes you want to curl up with a cup of tea and a good book, or share it with loved ones around a cozy table.
But the best part? It’s incredibly easy to make! Even if you’re a novice baker, you’ll find this recipe straightforward and forgiving. The ingredients are readily available, and the steps are clearly outlined, ensuring a successful bake every time. Forget complicated techniques and fancy equipment; this cake is all about embracing the joy of simple, home-style baking.
And while the original recipe is perfect as is, feel free to get creative and add your own personal touch! For a richer flavor, try using brown butter instead of melted butter. A handful of chopped walnuts or pecans adds a delightful crunch. Or, for a festive twist, sprinkle the top with a dusting of cinnamon sugar before baking.
Serving Suggestions:
* Serve warm with a scoop of vanilla ice cream or a dollop of whipped cream.
* Enjoy it with a cup of hot coffee or tea for a comforting afternoon treat.
* Dust it with powdered sugar for an elegant presentation.
* Pair it with a caramel sauce for an extra decadent dessert.
* For a breakfast treat, lightly toast a slice and spread it with butter.
Variations:
* Add a handful of raisins or dried cranberries for a chewy texture.
* Substitute pears for apples for a different flavor profile.
* Mix in a teaspoon of lemon zest for a bright, citrusy note.
* Top with a streusel topping made with flour, butter, and brown sugar.
* Drizzle with a cream cheese glaze for a tangy sweetness.
I’m so confident that you’ll love this recipe that I urge you to give it a try. It’s more than just a cake; it’s a connection to the past, a celebration of simple pleasures, and a testament to the power of home baking. I know that once you’ve tasted Granny’s apple cake, it will become a staple in your recipe collection, a go-to dessert for any occasion.
So, gather your ingredients, preheat your oven, and get ready to experience the magic of this timeless classic. And please, don’t be shy! I’d love to hear about your baking adventures. Share your photos, your variations, and your stories in the comments below. Let’s create a community of apple cake lovers and celebrate the joy of sharing delicious food with the people we care about. I can’t wait to see what you create! Happy baking!
Granny's Apple Cake: The Ultimate Recipe and Baking Guide
A moist and flavorful apple cake, perfect for fall. Features fresh apples, warm spices, and a simple glaze.
Ingredients
- 3 cups all-purpose flour
- 1 teaspoon baking soda
- 1 teaspoon ground cinnamon
- 1/2 teaspoon ground nutmeg
- 1/4 teaspoon salt
- 1 cup vegetable oil
- 2 cups granulated sugar
- 2 large eggs
- 1 teaspoon vanilla extract
- 4 cups peeled and chopped apples
- 1 cup chopped walnuts or pecans (optional)
Instructions
- Preheat oven to 350 degrees F (175 degrees C). Grease and flour a 9×13 inch pan.
- In a large bowl, cream together the butter, sugar, and eggs until light and fluffy.
- Blend in the flour, baking soda, salt, and cinnamon. Stir in the apples and walnuts.
- Pour batter into prepared pan.
- Bake for 30 to 35 minutes, or until a toothpick inserted into the center comes out clean.
- Let cool before serving.
Notes
- If you don’t have self-rising flour, you can make your own by combining all-purpose flour with baking powder and salt.
- Adjust the amount of sugar to your liking, depending on the tartness of the apples.
- Serve warm with a scoop of vanilla ice cream or a dollop of whipped cream.
“`
Leave a Comment