
Christmas Cheesecake Slab: Prepare to be the star of your holiday dessert table! Imagine a creamy, decadent cheesecake, not in the usual round, but spread generously across a slab, adorned with festive decorations and ready to feed a crowd. This isn’t just dessert; it’s a statement piece, a conversation starter, and a guaranteed crowd-pleaser that will have everyone reaching for seconds (and thirds!).
While cheesecake itself has ancient roots, with early forms dating back to ancient Greece, the modern cheesecake we know and love really took off in America. This Christmas Cheesecake Slab recipe takes that classic dessert and gives it a holiday twist, making it perfect for sharing with family and friends during the festive season. Think of it as a blank canvas for your creativity you can decorate it with everything from sugared cranberries and rosemary sprigs to crushed peppermint candies and chocolate shavings.
People adore cheesecake for its rich, smooth texture and its ability to be customized with endless flavor combinations. The slab format makes it even more appealing because it’s easy to serve, visually stunning, and offers a generous portion for everyone. Plus, let’s be honest, who can resist a slice of creamy cheesecake, especially when it’s dressed up for Christmas? This recipe is surprisingly simple to make, and the “wow” factor is off the charts. Get ready to create a memorable dessert that will become a holiday tradition!

Ingredients:
- 1 cup (2 sticks) unsalted butter, softened
- ¾ cup granulated sugar
- ¾ cup packed brown sugar
- 2 large eggs
- 1 teaspoon vanilla extract
- 2 ¼ cups all-purpose flour
- 1 teaspoon baking soda
- 1 teaspoon salt
- 1 cup semi-sweet chocolate chips
- ½ cup Nutella, chilled (very important!)
- Optional: Sea salt flakes, for sprinkling
Preparing the Cookie Dough:
- Cream the Butter and Sugars: In a large bowl (or the bowl of your stand mixer), cream together the softened butter, granulated sugar, and brown sugar until light and fluffy. This usually takes about 3-5 minutes. Don’t rush this step; it’s crucial for creating a tender cookie. You want the mixture to be pale and airy.
- Add the Eggs and Vanilla: Beat in the eggs one at a time, making sure each egg is fully incorporated before adding the next. Then, stir in the vanilla extract. The mixture should be smooth and well combined.
- Combine Dry Ingredients: In a separate medium bowl, whisk together the all-purpose flour, baking soda, and salt. Whisking ensures that the baking soda and salt are evenly distributed throughout the flour, which is important for proper leavening and flavor.
- Gradually Add Dry Ingredients to Wet Ingredients: Gradually add the dry ingredients to the wet ingredients, mixing on low speed until just combined. Be careful not to overmix! Overmixing develops the gluten in the flour, which can result in tough cookies. Mix until you no longer see streaks of flour.
- Stir in Chocolate Chips: Gently fold in the chocolate chips. I like to use a rubber spatula for this step to avoid overmixing.
- Chill the Dough: Cover the bowl with plastic wrap and chill the dough in the refrigerator for at least 30 minutes. Chilling the dough prevents the cookies from spreading too much during baking and also allows the flavors to meld together. You can chill it for longer, even overnight, if you prefer. If chilling overnight, let the dough sit at room temperature for about 15-20 minutes before scooping.
Preparing the Nutella Filling:
- Chill the Nutella: This is a crucial step! The Nutella needs to be very cold and firm so that it doesn’t melt completely during baking. I recommend chilling the Nutella in the refrigerator for at least an hour, or even better, overnight.
- Scoop Nutella onto Parchment Paper: Line a baking sheet with parchment paper. Using a small cookie scoop or a teaspoon, scoop small mounds of chilled Nutella onto the parchment paper. You should aim for about 1 teaspoon of Nutella per mound.
- Freeze the Nutella Mounds: Place the baking sheet with the Nutella mounds in the freezer for at least 30 minutes, or until the Nutella is frozen solid. This will make it much easier to handle and stuff into the cookies.
Assembling and Baking the Cookies:
- Preheat Oven: Preheat your oven to 375°F (190°C). Line a baking sheet with parchment paper or a silicone baking mat.
- Scoop Cookie Dough: Using a medium cookie scoop (about 1.5 tablespoons), scoop out a portion of cookie dough. Flatten the dough slightly in the palm of your hand.
- Place Frozen Nutella in Dough: Place one frozen Nutella mound in the center of the flattened cookie dough.
- Wrap Dough Around Nutella: Gently wrap the cookie dough around the Nutella, making sure to completely enclose it. Pinch the edges together to seal. Roll the cookie dough into a ball.
- Place on Baking Sheet: Place the stuffed cookie dough balls onto the prepared baking sheet, leaving about 2 inches between each cookie.
- Bake: Bake for 9-11 minutes, or until the edges are golden brown and the centers are still slightly soft. The baking time may vary depending on your oven, so keep a close eye on them.
- Cool: Remove the baking sheet from the oven and let the cookies cool on the baking sheet for a few minutes before transferring them to a wire rack to cool completely.
- Optional: Sprinkle with Sea Salt: While the cookies are still warm, you can sprinkle them with a few flakes of sea salt for a sweet and salty flavor combination.
Tips and Tricks for Perfect Nutella Stuffed Cookies:
- Don’t Overmix the Dough: Overmixing develops the gluten in the flour, which can result in tough cookies. Mix until just combined.
- Chill the Dough: Chilling the dough is essential for preventing the cookies from spreading too much during baking.
- Freeze the Nutella: Freezing the Nutella makes it much easier to handle and stuff into the cookies. It also prevents the Nutella from melting completely during baking.
- Use a Cookie Scoop: Using a cookie scoop ensures that all of your cookies are the same size, which helps them bake evenly.
- Don’t Overbake: Overbaked cookies will be dry and crumbly. Bake until the edges are golden brown and the centers are still slightly soft.
- Let Cool Completely: Let the cookies cool completely on a wire rack before serving. This will allow them to firm up and prevent them from falling apart.
- Storage: Store the cookies in an airtight container at room temperature for up to 3 days.
- Make Ahead: You can make the cookie dough ahead of time and store it in the refrigerator for up to 2 days. You can also freeze the cookie dough for up to 2 months. Let the dough thaw in the refrigerator overnight before baking.
- Variations: Try adding different types of chocolate chips, such as dark chocolate or white chocolate. You can also add chopped nuts, such as walnuts or pecans. For a festive touch, add sprinkles!
Troubleshooting:
- Cookies are spreading too much: Make sure you chilled the dough for at least 30 minutes. You can also try adding a tablespoon or two of flour to the dough.
- Nutella is leaking out: Make sure you froze the Nutella completely before stuffing it into the cookies. Also, make sure you completely seal the cookie dough around the Nutella.
- Cookies are too dry: Don’t overbake the cookies. Bake until the edges are golden brown and the centers are still slightly soft.
- Cookies are too tough: Don’t overmix the dough. Mix until just combined.
Serving Suggestions:
- Serve warm with a glass of milk or a scoop of vanilla ice cream.
- Pack them in lunchboxes for a special treat.
- Bring them to a potluck or party.
- Give them as gifts to friends and family.
Nutritional Information (Approximate, per cookie):
- Calories: 250-300
- Fat: 15-20g
- Saturated Fat: 8-10g
- Cholesterol: 30-40mg
- Sodium: 100-150mg
- Carbohydrates: 30-35g
- Sugar: 20-25g
- Protein: 2-3g
Enjoy your delicious Nutella Stuffed Cookies! They are sure to be a crowd-pleaser.
Conclusion:
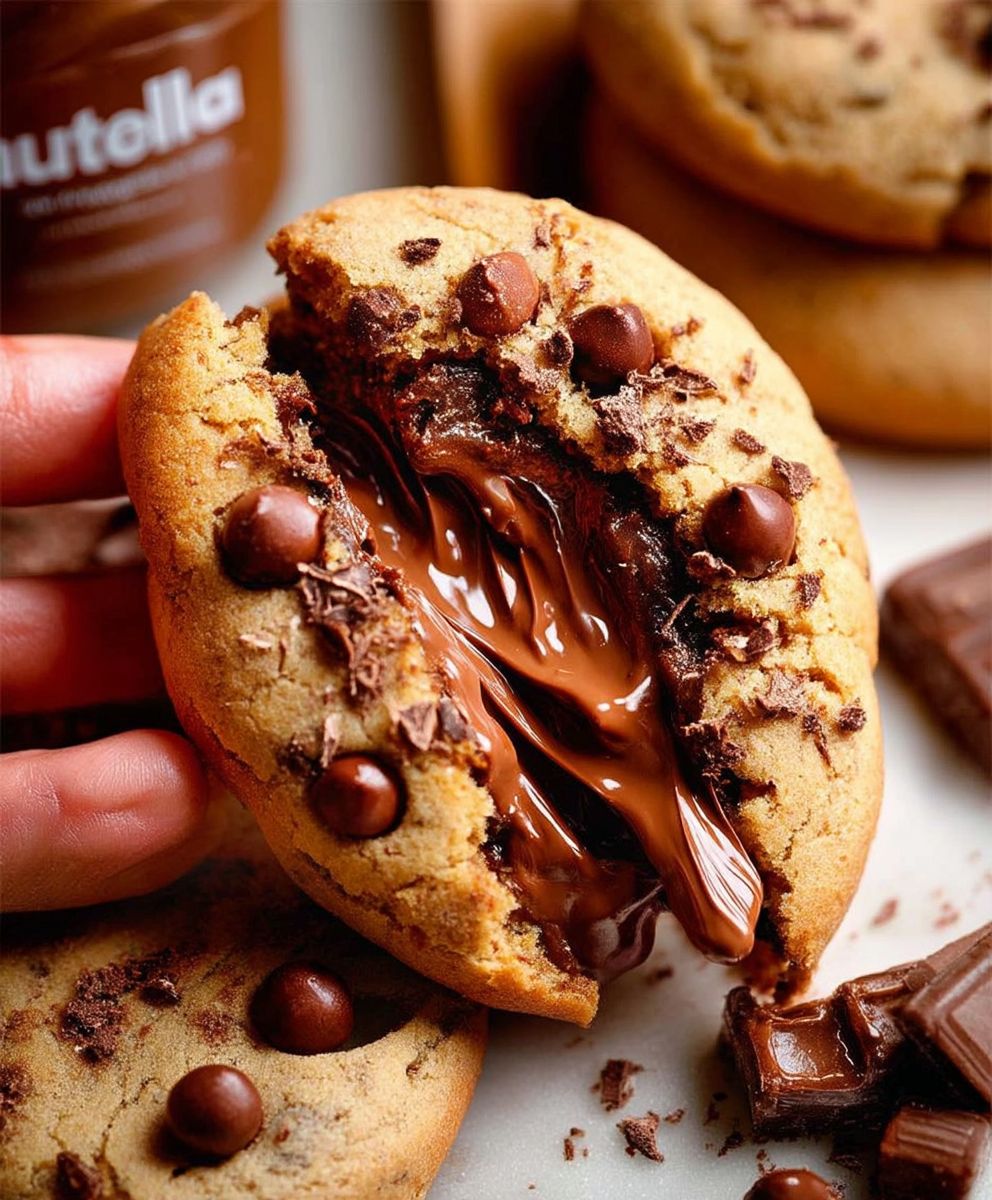
And there you have it! These Nutella Stuffed Cookies are truly a must-try for any cookie lover, and I’m confident they’ll become a new favorite in your household. The combination of the soft, chewy cookie dough with the molten, hazelnutty goodness of Nutella is simply irresistible. It’s a delightful explosion of textures and flavors that will leave you wanting more.
But why are these cookies so special? It’s more than just the sum of their parts. The warmth of the oven transforms the Nutella into a gooey, decadent center that perfectly complements the buttery, slightly crisp edges of the cookie. It’s a simple recipe, yes, but the result is anything but ordinary. These cookies are perfect for a cozy night in, a special occasion, or just a sweet treat to brighten your day.
Serving Suggestions and Variations:
While these cookies are absolutely divine on their own, there are plenty of ways to elevate the experience even further. Consider serving them warm with a scoop of vanilla ice cream for an extra indulgent dessert. The contrast between the warm cookie and the cold ice cream is heavenly! You could also drizzle a little extra melted Nutella on top for an even more intense hazelnut flavor.
For a fun twist, try adding a sprinkle of sea salt to the tops of the cookies before baking. The salt enhances the sweetness of the Nutella and adds a delightful savory element. Another variation is to incorporate chopped hazelnuts into the cookie dough for added texture and nutty flavor. If you’re feeling adventurous, you could even try using different types of chocolate chips in the dough, such as dark chocolate or white chocolate, to create a unique flavor profile.
And don’t be afraid to experiment with different fillings! While Nutella is the star of the show here, you could also try using other chocolate spreads, peanut butter, or even jam. The possibilities are endless! Just make sure the filling is thick enough to hold its shape during baking.
Time to Bake!
I truly believe that everyone should experience the joy of biting into a warm, gooey Nutella Stuffed Cookie. It’s a simple pleasure that can bring a smile to your face and make any day a little bit brighter. So, what are you waiting for? Gather your ingredients, preheat your oven, and get ready to bake some magic!
I’ve poured my heart into perfecting this recipe, and I’m so excited for you to try it. I’m confident that you’ll love these cookies as much as I do. Remember, baking is all about having fun and experimenting, so don’t be afraid to put your own spin on the recipe and make it your own.
Once you’ve made these incredible Nutella Stuffed Cookies, I would absolutely love to hear about your experience! Share your photos and stories in the comments below. Let me know what variations you tried and how they turned out. Did you add sea salt? Did you use a different filling? I’m eager to hear all about your baking adventures! Your feedback is invaluable, and it helps me to continue creating delicious and easy-to-follow recipes for you to enjoy. Happy baking!
Nutella Stuffed Cookies: The Ultimate Recipe for Gooey Goodness
Soft, chewy cookies with a gooey Nutella center. Perfect for a sweet treat!
Ingredients
2 1/2 cups all-purpose flour
1 teaspoon baking soda
1 teaspoon salt
1 cup (2 sticks) unsalted butter, softened
3/4 cup granulated sugar
3/4 cup packed brown sugar
2 large eggs
1 teaspoon vanilla extract
1/2 cup Nutella, chilled
- 2 1/2 cups all-purpose flour
- 1 teaspoon baking soda
- 1 teaspoon salt
- 1 cup (2 sticks) unsalted butter, softened
- 3/4 cup granulated sugar
- 3/4 cup packed brown sugar
- 2 large eggs
- 1 teaspoon vanilla extract
- 1/2 cup Nutella, chilled
Instructions
- Preheat oven to 350 degrees F (175 degrees C).
- In a large bowl, cream together the butter, brown sugar, and white sugar until smooth.
- Beat in the egg and vanilla extract.
- Dissolve baking soda in hot water and add to batter along with salt.
- Stir in the flour and chocolate chips.
- Scoop cookie dough using a medium cookie scoop.
- Press a small indentation into the center of each cookie.
- Fill each indentation with about 1 teaspoon of Nutella.
- Bake for 10-12 minutes, or until edges are nicely browned.
- Cool on baking sheets for a few minutes before serving.
Notes
- For best results, chill the dough for at least 30 minutes.
- You can use any type of nut butter or chocolate spread you like.
- These cookies are best enjoyed warm.
Leave a Comment