
Beef lentil soup: just the name conjures up images of cozy evenings, crackling fireplaces, and the comforting aroma of a hearty, home-cooked meal. Have you ever craved a dish that warms you from the inside out, satisfying your hunger and nourishing your soul? Well, look no further! This isn’t just any soup; it’s a culinary hug in a bowl, and I’m thrilled to share my take on this classic recipe with you.
Lentil soup, in its various forms, boasts a rich history, tracing back to ancient civilizations. For centuries, lentils have been a staple food, prized for their nutritional value and versatility. Combining them with beef elevates the dish, adding a depth of flavor and protein that transforms it into a complete and satisfying meal. In many cultures, lentil soup is considered a symbol of good luck and prosperity, often enjoyed during celebrations and family gatherings.
What makes beef lentil soup so universally loved? It’s a symphony of flavors and textures. The earthy lentils, the savory beef, and the aromatic vegetables create a harmonious blend that’s both comforting and exciting. The tender beef and the slightly chewy lentils offer a delightful contrast, while the rich broth ties everything together. Plus, it’s incredibly convenient! This recipe is relatively simple to prepare, making it perfect for busy weeknights. And the best part? It tastes even better the next day, as the flavors meld and deepen. So, grab your apron, and let’s get cooking!

Ingredients:
- For the Pork Roast:
- 3-4 lb boneless pork shoulder roast (skin on, rind intact)
- 2 tablespoons olive oil
- 2 teaspoons sea salt, plus more for seasoning
- 1 teaspoon black pepper, freshly ground
- 1 teaspoon garlic powder
- 1 teaspoon onion powder
- 1/2 teaspoon dried thyme
- 1/2 teaspoon dried rosemary
- For the Brine (Optional, but Highly Recommended):
- 8 cups water
- 1/2 cup kosher salt
- 1/4 cup brown sugar
- 4 cloves garlic, smashed
- 1 tablespoon black peppercorns
- 2 bay leaves
- For the Roasting Pan:
- 1 large onion, quartered
- 2 carrots, roughly chopped
- 2 celery stalks, roughly chopped
- 1 cup chicken broth (or water)
Brining the Pork (Optional)
While not strictly necessary, brining the pork shoulder for several hours (or overnight) will result in a more flavorful and juicy roast. The salt in the brine helps to break down the muscle fibers, allowing the pork to retain more moisture during cooking. If you’re short on time, you can skip this step, but I highly recommend it if you can.
- Prepare the Brine: In a large pot, combine the water, kosher salt, brown sugar, smashed garlic cloves, black peppercorns, and bay leaves. Bring the mixture to a simmer over medium heat, stirring until the salt and sugar are completely dissolved.
- Cool the Brine: Remove the pot from the heat and let the brine cool completely to room temperature. This is crucial, as adding the pork to hot brine can partially cook it and affect the final texture.
- Submerge the Pork: Place the pork shoulder roast in a large container or resealable bag. Pour the cooled brine over the pork, ensuring that it is completely submerged. If necessary, weigh the pork down with a plate or bowl to keep it submerged.
- Refrigerate: Refrigerate the pork in the brine for at least 4 hours, or preferably overnight (up to 24 hours). The longer it brines, the more flavorful and juicy it will be.
- Rinse and Pat Dry: After brining, remove the pork from the brine and rinse it thoroughly under cold water. Pat it completely dry with paper towels. This is a very important step for achieving crispy crackling. The drier the skin, the better it will crisp up.
Preparing the Pork Roast
Now that the pork is brined (or not, if you skipped that step), it’s time to prepare it for roasting. This involves scoring the skin, seasoning the meat, and setting up the roasting pan.
- Score the Skin: This is the most important step for achieving crispy crackling. Use a sharp knife or a box cutter to score the pork skin in a crosshatch pattern. Make sure to cut through the skin and into the fat layer, but be careful not to cut into the meat itself. The scoring allows the fat to render out during cooking, resulting in crispy, bubbly crackling. Aim for squares or diamonds that are about 1 inch in size. The closer the scores, the better the crackling.
- Season the Pork: In a small bowl, combine the olive oil, sea salt, black pepper, garlic powder, onion powder, dried thyme, and dried rosemary. Mix well to form a paste.
- Rub the Seasoning: Rub the seasoning paste all over the pork roast, making sure to get it into all the crevices and scoring marks. Pay special attention to the skin, ensuring that it is well coated with the seasoning.
- Prepare the Roasting Pan: In a large roasting pan, spread the quartered onion, roughly chopped carrots, and roughly chopped celery stalks. These vegetables will act as a rack for the pork, preventing it from sitting directly on the bottom of the pan and allowing for better air circulation. They will also add flavor to the drippings, which can be used to make a delicious gravy.
- Place the Pork on the Vegetables: Place the seasoned pork roast on top of the vegetables in the roasting pan, skin side up.
- Add Liquid to the Pan: Pour the chicken broth (or water) into the bottom of the roasting pan. The liquid will help to keep the vegetables from burning and will also create steam, which will help to keep the pork moist during cooking.
Roasting the Pork
The roasting process is divided into two stages: a high-heat stage to crisp up the skin and a low-heat stage to cook the pork through. This two-stage approach ensures that you get crispy crackling without drying out the meat.
- Preheat the Oven: Preheat your oven to 450°F (232°C). Make sure your oven is fully preheated before placing the pork inside.
- High-Heat Roasting: Place the roasting pan in the preheated oven and roast for 30-45 minutes, or until the skin is puffed up and starting to blister. Keep a close eye on the pork during this stage, as the skin can burn easily. If the skin starts to brown too quickly, you can tent it loosely with aluminum foil.
- Reduce the Heat: After the high-heat roasting, reduce the oven temperature to 325°F (163°C).
- Low-Heat Roasting: Continue roasting the pork for another 2-3 hours, or until the internal temperature reaches 195-205°F (90-96°C). Use a meat thermometer to check the internal temperature. Insert the thermometer into the thickest part of the pork, avoiding the bone.
- Rest the Pork: Once the pork is cooked through, remove it from the oven and let it rest for at least 20-30 minutes before carving. This allows the juices to redistribute throughout the meat, resulting in a more tender and flavorful roast. Tent the pork loosely with aluminum foil while it rests.
Achieving Perfect Crackling (Troubleshooting)
Sometimes, despite your best efforts, the crackling might not be as crispy as you’d like. Here are a few tips for troubleshooting:
- Dry Skin is Key: Make absolutely sure the skin is as dry as possible before roasting. After brining, pat it dry thoroughly. You can even leave it uncovered in the refrigerator for a few hours to further dry it out.
- High Heat is Essential: The initial high-heat roasting is crucial for puffing up the skin. Don’t be afraid to crank up the heat.
- Broiling (If Necessary): If the crackling isn’t crispy enough after the low-heat roasting, you can broil it for a few minutes at the end. Keep a very close eye on it, as it can burn quickly under the broiler. Place the pork on the top rack of the oven, about 6 inches from the broiler.
- Don’t Overcrowd the Pan: Make sure there’s enough space around the pork in the roasting pan for air to circulate. Overcrowding can prevent the skin from crisping up properly.
- Score Deeply Enough: Ensure your scoring goes through the skin and into the fat layer. This allows the fat to render out and create crispy crackling.
Serving and Enjoying
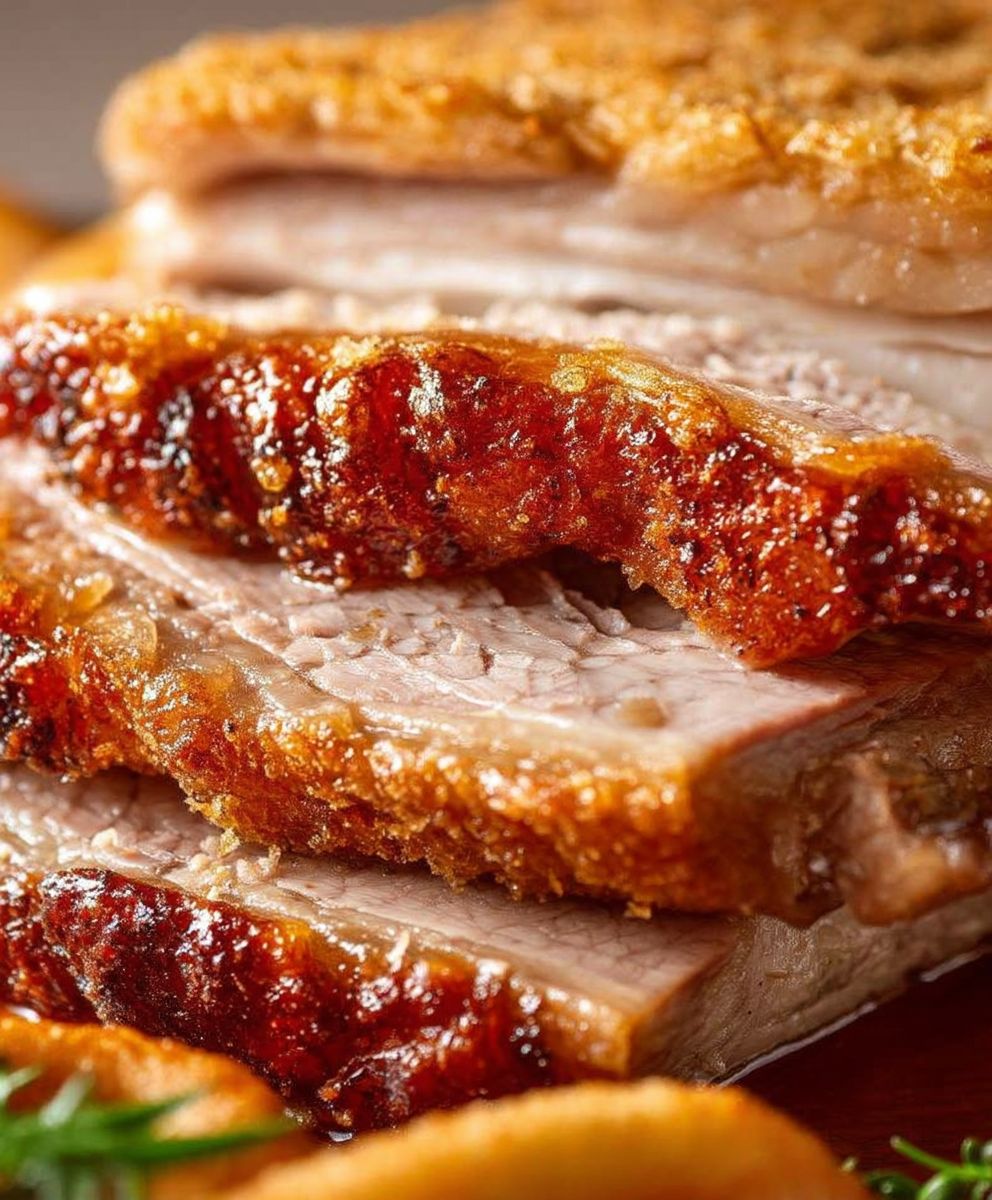
Once the pork has rested, it’s time to carve and serve. The crackling should be shatteringly crisp and the meat should be tender and juicy.
- Carve the Pork: Use a sharp knife to carve the pork into slices. Separate the crackling from the meat and break it into smaller pieces.
- Serve: Serve the sliced pork with the crispy crackling. You can also serve it with the roasted vegetables from the roasting pan and a gravy made from the pan drippings.
- Make Gravy (Optional): To make gravy, strain the pan drippings into a saucepan. Skim off any excess fat. Add a tablespoon of flour to the saucepan and whisk until smooth. Cook over medium heat for a few minutes, stirring constantly, until the flour is lightly browned. Gradually whisk in 1-2 cups of chicken broth (or water) until the gravy reaches your desired consistency. Season with salt and pepper to taste.
Enjoy your delicious crispy pork roast with crackling! It’s perfect for a Sunday dinner or any special occasion.
Conclusion:
So there you have it! This Crispy Pork Roast Crackling recipe isn’t just another roast; it’s a culinary experience waiting to happen. From the satisfying crunch of the perfectly rendered skin to the juicy, flavorful meat beneath, this dish is guaranteed to impress. I know, I know, achieving that perfect crackling can seem daunting, but trust me, with these simple steps and a little patience, you’ll be rewarded with a roast that rivals anything you’d find in a high-end restaurant. It’s a showstopper, a conversation starter, and most importantly, incredibly delicious.
Why is this a must-try? Because it elevates the humble pork roast to something truly special. It’s not just about the taste; it’s about the texture, the aroma, and the sheer satisfaction of creating something so impressive. Plus, it’s surprisingly versatile! Serve it with classic roasted vegetables like potatoes, carrots, and parsnips for a traditional Sunday dinner. Or, get a little more adventurous and pair it with a vibrant apple and fennel slaw for a refreshing contrast. For a truly decadent experience, try serving it with creamy mashed potatoes and a rich red wine reduction. The possibilities are endless!
Serving Suggestions and Variations:
Looking to switch things up? Here are a few ideas to get your creative juices flowing:
- Spice it up: Add a pinch of chili flakes to the spice rub for a little heat.
- Herb it up: Experiment with different herbs like rosemary, thyme, or sage.
- Citrus zest: A little lemon or orange zest in the rub adds a bright, zesty flavor.
- Glaze it: Brush the pork with a honey-mustard glaze during the last 30 minutes of cooking for a sweet and savory finish.
- Pulled Pork Variation: Once cooked, shred the pork and toss it with your favorite BBQ sauce for amazing pulled pork sandwiches. Don’t forget to crumble the crackling on top for extra crunch!
- Crackling Croutons: If you have any leftover crackling (unlikely, I know!), crumble it up and use it as a topping for salads or soups. It adds an incredible salty, savory crunch.
I’ve personally made this recipe countless times, and it’s always a hit. The secret, as I mentioned earlier, is all in the preparation. Don’t skip the drying step! That’s crucial for achieving that perfect, crispy crackling. And don’t be afraid to experiment with different seasonings and flavors to make it your own. This recipe is a fantastic base, and you can easily adapt it to suit your personal preferences.
Now, it’s your turn! I’m so excited for you to try this Crispy Pork Roast Crackling recipe and experience the magic for yourself. I truly believe that anyone can make this, regardless of their cooking experience. So, gather your ingredients, preheat your oven, and get ready to create something amazing. And most importantly, don’t forget to have fun! Cooking should be enjoyable, so relax, put on some music, and let the aroma of roasting pork fill your kitchen.
Once you’ve made it, I’d absolutely love to hear about your experience! Share your photos and stories in the comments below. Did you try any of the variations? What did you serve it with? What was the biggest hit? Your feedback is invaluable, and it helps me to continue creating recipes that you’ll love. So, go ahead, give this recipe a try, and let me know what you think. Happy cooking!
Crispy Pork Roast Crackling: The Ultimate Guide to Perfect Crackling
Achieve perfectly crispy pork crackling with this simple roast. High heat and proper scoring are key for bubbly, golden results.
Ingredients
- 3-4 lb boneless pork shoulder roast, skin on
- 2 tablespoons olive oil
- 1 tablespoon kosher salt
- 1 teaspoon black pepper
- 1 teaspoon garlic powder
- 1 teaspoon onion powder
- 1/2 teaspoon smoked paprika
- 1/4 teaspoon cayenne pepper (optional)
- 1 cup chicken broth
Instructions
- Preheat oven to 450°F (232°C).
- Pat the pork skin dry with paper towels. This is crucial for crispy crackling.
- Score the pork skin in a crosshatch pattern, being careful not to cut into the meat.
- Rub the pork with salt, pepper, and any other desired seasonings.
- Place the pork roast on a roasting rack in a roasting pan.
- Add about 1 cup of water to the bottom of the roasting pan. This will help create steam and prevent the drippings from burning.
- Roast for 30 minutes at 450°F (232°C).
- Reduce the oven temperature to 325°F (163°C) and continue roasting for about 20-25 minutes per pound, or until the internal temperature reaches 190-200°F (88-93°C). Use a meat thermometer to check the temperature.
- If the crackling is not crispy enough, increase the oven temperature back to 450°F (232°C) for the last 5-10 minutes, watching carefully to prevent burning.
- Let the pork roast rest for at least 15 minutes before carving. This allows the juices to redistribute, resulting in a more tender and flavorful roast.
- Carve and serve immediately.
“`
Notes
* 2 kg (4.4 lbs) pork roast, skin on
* 2 tbsp salt
* 1 tbsp black pepper
* 1 tbsp garlic powder
* 1 tbsp onion powder
* 1 tbsp dried thyme
* 1 tbsp dried rosemary
* 2 tbsp olive oil
* 1 cup water
Instructions:
1. Preheat oven to 220°C (430°F).
2. Score the pork skin in a crosshatch pattern.
3. In a small bowl, mix together salt, pepper, garlic powder, onion powder, thyme, and rosemary.
4. Rub the spice mixture all over the pork roast, including the skin.
5. Drizzle olive oil over the pork skin.
6. Place the pork roast in a roasting pan and add water to the bottom of the pan.
7. Roast for 30 minutes, then reduce the oven temperature to 160°C (320°F) and continue roasting for another 2-3 hours, or until the internal temperature reaches 70°C (160°F).
8. Increase the oven temperature back to 220°C (430°F) for the last 10-15 minutes to crisp up the skin.
9. Let the pork roast rest for 15-20 minutes before carving.
Notes:
* Make sure the pork skin is dry before roasting for the best crackling.
* You can use other herbs and spices to your liking.
* If the crackling is not crispy enough, you can broil it for a few minutes at the end.
* Resting the pork roast is important for retaining its juices.


Leave a Comment