
Chinese Chicken Salad: just the name conjures up images of vibrant colors, satisfying textures, and a symphony of flavors that dance on your tongue. Have you ever craved a dish that’s both refreshingly light and incredibly satisfying? A dish that’s perfect for a quick lunch, a potluck gathering, or even a light dinner on a warm evening? Then look no further! This isn’t just another salad; it’s an experience.
While the exact origins of Chinese Chicken Salad are debated, its popularity in the United States can be traced back to the mid-20th century. It’s believed to be an Americanized adaptation of traditional Asian flavors, blending the best of both worlds. Over the years, it has evolved, with countless variations and personal touches added to create the perfect balance of sweet, savory, and crunchy.
What makes this salad so irresistible? It’s the delightful combination of tender chicken, crisp vegetables, crunchy noodles or wonton strips, and a tangy, slightly sweet dressing. The contrasting textures and flavors create a truly addictive experience. Plus, it’s incredibly versatile! You can easily customize it with your favorite vegetables, nuts, and dressings. Whether you’re a seasoned cook or a kitchen novice, this Chinese Chicken Salad recipe is guaranteed to be a crowd-pleaser. Get ready to embark on a culinary adventure that will tantalize your taste buds and leave you wanting more!

Ingredients:
- 1 ½ cups all-purpose flour
- 1 teaspoon baking soda
- 1 teaspoon salt
- ¾ cup packed brown sugar
- ¾ cup granulated sugar
- 1 cup chocolate chips (semi-sweet or milk chocolate, your preference!)
- ¾ cup chopped nuts (walnuts, pecans, or almonds work great, optional)
- Decorative ribbon or twine
- Jar (quart-sized, wide-mouth is easiest)
Instructions for Layering the Cookie Mix in the Jar:
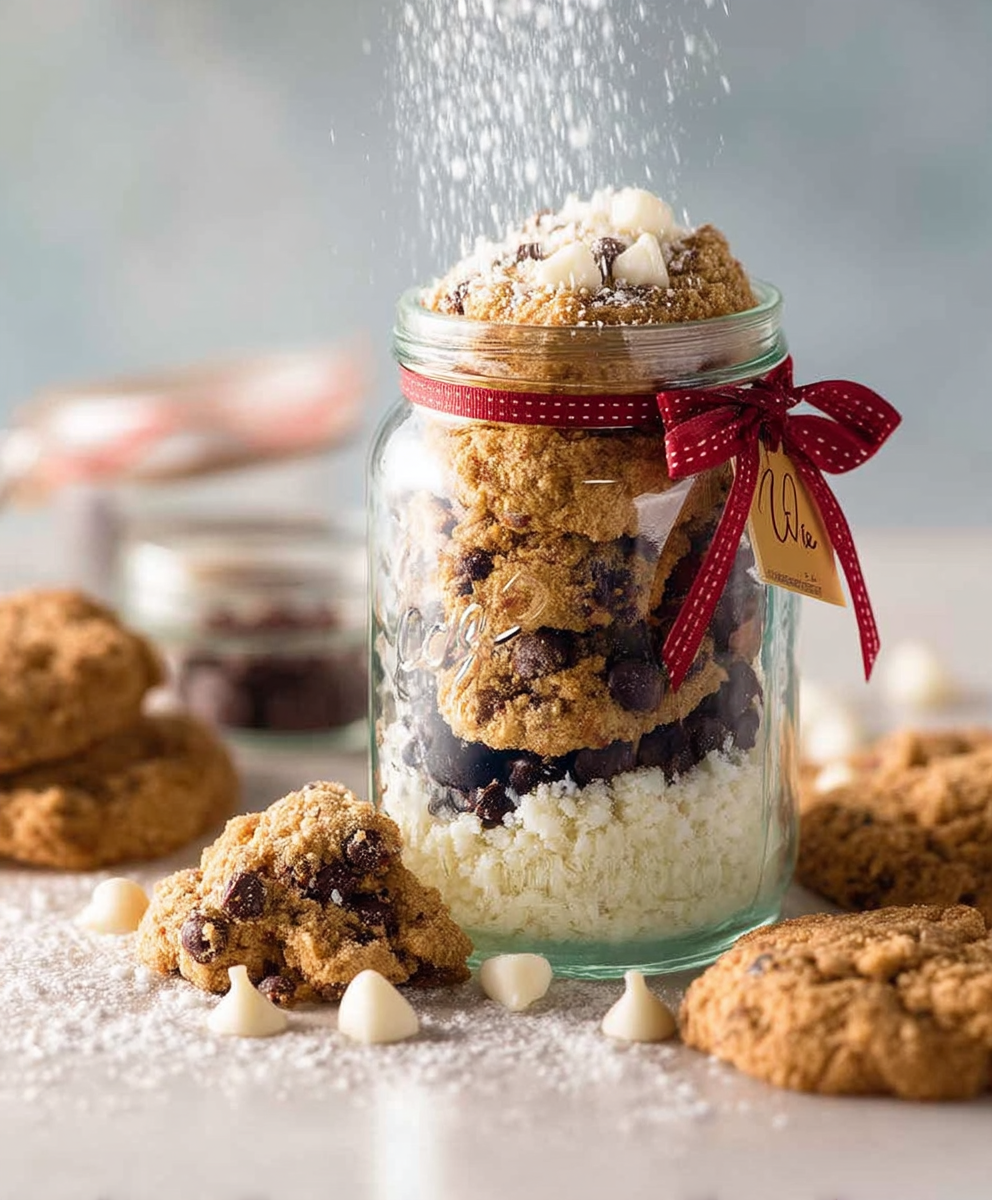
Okay, let’s get this cookie mix jar looking beautiful! The key is to pack each layer down firmly so they stay distinct and don’t mix together during transport. I like to use the back of a spoon to press down each layer.
- First Layer: Flour, Baking Soda, and Salt. In a medium bowl, whisk together the flour, baking soda, and salt until well combined. Carefully pour this mixture into the bottom of the jar, packing it down firmly. This creates a nice, solid base for the other ingredients.
- Second Layer: Brown Sugar. Gently pour the packed brown sugar over the flour mixture. Try to spread it evenly and then pack it down firmly. This layer adds a lovely molasses flavor to the cookies.
- Third Layer: Granulated Sugar. Now, add the granulated sugar on top of the brown sugar. Again, spread it evenly and pack it down. This layer provides sweetness and helps with the cookie’s texture.
- Fourth Layer: Chocolate Chips. Pour the chocolate chips into the jar, creating a layer of chocolatey goodness. You don’t need to pack this layer down as much, just make sure they are distributed evenly.
- Fifth Layer (Optional): Nuts. If you’re using nuts, add them as the final layer. Spread them evenly over the chocolate chips. Lightly press them down.
- Seal and Decorate. Once all the layers are in place, tightly seal the jar. Now for the fun part decorating! Tie a decorative ribbon or twine around the neck of the jar. You can also add a small tag with baking instructions (see below).
Instructions for Baking the Cookies:
Now for the best part baking and enjoying these delicious cookies! Make sure the recipient knows how to bake them. I always include a cute little tag with the instructions.
- Preheat the Oven. Preheat your oven to 375°F (190°C).
- Combine the Mix. Pour the cookie mix from the jar into a large bowl. Make sure to get all the layers!
- Add Wet Ingredients. Add ¾ cup (1 ½ sticks) of softened butter (or margarine), 1 teaspoon of vanilla extract, and 1 large egg to the bowl.
- Mix Well. Using an electric mixer (or a sturdy spoon), mix all the ingredients together until well combined. The dough will be thick and slightly crumbly at first, but keep mixing until it comes together. Don’t overmix!
- Drop by Rounded Tablespoons. Drop rounded tablespoons of cookie dough onto ungreased baking sheets. Leave about 2 inches between each cookie to allow for spreading.
- Bake. Bake for 9-11 minutes, or until the edges are golden brown and the centers are set. Keep a close eye on them, as baking times can vary depending on your oven.
- Cool. Remove the baking sheets from the oven and let the cookies cool on the baking sheets for a few minutes before transferring them to a wire rack to cool completely.
- Enjoy! Enjoy your freshly baked, homemade cookies! They’re perfect with a glass of milk or a cup of coffee.
Tips and Variations:
Want to customize your cookie mix jar? Here are a few ideas to get you started:
- Different Chocolate Chips: Experiment with different types of chocolate chips, such as dark chocolate, white chocolate, or even peanut butter chips.
- Dried Fruit: Add a layer of dried cranberries, raisins, or chopped apricots for a chewy and flavorful twist.
- Spices: Add a pinch of cinnamon, nutmeg, or ginger to the flour mixture for a warm and cozy flavor.
- Candy Pieces: Add a layer of crushed candy canes (for a festive holiday treat) or M&Ms for a colorful and fun addition.
- Gluten-Free Option: Use a gluten-free all-purpose flour blend to make this cookie mix gluten-free. Be sure to check that all other ingredients are also gluten-free.
- Vegan Option: Substitute the butter with a vegan butter alternative and use a flax egg (1 tablespoon of ground flaxseed mixed with 3 tablespoons of water, let sit for 5 minutes to thicken) in place of the egg.
Printable Tag Instructions:
Here’s what I usually put on the tag for the recipient:
Cookie Mix in a Jar – Baking Instructions
- Preheat oven to 375°F (190°C).
- Pour cookie mix into a large bowl.
- Add ¾ cup (1 ½ sticks) softened butter, 1 teaspoon vanilla extract, and 1 egg.
- Mix well until combined.
- Drop by rounded tablespoons onto ungreased baking sheets.
- Bake for 9-11 minutes, or until golden brown.
- Cool on baking sheets for a few minutes before transferring to a wire rack.
- Enjoy!
Storage Instructions:
The cookie mix in the jar can be stored in a cool, dry place for up to 3 months. Once the cookies are baked, they can be stored in an airtight container at room temperature for up to 3-4 days.
Troubleshooting:
Cookies are too dry: Make sure you’re using softened butter, not melted. Also, avoid overbaking the cookies. If your oven tends to run hot, reduce the baking time by a minute or two.
Cookies are too flat: This could be due to using melted butter or not chilling the dough before baking. Make sure your butter is softened but still cool to the touch. You can also try chilling the dough for 30 minutes before baking to help prevent spreading.
Cookies are too crumbly: This could be due to overmixing the dough or not using enough butter. Be careful not to overmix the dough, as this can develop the gluten in the flour and make the cookies tough. Also, double-check that you’ve added the correct amount of butter.
Why This Recipe Works:
This cookie mix in a jar is a fantastic gift because it’s both thoughtful and practical. It allows the recipient to enjoy freshly baked, homemade cookies without having to measure out all the dry ingredients themselves. The layered presentation is visually appealing, and the baking instructions are easy to follow. Plus, it’s a great way to use up ingredients you already have in your pantry!
Making it a Gift Basket:
To elevate this gift even further, consider creating a small gift basket around the cookie mix jar. Here are some ideas:
- Include a Spatula or Cookie Scoop: A nice spatula or cookie scoop makes baking even easier.
- Add a Cute Oven Mitt: A festive oven mitt adds a touch of personality.
- Include a Bag of Sprinkles: Sprinkles are always a fun addition to cookies!
- Add a Small Bottle of Vanilla Extract: A high-quality vanilla extract can enhance the flavor of the cookies.
- Include a Mug and Some Hot Chocolate Mix: Perfect for enjoying with the freshly baked cookies.
Nutritional Information (Approximate, per cookie):
Please note: This is an estimate and can vary depending on the specific ingredients used and the size of the cookies.
- Calories: 150-200
- Fat: 8-12g
- Saturated Fat: 5-8g
- Cholesterol: 20-30mg
- Sodium: 50-75mg
- Carbohydrates: 20-25g
- Sugar: 12-15g
- Protein: 1-2g
Final Thoughts:
This cookie mix in a jar is more than just a recipe; it’s a gift of warmth, love, and deliciousness. It’s perfect for holidays,
Conclusion:
This Cookie Mix In Jar isn’t just a recipe; it’s a delightful experience waiting to happen! From the satisfying layering process to the incredible aroma that fills your kitchen as these cookies bake, it’s a gift that keeps on giving both literally and figuratively. I truly believe this is a must-try for anyone looking for a thoughtful, homemade present or simply a fun baking project. The beauty of this mix lies in its simplicity and versatility. It’s a blank canvas for your creativity!
Think beyond the basic chocolate chip. Imagine adding dried cranberries and white chocolate chips for a festive holiday treat. Or perhaps some chopped pecans and a dash of cinnamon for a cozy autumn vibe. For the coffee lovers, a tablespoon of instant espresso powder mixed into the dry ingredients will create a mocha masterpiece. And if you’re feeling adventurous, consider adding a pinch of sea salt to the top of each cookie before baking to enhance the sweetness and create a delightful salty-sweet contrast. The possibilities are truly endless!
Beyond the variations within the cookie itself, consider how you might present the finished product. A simple ribbon tied around the jar is always charming, but you could also add a handwritten tag with baking instructions and a personal message. For a more elaborate gift, include a small spatula or a set of measuring spoons. You could even pair the jar with a cute cookie cutter or a bag of your favorite sprinkles. The presentation is just as important as the mix itself, so let your imagination run wild!
Serving suggestions are just as varied. These cookies are perfect on their own, warm from the oven with a glass of cold milk. But they also make a fantastic addition to a dessert platter, a thoughtful treat for a neighbor, or a sweet ending to a holiday meal. Crumble them over ice cream for a decadent sundae, or use them as the base for a mini cheesecake. And don’t forget the classic cookie sandwich! Fill them with your favorite frosting or ice cream for a truly unforgettable treat.
I’ve poured my heart into perfecting this Cookie Mix In Jar recipe, and I’m confident that you’ll love it just as much as I do. It’s more than just a collection of ingredients; it’s a symbol of warmth, generosity, and the joy of sharing homemade goodness. So, gather your ingredients, grab your jars, and get ready to create something truly special.
I can’t wait to hear about your experience! Did you try any of the variations I suggested? Did you come up with your own unique twist? What was the reaction of the lucky recipient of your homemade gift? Please, share your photos, stories, and feedback in the comments below. Your insights will not only inspire others but will also help me continue to improve and refine this recipe. Happy baking, and happy gifting! I hope this becomes a cherished tradition for you and your loved ones. Let’s spread some cookie love!
Cookie Mix In Jar: The Ultimate Homemade Gift Guide
Layer dry cookie ingredients in a jar for a beautiful and convenient homemade gift. Just add wet ingredients and bake!
Ingredients
- 1 1/2 cups all-purpose flour
- 1 teaspoon baking soda
- 1 teaspoon salt
- 3/4 cup packed brown sugar
- 1/2 cup granulated sugar
- 1 cup chocolate chips
- 1 cup chopped nuts (optional)
Instructions
- In a large bowl, combine flour, baking soda, and salt.
- In a separate bowl, whisk together brown sugar and granulated sugar.
- Layer the dry ingredients in a jar, starting with the flour mixture, then the brown sugar, then the granulated sugar, and finally the chocolate chips.
- Attach a tag with baking instructions: “Preheat oven to 375 degrees F (190 degrees C). Empty jar into a large bowl. Add 3/4 cup (170g) softened butter and 1 egg. Mix well. Drop by rounded tablespoons onto baking sheets. Bake for 9-11 minutes.”
Notes
- Mix well to combine all ingredients.
- Store in a cool, dry place for up to 6 months.
- Attach a tag with instructions for baking.
“`

Leave a Comment