
Muddy Buddy Bars are a delightful treat that combines the irresistible flavors of chocolate and peanut butter, creating a snack that is both indulgent and satisfying. Originating from the classic Muddy Buddies snack mix, these bars take the beloved combination of cereal, chocolate, and powdered sugar to a whole new level. I remember the first time I tried them; the crunchy texture paired with the creamy richness of peanut butter was simply unforgettable. People love Muddy Buddy Bars not only for their delicious taste but also for their convenienceperfect for a quick dessert or a sweet pick-me-up during the day. Whether youre hosting a gathering or just craving something sweet, these bars are sure to please everyone!

Ingredients:
- 4 cups of Rice Chex cereal
- 1 cup of creamy peanut butter
- 1 cup of semi-sweet chocolate chips
- ½ cup of unsalted butter
- 1 cup of powdered sugar
- 1 teaspoon of vanilla extract
- ½ cup of mini marshmallows (optional)
- ½ cup of chopped nuts (optional)
Preparing the Mixture
1. **Gather Your Ingredients**: Start by measuring out all your ingredients. This will make the process smoother and more enjoyable. I like to have everything ready to go before I start cooking. 2. **Melt the Chocolate and Peanut Butter**: In a medium saucepan, combine the semi-sweet chocolate chips, creamy peanut butter, and unsalted butter. Place the saucepan over low heat. Stir continuously until everything is melted and smooth. This usually takes about 5-7 minutes. Be careful not to let it burn; keep the heat low and stir often. 3. **Add Vanilla Extract**: Once the chocolate and peanut butter mixture is smooth, remove it from the heat. Stir in the vanilla extract. This adds a lovely depth of flavor to your bars. 4. **Combine with Cereal**: In a large mixing bowl, add the Rice Chex cereal. Pour the melted chocolate-peanut butter mixture over the cereal. Using a spatula or wooden spoon, gently fold the mixture until all the cereal is evenly coated. This step is crucial; you want every piece of cereal to be covered in that delicious chocolate-peanut butter goodness. 5. **Optional Add-ins**: If youre feeling adventurous, now is the time to fold in the mini marshmallows and chopped nuts. They add a delightful texture and flavor to the bars. Mix gently to avoid crushing the cereal.Setting the Bars
6. **Prepare the Pan**: Line a 9×13 inch baking dish with parchment paper, leaving some overhang on the sides. This will make it easier to lift the bars out later. If you dont have parchment paper, you can lightly grease the pan with cooking spray. 7. **Transfer the Mixture**: Pour the cereal mixture into the prepared baking dish. Using your spatula, press the mixture down firmly and evenly into the pan. Make sure its packed tightly; this will help the bars hold together once theyre set. 8. **Chill the Bars**: Place the baking dish in the refrigerator for at least 1 hour. This allows the chocolate-peanut butter mixture to firm up, making it easier to cut into bars later.Cutting and Serving
9. **Remove from the Pan**: Once the bars have chilled and set, remove the baking dish from the refrigerator. Use the overhanging parchment paper to lift the entire block of bars out of the pan. 10. **Cut into Bars**: Place the block on a cutting board. Using a sharp knife, cut it into squares or rectangles, depending on your preference. I usually aim for about 24 bars, but you can make them larger or smaller based on your liking. 11. **Store the Bars**: If you have any leftovers (which is rare!), store the bars in an airtight container at room temperature for up to a week. You can also refrigerate them for a longer shelf life, but I find theyre best enjoyed at room temperature.Enjoying Your Muddy Buddy Bars
12. **Serve and Share**: These Muddy Buddy Bars are perfect for sharing with friends and family. They make a great treat for parties, picnics, or just a cozy night in. I love serving them with a glass of cold milk or a warm cup of coffee. 13. **Experiment with Flavors**: Feel free to get creative with this recipe! You can substitute almond butter for peanut butter, use white chocolate chips instead of semi-sweet, or even add a sprinkle of sea salt on top for a sweet and salty combination. The possibilities are endless! 14. **Enjoy the Process**: Remember, cooking is all about having fun and enjoying the process. Dont stress if things dont turn out perfectly; the most important part is that youre making something delicious with your own hands. Now that you have this detailed recipe for Muddy Buddy Bars, I hope you feel inspired to get into the kitchen and whip up a batch. Theyre a delightful treat thats sure to please everyone, and I cant wait for you to try them! Happy cooking!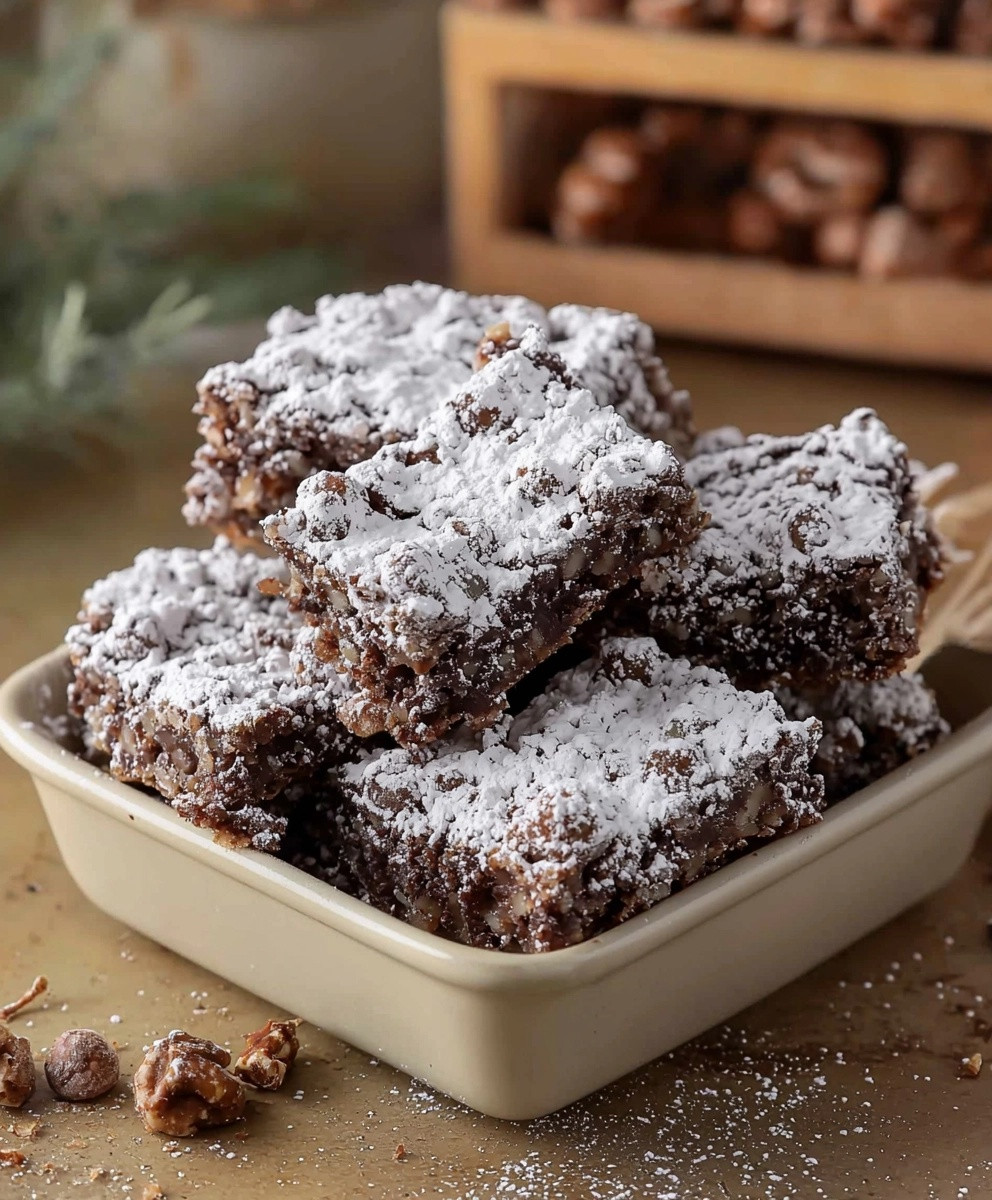
Conclusion:
In summary, these Muddy Buddy Bars are an absolute must-try for anyone looking to indulge in a deliciously sweet and crunchy treat. The combination of rich chocolate, creamy peanut butter, and the delightful crunch of cereal creates a flavor explosion that is simply irresistible. Whether you’re preparing a snack for movie night, a dessert for a potluck, or just a sweet treat to enjoy at home, these bars are sure to impress. For serving suggestions, consider pairing these Muddy Buddy Bars with a scoop of vanilla ice cream or a drizzle of caramel sauce for an extra touch of decadence. You can also experiment with variations by adding in your favorite mix-ins, such as nuts, dried fruits, or even a sprinkle of sea salt on top for a sweet and salty contrast. The possibilities are endless! I encourage you to give this recipe a try and experience the joy of making your own Muddy Buddy Bars. Once you do, I would love to hear about your experience! Share your thoughts, any variations you tried, or even a picture of your delicious creation. Let’s spread the love for these delightful bars together! Happy baking! Print
Muddy Buddy Bars: The Ultimate No-Bake Treat for Snack Lovers
- Total Time: 85 minutes
- Yield: 24 bars 1x
Description
These Muddy Buddy Bars are a delicious no-bake treat made with crunchy Rice Chex cereal, creamy peanut butter, and rich chocolate. Easy to prepare and perfect for satisfying your sweet cravings, they can be customized with optional mini marshmallows and nuts for added texture. Enjoy these delightful bars with family and friends!
Ingredients
- 4 cups of Rice Chex cereal
- 1 cup of creamy peanut butter
- 1 cup of semi-sweet chocolate chips
- ½ cup of unsalted butter
- 1 cup of powdered sugar
- 1 teaspoon of vanilla extract
- ½ cup of mini marshmallows (optional)
- ½ cup of chopped nuts (optional)
Instructions
- Gather Your Ingredients: Measure out all your ingredients for a smoother cooking process.
- Melt the Chocolate and Peanut Butter: In a medium saucepan, combine the chocolate chips, peanut butter, and butter. Heat over low, stirring continuously until melted and smooth (about 5-7 minutes).
- Add Vanilla Extract: Remove from heat and stir in the vanilla extract.
- Combine with Cereal: In a large bowl, add the Rice Chex cereal. Pour the melted mixture over the cereal and gently fold until evenly coated.
- Optional Add-ins: Fold in mini marshmallows and chopped nuts if desired, mixing gently.
- Prepare the Pan: Line a 9×13 inch baking dish with parchment paper or lightly grease it.
- Transfer the Mixture: Pour the cereal mixture into the prepared dish and press down firmly and evenly.
- Chill the Bars: Refrigerate for at least 1 hour to firm up.
- Remove from the Pan: Lift the block of bars out using the parchment paper.
- Cut into Bars: Cut into squares or rectangles as desired.
- Store the Bars: Store in an airtight container at room temperature for up to a week or refrigerate for longer shelf life.
- Serve and Share: Enjoy with friends and family, perfect for any occasion!
- Experiment with Flavors: Feel free to substitute ingredients or add toppings for a unique twist.
- Enjoy the Process: Have fun in the kitchen and enjoy your delicious creation!
Notes
- For a different flavor, try using almond butter or white chocolate chips.
- Adding a sprinkle of sea salt on top can enhance the sweet and salty combination.
- Prep Time: 15 minutes
- Cook Time: 10 minutes


Leave a Comment