
Buttered corn rice: just the name conjures up images of sunshine, warmth, and pure comfort food, doesn’t it? I remember the first time I tasted this delightful dish; it was at a summer barbecue, and I was instantly hooked. The creamy, sweet, and savory combination was unlike anything I’d ever had before. It was so good that I had to ask for the recipe!
While the exact origins of buttered corn rice are a bit hazy, similar rice and corn combinations have been enjoyed in various cultures for centuries. Corn, a staple grain in many parts of the world, has always been a natural pairing with rice, another global culinary cornerstone. This particular iteration, however, feels distinctly American, evoking images of family gatherings and potlucks.
What makes this dish so universally loved? Well, for starters, it’s incredibly easy to make. With just a handful of ingredients and minimal effort, you can whip up a side dish that’s guaranteed to be a crowd-pleaser. The creamy texture, the sweetness of the corn, and the subtle buttery flavor create a symphony of tastes that’s both comforting and satisfying. Plus, it’s a fantastic way to add a touch of sweetness and color to any meal. So, if you’re looking for a simple yet delicious recipe that’s sure to become a family favorite, look no further!

Ingredients:
- 2 cups all-purpose flour, plus more for dusting
- 1 cup whole wheat flour
- 1 teaspoon baking soda
- 1 teaspoon salt
- 1/2 teaspoon granulated sugar
- 1/2 cup (1 stick) cold unsalted butter, cut into small cubes
- 1/4 cup olive oil
- 3/4 cup cold buttermilk, plus more if needed
- Optional toppings: coarse sea salt, sesame seeds, poppy seeds, dried herbs (rosemary, thyme), everything bagel seasoning
Preparing the Dough:
- In a large bowl, whisk together the all-purpose flour, whole wheat flour, baking soda, salt, and sugar. Make sure everything is evenly distributed. This ensures that the baking soda and salt are properly incorporated, which is crucial for the texture and flavor of the crackers.
- Add the cold, cubed butter to the flour mixture. Using a pastry blender or your fingertips, cut the butter into the flour until the mixture resembles coarse crumbs. The key here is to work quickly so the butter stays cold. Cold butter creates flaky layers in the crackers. If you don’t have a pastry blender, you can use two knives to cut the butter in.
- Drizzle in the olive oil and mix lightly. The olive oil adds richness and flavor to the crackers. Don’t overmix at this stage; just ensure the oil is distributed throughout the flour and butter mixture.
- Gradually add the cold buttermilk, mixing until a dough just comes together. Start with 3/4 cup and add more, a tablespoon at a time, if needed. The amount of buttermilk you need may vary depending on the humidity and the type of flour you’re using. You want a dough that’s moist but not sticky.
- Turn the dough out onto a lightly floured surface and gently knead it a few times until it forms a smooth ball. Be careful not to overwork the dough, as this can make the crackers tough.
- Divide the dough in half. Flatten each half into a disc, wrap tightly in plastic wrap, and refrigerate for at least 30 minutes, or up to 2 hours. This chilling period is important because it allows the gluten to relax, making the dough easier to roll out and preventing the crackers from shrinking during baking.
Rolling and Shaping the Crackers:
- Preheat your oven to 375°F (190°C). Line two baking sheets with parchment paper. Parchment paper prevents the crackers from sticking and makes cleanup a breeze.
- Remove one disc of dough from the refrigerator. On a lightly floured surface, roll the dough out very thinly, about 1/16 inch thick. The thinner you roll the dough, the crispier the crackers will be. Don’t be afraid to use a little extra flour to prevent sticking.
- Using a pizza cutter or a sharp knife, cut the dough into desired shapes. You can make squares, rectangles, triangles, or even use cookie cutters for fun shapes. Get creative!
- Transfer the cut crackers to the prepared baking sheets, leaving a little space between each cracker. They don’t spread much, but you want to ensure they bake evenly.
- Repeat steps 2-4 with the remaining disc of dough.
Adding Toppings and Baking:
- Before baking, brush the crackers lightly with a little extra buttermilk or olive oil. This helps the toppings adhere and gives the crackers a nice golden color.
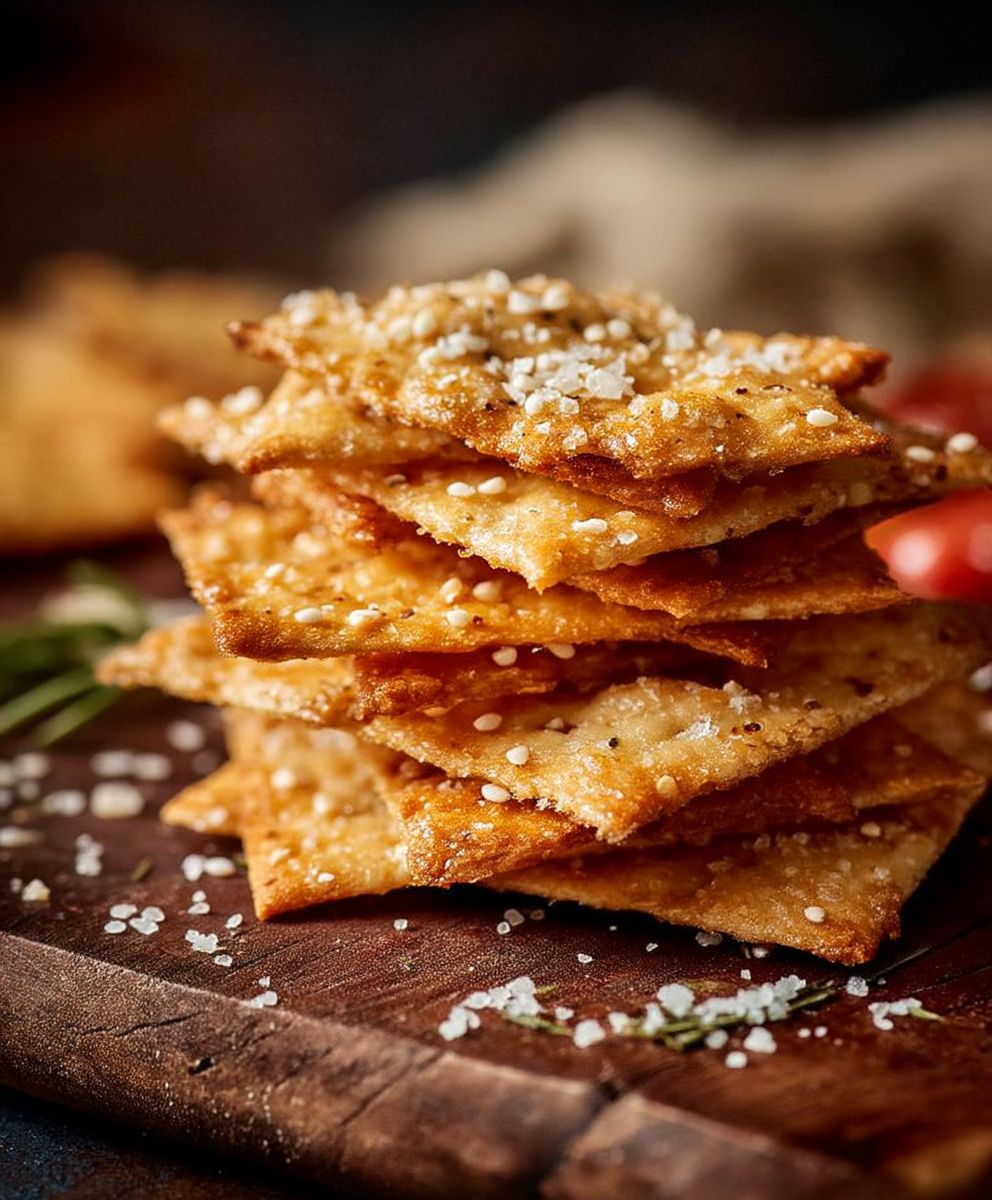
- Sprinkle the crackers with your desired toppings. Coarse sea salt is a classic choice, but sesame seeds, poppy seeds, dried herbs (like rosemary or thyme), and everything bagel seasoning are also delicious options. Feel free to experiment with different combinations!
- Bake for 10-15 minutes, or until the crackers are golden brown and crisp. Keep a close eye on them, as they can burn easily. The baking time will vary depending on the thickness of the crackers and your oven.
- Remove the baking sheets from the oven and let the crackers cool completely on the baking sheets before serving. This allows them to crisp up further.
Tips for Perfect Crackers:
- Use cold ingredients: Cold butter and buttermilk are essential for creating flaky, crispy crackers.
- Don’t overmix the dough: Overmixing develops the gluten, which can make the crackers tough. Mix just until the dough comes together.
- Roll the dough thinly: The thinner you roll the dough, the crispier the crackers will be.
- Prick the crackers with a fork: This helps prevent them from puffing up too much during baking. I usually skip this step for a more rustic look, but it’s helpful if you want perfectly flat crackers.
- Watch them carefully while baking: Crackers can burn easily, so keep a close eye on them and adjust the baking time as needed.
- Experiment with flavors: Don’t be afraid to get creative with your toppings and seasonings. You can add cheese, spices, or even a touch of sweetness to the dough.
- Storage: Store the cooled crackers in an airtight container at room temperature for up to a week. They’re best enjoyed fresh, but they’ll still be delicious after a few days.
Variations and Flavor Combinations:
The beauty of homemade crackers is that you can customize them to your liking. Here are a few ideas to get you started:
- Cheese Crackers: Add 1/2 cup of grated cheddar, Parmesan, or Gruyere cheese to the dough.
- Spicy Crackers: Add 1/4 teaspoon of cayenne pepper or red pepper flakes to the dough.
- Herb Crackers: Add 2 tablespoons of chopped fresh herbs, such as rosemary, thyme, or oregano, to the dough.
- Garlic Crackers: Add 1 teaspoon of garlic powder to the dough.
- Everything Bagel Crackers: Sprinkle the crackers with everything bagel seasoning before baking.
- Sweet Crackers: Add 2 tablespoons of sugar and 1/4 teaspoon of cinnamon to the dough. These are great with a drizzle of honey or a sprinkle of powdered sugar after baking.
- Seed Crackers: Add 1/4 cup of mixed seeds, such as sunflower seeds, pumpkin seeds, and flax seeds, to the dough.
Serving Suggestions:
These artisan crackers are incredibly versatile and can be enjoyed in many ways:
- With cheese and charcuterie: Serve them as part of a cheese board or charcuterie platter.
- With dips and spreads: Pair them with your favorite dips, such as hummus, guacamole, or spinach artichoke dip.
- With soup or salad: Crumble them over soup or salad for added texture and flavor.
- As a snack: Enjoy them on their own as a simple and satisfying snack.
- With wine: Serve them with a glass of wine for a sophisticated appetizer.
Troubleshooting:
Crackers are too tough: You may have overmixed the dough. Be careful not to overwork the dough, and make sure to chill it for at least 30 minutes before rolling it out.
Crackers are too soft: You may not have rolled the dough thinly enough, or you may not have baked them long enough. Roll the dough as thinly as possible, and bake the crackers until they are golden brown and crisp.
Crackers are burning: Your oven may be too hot. Reduce the oven temperature by 25 degrees and bake the crackers for a longer period of time.
Crackers are sticking to the baking sheet: Make sure to line the baking sheet with parchment paper. This will prevent the crackers from sticking and make cleanup a breeze.
Enjoy your homemade artisan crackers!
Conclusion:
So there you have it! This artisan crackers homemade recipe is more than just a set of instructions; it’s an invitation to create something truly special, something that elevates your snacking experience and impresses your friends and family. I genuinely believe that once you taste the difference between store-bought and homemade crackers, you’ll never go back. The depth of flavor, the satisfying crunch, and the sheer satisfaction of knowing you crafted it all yourself it’s an unbeatable combination.
Why is this recipe a must-try? Because it’s surprisingly simple, incredibly versatile, and yields a product that’s far superior to anything you can find on a supermarket shelf. We’re talking about crackers that are bursting with flavor, perfectly crisp, and free from all those unnecessary additives and preservatives. Plus, the aroma that fills your kitchen while they’re baking is simply divine!
But the best part? The possibilities are endless! These crackers are fantastic on their own, but they truly shine when paired with your favorite cheeses, dips, and spreads. Imagine serving them with a creamy brie and fig jam, a sharp cheddar and apple chutney, or a vibrant hummus and roasted red pepper dip. The combinations are limited only by your imagination!
And don’t be afraid to experiment with variations! Try adding different herbs and spices to the dough rosemary, thyme, garlic powder, onion powder, or even a pinch of chili flakes for a little kick. You could also incorporate different types of seeds, like sesame, poppy, or sunflower seeds, for added texture and flavor. For a sweeter cracker, consider adding a touch of honey or maple syrup to the dough. You can even experiment with different flours, like whole wheat or rye, for a heartier flavor.
Here are a few serving suggestions to get you started:
- Cheese and Charcuterie Board: Arrange your homemade crackers alongside a selection of cheeses, cured meats, olives, and fruits for a stunning and delicious appetizer.
- Soup and Salad Accompaniment: Serve these crackers with a warm bowl of soup or a refreshing salad for a satisfying and complete meal.
- Snack Attack: Enjoy them straight from the oven with a simple spread of butter or cream cheese for a quick and easy snack.
- Dip Delights: Pair them with your favorite dips, such as hummus, guacamole, or spinach artichoke dip, for a crowd-pleasing appetizer.
I’m so excited for you to try this recipe and discover the joy of making your own artisan crackers homemade. It’s a rewarding experience that will elevate your snacking game and impress your loved ones.
So, what are you waiting for? Gather your ingredients, preheat your oven, and get ready to create some truly amazing crackers. I promise you won’t be disappointed!
And once you’ve tried the recipe, I’d love to hear about your experience! Share your photos, your variations, and your serving suggestions in the comments below. Let’s inspire each other to create even more delicious and unique cracker creations. Happy baking! I can’t wait to see what you come up with! Let me know if you have any questions, I’m always happy to help.
Artisan Crackers Homemade: The Ultimate Guide to Baking Your Own
Crisp, flavorful crackers perfect for snacking or pairing with cheese and dips. Made from scratch with simple ingredients.
Ingredients
- 225g all-purpose flour
- 1 tsp baking powder
- 1 tsp salt
- 60ml olive oil
- 120ml water
- Optional toppings: herbs, seeds, spices
Instructions
- Preheat oven to 350°F (175°C).
- In a large bowl, whisk together flour, salt, and any desired spices.
- Add olive oil and water, mixing until a dough forms.
- Turn dough out onto a lightly floured surface and knead for a few minutes until smooth.
- Roll out dough very thinly.
- Cut into desired shapes using a knife or cookie cutter.
- Place crackers on a baking sheet lined with parchment paper.
- Prick each cracker several times with a fork.
- Bake for 12-15 minutes, or until golden brown.
- Let cool completely on a wire rack before serving.
Notes
- For best results, use a kitchen scale to measure ingredients.
- The dough can be made ahead of time and stored in the refrigerator for up to 3 days.
- Feel free to experiment with different herbs and spices.
- If the dough is too sticky, add a little more flour, 1 tablespoon at a time.
- If the dough is too dry, add a little more water, 1 teaspoon at a time.
- The crackers can be stored in an airtight container at room temperature for up to 1 week.
“`


Leave a Comment