
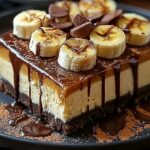
Banoffee Pie Cheesecake: Prepare to have your dessert dreams redefined! Imagine the rich, creamy decadence of a classic cheesecake swirling together with the sweet, caramel-y goodness of banoffee pie. It’s a flavor explosion that will leave you craving more with every single bite.
While the exact origins of banoffee pie are relatively recent dating back to 1971 in England its impact on the dessert world has been monumental. The combination of bananas, toffee (often made from boiled condensed milk), and cream proved irresistible, quickly becoming a beloved classic. Now, we’re taking that iconic flavor profile and elevating it to new heights by infusing it into a cheesecake!
What makes this Banoffee Pie Cheesecake so special? It’s the perfect marriage of textures and tastes. The smooth, velvety cheesecake base provides a luxurious foundation for the layers of sweet, sticky caramel and the soft, fruity banana slices. The buttery biscuit crust adds a delightful crunch, creating a symphony of sensations in your mouth. Plus, it’s surprisingly easy to make, making it the ideal show-stopping dessert for any occasion. Whether you’re hosting a dinner party or simply treating yourself, this cheesecake is guaranteed to impress. So, let’s get baking and create a dessert that’s both comforting and utterly irresistible!

Ingredients:
- For the Biscuit Base:
- 250g Digestive Biscuits
- 100g Unsalted Butter, melted
- 25g Light Brown Sugar
- For the Caramel Layer:
- 397g Can of Sweetened Condensed Milk
- 50g Unsalted Butter
- Pinch of Sea Salt
- For the Cheesecake Filling:
- 600g Full-Fat Cream Cheese, softened
- 150g Icing Sugar, sifted
- 1 tsp Vanilla Extract
- 300ml Double Cream
- For the Banana Topping:
- 3-4 Ripe Bananas
- Juice of 1 Lemon
- For Decoration:
- 50g Dark Chocolate, grated or shaved
- Optional: Extra Caramel Sauce for drizzling
Preparing the Biscuit Base:
- Crush the Biscuits: First, you’ll need to crush the digestive biscuits into fine crumbs. You can do this in a food processor, pulsing until they are finely ground. Alternatively, place the biscuits in a large zip-lock bag and bash them with a rolling pin until you achieve a similar consistency. Make sure there are no large chunks remaining!
- Combine with Butter and Sugar: In a large bowl, combine the crushed biscuit crumbs, melted butter, and light brown sugar. Mix well until all the crumbs are evenly coated with the butter and sugar mixture. The mixture should resemble wet sand.
- Press into the Tin: Press the biscuit mixture firmly into the base of a 23cm (9-inch) springform tin. Use the back of a spoon or a measuring cup to create a smooth and even layer. Make sure to press it down firmly to create a solid base for the cheesecake.
- Chill the Base: Place the springform tin in the refrigerator and chill for at least 30 minutes. This will allow the butter to solidify and the base to set properly, preventing it from crumbling when you add the filling.
Making the Caramel Layer:
- Prepare the Caramel: There are a couple of ways to make the caramel. You can either use the traditional method of boiling a can of sweetened condensed milk (which takes several hours and requires constant monitoring) or the stovetop method, which is much quicker and easier. We’ll go with the stovetop method here.
- Melt Butter and Condensed Milk: In a medium-sized saucepan, combine the sweetened condensed milk and butter. Place the saucepan over medium-low heat.
- Cook and Stir: Stir the mixture constantly with a wooden spoon or heat-resistant spatula. It’s crucial to stir continuously to prevent the caramel from burning or sticking to the bottom of the pan.
- Simmer Until Thickened: Continue to cook and stir the mixture for about 10-15 minutes, or until it thickens and turns a rich golden brown color. The caramel should be thick enough to coat the back of a spoon. Be patient, as it takes time for the caramel to develop its flavor and consistency.
- Add Salt: Remove the saucepan from the heat and stir in a pinch of sea salt. The salt enhances the sweetness of the caramel and adds a lovely depth of flavor.
- Cool Slightly: Allow the caramel to cool slightly for about 5-10 minutes before pouring it over the chilled biscuit base. This will prevent the caramel from melting the biscuit base too much.
- Pour Over Base: Pour the slightly cooled caramel evenly over the chilled biscuit base. Spread it out to cover the entire surface.
- Chill Again: Return the springform tin to the refrigerator and chill for at least 1 hour, or until the caramel layer is firm and set. This is important to ensure that the caramel doesn’t mix with the cheesecake filling.
Preparing the Cheesecake Filling:
- Soften the Cream Cheese: Make sure your cream cheese is completely softened before you start. This is crucial for a smooth and lump-free cheesecake filling. If you forget to take it out of the fridge in advance, you can microwave it in 15-second intervals, checking and stirring in between, until it’s soft.
- Beat Cream Cheese and Sugar: In a large bowl, beat the softened cream cheese with the sifted icing sugar until smooth and creamy. Use an electric mixer (either a stand mixer or a handheld mixer) for best results. Sifting the icing sugar prevents lumps in the filling.
- Add Vanilla Extract: Stir in the vanilla extract. This adds a lovely aroma and enhances the overall flavor of the cheesecake.
- Whip the Double Cream: In a separate bowl, whip the double cream until soft peaks form. Be careful not to overwhip the cream, as it can become grainy. You want it to be thick enough to hold its shape but still soft and creamy.
- Gently Fold in Cream: Gently fold the whipped cream into the cream cheese mixture. Use a spatula and be careful not to deflate the cream. Fold until just combined, ensuring there are no streaks of cream cheese remaining. Overmixing can result in a dense cheesecake.
- Pour Over Caramel: Carefully pour the cheesecake filling over the chilled caramel layer. Spread it out evenly to cover the entire surface.
- Smooth the Top: Use a spatula or the back of a spoon to smooth the top of the cheesecake filling. This will create a nice, even surface for the banana topping.
- Chill the Cheesecake: Cover the springform tin with plastic wrap and chill the cheesecake in the refrigerator for at least 6 hours, or preferably overnight. This allows the cheesecake to set completely and develop its flavors.
Assembling the Banoffee Pie Cheesecake:
- Prepare the Bananas: Just before serving, peel the bananas and slice them into even rounds. To prevent the bananas from browning, toss them gently with lemon juice. The lemon juice will also add a subtle tang that complements the sweetness of the cheesecake.
- Arrange Bananas on Top: Arrange the banana slices on top of the chilled cheesecake filling. You can arrange them in a circular pattern, overlapping each other, or simply scatter them randomly over the surface.
- Grate Chocolate: Grate or shave the dark chocolate using a grater or a vegetable peeler.
- Decorate with Chocolate: Sprinkle the grated or shaved dark chocolate over the banana slices. The dark chocolate adds a lovely contrast in flavor and texture to the sweet bananas and creamy cheesecake.
- Optional: Drizzle with Caramel: If desired, drizzle some extra caramel sauce over the top of the cheesecake for an extra touch of indulgence.
- Remove from Tin: Carefully remove the cheesecake from the springform tin. Run a thin knife or spatula around the edge of the cheesecake to loosen it from the sides of the tin before releasing the spring.
- Serve and Enjoy: Slice the Banoffee Pie Cheesecake into wedges and serve immediately. Enjoy the delicious combination of flavors and textures!
Tips for Success:
- Use Full-Fat Cream Cheese: For the best texture and flavor, use full-fat cream cheese. Low-fat cream cheese can result in a cheesecake that is too soft or watery.
- Don’t Overbake: Since this is a no-bake cheesecake, there’s no risk of overbaking. However, it’s important to chill it for a sufficient amount of time to allow it to set properly.
- Chill Thoroughly: Chilling the cheesecake for at least 6 hours, or preferably overnight, is crucial for a firm and stable cheesecake.
- Fresh Ingredients: Use fresh, ripe bananas for the best flavor and texture.
- Variations: Feel free to experiment with different variations of this recipe. You can add a layer of whipped cream on top of the bananas, or use different types of chocolate for decoration. You could also add a sprinkle of chopped nuts for extra crunch.

Conclusion:
So, there you have it! This Banoffee Pie Cheesecake isn’t just a dessert; it’s an experience. It’s the creamy decadence of cheesecake meeting the sweet, sticky goodness of banoffee pie in a harmonious explosion of flavor. I truly believe this recipe is a must-try for anyone who loves a good dessert, and especially for those who appreciate the magic that happens when two classic treats collide. Why is it a must-try? Because it’s surprisingly easy to make! Don’t let the layers fool you; each step is straightforward, and the result is so impressive that you’ll feel like a professional baker. Plus, the combination of textures the crunchy biscuit base, the smooth cheesecake filling, the soft bananas, and the rich caramel is simply irresistible. It’s a guaranteed crowd-pleaser, perfect for birthdays, holidays, or any occasion that calls for a little bit of indulgence. But the best part? You can totally make it your own! Feel free to experiment with different variations. For a richer, more intense caramel flavor, try using dark brown sugar in your toffee sauce. If you’re feeling adventurous, add a splash of rum or bourbon to the caramel for an extra kick. For a lighter version, you could use reduced-fat cream cheese and a graham cracker crust. Serving suggestions? Oh, the possibilities! A dollop of freshly whipped cream is always a welcome addition. A sprinkle of shaved chocolate or a dusting of cocoa powder adds a touch of elegance. For a truly decadent experience, serve it with a scoop of vanilla ice cream. And if you’re feeling extra fancy, you can drizzle a little extra caramel sauce over the top. I personally love serving this Banoffee Pie Cheesecake slightly chilled, as it allows the flavors to meld together beautifully. It’s also fantastic the next day, if you happen to have any leftovers (which is a rare occurrence in my house!).Serving Suggestions:
- With a dollop of freshly whipped cream
- Sprinkled with shaved chocolate or cocoa powder
- Alongside a scoop of vanilla ice cream
- Drizzled with extra caramel sauce
Variations:
- Use dark brown sugar for a richer caramel flavor
- Add a splash of rum or bourbon to the caramel
- Use reduced-fat cream cheese and a graham cracker crust for a lighter version
- Try adding a layer of chocolate ganache between the cheesecake and the bananas
Banoffee Pie Cheesecake: The Ultimate Dessert Recipe
- Total Time: 25 minutes
- Yield: 12 slices 1x
Description
A delightful fusion of banoffee pie and cheesecake. Features a biscuit base, creamy cheesecake filling, caramel, bananas, and whipped cream.
Ingredients
- 250g digestive biscuits
- 100g unsalted butter, melted
- 397g can condensed milk
- 100g light brown soft sugar
- 75g butter, salted
- 2 large bananas
- 300ml double cream
- 1 tsp vanilla extract
- 1 tbsp icing sugar
- ½ tsp cocoa powder
Instructions
- Crush the biscuits in a food processor until they resemble breadcrumbs.
- Melt the butter and mix with the biscuit crumbs.
- Press the mixture into the base of a 23cm springform tin and chill in the fridge for 30 minutes.
- Beat the cream cheese, sugar and vanilla extract together until smooth.
- In a separate bowl, whip the double cream until it forms soft peaks.
- Gently fold the whipped cream into the cream cheese mixture.
- Spread the caramel over the biscuit base.
- Slice the bananas and arrange them over the caramel.
- Spoon the cheesecake mixture over the bananas and smooth the top.
- Chill in the fridge for at least 4 hours, or preferably overnight.
- Before serving, decorate with grated chocolate and a drizzle of caramel sauce.
Notes
“`html
- For the best results, use full-fat cream cheese and double cream.
- Make sure the digestive biscuits are crushed very finely to create a smooth base.
- Allow the cheesecake to chill for at least 6 hours, or preferably overnight, to allow it to set properly.
- If you don’t have time to make the caramel from scratch, you can use a good quality store-bought caramel sauce.
- For a richer flavor, use dark brown sugar in the caramel.
- Garnish with extra banana slices and chocolate shavings just before serving.
“`
- Prep Time: 25 minutes
- Cook Time: 45 minutes
Leave a Comment