
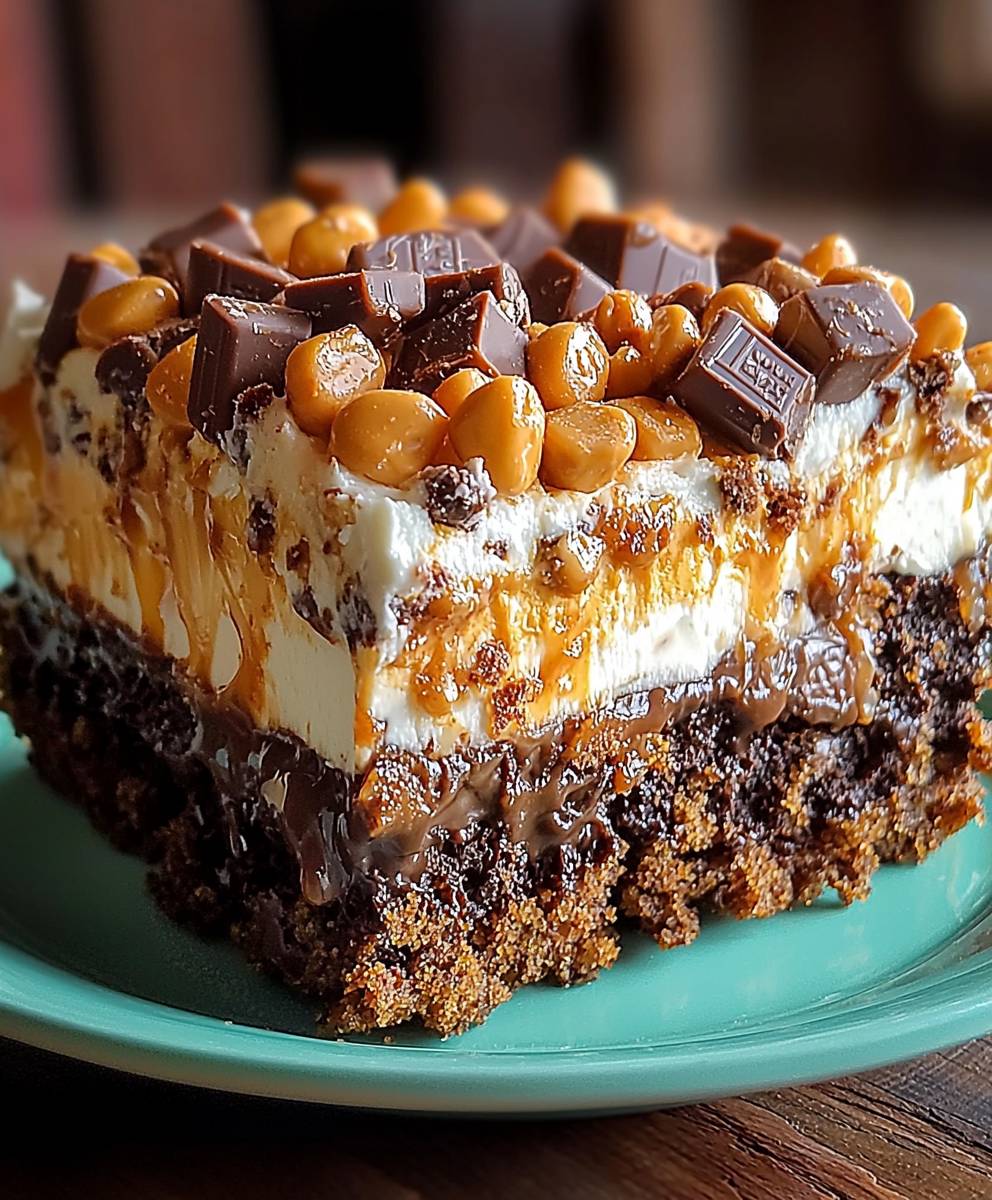
Butterfinger Poke Cake: Prepare to be amazed by this incredibly moist and decadent dessert that’s guaranteed to become a family favorite! Imagine a tender cake, soaked with a luscious caramel mixture, and then topped with whipped cream and a generous shower of crunchy, irresistible Butterfinger candy. Sounds divine, right?
Poke cakes, in general, have a surprisingly humble history. Emerging in the 1970s, they were initially popularized by Jell-O, who cleverly used them in advertisements to showcase the versatility of their gelatin. The concept was simple yet brilliant: poke holes in a baked cake and fill them with liquid, creating an incredibly moist and flavorful treat. Over the years, the poke cake has evolved, with countless variations emerging, each as tempting as the last.
What makes this Butterfinger Poke Cake so special? It’s the perfect combination of textures and flavors. The soft, yielding cake contrasts beautifully with the crisp Butterfinger pieces, while the caramel sauce adds a rich, buttery sweetness that’s simply irresistible. Plus, it’s incredibly easy to make, making it ideal for potlucks, parties, or even a simple weeknight dessert. Everyone loves the nostalgic taste of Butterfinger, and this cake elevates it to a whole new level of deliciousness. Get ready to experience a dessert that’s both comforting and exciting you won’t be able to stop at just one slice!

Ingredients:
- 1 box (13.25 oz) yellow cake mix, plus ingredients called for on the box (usually eggs, oil, and water)
- 1 can (14 oz) sweetened condensed milk
- 1 jar (12 oz) caramel topping
- 5 fun-size Butterfinger bars, chopped
- 1 container (8 oz) frozen whipped topping, thawed
- 3 fun-size Butterfinger bars, crushed, for garnish
Baking the Cake
- First things first, let’s get that oven preheated! Set it to 350°F (175°C). This is crucial for even baking.
- Now, grease and flour a 9×13 inch baking pan. I like to use a baking spray that already has flour in it it makes life so much easier! But if you don’t have that, just grease the pan with butter or shortening, then sprinkle a little flour in and tap it around until the whole pan is coated. Tap out any excess flour. This prevents the cake from sticking and ensures it comes out cleanly.
- Prepare the yellow cake mix according to the package directions. Usually, this involves combining the cake mix with eggs, oil, and water. Follow the instructions precisely for the best results. Don’t overmix the batter, though! Overmixing can lead to a tough cake. Mix until just combined.
- Pour the batter into the prepared baking pan, spreading it evenly. Make sure the batter reaches all the corners of the pan.
- Bake for the time specified on the cake mix box, usually around 25-30 minutes. To check for doneness, insert a toothpick into the center of the cake. If it comes out clean or with just a few moist crumbs attached, the cake is done. If the toothpick comes out with wet batter, bake for a few more minutes and check again.
- Once the cake is baked, remove it from the oven and let it cool slightly, about 10-15 minutes. This is important because you don’t want to pour the sweetened condensed milk onto a piping hot cake it could cause the cake to collapse a bit.
Poking and Soaking
- Now comes the fun part poking! Use the handle of a wooden spoon or a fork to poke holes all over the cake. Make sure the holes are evenly spaced and go all the way down to the bottom of the cake. The more holes you poke, the more the sweetened condensed milk and caramel will soak in, making the cake extra moist and delicious.
- Pour the sweetened condensed milk evenly over the cake, making sure it seeps into all the holes. Don’t be shy! You want the cake to be thoroughly soaked.
- Next, drizzle the caramel topping over the cake, again making sure it gets into all those lovely holes. I like to warm the caramel topping slightly in the microwave (about 15-20 seconds) to make it easier to pour.
- Sprinkle the chopped Butterfinger bars evenly over the caramel. This adds a fantastic crunch and that signature Butterfinger flavor.
- Cover the cake with plastic wrap and refrigerate for at least 2 hours, or preferably overnight. This allows the sweetened condensed milk and caramel to fully soak into the cake, creating a super moist and flavorful dessert. The longer it chills, the better it tastes!
Frosting and Finishing
- Once the cake has chilled, remove it from the refrigerator.
- Spread the thawed whipped topping evenly over the cake. Make sure to cover the entire surface. You can use a spatula or a knife to create a smooth and even layer.
- Finally, sprinkle the crushed Butterfinger bars over the whipped topping. This adds a final touch of Butterfinger flavor and a beautiful visual appeal.
- Cut the cake into squares and serve. Enjoy! This cake is best served cold.
Tips and Variations
- Cake Mix Options: While yellow cake mix is the classic choice for Butterfinger Poke Cake, you can experiment with other flavors. Chocolate cake mix would be a delicious alternative, adding a richer, more decadent flavor. Vanilla cake mix would also work well, providing a more subtle flavor that allows the Butterfinger and caramel to shine.
- Caramel Variations: If you’re feeling adventurous, you can try making your own homemade caramel sauce. It’s a bit more work, but the flavor is incredible. Alternatively, you can use a salted caramel sauce for a slightly salty-sweet twist.
- Butterfinger Alternatives: While Butterfinger is the star of this cake, you can substitute other candy bars if you prefer. Snickers, Heath bars, or even Reese’s Peanut Butter Cups would all be delicious additions. Just make sure to chop them into small pieces before adding them to the cake.
- Adding Nuts: For extra crunch and flavor, consider adding chopped nuts to the cake. Peanuts, pecans, or walnuts would all complement the Butterfinger and caramel flavors nicely. Sprinkle them over the caramel layer or the whipped topping.
- Making it Ahead: Butterfinger Poke Cake is a great make-ahead dessert. You can bake the cake and poke the holes a day or two in advance. Just cover it tightly with plastic wrap and store it in the refrigerator until you’re ready to add the sweetened condensed milk, caramel, and Butterfinger bars.
- Serving Suggestions: This cake is delicious on its own, but you can also serve it with a scoop of vanilla ice cream or a dollop of whipped cream. A drizzle of chocolate sauce would also be a nice addition.
- Storage: Store leftover cake in the refrigerator, covered tightly with plastic wrap or in an airtight container. It will keep for up to 3 days. The cake may become slightly softer over time, but it will still be delicious.
- Whipped Cream Alternative: If you prefer whipped cream over whipped topping, feel free to use it! Just make sure to whip it to stiff peaks so it holds its shape on the cake. You can also add a little powdered sugar to sweeten it to your liking.
- Dietary Considerations: This cake is not gluten-free or dairy-free. To make it gluten-free, you would need to use a gluten-free cake mix. To make it dairy-free, you would need to find dairy-free alternatives for the sweetened condensed milk, caramel topping, and whipped topping.
Troubleshooting
- Cake is too dry: Make sure you’re not overbaking the cake. Check for doneness with a toothpick and remove it from the oven as soon as it’s done. Also, make sure you’re poking enough holes in the cake so the sweetened condensed milk and caramel can soak in properly.
- Cake is too soggy: You may have added too much sweetened condensed milk or caramel. Try using slightly less next time. Also, make sure you’re chilling the cake for at least 2 hours to allow the liquids to fully absorb.
- Whipped topping is melting: Make sure the cake is thoroughly chilled before adding the whipped topping. Also, keep the cake refrigerated until you’re ready to serve it.
- Butterfinger bars are sinking: This can happen if the caramel layer is too soft. Try chilling the cake for a longer period of time before adding the Butterfinger bars. You can also lightly press the Butterfinger bars into the caramel to help them stay in place.
Nutritional Information (Approximate)
Please note that the following nutritional information is an estimate and may vary depending on the specific ingredients used.
- Serving Size: 1 slice (1/12 of the cake)
- Calories: 450-550
- Fat: 20-30g
- Saturated Fat: 10-15g
- Cholesterol: 50-70mg
- Sodium: 200-300mg
- Carbohydrates: 60-70g
- Sugar: 40-50g
- Protein: 5-7g
This cake is a treat, so enjoy it in moderation!
Conclusion:
This Butterfinger Poke Cake is truly a dessert experience you won’t want to miss! From the moist, tender cake soaked in that creamy, dreamy pudding mixture to the crunchy, irresistible Butterfinger topping, every bite is a symphony of textures and flavors. It’s the perfect balance of sweet, salty, and peanut buttery goodness that will have everyone begging for seconds. Trust me, this isn’t just another cake recipe; it’s a guaranteed crowd-pleaser that’s surprisingly easy to make.
Why is this a must-try? Because it’s ridiculously delicious, incredibly simple, and always a hit. It’s the kind of dessert that disappears in minutes at potlucks, birthday parties, or even just a casual weeknight treat. The poke cake method ensures that every single crumb is infused with flavor, preventing any dry or bland bites. And let’s be honest, who can resist the allure of Butterfinger candy? It elevates this cake from ordinary to extraordinary.
Looking for serving suggestions? This cake is fantastic on its own, but you can definitely dress it up! A dollop of whipped cream or a scoop of vanilla ice cream adds a cool and creamy contrast to the rich cake. For an extra touch of indulgence, drizzle some melted chocolate or caramel sauce over the top. If you’re feeling adventurous, try adding a sprinkle of chopped peanuts or pretzels for even more crunch.
Want to get creative with variations? The possibilities are endless! You could swap out the vanilla pudding for chocolate or peanut butter pudding to intensify the flavor. Consider using a different type of candy bar for the topping Snickers, Reese’s, or even Heath bars would be delicious alternatives. You could also experiment with different cake flavors, such as chocolate, yellow, or even red velvet. For a lighter version, try using sugar-free pudding and a reduced-fat cake mix.
I truly believe this Butterfinger Poke Cake will become a staple in your dessert repertoire. It’s the perfect recipe to have on hand when you need a quick, easy, and impressive dessert that everyone will love. Its also a great recipe to get the kids involved with, as they can help with poking the holes and sprinkling the Butterfinger pieces.
So, what are you waiting for? Grab your ingredients, preheat your oven, and get ready to bake up a batch of this amazing cake. I’m confident that you’ll be thrilled with the results.
I’m so excited for you to try this recipe! Once you’ve made it, please come back and share your experience in the comments below. I’d love to hear what you think, what variations you tried, and how much everyone enjoyed it. Did you add a special twist? Did you serve it with a particular topping? Your feedback is invaluable and helps other bakers discover new and exciting ways to enjoy this delicious cake. Happy baking! I can’t wait to hear all about your Butterfinger Poke Cake success!
Butterfinger Poke Cake: A Delicious & Easy Dessert Recipe
A moist and delicious poke cake featuring a Butterfinger candy infusion. Vanilla cake is poked and filled with sweetened condensed milk and caramel, then topped with whipped cream and crushed Butterfinger bars.
Ingredients
- 1 box (15.25 ounces) yellow cake mix
- 1 cup water
- 1/3 cup vegetable oil
- 3 large eggs
- 1 can (14 ounces) sweetened condensed milk
- 1 jar (16 ounces) caramel topping
- 8 Butterfinger candy bars, coarsely chopped
- 1 container (8 ounces) frozen whipped topping, thawed
Instructions
- Prepare cake mix according to package directions in a 9×13 inch pan.
- Let cool 15 minutes.
- Poke holes in cake with a fork or wooden spoon handle.
- Pour sweetened condensed milk over cake, allowing it to seep into the holes.
- Drizzle caramel topping over the condensed milk.
- Let cool completely.
- Spread whipped topping over the cake.
- Sprinkle crushed Butterfinger candy bars over the whipped topping.
- Refrigerate for at least 1 hour before serving.
Notes
- For best results, poke holes while the cake is still warm.
- Refrigerate the cake for at least 2 hours before serving to allow the pudding to set.
- Feel free to experiment with different flavors of pudding and candy bars!
“`

Leave a Comment