
Pasta Soup: Is there anything more comforting on a chilly evening? I think not! Imagine a warm bowl filled with tender pasta, simmered in a flavorful broth, and packed with fresh vegetables. Its a hug in a bowl, and I’m so excited to share my favorite recipe with you.
While the exact origins of Pasta Soup are difficult to pinpoint, variations have been enjoyed for centuries across numerous cultures. In Italy, pasta e fagioli (pasta and beans) is a classic example, showcasing the simple yet satisfying combination of pasta and legumes. Similar hearty soups exist in other Mediterranean countries and beyond, each adapted to local ingredients and tastes.
But what makes this dish so universally loved? For starters, its incredibly versatile. You can customize it with your favorite vegetables, proteins, and herbs. It’s also budget-friendly, making it a perfect weeknight meal. The combination of carbohydrates from the pasta, nutrients from the vegetables, and savory broth creates a symphony of flavors and textures that is both comforting and nourishing. Plus, it’s a fantastic way to use up leftover vegetables! So, let’s get cooking and create a delicious bowl of pasta soup that will warm you from the inside out.

Ingredients:
- 1 (6-ounce) package of salami, thinly sliced
- 1 (6-ounce) package of prosciutto, thinly sliced
- 1 (6-ounce) package of pepperoni, thinly sliced
- 4 ounces of cheddar cheese, cubed
- 4 ounces of Monterey Jack cheese, cubed
- 4 ounces of pepper jack cheese, cubed
- 1 cup of green olives, pitted
- 1 cup of black olives, pitted
- 1 cup of marinated artichoke hearts, quartered
- 1 cup of cherry tomatoes, halved
- 1 cup of grapes (red or green, or a mix)
- 1 cup of baby carrots
- 1 cup of cucumber slices
- 1 cup of pretzel sticks
- 1 cup of breadsticks
- 1/2 cup of roasted almonds
- 1/2 cup of walnuts
- 1/4 cup of fresh rosemary sprigs, for garnish (optional)
- 24 clear plastic cups (9-ounce size recommended)
Preparing the Components:
Before we start assembling our charcuterie cups, let’s get all our ingredients prepped and ready to go. This will make the assembly process much smoother and more efficient. Trust me, a little prep goes a long way!
- Prepare the Meats: Gently separate the salami, prosciutto, and pepperoni slices. If the slices are very large, you can fold them in half or quarters to make them easier to arrange in the cups. We want them to look appealing and be easy to grab.
- Prepare the Cheeses: If you haven’t already, cube the cheddar, Monterey Jack, and pepper jack cheeses into bite-sized pieces. Aim for roughly the same size for each type of cheese for a uniform look.
- Prepare the Olives and Artichoke Hearts: Drain the olives and artichoke hearts well. If the artichoke hearts are large, quarter them. This ensures they fit nicely in the cups and are easy to eat.
- Prepare the Vegetables and Fruits: Halve the cherry tomatoes and wash and dry the grapes. Wash, peel (if desired), and cut the baby carrots into smaller pieces if they are very large. Slice the cucumber into rounds.
- Prepare the Nuts and Pretzels: Measure out the roasted almonds and walnuts. Ensure the pretzel sticks and breadsticks are readily available.
- Prepare the Rosemary (Optional): If you’re using fresh rosemary for garnish, wash and dry the sprigs. Set them aside for the final touch.
Assembling the Charcuterie Cups:
Now for the fun part! This is where you get to be creative and arrange all the delicious ingredients into individual cups. There’s no right or wrong way to do it, but here’s a method that works well for me. Remember, presentation is key!
- Layering the Base: Start by adding a layer of pretzel sticks and/or breadsticks to the bottom of each cup. This provides a base for the other ingredients and adds some height to the presentation. Don’t overfill; just enough to cover the bottom.
- Adding the Meats: Next, add a selection of meats to each cup. I like to include a mix of salami, prosciutto, and pepperoni in each one. You can fold or roll the meat slices to create different textures and visual interest. Try to arrange them so they are partially visible from the outside of the cup.
- Adding the Cheeses: Now, add a few cubes of each type of cheese to each cup. Distribute the cheddar, Monterey Jack, and pepper jack evenly among the cups. Tuck them in amongst the meats for a colorful and appealing look.
- Adding the Olives and Artichoke Hearts: Add a mix of green and black olives, along with the quartered artichoke hearts, to each cup. These add a briny and savory element to the charcuterie cups.
- Adding the Vegetables and Fruits: Add the halved cherry tomatoes, grapes, cucumber slices, and baby carrots to each cup. These add freshness, color, and a touch of sweetness to balance the savory elements.
- Adding the Nuts: Sprinkle a small amount of roasted almonds and walnuts into each cup. These add a crunchy texture and nutty flavor.
- Arranging for Visual Appeal: As you add each ingredient, take a moment to arrange it so it looks visually appealing. You want to create a mix of colors, textures, and heights. Don’t be afraid to experiment and adjust as you go.
- Garnishing (Optional): If you’re using fresh rosemary sprigs, add a small sprig to each cup as a garnish. This adds a touch of elegance and a fresh, herbal aroma.
Tips and Variations:
These charcuterie cups are incredibly versatile, and you can easily customize them to suit your preferences and dietary needs. Here are a few tips and variations to consider:
- Cheese Variations: Feel free to substitute or add other types of cheese, such as brie, gouda, or goat cheese.
- Meat Variations: You can also add other types of cured meats, such as chorizo or soppressata.
- Vegetarian Option: For a vegetarian option, omit the meats and add more cheese, olives, artichoke hearts, and vegetables. You could also add marinated mushrooms or roasted red peppers.
- Fruit Variations: Consider adding other fruits, such as melon cubes, berries, or dried apricots.
- Nut-Free Option: If you have a nut allergy, simply omit the nuts or substitute them with seeds, such as sunflower seeds or pumpkin seeds.
- Dips: You can add small containers of dips like hummus, ranch dressing, or balsamic glaze to the cups for an extra touch.
- Presentation: Get creative with the presentation! Use different sizes and shapes of cups, or arrange the cups on a platter or tiered stand.
- Make Ahead: You can assemble the charcuterie cups a few hours in advance and store them in the refrigerator until ready to serve. However, it’s best to add the crackers and nuts just before serving to prevent them from getting soggy.
Serving Suggestions:
These charcuterie cups are perfect for parties, gatherings, or even a fun and easy weeknight snack. They are a crowd-pleaser and require minimal effort to prepare. Here are a few serving suggestions:
- Party Appetizer: Arrange the charcuterie cups on a platter or tiered stand for a visually appealing and easy-to-grab appetizer.
- Individual Snacks: Serve the charcuterie cups as individual snacks for a quick and satisfying bite.
- Lunchbox Addition: Pack a charcuterie cup in a lunchbox for a fun and healthy alternative to traditional snacks.
- Picnic Treat: Bring charcuterie cups to a picnic for a portable and delicious snack.
- Wine Pairing: Pair the charcuterie cups with your favorite wine for a sophisticated and flavorful experience. A crisp white wine or a light-bodied red wine would complement the flavors nicely.
Storage Instructions:
If you have any leftover charcuterie cups, you can store them in the refrigerator for up to 24 hours. However, it’s best to consume them as soon as possible to maintain their freshness and flavor. Keep in mind that the crackers and nuts may become slightly soggy over time.
To store the cups, cover them tightly with plastic wrap or transfer the contents to an airtight container. This will help prevent the ingredients from drying out and absorbing odors from the refrigerator.
When you’re ready to enjoy the leftovers, give them a quick inspection to ensure the ingredients are still fresh. Discard any items that appear to be spoiled or have an off odor.
Enjoy your delicious and customizable charcuterie cups! I hope you and your guests love them as much as I do.
Conclusion:
So there you have it! These individual charcuterie cups are not just adorable; they’re a flavor explosion waiting to happen. I truly believe this recipe is a must-try for your next gathering, big or small. Why? Because it takes the elegance and deliciousness of a traditional charcuterie board and makes it incredibly accessible and convenient. No more awkward reaching, no more double-dipping worries just pure, unadulterated snacking bliss in a perfectly portioned cup.
Think about it: the vibrant colors, the contrasting textures, the savory and sweet combinations it’s a feast for the eyes and the palate! Plus, the customization options are endless. You can tailor each cup to your guests’ preferences, dietary restrictions, or even the theme of your party. It’s a guaranteed crowd-pleaser that will have everyone raving about your hosting skills.
But the real magic lies in the simplicity. This recipe is surprisingly easy to execute, even for novice cooks. With a little planning and some creative flair, you can whip up a batch of these delightful cups in no time. And trust me, the effort is well worth the reward.
Looking for serving suggestions? These charcuterie cups are fantastic as appetizers before a meal, as a snack during game night, or even as a light lunch option. Consider pairing them with a crisp white wine, a refreshing sparkling cider, or your favorite craft beer. The possibilities are endless!
And speaking of possibilities, let’s talk variations! Feel free to get creative and experiment with different ingredients. Swap out the prosciutto for salami, add some marinated artichoke hearts, or include a variety of cheeses like brie, goat cheese, or cheddar. For a vegetarian option, load up on olives, roasted vegetables, and hummus. You can even create themed cups, like a Mediterranean cup with feta cheese, olives, and sun-dried tomatoes, or a sweet and savory cup with berries, chocolate-covered pretzels, and a drizzle of honey.
Don’t be afraid to think outside the box and personalize these cups to your liking. The key is to have fun and create a combination of flavors and textures that you enjoy.
I’m so excited for you to try this recipe and experience the joy of these individual charcuterie cups for yourself. I know you’ll love them as much as I do!
So, what are you waiting for? Gather your ingredients, unleash your inner creativity, and get ready to create some seriously delicious and impressive appetizers.
And most importantly, I want to hear about your experience! Did you try the recipe? What variations did you make? What did your guests think? Share your photos and stories with me in the comments below. I can’t wait to see your creations and hear all about your charcuterie cup adventures. Let’s spread the love and inspire others to try this amazing recipe! Happy snacking!
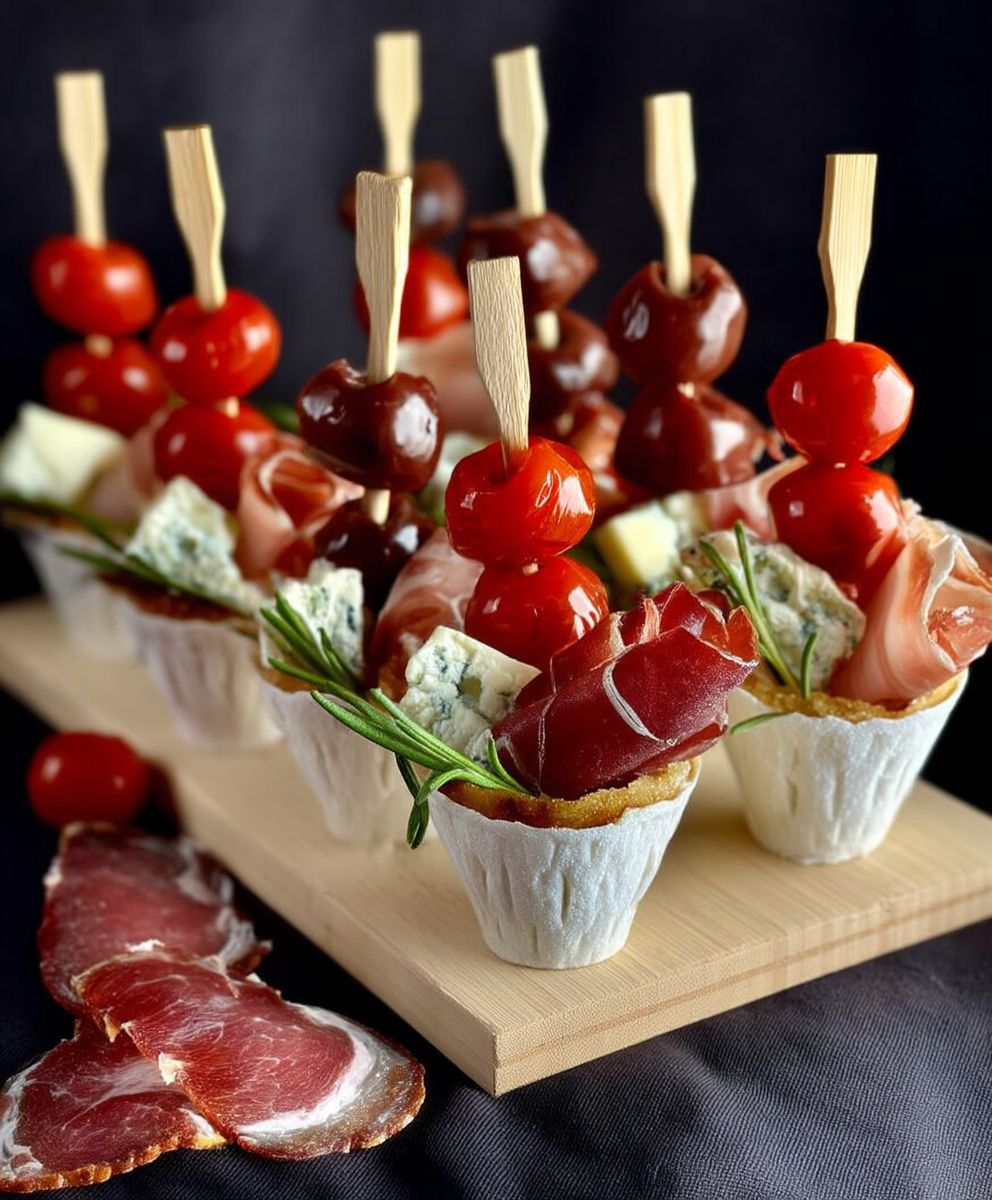
Charcuterie Cups Appetizer: The Perfect Individual Serving
Individual cups filled with an assortment of cured meats, cheeses, olives, crackers, and fruits, perfect for easy serving and customizable snacking.
Ingredients
- Salami slices
- Prosciutto
- Cured sausages
- Assorted cheeses (cheddar, brie, gouda)
- Olives
- Pickles
- Crackers or breadsticks
- Grapes or berries
- Cherry tomatoes
- Pretzel bites
Instructions
- Gather your ingredients: cured meats, cheeses, crackers, fruits, vegetables, and any desired dips or spreads.
- Choose your cups: Select clear plastic or glass cups that are appropriately sized for individual servings.
- Prepare the ingredients: Cut the meats and cheeses into bite-sized pieces. Wash and chop any fruits and vegetables.
- Assemble the cups: Start by placing a base layer of crackers or breadsticks at the bottom of each cup.
- Add the meats and cheeses: Arrange the cured meats and cheeses artfully on top of the base layer.
- Incorporate fruits and vegetables: Add pops of color and freshness by placing fruits and vegetables around the meats and cheeses.
- Include dips or spreads: If desired, add small containers of dips or spreads to each cup.
- Garnish and serve: Garnish the cups with fresh herbs, olives, or nuts. Serve immediately or chill for later.
Notes
- For best results, chill the dough for at least 30 minutes before baking.
- These cups can be made ahead of time and stored in an airtight container at room temperature for up to 2 days.
- Feel free to customize the fillings with your favorite charcuterie items.


Leave a Comment