
Italian Pasta Salad: the vibrant, crowd-pleasing dish that’s about to become your new go-to for potlucks, picnics, and easy weeknight dinners! Forget boring salads this isn’t just lettuce and dressing. We’re talking perfectly cooked pasta, bursting with fresh vegetables, tangy vinaigrette, and enough flavor to transport you straight to a sun-drenched Italian piazza.
While the exact origins of Italian Pasta Salad are debated, its spirit is undeniably rooted in the Italian tradition of using simple, high-quality ingredients to create something extraordinary. Think of it as a deconstructed antipasto platter, reimagined as a satisfying and portable salad. It embodies the Italian love for fresh produce, flavorful cheeses, and, of course, perfectly cooked pasta.
But what makes this salad so irresistible? It’s the symphony of textures and tastes! The al dente pasta provides a satisfying bite, while the crisp vegetables offer a refreshing crunch. The tangy vinaigrette ties everything together, creating a harmonious blend of sweet, savory, and acidic notes. Plus, it’s incredibly versatile! You can customize it with your favorite vegetables, cheeses, and meats, making it a dish that truly reflects your personal taste. And let’s not forget the convenience factor it’s quick to prepare, travels well, and can be made ahead of time, making it the perfect solution for busy schedules. Get ready to experience the magic of Italian Pasta Salad!

Ingredients:
- 1 pound ground beef (80/20 blend is ideal for flavor)
- 1 tablespoon olive oil
- 1 medium yellow onion, finely chopped
- 2 cloves garlic, minced
- 1 teaspoon chili powder
- 1/2 teaspoon smoked paprika
- 1/4 teaspoon cayenne pepper (optional, for a little kick)
- 1 teaspoon dried oregano
- 1/2 teaspoon ground cumin
- 1/2 teaspoon salt, plus more to taste
- 1/4 teaspoon black pepper, plus more to taste
- 1/2 cup beef broth or water
- 1/4 cup ketchup
- 2 tablespoons yellow mustard
- 1 tablespoon Worcestershire sauce
- 1 tablespoon apple cider vinegar
- 12 small flour tortillas (street taco size)
- 1 cup shredded cheddar cheese
- 1 cup shredded Monterey Jack cheese
- 1/2 cup dill pickle relish, drained well
- 1/4 cup finely diced red onion
- 1/4 cup yellow mustard (for drizzling)
- 1/4 cup ketchup (for drizzling)
- Optional toppings: shredded lettuce, diced tomatoes, crumbled bacon, avocado slices, jalapenos
Preparing the Beef Filling
- Brown the Ground Beef: Heat the olive oil in a large skillet over medium-high heat. Add the ground beef and cook, breaking it up with a spoon, until browned. Drain off any excess grease. This is a crucial step for preventing a greasy taco!
- Sauté the Aromatics: Add the chopped onion to the skillet with the browned beef and cook until softened, about 5 minutes. Then, add the minced garlic and cook for another minute until fragrant. Be careful not to burn the garlic!
- Add the Spices: Stir in the chili powder, smoked paprika, cayenne pepper (if using), oregano, cumin, salt, and pepper. Cook for 1 minute, stirring constantly, to toast the spices and release their flavors. This step really deepens the flavor of the filling.
- Simmer in Sauce: Pour in the beef broth or water, ketchup, yellow mustard, Worcestershire sauce, and apple cider vinegar. Bring the mixture to a simmer, then reduce the heat to low and cook for 15-20 minutes, or until the sauce has thickened slightly and the flavors have melded together. Stir occasionally to prevent sticking. The longer it simmers, the better the flavor!
- Taste and Adjust: Taste the beef filling and adjust the seasoning as needed. Add more salt, pepper, or any of the spices to your liking. You can also add a pinch of sugar if you prefer a slightly sweeter flavor.
Warming the Tortillas
- Choose Your Method: There are several ways to warm your tortillas. You can warm them in a dry skillet over medium heat for about 15-20 seconds per side, until softened and pliable. Alternatively, you can wrap them in a damp paper towel and microwave them for 30-60 seconds. Or, you can warm them in the oven by wrapping them in foil and baking them at 350°F (175°C) for 10-15 minutes. I prefer the skillet method for a slightly charred flavor.
- Keep Them Warm: As you warm the tortillas, keep them stacked and covered with a clean kitchen towel to prevent them from drying out. This will make them easier to fill and fold.
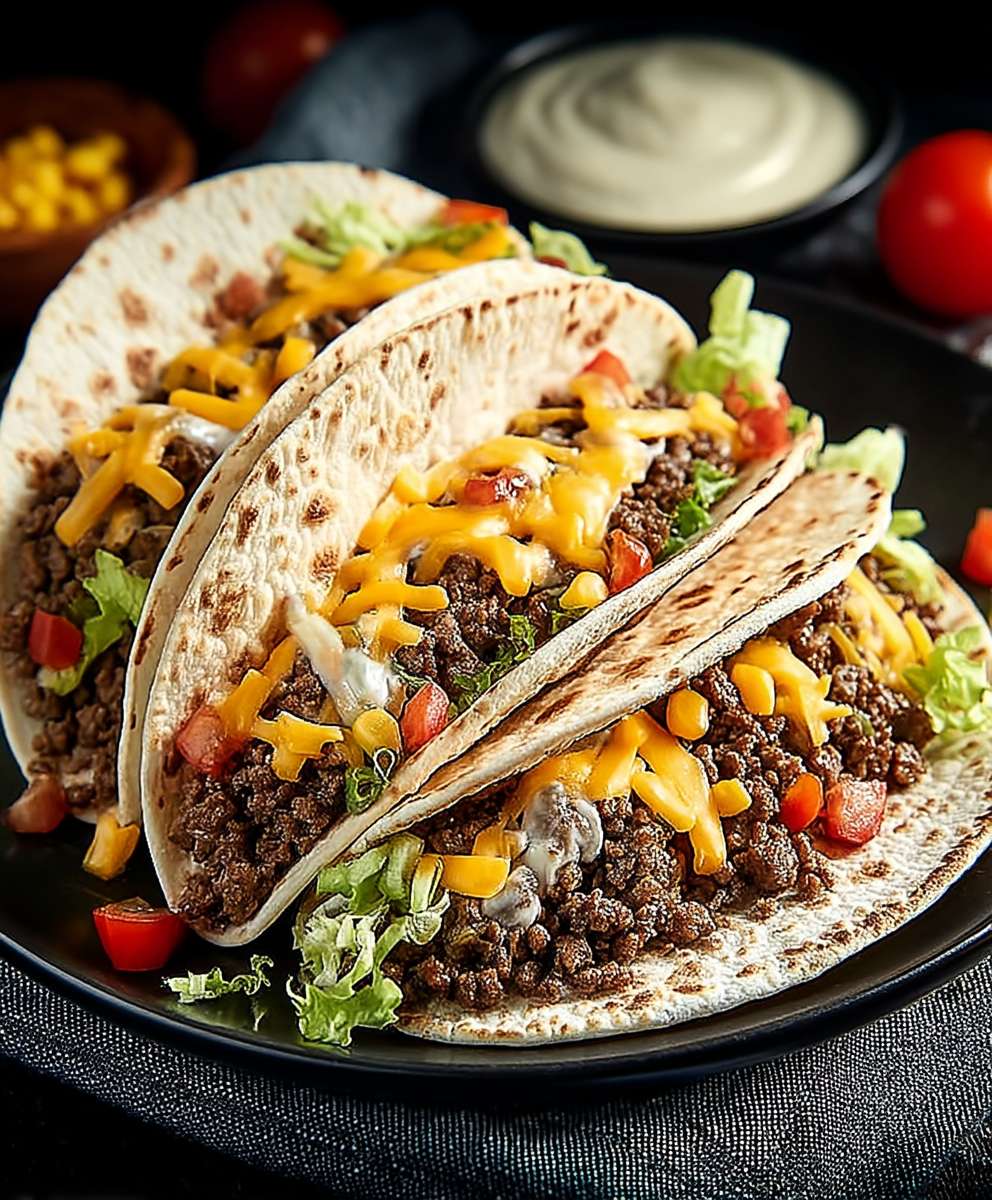
Assembling the Cheeseburger Tacos
- Layer the Cheese: Sprinkle a mixture of cheddar and Monterey Jack cheese evenly over each warm tortilla. Don’t be shy with the cheese!
- Add the Beef Filling: Spoon a generous amount of the beef filling onto each tortilla, on top of the cheese.
- Top with Relish and Onion: Sprinkle dill pickle relish and diced red onion over the beef filling.
- Drizzle with Condiments: Drizzle yellow mustard and ketchup over the toppings.
- Fold and Serve: Fold each tortilla in half to create a taco. Serve immediately.
Optional Cooking Method: Crispy Tacos
If you prefer crispy tacos, you can pan-fry them after assembling. Here’s how:
- Heat Oil: Heat about 1/4 inch of vegetable oil in a large skillet over medium heat.
- Fry the Tacos: Carefully place the assembled tacos in the hot oil, seam-side down. Cook for 2-3 minutes per side, or until golden brown and crispy.
- Drain Excess Oil: Remove the tacos from the skillet and place them on a paper towel-lined plate to drain off any excess oil.
- Serve Immediately: Serve the crispy cheeseburger tacos immediately.
Serving Suggestions and Variations
These cheeseburger tacos are delicious on their own, but here are some ideas to take them to the next level:
- Shredded Lettuce and Diced Tomatoes: Add a refreshing crunch with shredded lettuce and diced tomatoes.
- Crumbled Bacon: Everything is better with bacon! Sprinkle crumbled bacon over the tacos for a smoky, salty flavor.
- Avocado Slices: Add creamy avocado slices for a healthy and delicious topping.
- Jalapenos: If you like it spicy, add sliced jalapenos for a kick.
- Special Sauce: Create a special sauce by mixing mayonnaise, ketchup, mustard, and a dash of hot sauce.
- Different Cheeses: Experiment with different cheeses, such as pepper jack, Colby jack, or even a sprinkle of blue cheese for a more sophisticated flavor.
- Burger Sauce: Instead of ketchup and mustard, use your favorite burger sauce.
- Lettuce Wraps: For a low-carb option, use large lettuce leaves instead of tortillas.
- Taco Bowls: Serve the beef filling over rice or quinoa in a bowl, topped with all your favorite toppings.
Tips for Success
- Use High-Quality Ground Beef: The quality of the ground beef will greatly affect the flavor of the tacos. I recommend using an 80/20 blend for the best flavor and texture.
- Don’t Overcook the Beef: Overcooked beef can be dry and tough. Cook it until it’s just browned, then simmer it in the sauce to keep it moist and tender.
- Drain Excess Grease: Draining off any excess grease after browning the beef will prevent the tacos from being greasy.
- Toast the Spices: Toasting the spices before adding the liquid will release their flavors and create a more complex and aromatic filling.
- Warm the Tortillas Properly: Warming the tortillas will make them more pliable and prevent them from cracking when you fold them.
- Don’t Overfill the Tacos: Overfilling the tacos will make them difficult to fold and eat.
- Serve Immediately: Cheeseburger tacos are best served immediately while the filling is hot and the tortillas are warm.
- Get Creative with Toppings: Don’t be afraid to experiment with different toppings to create your own unique cheeseburger taco.
- Make Ahead: The beef filling can be made ahead of time and stored in the refrigerator for up to 3 days. Simply reheat it before assembling the tacos.
- Freezing: The beef filling can also be frozen for up to 2 months. Thaw it overnight in the refrigerator before reheating.
Nutritional Information (Approximate, per taco)
Please note that the nutritional information is an estimate and may vary depending on the specific ingredients and portion sizes used.
- Calories: 350-450
- Protein: 20-25g
- Fat: 20-30g
- Carbohydrates: 20-30g
Enjoy your delicious and fun Cheeseburger Tacos! I hope you and your family love them as much as we do!
Conclusion:
So there you have it! These Cheeseburger Tacos are truly a game-changer, a delightful fusion of two beloved classics that will have everyone begging for more. I genuinely believe this recipe is a must-try because its not just about the ease of preparation (though thats definitely a huge plus!), its about the explosion of flavor in every single bite. The savory ground beef, the tangy cheeseburger sauce, the crisp lettuce, and the melted cheese all nestled in a warm, comforting tortilla it’s pure culinary bliss!
But beyond the incredible taste, these tacos are incredibly versatile. Looking for serving suggestions? I love to serve them with a side of crispy french fries or sweet potato fries for the ultimate cheeseburger experience. A simple coleslaw also works wonders, adding a refreshing crunch to balance the richness of the tacos. And don’t forget the toppings! Diced tomatoes, chopped onions, pickles, or even a dollop of sour cream can elevate these tacos to a whole new level.
Want to get creative with variations? Absolutely! For a spicier kick, add some diced jalapeños or a dash of hot sauce to the ground beef mixture. If you’re a fan of bacon (and who isn’t?), crumble some crispy bacon on top for an extra layer of smoky goodness. Vegetarian? No problem! Simply substitute the ground beef with seasoned lentils or crumbled veggie burgers. You can even use different types of cheese, like pepper jack for a little heat or provolone for a milder flavor. The possibilities are truly endless!
These Cheeseburger Tacos are perfect for a quick weeknight dinner, a fun weekend gathering, or even a potluck. They’re guaranteed to be a crowd-pleaser, and they’re so easy to customize to suit everyone’s taste preferences. Ive made them for picky eaters, adventurous foodies, and everyone in between, and theyve always been a hit.
I truly hope you’ll give this recipe a try. I poured my heart into perfecting it, and I’m confident that you’ll love it as much as I do. The beauty of cooking is in the sharing, so I encourage you to gather your loved ones, get into the kitchen, and create some delicious memories together.
And most importantly, I want to hear about your experience! Did you try the recipe as is, or did you add your own unique twist? What were your favorite toppings? What did your family and friends think? Share your photos, your stories, and your feedback in the comments below. I can’t wait to see what you create! Your feedback is invaluable and helps me continue to create recipes that you’ll love. Let me know if you have any questions or need any help along the way. Happy cooking, and enjoy your amazing Cheeseburger Tacos! I am sure you will love this recipe as much as I do.
Cheeseburger Tacos: A Delicious Fusion Recipe You Need to Try
These fun and flavorful tacos combine the best of both worlds! Ground beef is seasoned with classic cheeseburger flavors, then piled into tortillas with your favorite toppings like cheese, lettuce, tomato, and a tangy burger sauce. Perfect for a quick and easy weeknight meal.
Ingredients
- 1 pound ground beef
- 1 packet taco seasoning
- 1/2 cup water
- 12 taco shells
- 1 cup shredded cheddar cheese
- 1/2 cup chopped tomatoes
- 1/4 cup chopped onion
- 1/4 cup ketchup
- 1/4 cup mustard
- 1/4 cup dill pickle relish
Instructions
- Brown the ground beef in a skillet over medium-high heat. Drain off any excess grease.
- Stir in the taco seasoning and water according to the package directions. Simmer for a few minutes until the sauce has thickened.
- Warm the taco shells according to package directions.
- Fill each taco shell with the seasoned ground beef.
- Top with shredded cheese, lettuce, diced tomatoes, onions, pickles, ketchup, and mustard, as desired.
- Serve immediately.
Notes
- For a spicier kick, add a pinch of cayenne pepper to the beef mixture.
- To prevent the tortillas from tearing, warm them slightly before filling.
- Feel free to customize the toppings with your favorite burger additions like pickles, lettuce, or tomato.
“`


Leave a Comment