
Matcha green tea cake: Prepare to embark on a culinary adventure that will tantalize your taste buds and leave you craving more! Imagine a dessert that perfectly balances the earthy notes of green tea with a delicate sweetness, all wrapped in a moist and airy cake. This isn’t just a cake; it’s an experience.
Matcha, the finely ground powder of specially grown and processed green tea leaves, has been a cornerstone of Japanese culture for centuries, deeply intertwined with traditional tea ceremonies. Its use in desserts, like this exquisite cake, is a more recent, yet equally delightful, innovation. The vibrant green hue and unique flavor profile of matcha make it a star ingredient, transforming ordinary baked goods into something truly special.
What makes matcha green tea cake so irresistible? It’s the harmonious blend of flavors and textures. The subtle bitterness of the matcha is beautifully complemented by the sweetness of the cake, creating a balanced and sophisticated taste. The cake itself is incredibly moist and tender, practically melting in your mouth with each bite. Whether you’re a seasoned baker or a novice in the kitchen, this recipe is surprisingly easy to follow, making it a perfect treat for any occasion. Get ready to impress your friends and family with this stunning and delicious dessert!

Ingredients:
- 1 cup (2 sticks) unsalted butter, melted
- 2 cups granulated sugar
- 4 large eggs
- 1 teaspoon vanilla extract
- 1 cup all-purpose flour
- ¾ cup unsweetened cocoa powder
- ¼ teaspoon baking powder
- ¼ teaspoon salt
- 1 cup chocolate chips (semi-sweet or dark, your preference!)
- Optional: ½ cup chopped walnuts or pecans
Preparing the Brownie Batter:
- Melt the butter: In a large, microwave-safe bowl, melt the butter. I usually do this in 30-second intervals, stirring in between, to prevent it from splattering everywhere. You can also melt it in a saucepan over low heat if you prefer. Just make sure it’s completely melted and smooth.
- Combine butter and sugar: Once the butter is melted, add the granulated sugar to the bowl. Whisk them together really well until the mixture is smooth and there are no lumps of sugar. This step is important for getting that shiny, crackly top on your brownies!
- Incorporate the eggs: Now, add the eggs one at a time, whisking well after each addition. Make sure each egg is fully incorporated before adding the next. This helps to emulsify the batter and create a rich, fudgy texture.
- Add the vanilla extract: Stir in the vanilla extract. It enhances the chocolate flavor and adds a lovely aroma to the brownies.
- Combine dry ingredients: In a separate medium-sized bowl, whisk together the all-purpose flour, cocoa powder, baking powder, and salt. Whisking ensures that the baking powder and salt are evenly distributed throughout the flour mixture. This is crucial for proper leavening and flavor balance.
- Gradually add dry ingredients to wet ingredients: Slowly add the dry ingredients to the wet ingredients, mixing until just combined. Be careful not to overmix! Overmixing can develop the gluten in the flour, resulting in tough brownies. A few streaks of flour are okay at this point.
- Fold in chocolate chips and nuts (optional): Gently fold in the chocolate chips and chopped nuts (if using). I like to use a rubber spatula for this step to avoid overmixing.
Baking the Brownies:
- Preheat the oven: Preheat your oven to 350°F (175°C). Make sure your oven is properly preheated before baking the brownies for even cooking.
- Prepare the baking pan: Grease and flour a 9×13 inch baking pan. You can also line the pan with parchment paper, leaving an overhang on the sides. This makes it super easy to lift the brownies out of the pan after baking. If you’re using parchment paper, you can skip the greasing and flouring.
- Pour batter into pan: Pour the brownie batter into the prepared baking pan and spread it evenly.
- Bake the brownies: Bake for 25-30 minutes, or until a toothpick inserted into the center comes out with moist crumbs attached. The baking time may vary depending on your oven, so keep an eye on them. Don’t overbake the brownies, or they will be dry. I always start checking them around 25 minutes.
- Cool completely: Let the brownies cool completely in the pan before cutting. This is the hardest part, I know! But it’s important to let them cool completely so they set properly and are easier to cut. If you used parchment paper, you can lift the brownies out of the pan and place them on a cutting board to cool.
Cutting and Serving:
- Cut the brownies: Once the brownies are completely cool, cut them into squares. I like to use a sharp knife and wipe it clean between each cut for clean, even squares.
- Serve and enjoy: Serve the brownies as is, or with a scoop of vanilla ice cream, a drizzle of chocolate sauce, or a sprinkle of powdered sugar. They’re also delicious with a cup of coffee or a glass of milk.
Tips and Variations:
- For fudgier brownies: Reduce the baking time by a few minutes. The center should still be slightly soft.
- For cakier brownies: Increase the baking powder to ½ teaspoon.
- Add-ins: Get creative with your add-ins! Try adding different types of chocolate chips (milk chocolate, white chocolate), nuts (walnuts, pecans, almonds), dried fruit (raisins, cranberries), or even chopped candy bars.
- Espresso powder: Add a teaspoon of espresso powder to the dry ingredients to enhance the chocolate flavor.
- Salted caramel brownies: Swirl in some salted caramel sauce before baking.
- Peanut butter swirl brownies: Swirl in some peanut butter before baking.
- Cream cheese swirl brownies: Make a simple cream cheese swirl by mixing cream cheese, sugar, and an egg yolk, then swirling it into the batter before baking.
- Storage: Store the brownies in an airtight container at room temperature for up to 3 days, or in the refrigerator for up to a week. You can also freeze them for up to 2 months.
- Using a different pan size: If you don’t have a 9×13 inch pan, you can use an 8×8 inch pan. The baking time will be slightly longer.
- High altitude adjustments: If you live at a high altitude, you may need to adjust the recipe slightly. Try reducing the sugar by 1-2 tablespoons and increasing the flour by 1-2 tablespoons. You may also need to increase the baking time slightly.
- Gluten-free brownies: Substitute the all-purpose flour with a gluten-free all-purpose flour blend. Make sure the blend contains xanthan gum for best results.
- Vegan brownies: Substitute the butter with vegan butter, the eggs with flax eggs (1 tablespoon ground flaxseed mixed with 3 tablespoons water per egg), and the chocolate chips with vegan chocolate chips.
- Don’t overmix: I can’t stress this enough! Overmixing develops the gluten in the flour, resulting in tough brownies. Mix until just combined.
- Use good quality ingredients: The quality of your ingredients will affect the taste of your brownies. Use good quality butter, chocolate, and cocoa powder for the best results.
- Let them cool completely: Again, this is important for getting clean cuts and preventing the brownies from falling apart.
Troubleshooting:
- Brownies are too dry: You may have overbaked them. Reduce the baking time next time.
- Brownies are too gooey: You may have underbaked them. Increase the baking time next time.
- Brownies are tough: You may have overmixed the batter. Mix until just combined next time.
- Brownies are not rising: Your baking powder may be old. Make sure your baking powder is fresh.
- Brownies are sinking in the middle: This can happen if the oven temperature is too high or if the brownies are underbaked. Make sure your oven is properly calibrated and bake the brownies until a toothpick inserted into the center comes out with moist crumbs attached.
- Brownies are burning on the edges: Your oven temperature may be too high. Reduce the oven temperature by 25 degrees and bake for a longer time.
Enjoy your delicious homemade brownies! I hope these tips and variations help you create the perfect batch every time. Happy baking!
Conclusion:
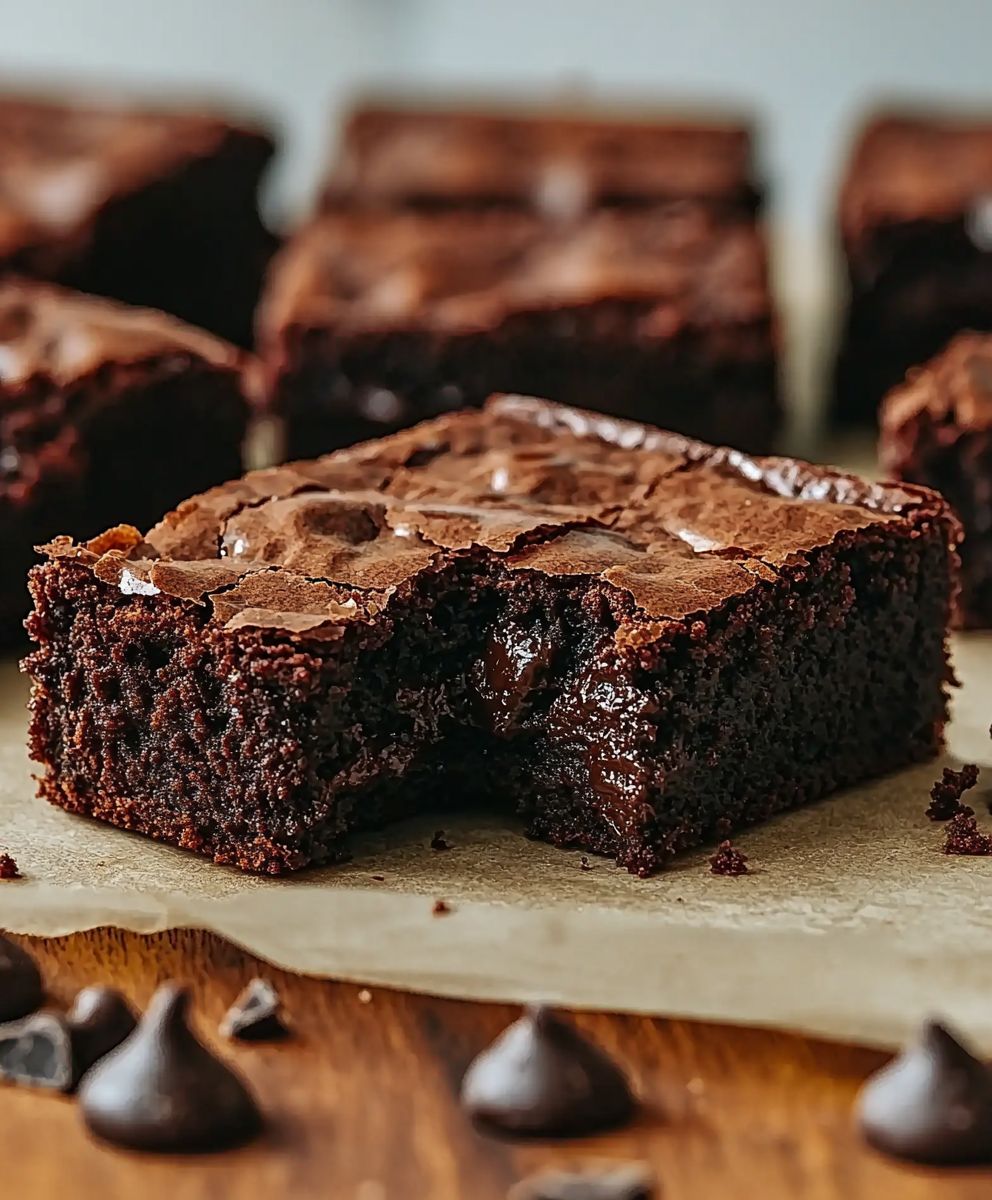
And there you have it! These aren’t just any brownies; they’re an experience. From the rich, fudgy center to the slightly crisp edges, every bite of these chocolate brownies is pure bliss. If you’re looking for a dessert that’s guaranteed to impress, whether you’re baking for a crowd or just treating yourself, this recipe is an absolute must-try. I truly believe these will become your go-to brownie recipe, the one you reach for time and time again.
But the best part? The possibilities are endless! While these brownies are incredible on their own, warm from the oven with a scoop of vanilla ice cream melting on top, don’t be afraid to experiment. For an extra layer of decadence, try adding a swirl of peanut butter or Nutella before baking. Or, if you’re a fan of nuts, fold in some chopped walnuts or pecans for a delightful crunch.
Serving Suggestions and Variations:
* Classic Indulgence: Serve warm with a scoop of vanilla bean ice cream and a drizzle of chocolate sauce. A sprinkle of sea salt elevates the flavors beautifully.
* Peanut Butter Bliss: Swirl peanut butter into the batter before baking for a rich and nutty twist. Top with chopped peanuts for added texture.
* Nutella Dream: Replace some of the melted butter with Nutella for an intensely chocolatey and hazelnut-infused brownie.
* Mint Chocolate Chip: Add mint extract and chocolate chips to the batter for a refreshing and festive treat.
* Espresso Boost: Incorporate a teaspoon of instant espresso powder into the dry ingredients to enhance the chocolate flavor and add a subtle coffee kick.
* Salted Caramel Delight: Drizzle salted caramel sauce over the baked brownies for a sweet and salty combination that’s simply irresistible.
* Brownie Sundaes: Cut the brownies into squares and serve them in sundae glasses with your favorite ice cream, toppings, and sauces.
* Brownie Parfaits: Layer crumbled brownies with whipped cream, berries, and chocolate shavings in parfait glasses for an elegant and delicious dessert.
* Brownie Bites: Bake the batter in a mini muffin tin for bite-sized brownies that are perfect for parties or snacking.
* Gluten-Free Option: Substitute the all-purpose flour with a gluten-free flour blend for a delicious treat that everyone can enjoy.
I’ve poured my heart into perfecting this recipe, and I’m so excited for you to try it. I’m confident that you’ll love the results. The rich, fudgy texture and intense chocolate flavor are simply irresistible.
So, what are you waiting for? Preheat your oven, gather your ingredients, and get ready to bake the best chocolate brownies you’ve ever tasted. I promise, you won’t regret it!
And most importantly, I’d love to hear about your experience! Did you try any of the variations? Did you add your own special touch? Share your photos and stories in the comments below. Let me know what you think, and don’t forget to tag me in your social media posts. Happy baking! I can’t wait to see your creations and hear all about your brownie adventures. Let’s spread the brownie love!
Chocolate Brownies: The Ultimate Guide to Baking Perfection
Fudgy chocolate brownies with a crackly top. Perfect for a quick dessert or sweet treat.
Ingredients
- 1 cup (2 sticks) unsalted butter
- 1 1/4 cups granulated sugar
- 3/4 cup unsweetened cocoa powder
- 1/4 teaspoon salt
- 1 teaspoon vanilla extract
- 2 large eggs
- 1/2 cup all-purpose flour
- 1/2 cup chocolate chips (optional)
Instructions
- Preheat your oven to 350°F (175°C).
- Grease and flour an 8-inch square baking pan.
- In a large bowl, melt the butter and chocolate together. You can do this in the microwave in 30-second intervals, stirring in between, or over a double boiler.
- Stir in the sugar until well combined.
- Beat in the eggs one at a time, then stir in the vanilla extract.
- In a separate bowl, whisk together the flour, cocoa powder, and salt.
- Gradually add the dry ingredients to the wet ingredients, mixing until just combined. Be careful not to overmix.
- Pour the batter into the prepared pan and spread evenly.
- Bake for 25-30 minutes, or until a toothpick inserted into the center comes out with moist crumbs attached.
- Let the brownies cool completely in the pan before cutting into squares.
“`
Notes
- For best results, use high-quality chocolate.
- Don’t overbake the brownies; they should be slightly fudgy in the center.
- Add nuts or chocolate chips for extra flavor and texture.

Leave a Comment