
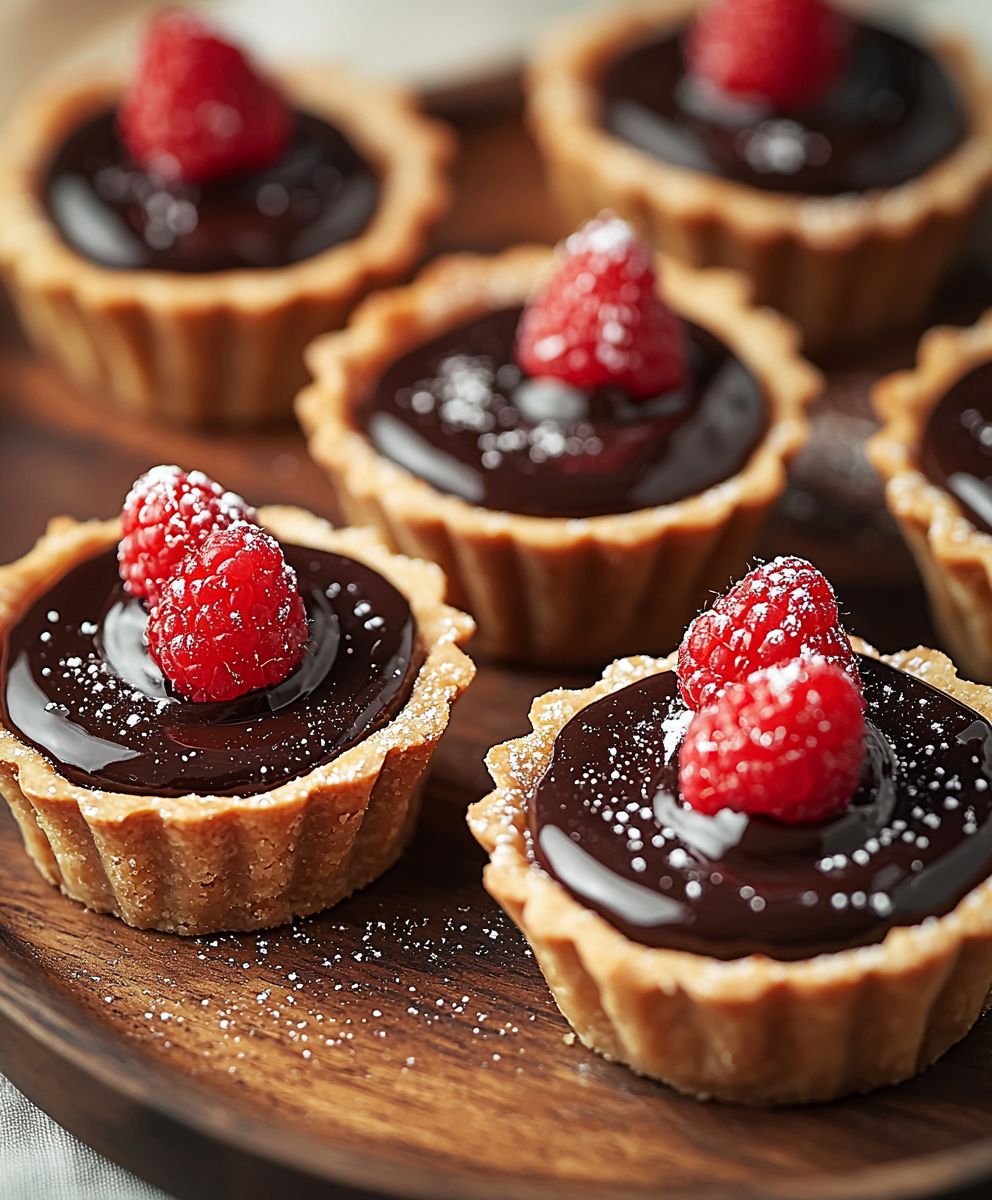
Chocolate mini tarts, those delectable little bites of pure indulgence, are about to become your new favorite dessert! Imagine sinking your teeth into a crisp, buttery crust, giving way to a smooth, rich, and intensely chocolatey filling. Are you drooling yet? I know I am just thinking about them! These aren’t just any tarts; they’re miniature masterpieces, perfect for parties, afternoon tea, or simply satisfying that chocolate craving that hits out of nowhere.
While the exact origins of the tart are somewhat debated, pastry shells filled with sweet or savory fillings have been enjoyed for centuries. The addition of chocolate, however, is a more modern twist, elevating this classic treat to new heights of deliciousness. The beauty of chocolate mini tarts lies not only in their exquisite taste but also in their convenience. They are perfectly portioned, easy to transport, and require no forks or spoons making them ideal for any occasion.
People adore these little tarts for a multitude of reasons. The combination of textures the flaky crust and the creamy filling is simply irresistible. The intense chocolate flavor is a guaranteed crowd-pleaser, and their small size means you can indulge without feeling too guilty (or maybe you’ll just have two!). Whether you’re a seasoned baker or a novice in the kitchen, these chocolate mini tarts are surprisingly easy to make, and I’m here to guide you through every step of the process. Get ready to impress your friends and family with these delightful treats!

Ingredients:
- For the Crust:
- 1 1/2 cups all-purpose flour
- 1/2 cup unsweetened cocoa powder
- 1/2 cup (1 stick) cold unsalted butter, cut into small cubes
- 1/2 cup granulated sugar
- 1/4 teaspoon salt
- 1 large egg yolk
- 3-5 tablespoons ice water
- For the Chocolate Filling:
- 12 ounces semi-sweet chocolate, finely chopped
- 1 cup heavy cream
- 1/4 cup unsalted butter
- 1/4 cup light corn syrup
- 1 teaspoon vanilla extract
- Pinch of salt
- Optional Garnishes:
- Fresh raspberries
- Whipped cream
- Chocolate shavings
- Edible gold dust
Preparing the Chocolate Tart Crust
Okay, let’s get started with the most important part the crust! A good crust is the foundation of any great tart, and this chocolate crust is no exception. It’s rich, crumbly, and perfectly complements the decadent chocolate filling.
- Combine Dry Ingredients: In a large bowl, whisk together the flour, cocoa powder, sugar, and salt. Make sure everything is evenly distributed. This ensures a consistent flavor and texture in your crust.
- Cut in the Butter: Add the cold, cubed butter to the dry ingredients. Using a pastry blender or your fingertips (work quickly to keep the butter cold!), cut the butter into the flour mixture until it resembles coarse crumbs. You should still see small pieces of butter, about the size of peas. These little butter pockets are what create that flaky texture we all love.
- Add the Egg Yolk: In a small bowl, lightly whisk the egg yolk. Add it to the flour mixture. The egg yolk adds richness and helps bind the dough together.
- Add Ice Water: Gradually add the ice water, one tablespoon at a time, mixing after each addition. Mix until the dough just comes together. Be careful not to overmix! Overmixing develops the gluten in the flour, which can result in a tough crust. You want a tender, melt-in-your-mouth crust, so handle the dough gently. The amount of water needed can vary depending on the humidity, so start with 3 tablespoons and add more as needed.
- Form the Dough: Turn the dough out onto a lightly floured surface. Gently form it into a disc, about 1 inch thick. Wrap the disc tightly in plastic wrap and refrigerate for at least 30 minutes, or up to 2 hours. This chilling time is crucial! It allows the gluten to relax, making the dough easier to roll out and preventing it from shrinking during baking.
- Roll Out the Dough: After chilling, remove the dough from the refrigerator and let it sit at room temperature for a few minutes to soften slightly. On a lightly floured surface, roll out the dough to about 1/8 inch thickness. You want it thin enough to be delicate but not so thin that it tears easily.
- Shape the Tart Shells: Using a 3-inch cookie cutter or a sharp knife, cut out circles from the rolled-out dough. Gently press each circle into a mini tart pan (about 2 inches in diameter). Make sure the dough is snug against the bottom and sides of the pan. Trim any excess dough from the edges.
- Dock the Crusts: Use a fork to prick the bottom of each tart shell several times. This prevents the crust from puffing up during baking.
- Chill Again: Place the tart shells in the refrigerator for another 15-20 minutes. This helps them hold their shape during baking.
- Pre-bake the Crusts: Preheat your oven to 350°F (175°C). Line the tart shells with parchment paper and fill them with pie weights or dried beans. This will prevent the crusts from puffing up and losing their shape. Bake for 15-20 minutes, or until the edges are lightly golden brown.
- Remove Weights and Bake Further: Remove the parchment paper and pie weights. Bake for another 5-10 minutes, or until the crusts are golden brown all over. Watch them carefully to prevent burning.
- Cool Completely: Let the tart shells cool completely in the pans before filling.
Making the Decadent Chocolate Filling
Now for the best part the chocolate filling! This filling is rich, smooth, and intensely chocolatey. It’s the perfect complement to the buttery, crumbly crust.
- Chop the Chocolate: Finely chop the semi-sweet chocolate. This ensures that it melts evenly and smoothly.
- Heat the Cream and Butter: In a medium saucepan, combine the heavy cream, butter, and corn syrup. Heat over medium heat, stirring occasionally, until the butter is melted and the mixture is simmering gently. The corn syrup adds a subtle sweetness and helps prevent the chocolate from seizing.
- Pour over Chocolate: Remove the saucepan from the heat and pour the hot cream mixture over the chopped chocolate. Let it sit for a minute or two to allow the chocolate to melt.
- Whisk Until Smooth: Whisk the mixture gently until the chocolate is completely melted and the filling is smooth and glossy. Be patient and keep whisking until all the chocolate is melted.
- Add Vanilla and Salt: Stir in the vanilla extract and a pinch of salt. The vanilla enhances the chocolate flavor, and the salt balances the sweetness.
- Let Cool Slightly: Let the filling cool slightly for about 10-15 minutes before pouring it into the tart shells. This will help prevent the crust from becoming soggy.
Assembling the Mini Chocolate Tarts
Almost there! Now it’s time to put everything together and create these irresistible mini chocolate tarts.
- Fill the Tart Shells: Pour the chocolate filling into the cooled tart shells, filling them almost to the top.
- Chill to Set: Place the filled tarts in the refrigerator for at least 2 hours, or preferably overnight, to allow the filling to set completely. This is important for achieving that perfect, smooth texture.
- Garnish (Optional): Once the tarts are set, you can garnish them as desired. Some popular options include fresh raspberries, whipped cream, chocolate shavings, or a dusting of edible gold dust. Get creative and have fun with it!
Tips and Tricks for Perfect Mini Chocolate Tarts
Here are a few extra tips and tricks to help you achieve chocolate tart perfection:
- Use High-Quality Chocolate: The quality of the chocolate will greatly impact the flavor of the filling. Use a good-quality semi-sweet chocolate for the best results.
- Keep the Butter Cold: Cold butter is essential for creating a flaky crust. Make sure the butter is very cold before cutting it into the flour mixture. You can even chill the flour mixture and the bowl before starting.
- Don’t Overmix the Dough: Overmixing the dough will develop the gluten and result in a tough crust. Mix the dough just until it comes together.
- Chill the Dough: Chilling the dough is crucial for preventing it from shrinking during baking. Chill the dough before rolling it out and again after shaping the tart shells.
- Use Pie Weights: Pie weights or dried beans are essential for preventing the crust from puffing up during baking.
- Adjust Sweetness to Taste: If you prefer a sweeter filling, you can add a little more sugar to the chocolate filling.
- Make Ahead: The tart shells can be made ahead of time and stored in an airtight container at room temperature for up to 2 days. The chocolate filling can also be made ahead of time and stored in the refrigerator for up to 3 days. Just reheat it gently before pouring it into the tart shells.
- Storage: Store the finished tarts in the refrigerator for up to 3 days.
Variations and Adaptations
Want to mix things up a bit? Here are a few variations and adaptations you can try:
- Different Chocolate: Use dark chocolate, milk chocolate, or even white chocolate for the filling.
- Add Flavorings: Add a teaspoon of espresso powder to the chocolate filling for a mocha flavor. Or, add a few drops of peppermint extract for a chocolate peppermint tart.
- Nutella Filling: Replace the chocolate filling with Nutella for a hazelnut chocolate tart.
- Salted Caramel
Conclusion:
And there you have it! These chocolate mini tarts are truly a must-try for any chocolate lover, and I’m confident they’ll become a new favorite in your household. The combination of the buttery, crumbly crust and the rich, decadent chocolate filling is simply irresistible. They’re elegant enough for a special occasion, yet easy enough to whip up for a weeknight dessert. What’s not to love? But the best part? The versatility! While I adore them just as they are, there are so many ways to customize these little beauties to suit your taste. For a touch of freshness, try topping them with a dollop of whipped cream and a few fresh raspberries or strawberries. The tartness of the berries perfectly complements the sweetness of the chocolate. Or, if you’re feeling adventurous, sprinkle a pinch of sea salt on top of the melted chocolate before it sets for a delightful sweet and salty contrast. For a more sophisticated twist, consider adding a hint of espresso powder to the chocolate filling. It intensifies the chocolate flavor and adds a subtle depth that’s simply divine. You could also infuse the cream with orange zest for a citrusy note that pairs beautifully with dark chocolate. Another fantastic variation is to add a layer of salted caramel beneath the chocolate filling. The gooey caramel adds a wonderful texture and a salty-sweet element that’s incredibly addictive. Serving these chocolate mini tarts is a breeze. They’re perfect as an after-dinner treat, a delightful addition to a dessert buffet, or even as a sweet snack with a cup of coffee or tea. They also make a wonderful homemade gift for friends and family. Imagine the smiles you’ll bring when you present them with a box of these delectable treats! Don’t be intimidated by the idea of making tarts from scratch. This recipe is surprisingly simple, and I’ve included plenty of tips and tricks to ensure your success. The key is to not overwork the dough and to chill it thoroughly before baking. This will prevent the crust from shrinking and ensure a perfectly crisp and tender texture. And remember, even if they don’t look perfect, they’ll still taste amazing! I truly believe that everyone should have a go-to chocolate dessert recipe, and these chocolate mini tarts are definitely a contender. They’re easy to make, incredibly delicious, and endlessly customizable. So, what are you waiting for? Gather your ingredients, preheat your oven, and get ready to indulge in a little bit of chocolate heaven. I’m so excited for you to try this recipe! Once you’ve made your own batch of these delightful mini tarts, I’d love to hear about your experience. Did you try any of the variations I suggested? Did you add your own unique twist? Share your photos and comments in the section below. I cant wait to see your creations and hear what you think. Happy baking! Print
Chocolate Mini Tarts: The Ultimate Guide to Baking Perfection
- Total Time: 45 minutes
- Yield: 12 tarts 1x
Description
Decadent mini chocolate tarts with a rich, smooth chocolate filling in a buttery, crisp crust. Perfect for parties or a sweet treat.
Ingredients
- 175g plain flour
- 75g cold butter, cut into cubes
- 25g icing sugar
- 1 egg yolk
- 1 tbsp cold water
- 200g dark chocolate
- 200ml double cream
- 1 tbsp golden syrup
Instructions
“`html
- Preheat your oven to 350 degrees F (175 degrees C).
- In a medium bowl, whisk together the flour, sugar, and cocoa powder.
- Cut in the butter using a pastry blender or your fingers until the mixture resembles coarse crumbs.
- Stir in the egg yolk and vanilla extract until the dough comes together.
- Press the dough into mini tart pans.
- Bake for 12-15 minutes, or until the crusts are set.
- Let cool completely before filling.
“`
Notes
“`html
- For best results, use high-quality chocolate.
- The tart shells can be made ahead of time and stored in an airtight container.
- Garnish with fresh berries or a dusting of cocoa powder for an elegant presentation.
“`
- Prep Time: 20 minutes
- Cook Time: 15 minutes

Leave a Comment