
Christmas Cookie Bars are the ultimate festive treat that brings joy and warmth to any holiday gathering. As the holiday season approaches, the aroma of freshly baked cookie bars wafting through the kitchen is enough to evoke cherished memories of family traditions and celebrations. These delightful bars combine the best elements of classic Christmas cookies into a convenient, easy-to-serve format, making them a favorite among both bakers and dessert lovers alike.
What I love most about Christmas Cookie Bars is their versatility; you can customize them with your favorite holiday flavors, from rich chocolate to zesty citrus. The chewy texture, combined with a buttery base and a sprinkle of festive toppings, creates a mouthwatering experience that keeps everyone coming back for more. Plus, they are incredibly convenient to make, allowing you to whip up a batch in no time, perfect for last-minute holiday parties or cozy family nights. Join me as we dive into this delicious recipe that captures the spirit of the season!

Ingredients:
- 2 ½ cups all-purpose flour
- 1 teaspoon baking powder
- ½ teaspoon baking soda
- ½ teaspoon salt
- 1 cup unsalted butter, softened
- 1 cup granulated sugar
- 1 cup packed brown sugar
- 2 large eggs
- 2 teaspoons vanilla extract
- 1 cup white chocolate chips
- 1 cup semi-sweet chocolate chips
- 1 cup chopped nuts (optional, I love pecans or walnuts)
- 1 cup dried cranberries or cherries (for that festive touch)
- 1 cup sprinkles (red and green for Christmas)
Preparing the Batter
1. **Preheat the Oven**: Start by preheating your oven to 350°F (175°C). This ensures that your cookie bars bake evenly and come out perfectly golden. 2. **Prepare the Baking Pan**: Grease a 9×13 inch baking pan with butter or line it with parchment paper for easy removal later. I usually prefer parchment paper as it makes cleanup a breeze. 3. **Mix Dry Ingredients**: In a medium bowl, whisk together the flour, baking powder, baking soda, and salt. This step is crucial as it helps to evenly distribute the leavening agents throughout the flour. 4. **Cream the Butter and Sugars**: In a large mixing bowl, using an electric mixer, cream together the softened butter, granulated sugar, and brown sugar until the mixture is light and fluffy. This usually takes about 3-4 minutes. The fluffiness of the butter and sugar mixture is key to achieving a soft texture in the cookie bars. 5. **Add Eggs and Vanilla**: Beat in the eggs one at a time, ensuring each is fully incorporated before adding the next. Then, mix in the vanilla extract. The vanilla adds a lovely aroma and flavor that complements the sweetness of the cookie bars. 6. **Combine Wet and Dry Ingredients**: Gradually add the dry ingredient mixture to the wet ingredients, mixing on low speed until just combined. Be careful not to overmix, as this can lead to tough cookie bars.Adding the Fun Ingredients
7. **Fold in the Mix-Ins**: Using a spatula, gently fold in the white chocolate chips, semi-sweet chocolate chips, chopped nuts (if using), dried cranberries or cherries, and sprinkles. This is where the magic happens! The combination of flavors and textures will make your cookie bars festive and delicious. 8. **Spread the Batter**: Pour the batter into the prepared baking pan. Use a spatula to spread it evenly across the pan. Dont worry if it seems thick; it will spread out as it bakes.Cooking Process
9. **Bake the Cookie Bars**: Place the pan in the preheated oven and bake for 25-30 minutes. The edges should be lightly golden, and a toothpick inserted into the center should come out with a few moist crumbs. If it comes out clean, you may have overbaked them, so keep an eye on them! 10. **Cool the Bars**: Once baked, remove the pan from the oven and let it cool in the pan for about 10-15 minutes. Then, transfer the bars to a wire rack to cool completely. This step is important as it allows the bars to set properly.Assembling and Serving
11. **Cutting the Bars**: Once the cookie bars are completely cool, use a sharp knife to cut them into squares or rectangles. I like to cut them into 24 pieces, but you can make them larger or smaller depending on your preference. 12. **Decorate (Optional)**: If you want to add an extra festive touch, you can drizzle some melted white chocolate over the top or sprinkle more festive sprinkles. This step is optional but adds a nice visual appeal. 13. **Storing the Cookie Bars**: Store the cookie bars in an airtight container at room temperature for up to a week. If you want to keep them longer, you can freeze them for up to three months. Just make sure to wrap them tightly in plastic wrap and then place them in a freezer-safe container. 14. **Enjoy**: Now comes the best part! Grab a plate, pour yourself a glass of milk (or your favorite holiday beverage), and enjoy these delicious Christmas cookie bars with family and friends. Theyre perfect for holiday gatherings, cookie exchanges,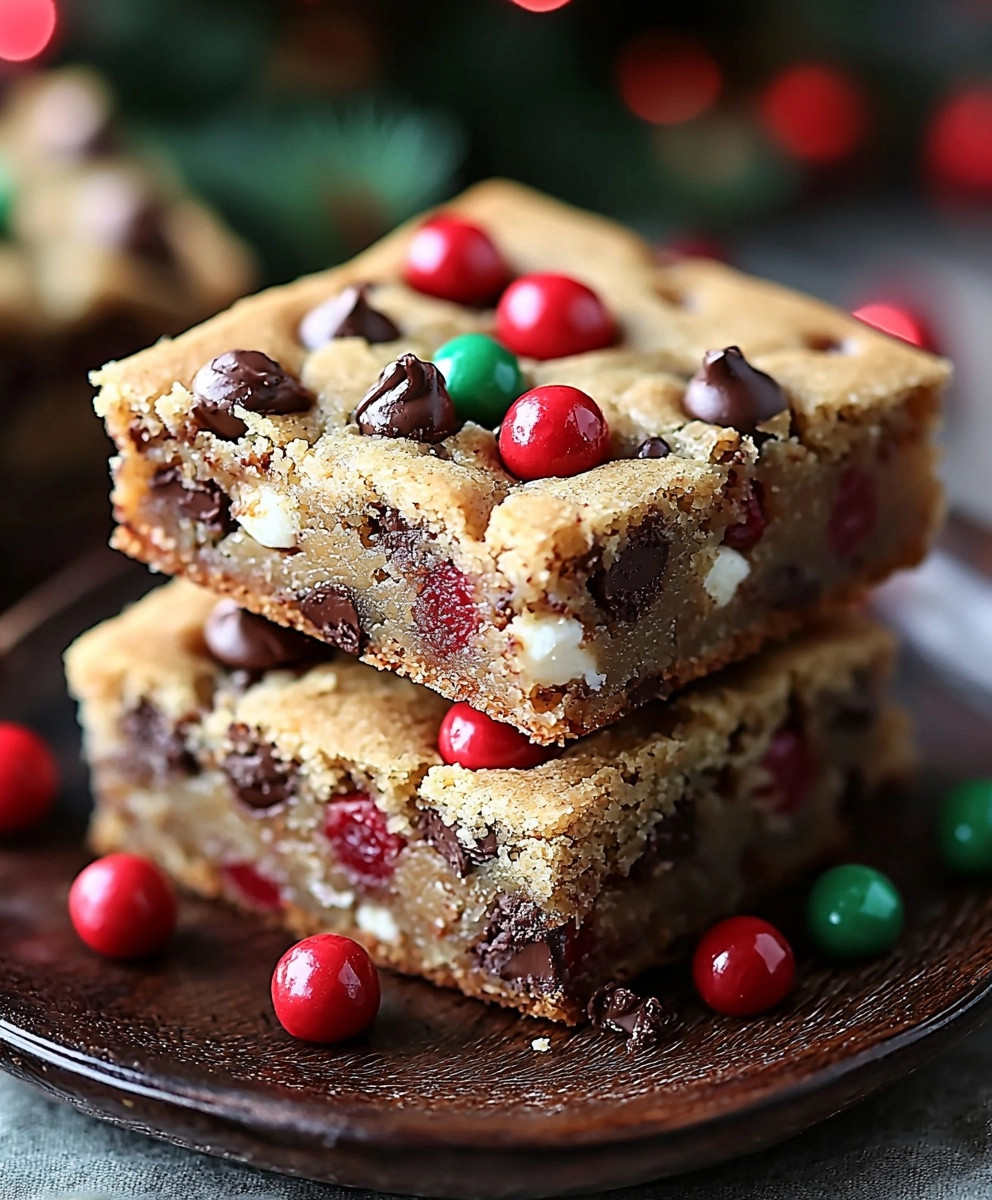
Conclusion:
In wrapping up this delightful journey into the world of Christmas Cookie Bars, I can confidently say that this recipe is a must-try for anyone looking to add a touch of festive cheer to their holiday celebrations. The combination of rich flavors, chewy textures, and the vibrant colors of holiday sprinkles makes these bars not only a treat for the taste buds but also a feast for the eyes. Whether youre baking for a family gathering, a cookie exchange, or simply to enjoy with a warm cup of cocoa, these cookie bars are sure to impress. For serving suggestions, consider pairing these Christmas Cookie Bars with a scoop of vanilla ice cream or a dollop of whipped cream for an indulgent dessert. You can also experiment with variations by adding your favorite mix-ins, such as crushed peppermint candies, dried cranberries, or even a swirl of caramel for an extra layer of flavor. The beauty of this recipe lies in its versatility, allowing you to customize it to suit your taste and the preferences of your loved ones. I wholeheartedly encourage you to try making these Christmas Cookie Bars and share your experience with friends and family. I would love to hear how they turned out for you and any creative twists you added along the way. So, roll up your sleeves, gather your ingredients, and let the holiday baking begin! Trust me, once you take that first bite, youll understand why these Christmas Cookie Bars are destined to become a cherished tradition in your home. Happy baking! Print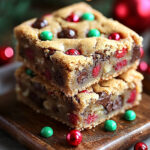
Christmas Cookie Bars: Easy Recipes for Festive Treats
- Total Time: 50 minutes
- Yield: 24 cookie bars 1x
Description
These Christmas cookie bars are a festive treat featuring a mix of white and semi-sweet chocolate chips, dried cranberries, and colorful sprinkles. Soft and chewy, they are perfect for holiday gatherings and sure to spread joy during the celebrations!
Ingredients
- 2 ½ cups all-purpose flour
- 1 teaspoon baking powder
- ½ teaspoon baking soda
- ½ teaspoon salt
- 1 cup unsalted butter, softened
- 1 cup granulated sugar
- 1 cup packed brown sugar
- 2 large eggs
- 2 teaspoons vanilla extract
- 1 cup white chocolate chips
- 1 cup semi-sweet chocolate chips
- 1 cup chopped nuts (optional, pecans or walnuts recommended)
- 1 cup dried cranberries or cherries
- 1 cup sprinkles (red and green for Christmas)
Instructions
- Preheat your oven to 350°F (175°C).
- Grease a 9×13 inch baking pan with butter or line it with parchment paper.
- In a medium bowl, whisk together the flour, baking powder, baking soda, and salt.
- In a large mixing bowl, cream together the softened butter, granulated sugar, and brown sugar until light and fluffy (about 3-4 minutes).
- Beat in the eggs one at a time, then mix in the vanilla extract.
- Gradually add the dry ingredients to the wet ingredients, mixing on low speed until just combined.
- Gently fold in the white chocolate chips, semi-sweet chocolate chips, chopped nuts (if using), dried cranberries or cherries, and sprinkles.
- Pour the batter into the prepared baking pan and spread it evenly.
- Bake for 25-30 minutes, until the edges are lightly golden and a toothpick inserted into the center comes out with a few moist crumbs.
- Let the bars cool in the pan for 10-15 minutes, then transfer to a wire rack to cool completely.
- Once cool, cut into squares or rectangles (about 24 pieces).
- Drizzle melted white chocolate over the top or sprinkle more festive sprinkles if desired.
- Store in an airtight container at room temperature for up to a week or freeze for up to three months.
- Serve with milk or your favorite holiday beverage and enjoy with family and friends!
Notes
- For a nut-free version, simply omit the chopped nuts.
- Feel free to customize the mix-ins based on your preferences or what you have on hand.
- These cookie bars are perfect for holiday cookie exchanges or as a festive dessert for gatherings.
- Prep Time: 15 minutes
- Cook Time: 25-30 minutes


Leave a Comment