
Crispy Meringue Cookies are a delightful treat that never fails to impress. With their light, airy texture and sweet, melt-in-your-mouth goodness, these cookies are a perfect addition to any dessert table. Originating from the 17th century, meringue has a rich history in European baking, often associated with French patisserie. Over the years, these crispy meringue cookies have become a beloved favorite around the world, cherished for their simplicity and elegance.
What makes these cookies so irresistible is not just their delightful crunch but also their versatility. They can be flavored with vanilla, chocolate, or even fruit extracts, making them a canvas for creativity. Whether enjoyed on their own or as a topping for ice cream or pavlova, people love these cookies for their delightful taste and the joy they bring to any occasion. Join me as we dive into the world of crispy meringue cookies and discover how easy it is to create this enchanting treat at home!

Ingredients:
- 4 large egg whites, at room temperature
- 1 cup granulated sugar
- 1 teaspoon vanilla extract
- 1/4 teaspoon cream of tartar
- 1/4 teaspoon salt
- Optional: food coloring or cocoa powder for flavoring
Preparing the Meringue
1. **Preheat the Oven**: Start by preheating your oven to 225°F (110°C). This low temperature is crucial for drying out the meringues and achieving that perfect crispy texture. 2. **Prepare the Baking Sheets**: Line two baking sheets with parchment paper. This will prevent the meringues from sticking and make cleanup a breeze. If you want to ensure your meringues are uniform in size, you can draw circles on the parchment paper as a guide. 3. **Separate the Egg Whites**: Carefully separate the egg whites from the yolks. Make sure there is no yolk in the whites, as even a tiny bit of fat can prevent the meringue from whipping up properly. I find it easiest to crack the egg and pass the yolk back and forth between the shell halves, letting the whites fall into a bowl. 4. **Whip the Egg Whites**: In a clean, dry mixing bowl, add the egg whites and cream of tartar. Using an electric mixer, start beating the egg whites on medium speed until they become frothy. This usually takes about 1-2 minutes. 5. **Add Sugar Gradually**: Once the egg whites are frothy, increase the mixer speed to high and begin adding the granulated sugar, one tablespoon at a time. This gradual addition helps the sugar dissolve completely and creates a stable meringue. Continue beating until the mixture forms stiff peaks. This means that when you lift the beaters out of the bowl, the peaks should stand straight up without drooping. 6. **Incorporate Flavorings**: Once you have achieved stiff peaks, gently fold in the vanilla extract and salt. If you want to add food coloring or cocoa powder for a twist, now is the time! Just be careful not to deflate the meringue; use a spatula to fold in the color gently.Shaping the Meringues
7. **Transfer the Meringue**: Using a spatula or a piping bag fitted with a star tip, transfer the meringue mixture onto the prepared baking sheets. If youre using a piping bag, you can create beautiful swirls or rosettes. If you prefer a more rustic look, simply spoon dollops of meringue onto the parchment. 8. **Create Texture**: If youre feeling creative, you can use a toothpick or the back of a spoon to create swirls or peaks in the meringue. This will give your cookies a lovely texture and make them visually appealing. 9. **Bake the Meringues**: Place the baking sheets in the preheated oven. Bake for about 1.5 to 2 hours, or until the meringues are completely dry and can easily be lifted off the parchment paper. They should be crisp on the outside and slightly chewy on the inside. If you want to check for doneness, you can turn off the oven and leave the meringues inside for an additional hour to cool down slowly.Cooling and Storing
10. **Cool the Meringues**: Once baked, remove the meringues from the oven and let them cool on the baking sheets for about 10 minutes. Then, carefully transfer them to a wire rack to cool completely. This step is essential as it allows the meringues to firm up and become extra crispy. 11. **Store Properly**: Once cooled, store the meringue cookies in an airtight container at room temperature. They can last for up to two weeks if kept dry. If you live in a humid environment, consider adding a packet of silica gel to the container to help absorb moisture.Serving Suggestions
12. **Enjoying the Meringues**: These crispy meringue cookies are delightful on their own, but you can also serve them with whipped cream and fresh berries for a delicious dessert. They can be crumbled over ice cream or used as a topping for cakes and pastries. 13. **Experiment with Flavors**: Feel free to experiment with different flavors! You can add almond extract instead of vanilla, or even fold in finely chopped nuts or chocolate chips for added texture. The possibilities are endless! 14. **Make it a Fun Activity**: If youre baking with kids or friends,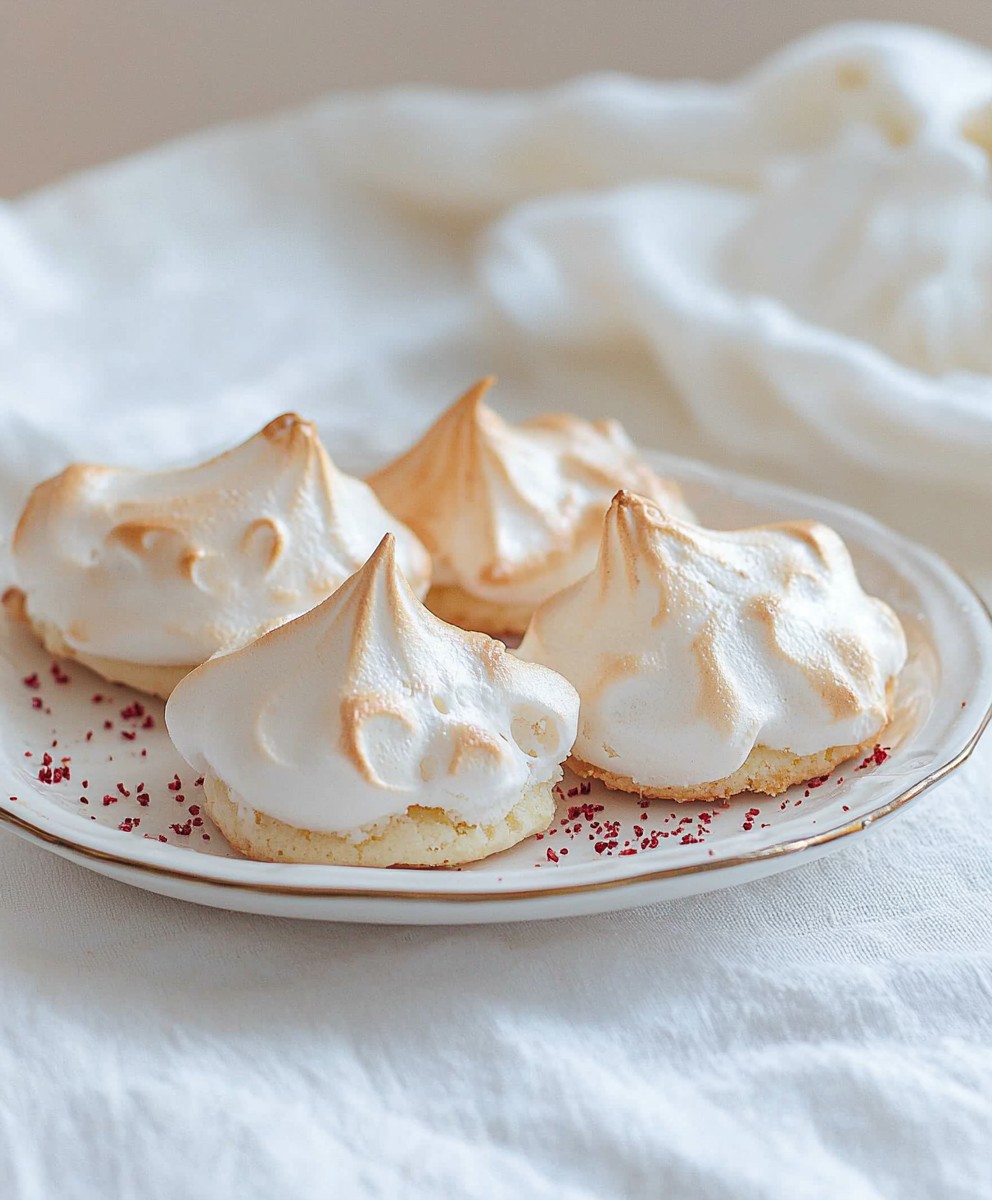
Conclusion:
In summary, these crispy meringue cookies are an absolute must-try for anyone looking to indulge in a light, airy treat that melts in your mouth. Their delicate texture and sweet flavor make them perfect for any occasion, whether you’re hosting a tea party, celebrating a birthday, or simply craving a delightful snack. Plus, the beauty of this recipe lies in its versatility; you can easily customize your meringue cookies by adding flavors like vanilla, almond, or even a hint of citrus zest. For a fun twist, consider folding in some mini chocolate chips or colorful sprinkles before baking to create a festive touch. I encourage you to give this recipe a go and experience the joy of creating these delightful cookies in your own kitchen. Once youve tried them, Id love to hear about your experience! Share your thoughts, variations, or even photos of your crispy meringue cookies. Your feedback not only inspires me but also helps others discover the magic of this recipe. So, roll up your sleeves, whip those egg whites, and lets make some crispy meringue cookies that will surely impress your friends and family! Print
Crispy Meringue Cookies: The Ultimate Guide to Perfectly Light and Crunchy Treats
- Total Time: 135 minutes
- Yield: 24 cookies 1x
Description
Enjoy the light and crispy delight of homemade meringue cookies! These airy treats are easy to make with just a few ingredients and are perfect for any occasion, whether served alone or as a dessert topping.
Ingredients
- 4 large egg whites, at room temperature
- 1 cup granulated sugar
- 1 teaspoon vanilla extract
- 1/4 teaspoon cream of tartar
- 1/4 teaspoon salt
- Optional: food coloring or cocoa powder for flavoring
Instructions
- Preheat your oven to 225°F (110°C).
- Line two baking sheets with parchment paper.
- Carefully separate the egg whites from the yolks, ensuring no yolk gets into the whites.
- In a clean mixing bowl, add egg whites and cream of tartar. Beat on medium speed until frothy (1-2 minutes).
- Increase speed to high and add sugar one tablespoon at a time. Beat until stiff peaks form.
- Gently fold in vanilla extract and salt. Add food coloring or cocoa powder if desired.
- Use a spatula or piping bag to transfer meringue onto prepared baking sheets.
- Use a toothpick or spoon to create swirls or peaks in the meringue.
- Bake for 1.5 to 2 hours until dry and easily lifted from parchment. Optionally, turn off the oven and leave meringues inside for an additional hour.
- Let cool on baking sheets for 10 minutes, then transfer to a wire rack to cool completely.
- Store in an airtight container at room temperature for up to two weeks.
Notes
- Ensure all equipment is clean and dry to achieve the best meringue.
- Experiment with flavors by adding different extracts or mix-ins.
- For a fun activity, involve kids in shaping and decorating the meringues.
- Prep Time: 15 minutes
- Cook Time: 90 minutes

Leave a Comment