
This Easy Bunny Cake Recipe is the ultimate crowd-pleaser, perfect for adding a touch of whimsical magic to any celebration. Whether you’re hosting an Easter brunch, a birthday party, or just looking for a fun weekend baking project, this delightful creation is sure to bring smiles all around. People absolutely adore this cake for its adorable presentation and, of course, its delicious, melt-in-your-mouth flavor. What truly makes this Easy Bunny Cake Recipe special is its surprising simplicity; it looks incredibly impressive but requires minimal fuss, making it accessible for bakers of all skill levels. It’s a wonderful way to channel your inner artist and craft a dessert that’s as joyful to make as it is to devour. Get ready to hop into a world of sweet fun with this fantastic recipe!

Easy Bunny Cake Recipe
Get ready to hop into spring with this incredibly easy and adorable Bunny Cake recipe! Perfect for Easter, spring parties, or just a fun weekend baking project, this cake is as delightful to look at as it is to eat. We’ll be transforming two simple round cake layers into a charming bunny face that’s sure to bring smiles to everyone’s faces. The beauty of this recipe is its simplicity – it relies on ready-made components for speed and ease, making it accessible even for begin extractner bakers. Don’t be intimidated; with a few basic decorating techniques, you’ll create a showstopper!
Ingredients:
Let’s get started on our delightful bunny creation! The foundation of our bunny is, of course, the cake itself. You can choose the convenience of a boxed cake mix, following the package instructions for baking two round layers. Alternatively, if you have a go-to homemade vanilla or yellow cake recipe, that will work beautifully too. Ensure your cake layers are completely cooled before you begin extract decorating. This is a crucial step; warm cake layers can lead to melting frosting and a messy decorating experience. If you’re baking ahead of time, you can even wrap your cooled layers tightly in plastic wrap and store them at room temperature or in the refrigerator for a day or two.
Decorating Your Bunny
Now for the fun part: transforming these humble cake layers into a festive bunny!
1. Prepare Your Workspace and Frosting: First, clear a clean surface for decorating. It’s helpful to have your piping bags ready to go. Fill one piping bag with white frosting, fitted with a small round tip for fine details. If you’re making your own pink frosting, mix a little pink gel food coloring into a portion of your white frosting until you achieve a lovely pastel bunny pink. Place this pink frosting into another piping bag, also fitted with a small round tip. If you’re using pre-made pink frosting, you can use it directly. Melt your chocolate icing or chocolate according to package directions. You can put this into a small piping bag with a very fine tip or even a Ziploc bag with a tiny corner snipped off.
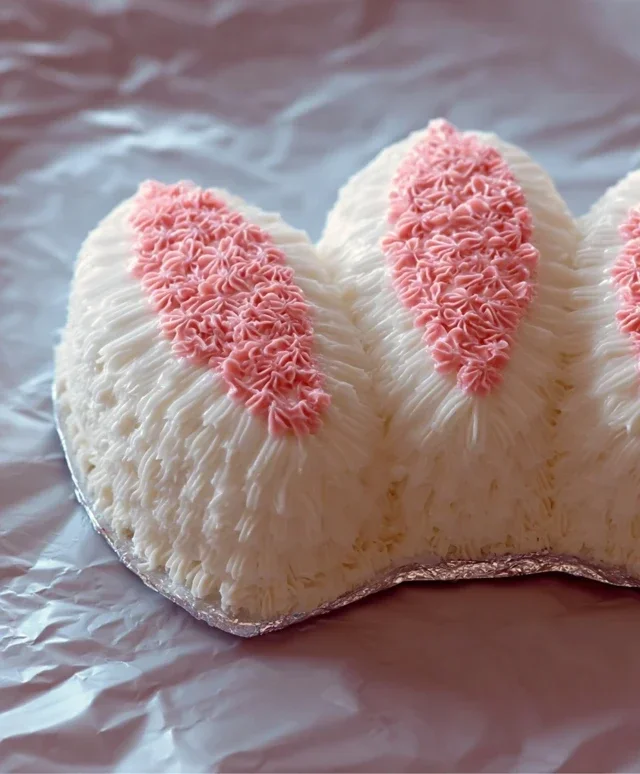
2. Assemble the Bunny Face: Take one of your completely cooled round cake layers and place it flat on your serving plate or cake board. This will be the main part of the bunny’s face. Now, take your second round cake layer and, using a sharp knife, carefully cut it in half. These two semi-circles will become the bunny’s ears. Position the two ear halves on top of the first round layer, with the cut edges meeting in the middle to create a V-shape. You can arrange them slightly angled outwards or more upright, depending on the look you prefer. Don’t worry about them being perfectly aligned yet; we’ll secure them with frosting.
3. Crum extractb Coat and Frost the Face: Before we go in for the main frosting, it’s a good idea to apply a thin “crum extractb coat” of white frosting over the entire cake, including the “ears.” This thin layer traps any loose crum extractbs and creates a smooth surface for your final frosting layer. Don’t worry about perfection here; just get a light, even coating. Place the cake in the refrigerator for about 15-20 minutes to let this crum extractb coat set. Once chilled, you can apply a thicker, more generous layer of white frosting to the entire cake, ensuring it’s smooth and covers all the cake surfaces. You can use an offset spatula to achieve a smooth finish.
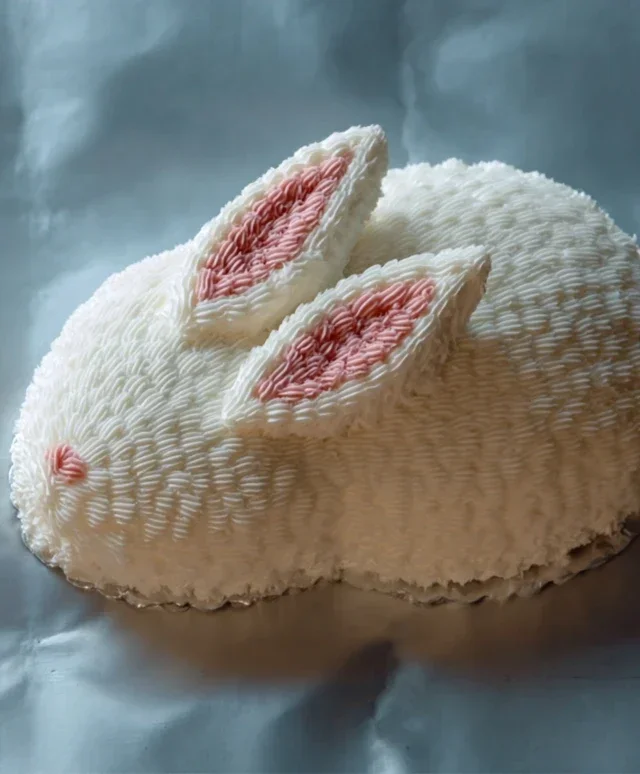
4. Create the Bunny’s Eyes and Nose: Using your piping bag filled with chocolate icing or melted chocolate and a fine tip, pipe two oval shapes on the upper half of the cake face for the eyes. You can make them as large or as small as you like. For the nose, pipe a slightly larger, rounded triangle or oval shape in the center, just below the eyes, using your pink frosting. You can also pipe two small pink circles above the nose to suggest rosy cheeks, or even a little pink heart. Feel free to get creative with the placement and size of these features! The key is to make them distinct and charming.
5. Add Whiskers and Detail the Ears: With your chocolate icing, carefully pipe thin lines extending from the sides of the pink nose to create the bunny’s whiskers. Aim for 3-4 lines on each side. Now, take your piping bag filled with pink frosting. You can use this to pipe a slightly more decorative outline around the inside edge of the bunny’s ears, or simply fill in the center of the ears with a swirled pattern for a bit of depth. You can also use the pink frosting to add a touch of blush to the cheeks if you didn’t do so earlier. Finally, place your jellybeans or colorful round candies around the base of the cake or even strategically on the cake itself as decorative accents, adding a pop of color and playful texture.
And there you have it – your very own Easy Bunny Cake! This simple yet effective decorating method makes for a truly memorable dessert without requiring advanced cake decorating skills. Enjoy!
Conclusion:
And there you have it – our incredibly straightforward and utterly adorable Easy Bunny Cake Recipe! I truly hope you’ve been inspired to hop into your kitchen and create this delightful treat. This recipe is perfect because it minimizes fuss while maximizing visual appeal, making it an ideal project for bakers of all skill levels, especially those looking for a fun and festive addition to Easter celebrations or any springtime gathering. The simplicity of the ingredients and steps means you can spend less time stressing and more time enjoying the process and the delicious outcome.
This bunny cake isn’t just a treat; it’s a statement piece that will bring smiles all around. Imagin extracte serving it at your next brunch or family get-together – it’s guaranteed to be a showstopper! For serving, a simple dusting of powdered sugar or a few fresh berries make perfect accompaniments. Don’t be afraid to get creative with variations! You can easily adapt the cake flavor by using your favorite cake mix, or change up the frosting colors to match your theme. Adding edible glitter or sprinkles can give your bunny an extra touch of magic. I can’t wait to hear about your own bunny cake creations!
Frequently Asked Questions:
Can I make this bunny cake ahead of time?
Absolutely! You can bake the cake layers and prepare the frosting a day in advance. Store the cooled cake layers at room temperature, wrapped tightly in plastic wrap, and refrigerate the frosting. Assemble and decorate closer to serving time for the freshest appearance.
What kind of frosting is best for decorating?
A buttercream frosting is generally the most versatile for decorating. It holds its shape well, making it easy to pipe details like the bunny’s face and fur texture. You can also use cream cheese frosting if you prefer a tangier flavor, but it might be slightly softer for intricate designs.
Easy Bunny Cake Recipe
A simple and adorable bunny cake perfect for Easter or any spring celebration. This recipe uses convenient store-bought ingredients for a quick and fun baking project.
Ingredients
-
Two round cake layers (use one cake mix or your favorite homemade recipe)
-
White frosting (ready-made or your favorite homemade recipe)
-
Pink frosting (or use pink gel food coloring on white frosting)
-
Chocolate icing or melted chocolate for details
-
Jellybeans or colorful round candies
-
Piping bags
Instructions
-
Step 1
Prepare and bake your two round cake layers according to the cake mix or homemade recipe instructions. Let them cool completely on a wire rack. -
Step 2
Place one cooled cake layer on your serving plate. Generously spread white frosting over the top of this layer. -
Step 3
Place the second cake layer on top of the frosted first layer. Frost the entire cake with a smooth layer of white frosting. This will be the bunny’s body. -
Step 4
To create the bunny ears, cut the second cake layer in half. Shape each half into an ear by trimming and slightly curving the edges. Place these on top of the ‘body’ cake at an angle. -
Step 5
Using a piping bag with a small round tip, pipe pink frosting onto the inside of the ears to create the inner ear detail. -
Step 6
Use chocolate icing or melted chocolate and a piping bag with a small tip to draw the bunny’s eyes, nose, and mouth. -
Step 7
Decorate the bunny’s body with jellybeans or colorful round candies for a festive touch.
Important Information
Nutrition Facts (Per Serving)
It is important to consider this information as approximate and not to use it as definitive health advice.
Allergy Information
Please check ingredients for potential allergens and consult a health professional if in doubt.

Leave a Comment