
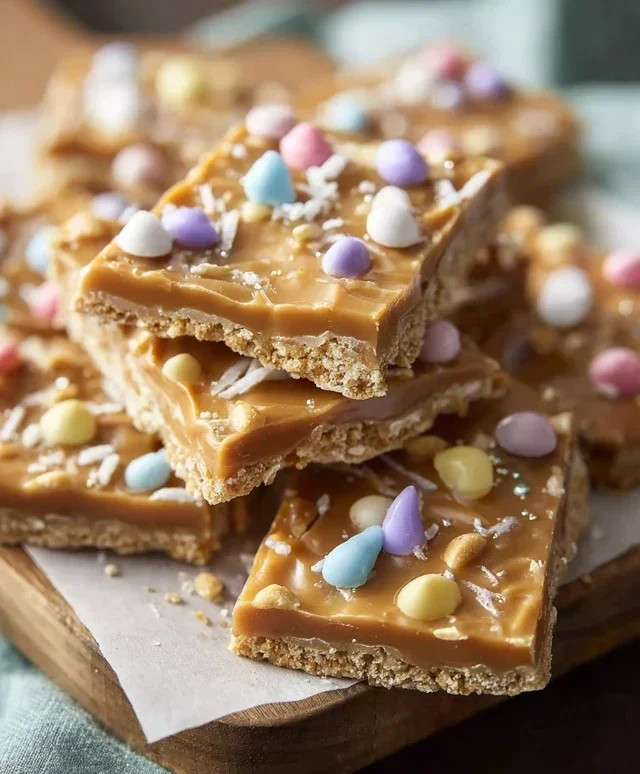
Easter Toffee: the quintessential treat that signals the arrival of spring and sweet celebrations. There’s something incredibly nostalgic and joyfully indulgent about this crunchy, buttery confection. When the first hints of sunshine appear, and the Easter bunny prepares its basket, my mind invariably turns to the glorious, irresistible crunch of homemade Easter Toffee. It’s more than just candy; it’s a tradition, a memory maker. What makes this Easter Toffee so special? It’s that perfect balance of rich, caramelized sugar meeting a satisfying snap, often studded with delightful additions that make each bite an adventure. Whether you’re a seasoned baker or embarking on your first sweet creation, this Easter Toffee recipe is designed to bring a smile to your face and a delicious warmth to your Easter gathering. Get ready to create a treat that will have everyone asking for seconds (and thirds!).

Easter Toffee
Easter is a time for joyous celebrations, and what better way to add a touch of homemade sweetness to your festivities than with a batch of dazzling Easter Toffee? This recipe is incredibly simple to make, yet it delivers a delightful crunch and a burst of festive color that will impress your family and friends. Forget complicated confections; this easy-to-follow toffee recipe uses just a few key ingredients to create a truly magical Easter treat. The beauty of this toffee lies in its adaptability – you can customize it with your favorite pastel colors and a generous scattering of Easter-themed sprinkles and candies. It’s perfect for filling Easter baskets, adorning dessert tables, or simply enjoying as a delightful afternoon pick-me-up.
Ingredients:
Instructions:
Preparing the Cracker Base
The foundation of our Easter Toffee is built upon humble Saltine crackers. To begin extract, preheat your oven to 350 degrees Fahrenheit (175 degrees Celsius). Line a large baking sheet (typically a 10×15 inch or similar size) with parchment paper. This is crucial to prevent sticking and make cleanup a breeze. Now, carefully arrange the Saltine crackers in a single, even layer on the prepared baking sheet. Try to cover as much of the surface as possible, overlapping slightly if necessary. The goal is to create a cohesive base for our toffee mixture. If your baking sheet is larger, you might need a few extra crackers to ensure complete coverage. This step is simple, but a well-arranged cracker layer makes for a better final product.
Cooking the Toffee Mixture
In a medium saucepan, combine the butter and the packed dark brown sugar. Place the saucepan over medium heat. Stir constantly with a wooden spoon or heat-resistant spatula. It’s important to stir continuously to prevent the sugar from scorching and to ensure the butter melts evenly into the brown sugar. Continue to cook and stir until the butter has completely melted and the sugar has dissolved, forming a smooth, syrupy mixture. This usually takes about 3-5 minutes. Once the mixture is smooth and bubbling gently, bring it to a boil. Continue to boil, stirring frequently, for approximately 5 minutes. You’re looking for the mixture to thicken slightly and reach a nice caramel color. Be patient during this stage; overcooking can lead to a burnt flavor, while undercooking might result in a toffee that is too soft. The aroma should be wonderfully rich and caramel-like.
Assembling and Baking the Toffee
Once your toffee mixture has reached the desired consistency, carefully pour it over the arranged Saltine crackers on the baking sheet. Use your spoon or spatula to spread the toffee evenly across the crackers, ensuring every cracker is coated. Work quickly, as the toffee will begin extract to set as it cools. Once the toffee is spread, place the baking sheet in the preheated oven. Bake for 5-7 minutes, or until the toffee is bubbly and the edges of the crackers are slightly caramelized. Keep a close eye on it during this time, as it can go from perfect to burnt very quickly. The heat of the oven will help the toffee to fully adhere to the crackers and achieve that signature brittle texture.
Melting and Coloring the Chocolate
While the toffee is baking, prepare your white chocolate. In a heatproof bowl, place the white chocolate chip morsels. You can melt the chocolate in one of two ways: either over a double boiler or in the microwave. For the double boiler method, fill a saucepan with a few inches of water and bring it to a gentle simmer. Place the bowl of white chocolate chips over the saucepan, ensuring the bottom of the bowl does not touch the water. Stir the chocolate frequently until it is smooth and completely melted. If microwaving, heat the chocolate in 30-second intervals, stirring thoroughly between each interval, until melted and smooth. Once the white chocolate is melted, if you desire colored toffee, stir in 1-2 drops of gel food coloring. Gel coloring is recommended as it’s concentrated and won’t add extra moisture. Stir until the color is evenly distributed. Remember, a little goes a long way with gel coloring.
Decorating and Cooling
As soon as the toffee comes out of the oven, immediately sprinkle the melted white chocolate evenly over the hot toffee. You can spread it with an offset spatula if you like, or just let it melt and drip, creating a beautiful marbled effect. While the white chocolate is still warm and melty, this is the time to get creative with your Easter and Springtime-themed sprinkles and candy. Go wild with pastel-colored jimmies, edible glitter, candy eggs, or any other festive decorations you can find. The warmth of the toffee will help the sprinkles adhere. Once decorated, allow the Easter Toffee to cool completely on the baking sheet at room temperature. This cooling process is critical for achieving a crisp, breakable toffee. It can take a few hours. Once fully set and hard, break the toffee into irregular pieces. Store your beautiful Easter Toffee in an airtight container at room temperature for up to a week. Enjoy sharing this festive treat!

Conclusion:
And there you have it! This Easter Toffee recipe is a guaranteed crowd-pleaser, offering that perfect balance of sweet, crunchy, and buttery goodness that simply screams celebration. Its simplicity makes it incredibly accessible for bakers of all skill levels, and the delightful crack when you break it into pieces is incredibly satisfying. Whether you’re looking for a festive treat to share with family and friends or a delightful homemade gift, this Easter Toffee is sure to impress.
I highly recommend serving this alongside a cup of hot tea or coffee, or even crum extractbled over ice cream for an extra decadent dessert. Don’t be afraid to get creative with variations! Consider adding a sprinkle of sea salt for a salted caramel effect, or a dusting of edible glitter for extra sparkle. You could even mix in some finely chopped nuts like pecans or almonds for added texture and flavor. I truly encourage you to give this delightful Easter Toffee a try this year – it’s a joy to make and even more of a joy to eat!
Frequently Asked Questions about Easter Toffee:
How should I store my Easter Toffee?
Once cooled and broken into pieces, store your Easter Toffee in an airtight container at room temperature. It should stay fresh for at least a week, though I doubt it will last that long! If your kitchen is particularly warm, you might consider storing it in the refrigerator to prevent it from getting too soft, but be aware that condensation can form on the surface.
Can I make Easter Toffee ahead of time?
Absolutely! This Easter Toffee is an excellent make-ahead treat. In fact, it’s best when allowed to fully set and cure for at least a few hours, or even overnight. This ensures it has that perfect crisp texture.
What if my toffee is too hard or too soft?
The key to perfectly textured toffee lies in accurately reaching the hard crack stage (around 300-310°F or 149-154°C) with your sugar mixture. If it’s too soft, it likely didn’t reach a high enough temperature. If it’s rock hard, you may have overheated it slightly. Using a candy thermometer is your best friend for consistent results with this Easter Toffee!
Easter Toffee
A festive and easy-to-make Easter treat featuring a salty cracker base topped with rich toffee and decorative Easter sprinkles.
Ingredients
-
48 Saltine crackers (regular)
-
1 cup unsalted butter
-
1 cup dark brown sugar, packed
-
6 ounces white chocolate chip morsels
-
1-2 drops of gel food coloring
-
Easter and Springtime-themed sprinkles and candy
Instructions
-
Step 1
Preheat oven to 350°F (175°C). Line a baking sheet with parchment paper or foil and arrange the saltine crackers in a single layer. -
Step 2
In a medium saucepan, melt the unsalted butter over medium heat. Add the packed dark brown sugar and stir constantly until the sugar is dissolved and the mixture is smooth and bubbly. -
Step 3
Bring the sugar mixture to a boil, stirring continuously. Continue to boil for 3-5 minutes, until it reaches a thick, caramel-like consistency. -
Step 4
Carefully pour the hot toffee mixture evenly over the saltine crackers on the prepared baking sheet. Spread it quickly with a heat-resistant spatula. -
Step 5
Immediately sprinkle the white chocolate chip morsels over the hot toffee. Let them sit for a minute to begin melting, then spread them evenly to create a smooth topping. -
Step 6
If using, add 1-2 drops of gel food coloring to the melted white chocolate and swirl gently with a toothpick for pastel colors. Don’t overmix. -
Step 7
While the chocolate is still melted, generously sprinkle with Easter and Springtime-themed sprinkles and candy. Press lightly to adhere. -
Step 8
Place the baking sheet in the preheated oven for 5-7 minutes, or until the white chocolate is fully melted and glossy. Do not overbake. -
Step 9
Remove from oven and let cool completely on the baking sheet until the toffee hardens. This may take at least 1-2 hours. -
Step 10
Once hardened, break the Easter toffee into pieces. Store in an airtight container at room temperature.
Important Information
Nutrition Facts (Per Serving)
It is important to consider this information as approximate and not to use it as definitive health advice.
Allergy Information
Please check ingredients for potential allergens and consult a health professional if in doubt.


Leave a Comment