
Turkey Chili: the hearty, flavorful, and surprisingly healthy dish that’s about to become your new weeknight staple! Forget everything you thought you knew about chili; this isn’t your grandma’s greasy, beef-laden recipe. We’re talking lean ground turkey simmered in a rich, smoky tomato base, bursting with beans, peppers, and just the right amount of spice.
Chili, in its various forms, has a fascinating history, believed to have originated in the American Southwest, possibly even dating back to the Canary Islanders who immigrated to San Antonio in the 18th century. While the original versions were likely quite simple, featuring meat, chilies, and perhaps some beans, the dish has evolved over centuries, incorporating influences from Mexican and Texan cuisine. My version, Turkey Chili, is a modern twist on this classic, offering a lighter, healthier alternative without sacrificing any of the bold flavors we all crave.
Why do people adore chili? It’s the perfect comfort food! The combination of savory meat, tender beans, and a complex blend of spices creates a symphony of flavors that’s both satisfying and warming. Plus, it’s incredibly versatile. You can customize it to your liking, adding your favorite toppings like shredded cheese, sour cream, avocado, or a dollop of Greek yogurt. And let’s not forget the convenience factor! Chili is a fantastic make-ahead meal that only gets better with time, making it ideal for busy weeknights or meal prepping. Get ready to experience the ultimate in flavor and convenience with this amazing recipe.

Ingredients:
- For the Ice Cream Balls:
- 1 quart high-quality vanilla ice cream (or your favorite flavor), softened slightly
- Plastic wrap
- Baking sheet lined with parchment paper
- For the Coating:
- 2 cups cornflakes, finely crushed
- 1 cup shredded coconut, sweetened or unsweetened
- 1/2 cup chopped pecans or walnuts (optional)
- 1/4 cup granulated sugar
- 1 teaspoon ground cinnamon
- 2 large eggs, beaten
- 1/4 cup milk
- Vegetable oil, for frying
- For Serving (Optional):
- Whipped cream
- Chocolate syrup
- Honey
- Sprinkles
- Fresh berries
Preparing the Ice Cream Balls:
This is the most crucial step, so pay close attention! We need to create super-frozen ice cream balls that won’t melt instantly when they hit the hot oil.
- Soften the Ice Cream: Let your ice cream sit at room temperature for about 10-15 minutes, just until it’s soft enough to scoop easily but not melted. You want it pliable, not soupy.
- Scoop and Shape: Line a baking sheet with parchment paper. Using an ice cream scoop (a medium-sized one works best), scoop out balls of ice cream. Place each ball onto the prepared baking sheet. Don’t worry if they aren’t perfectly round at this point.
- Refine the Shape: Gently roll each ice cream ball between your palms to smooth out any imperfections and create a uniform, round shape. Work quickly to prevent melting.
- Wrap Tightly: Cut squares of plastic wrap large enough to completely enclose each ice cream ball. Wrap each ball tightly in plastic wrap, ensuring there are no air pockets. This is essential to prevent ice crystals from forming and to help the balls hold their shape during frying.
- Freeze Solid: Place the wrapped ice cream balls back onto the parchment-lined baking sheet. Freeze for at least 3-4 hours, or preferably overnight. The longer they freeze, the better they’ll hold up during frying. This is not a step to skip!
Preparing the Coating:
While the ice cream is freezing, let’s get the coating ready. This is where the magic happens, creating that crispy, crunchy shell around the cold ice cream.
- Crush the Cornflakes: Place the cornflakes in a large zip-top bag. Seal the bag and use a rolling pin or your hands to crush the cornflakes into fine crumbs. You want them to be almost like a coarse powder. Alternatively, you can use a food processor, but be careful not to over-process them.
- Combine Dry Ingredients: In a large bowl, combine the crushed cornflakes, shredded coconut, chopped pecans (if using), granulated sugar, and ground cinnamon. Mix well to ensure everything is evenly distributed. This mixture will give your fried ice cream that signature flavor and texture.
- Prepare the Egg Wash: In a separate bowl, whisk together the beaten eggs and milk until well combined. This egg wash will help the coating adhere to the ice cream balls.
Coating the Ice Cream Balls:
This part can get a little messy, but it’s also kind of fun! Work quickly and efficiently to keep the ice cream as cold as possible.
- Set Up Your Coating Station: Set up a coating station with the bowl of dry ingredients and the bowl of egg wash. Have the baking sheet with the frozen ice cream balls nearby.
- Unwrap and Coat: Working one ice cream ball at a time, remove it from the freezer and unwrap it quickly.
- Dip in Egg Wash: Dip the ice cream ball into the egg wash, making sure it’s completely coated. Let any excess egg wash drip off.
- Coat in Dry Mixture: Immediately transfer the egg-washed ice cream ball to the bowl of dry ingredients. Use your hands to completely coat the ball with the cornflake mixture, pressing gently to ensure it adheres well.
- Double Coat (Optional but Recommended): For an extra-thick and protective coating, dip the coated ice cream ball back into the egg wash and then back into the dry mixture. This will create a more robust shell that’s less likely to crack during frying.
- Freeze Again: Place the coated ice cream ball back onto the parchment-lined baking sheet. Repeat the coating process with the remaining ice cream balls. Once all the balls are coated, freeze them again for at least 1-2 hours. This second freezing is crucial!
Frying the Ice Cream:
Now for the exciting part! Frying the ice cream requires a bit of finesse, but with the right technique, you’ll be enjoying perfectly fried ice cream in no time.
- Heat the Oil: Pour about 2-3 inches of vegetable oil into a deep, heavy-bottomed pot or Dutch oven. Heat the oil over medium-high heat until it reaches a temperature of 350-375°F (175-190°C). Use a deep-fry thermometer to monitor the temperature. Maintaining the correct oil temperature is essential for preventing the ice cream from melting too quickly.
- Prepare Your Workspace: Line a plate with paper towels to drain the fried ice cream balls. Have a slotted spoon or spider ready for removing the ice cream from the oil.
- Fry Quickly: Working one or two ice cream balls at a time (depending on the size of your pot), carefully lower them into the hot oil using the slotted spoon.
- Fry Briefly: Fry the ice cream balls for only 10-15 seconds per side, or until the coating is golden brown and crispy. Do not over-fry! The goal is to heat the coating without melting the ice cream inside.
- Drain and Cool Slightly: Remove the fried ice cream balls from the oil using the slotted spoon and place them on the prepared plate lined with paper towels to drain excess oil. Let them cool for a minute or two before serving.
Serving:
The best part! Get creative and enjoy your homemade fried ice cream.
- Plate and Garnish: Place the fried ice cream balls on individual plates or bowls.
- Add Toppings: Drizzle with chocolate syrup, honey, or caramel sauce. Top with whipped cream, sprinkles, fresh berries, or any other toppings you desire.
- Serve Immediately: Fried ice cream is best served immediately, while the coating is still crispy and the ice cream is cold and firm.
Tips for Success:
- Use High-Quality Ice Cream: The better the ice cream, the better the final product will taste.
- Freeze Thoroughly: Freezing the ice cream balls for the recommended time is crucial for preventing them from melting during frying.
- Maintain Oil Temperature: Keep the oil temperature consistent to ensure even cooking and prevent the ice cream from melting too quickly.
- Work Quickly: Work quickly during the coating and frying processes to minimize the amount of time the ice cream is exposed to room temperature.
- Don’t Overcrowd the Pot: Fry only one or two ice cream balls at a time to prevent the oil temperature from dropping too much.
Variations:
- Different Ice Cream Flavors: Experiment with different ice cream flavors, such as chocolate, strawberry, or coffee.
- Different Coatings: Try using different types of crushed cereals, such as graham crackers or frosted flakes. You can also add spices like nutmeg or cardamom to the coating.
- Mexican Fried Ice Cream: For a more authentic Mexican fried ice cream, use cinnamon ice cream and coat the balls with crushed cinnamon toast cereal. Serve with honey and a sprinkle of cinnamon.
Enjoy your delicious homemade fried ice cream! It’s a fun and impressive dessert that’s sure to be a hit with everyone.
Conclusion:
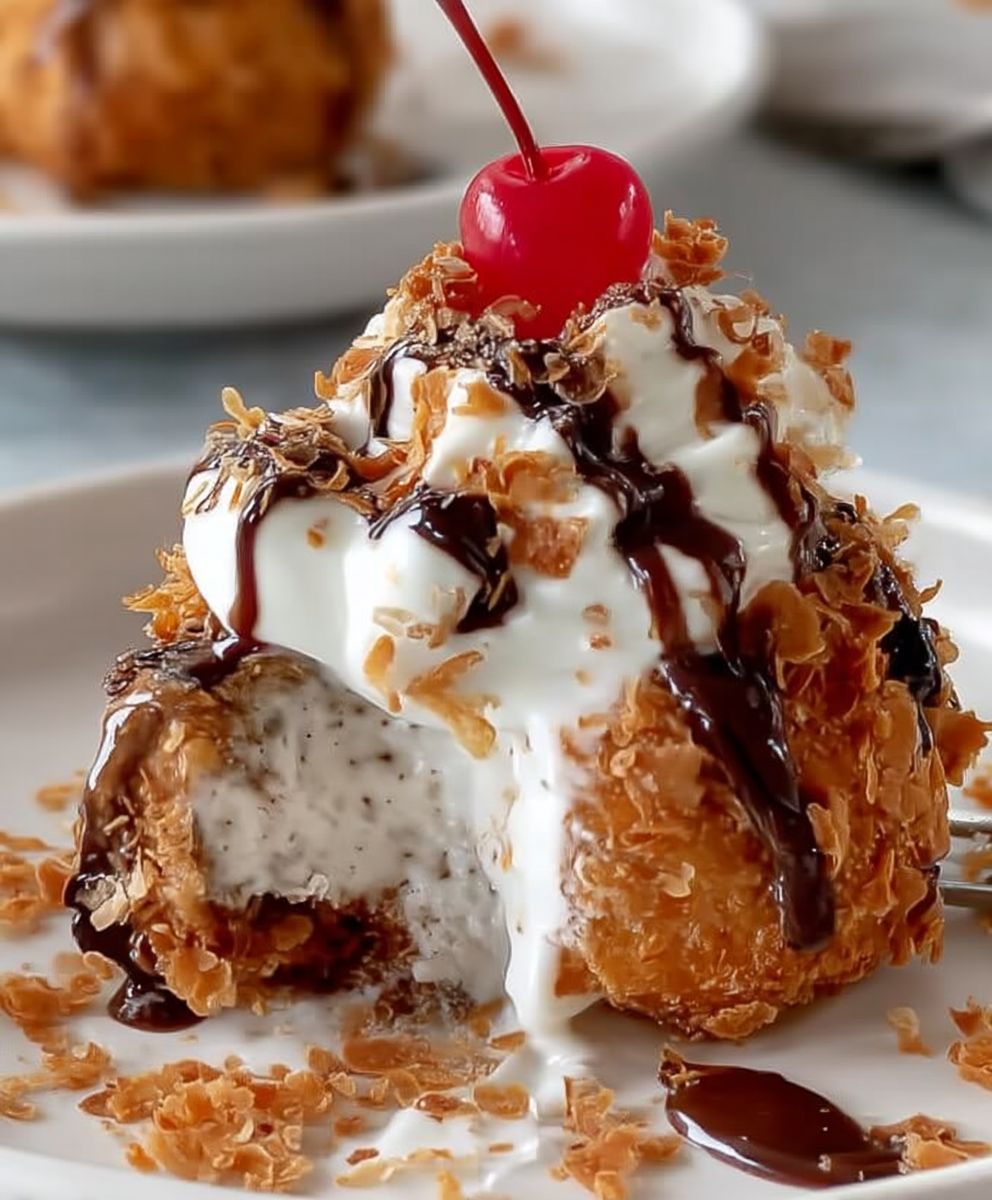
This isn’t just a dessert; it’s an experience! The contrasting textures of the crispy, golden-brown shell and the cold, creamy ice cream inside create a symphony of sensations that will leave you wanting more. Seriously, who can resist that warm-meets-cold magic? This Fried Ice Cream recipe is a must-try because it’s surprisingly easy to make at home, incredibly impressive to serve, and utterly delicious. Forget complicated desserts that take hours; this one delivers maximum impact with minimal effort.
But the best part? It’s endlessly customizable! For a classic presentation, serve your fried ice cream with a drizzle of honey, a sprinkle of cinnamon, and a dollop of whipped cream. Or, get creative! Think about adding a scoop of your favorite ice cream flavor chocolate, strawberry, or even pistachio would be fantastic. You could also experiment with different coatings. Instead of cornflakes, try crushed graham crackers, chopped nuts, or even shredded coconut for a tropical twist.
Serving Suggestions and Variations:
* Mexican Fiesta: Drizzle with chocolate sauce, caramel sauce, and a sprinkle of chopped pecans.
* Berry Bliss: Top with fresh berries, a raspberry sauce, and a dusting of powdered sugar.
* Chocolate Lover’s Dream: Use chocolate ice cream, coat with crushed chocolate cookies, and drizzle with hot fudge.
* Spiced Delight: Add a pinch of cinnamon and nutmeg to the cornflake coating and serve with a caramel sauce.
* Adults Only: A splash of Kahlua or Baileys Irish Cream over the top adds a sophisticated touch.
Don’t be intimidated by the “fried” part. The key is to work quickly and keep the ice cream frozen solid. I promise, with a little practice, you’ll be whipping up batches of this delectable treat like a pro. It’s the perfect dessert for a special occasion, a fun family activity, or simply a way to treat yourself after a long day.
I truly believe that this Fried Ice Cream recipe will become a new favorite in your household. It’s a guaranteed crowd-pleaser, and it’s so much fun to make! So, gather your ingredients, put on your apron, and get ready to create some culinary magic.
I’m so excited for you to try this recipe! Once you’ve made it, please come back and share your experience in the comments below. I’d love to hear about your variations, your serving suggestions, and any tips you might have for other readers. Did you try a different coating? Did you add a special sauce? Let me know! Your feedback is invaluable, and it helps me to make my recipes even better. Happy frying! I can’t wait to see your delicious creations!
Fried Ice Cream: The Ultimate Guide to Making It at Home
Balls of ice cream are coated in a crispy, crunchy mixture of cornflakes, cinnamon, and sugar, then quickly fried to create a warm, golden shell around the still-frozen center. Served with your favorite toppings.
Ingredients
1/2 gallon vanilla ice cream
1 cup corn flakes, finely crushed
1/4 cup ground cinnamon
2 eggs, beaten
1 cup vegetable oil
Optional toppings: honey, whipped cream, chocolate syrup
- 1/2 gallon vanilla ice cream
- 1 cup corn flakes, finely crushed
- 1/4 cup ground cinnamon
- 2 eggs, beaten
- 1 cup vegetable oil
- Optional toppings: honey, whipped cream, chocolate syrup
Instructions
- Scoop ice cream into balls and place on a baking sheet lined with parchment paper.
- Freeze for at least 2 hours, or until solid.
- In three separate shallow dishes, place flour, beaten eggs, and shredded coconut.
- Roll each ice cream ball in flour, then dip in egg, and finally coat with shredded coconut.
- Return to the baking sheet and freeze for at least 1 hour.
- Heat oil in a deep fryer or large pot to 375°F (190°C).
- Carefully drop the coated ice cream balls into the hot oil, a few at a time.
- Fry for about 10-15 seconds, or until golden brown.
- Remove with a slotted spoon and place on a paper towel-lined plate to drain.
- Serve immediately.
Notes
- For best results, freeze the ice cream balls for at least 4 hours, or preferably overnight. This will ensure they hold their shape during frying.
- Work quickly when coating and frying the ice cream to prevent it from melting too much.
- If you don’t have cornflakes, you can use crushed graham crackers, toasted breadcrumbs, or even crushed nuts as a coating.
- Be careful when frying the ice cream, as the oil can splatter. Use a long-handled spoon or tongs to carefully place the ice cream balls into the hot oil.
- Serve immediately after frying for the best texture and flavor.
“`


Leave a Comment