
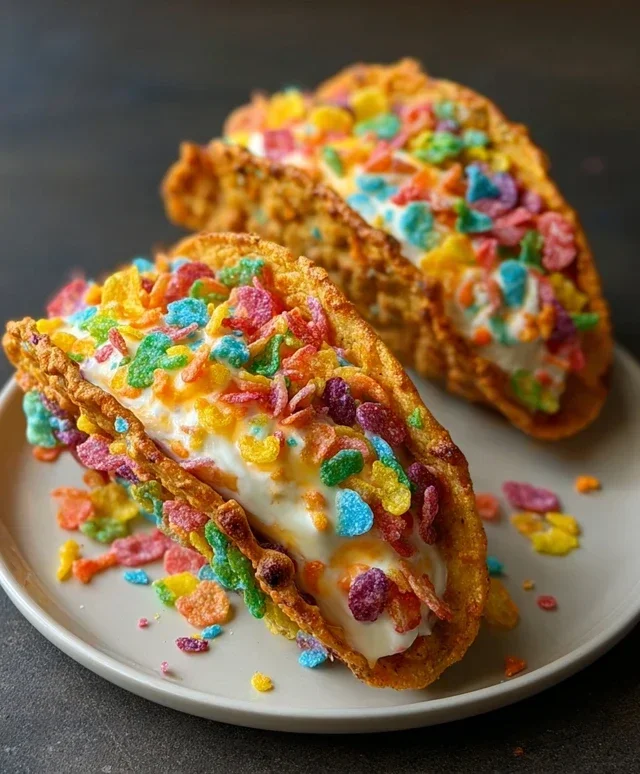
Fruity Pebbles Cheesecake Tacos are about to revolutionize your dessert game! If you’ve ever found yourself dreaming of vibrant colors, creamy textures, and that satisfying crunch, then get ready, because these aren’t your average tacos. We’re talking about a delightful fusion of your favorite childhood cereal and the decadent indulgence of cheesecake, all wrapped up in a fun, handheld package. It’s no wonder why everyone is obsessing over Fruity Pebbles Cheesecake Tacos – they tap into a nostalgic joy while delivering a sophisticated yet playful flavor profile. What truly makes these Fruity Pebbles Cheesecake Tacos special is the unexpected harmony of sweet, tart, and creamy, all with that signature pop of Fruity Pebbles magic. Prepare yourself for a treat that’s as much a feast for the eyes as it is for your taste buds!

Fruity Pebbles Cheesecake Tacos
Get ready for a flavor explosion that’s as vibrant and fun as it looks! These Fruity Pebbles Cheesecake Tacos are a delightful twist on classic cheesecake, served in a crunchy, sweet shell that’s made right at home. Imagin extracte the creamy, tangy goodness of cheesecake filling, bursting with the nostalgic sweetness of Fruity Pebbles, all nestled within a crisp, cereal-infused taco shell. It’s the perfect dessert for parties, a fun weekend project, or just when you need a serious dose of joy. We’re going to create these little handheld masterpieces from scratch, and trust me, it’s easier and more rewarding than you might think. The combination of textures and flavors is simply out of this world!
Ingredients:
Crafting the Taco Shells
The foundation of our Fruity Pebbles Cheesecake Tacos lies in these magical cereal shells. This is where the real fun begin extracts, transforming simple cereal and butter into something extraordinary. The melted butter acts as the binder, helping the cereal hold its shape once cooled.
1. In a medium bowl, combine 3 cups of colorful fruity cereal with the 1/2 cup of melted unsalted butter. Stir gently but thoroughly until every single cereal piece is coated in the melted butter. This ensures even crispness and flavor throughout your shells. It’s important to work quickly once the butter is melted to prevent it from solidifying too much before you start shaping. You want a consistency that’s wet enough to clump together but not so greasy that it feels soggy. If you find it’s a bit dry, you can add another tablespoon of melted butter, but be careful not to overdo it.
2. Now comes the shaping! You’ll need some kind of mold to create the taco shape. Taco molds are ideal, of course, but you can also use oven-safe ramekins or even small bowls turned upside down if you’re feeling creative. The key is to press the cereal mixture firmly into the mold to create a sturdy shell. I like to use a spoon or the back of a small cup to really compact the cereal. Once shaped, place these in the refrigerator for at least 30 minutes to allow them to firm up and set. This chilling period is crucial for them to hold their shape when you fill them later. Patience is key here!
3. Once your cereal shells have chilled and are firm to the touch, it’s time to bake them to golden perfection. Preheat your oven to 350°F (175°C). Carefully place your chilled, shaped cereal shells onto a baking sheet. Bake for about 10-12 minutes, or until the edges are slightly golden and the shells feel firm. Keep a close eye on them, as cereal can go from perfectly toasted to burnt very quickly. You want them to be crisp but not brittle. Let them cool completely on the baking sheet before attempting to remove them. Cooling is essential; if you try to move them while warm, they might break apart.
Whipping Up the Cheesecake Filling
While our taco shells are cooling, let’s prepare the luscious cheesecake filling. This is the creamy heart of our dessert, and it’s wonderfully simple to make.
4. In a separate bowl, beat together the 8 oz of softened cream cheese and the 1/2 cup of sifted powdered sugar until the mixture is smooth and creamy. Sifting the powdered sugar is a really important step here to avoid any lumpy bits in your filling. It ensures a velvety smooth texture. Then, stir in the 1 tsp of pure vanilla extract. Mix until just combined; you don’t want to overmix at this stage. The goal is a light, airy, and tangy cream cheese filling that complements the sweetness of the cereal.
5. Now, gently fold in the 1 cup of whipped cream. This is what gives our cheesecake filling that light and fluffy texture, making it more like a no-bake cheesecake mousse. Be gentle when folding to maintain the airiness. You want to incorporate the whipped cream without deflating it. The result should be a beautiful, creamy, and slightly aerated filling that’s ready to be spooned into our cooled taco shells.
Assembling and Garnishing
The final stage is where everything comes together for a truly spectacular dessert.
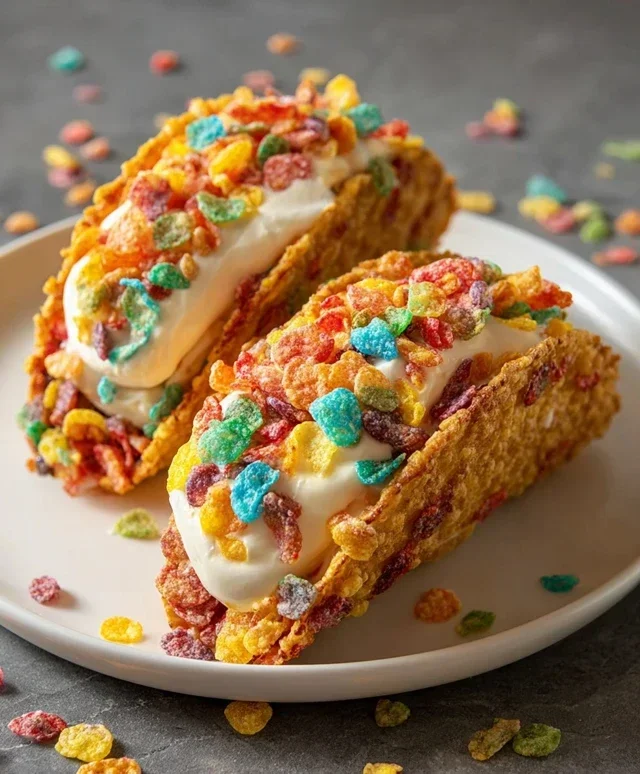
6. Once your Fruity Pebbles taco shells are completely cooled and firm, carefully spoon or pipe the cheesecake filling into each shell. Don’t overfill them; you want to leave a little room for garnish. For the finishing touch, sprinkle the tops of the cheesecake filling with additional colorful fruity cereal. This adds another layer of texture and a pop of color that makes these tacos truly irresistible. You can also add a few whole pieces of cereal around the edges for extra visual appeal. Serve immediately for the best texture, or chill for a short period before serving if you prefer a firmer filling.
Enjoy these delightful Fruity Pebbles Cheesecake Tacos – they’re a playful, delicious treat that’s sure to bring smiles all around!
Conclusion:
And there you have it – your guide to creating these delightful Fruity Pebbles Cheesecake Tacos! I truly believe this recipe is a winner because it’s a playful twist on classic cheesecake, offering a burst of color, crunch, and creamy sweetness that’s perfect for any occasion. The vibrant Fruity Pebbles cereal not only adds a fun visual appeal but also a satisfying texture contrast to the smooth, rich cheesecake filling. These aren’t just desserts; they’re edible works of art that are bound to impress! I love serving these as a festive treat at parties, as a unique dessert after a casual dinner, or even as a fun weekend project for the whole family to enjoy. Get creative with your toppings – think a drizzle of white chocolate, fresh berries, or even a dollop of whipped cream! Don’t be afraid to experiment with different cookie crusts or even a flavored cheesecake filling to make these Fruity Pebbles Cheesecake Tacos uniquely yours. I wholeheartedly encourage you to give this recipe a try. It’s surprisingly easy to make and the joy it brings with every bite is absolutely worth it!
Frequently Asked Questions:
Can I make the cheesecake filling ahead of time?
Absolutely! The cheesecake filling can be prepared a day or two in advance and stored in an airtight container in the refrigerator. This will save you time on assembly day, making the whole process even smoother.
What other cereals could I use besides Fruity Pebbles?
While Fruity Pebbles provide that signature rainbow crunch, you could certainly get creative! Other colorful, lightly sweetened cereals like Cap’n Crunch’s Crunch Berries or even a vanilla-flavored cereal would work well, offering a slightly different flavor profile and texture.
Are these tacos difficult to handle and eat?
They are designed to be handheld! The taco shells provide a sturdy base for the cheesecake. For the best experience, serve them chilled, and enjoy them with a napkin nearby, as they are a decadent treat!
Fruity Pebbles Cheesecake Tacos
A fun and colorful dessert taco featuring a Fruity Pebbles crust and a creamy cheesecake filling.
Ingredients
-
3 cups colorful fruity cereal
-
1/2 cup unsalted butter, melted
-
8 oz cream cheese, softened
-
1/2 cup powdered sugar, sifted
-
1 tsp pure vanilla extract
-
1 cup whipped cream
-
Additional fruity cereal for garnish
Instructions
-
Step 1
Combine 2.5 cups of fruity cereal with the melted butter. Press mixture into 4-6 taco shell molds. Bake at 350°F (175°C) for 8-10 minutes until set. Let cool completely. -
Step 2
In a medium bowl, beat cream cheese until smooth. Gradually add sifted powdered sugar and vanilla extract, mixing until well combined. -
Step 3
Gently fold in the whipped cream until just incorporated. -
Step 4
Spoon or pipe the cheesecake filling into the cooled Fruity Pebbles taco shells. -
Step 5
Garnish generously with additional fruity cereal. -
Step 6
Chill for at least 30 minutes before serving to allow the filling to set further.
Important Information
Nutrition Facts (Per Serving)
It is important to consider this information as approximate and not to use it as definitive health advice.
Allergy Information
Please check ingredients for potential allergens and consult a health professional if in doubt.
Leave a Comment