
Garlic Butter Keto Bread is about to become your new best friend on your low-carb journey. For anyone who has ever missed the satisfying chew and comforting aroma of freshly baked bread while sticking to a ketogenic diet, this recipe is a revelation. We all know that feeling: the craving for something warm, savory, and utterly delicious, only to be reminded that traditional bread is a no-go. But what if I told you that you can have all that goodness, and more, without derailing your keto goals?
This isn’t just any keto bread; it’s a masterpiece of flavor and texture.
The magic lies in the perfect balance of rich butter, pungent garlic, and a hint of herbs, all baked into a tender, flavorful loaf that browns beautifully. It’s incredibly versatile, perfect for dipping in soups, serving alongside your favorite keto meals, or simply enjoying on its own, slathered with extra butter. Get ready to experience the joy of authentic-tasting bread that’s surprisingly easy to make and delightfully low in carbs.
Prepare yourself for the ultimate Garlic Butter Keto Bread experience.

Garlic Butter Keto Bread
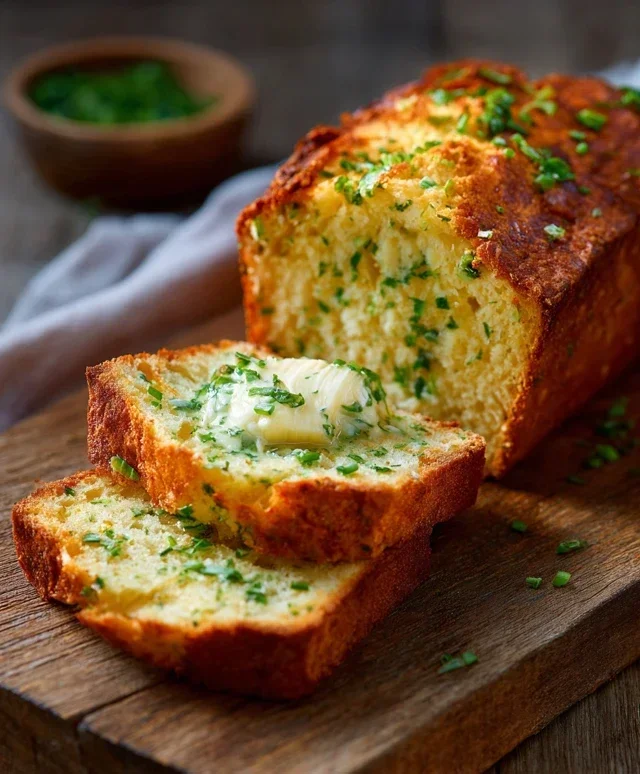
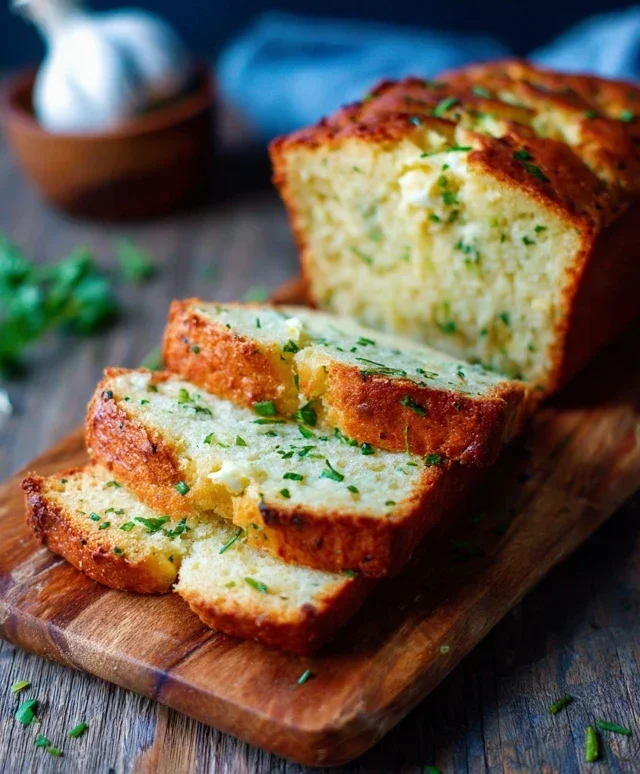
Craving that comforting, warm slice of bread but sticking to your keto lifestyle? You’ve come to the right place! This Garlic Butter Keto Bread is incredibly satisfying, incredibly easy to make, and packed with delicious flavor. It’s perfect for dipping into soups, serving alongside your favorite keto meals, or simply slathering with more butter. Forget those expensive store-bought keto breads that often fall flat; this homemade version is a game-changer. The key to its amazing texture and taste lies in the perfect combination of almond flour, psyllium husk powder, and a good dose of garlic and butter. I’ve tested this recipe countless times to get it just right, and I’m so excited to share it with you. Let’s get baking!
Ingredients:
Preparation and Mixing the Dough
The first step in creating this delightful keto bread is to preheat your oven and prepare your baking vessel. I find that a standard 8×4 inch loaf pan works wonderfully for this recipe. You’ll want to preheat your oven to 350°F (175°C). While the oven heats up, grease your loaf pan thoroughly with butter or a non-stick cooking spray, and then line it with parchment paper. This ensures that your beautiful loaf will slide out effortlessly once it’s baked, preventing any frustrating sticking.
Next, in a large mixing bowl, we’ll combine all of our dry ingredients. This is crucial for ensuring everything is evenly distributed, which will lead to a consistent texture in the final bread. Add the blanched almond flour, psyllium husk powder, baking powder, and salt to the bowl. Whisk these together thoroughly with a fork or a whisk until there are no visible clumps of any ingredient. Getting the psyllium husk powder well incorporated now is important, as it acts as a binder and provides that bread-like structure we’re aiming for. If you used whole psyllium husks, your bread might have a different texture, so double-check you have the powder!
Now, let’s move on to the wet ingredients. In a separate medium bowl, whisk together the melted butter, large eggs, and water. Make sure the melted butter isn’t too hot, as we don’t want to scramble the eggs. A gentle whisking will combine these components smoothly. Once you have your dry ingredients and wet ingredients prepared, it’s time to bring them together. Pour the wet ingredients into the bowl with the dry ingredients. Add your minced garlic (or garlic powder) at this stage as well. This is where that wonderful garlic aroma starts to develop!
Now, mix everything together until a cohesive dough forms. This dough will be quite sticky and dense, which is exactly what we’re looking for. It won’t be like traditional wheat dough that you can knead. A sturdy spatula or a wooden spoon works best for this mixing process. Be sure to scrape down the sides and the bottom of the bowl to incorporate all of the flour mixture into the wet ingredients. You might need to use your hands a bit to really bring it all together, especially towards the end. Don’t be alarmed by the texture; it’s meant to be a bit thick and sticky.
Shaping and Baking
Once your dough is well combined, transfer it to your prepared loaf pan. You can use a spatula or your hands (lightly greased with butter or oil can help prevent sticking) to press the dough evenly into the pan. Try to get the surface as smooth as possible, as this will contribute to a neater looking loaf. Don’t worry if it’s not perfectly smooth; the rustic charm is part of its appeal!
Place the loaf pan into your preheated oven. Bake for approximately 40-50 minutes. The exact baking time can vary depending on your oven, so it’s important to keep an eye on it. You’ll know it’s done when the top is golden brown and firm to the touch. A quick way to check for doneness is to insert a toothpick or a thin knife into the center of the loaf. If it comes out clean, your bread is ready. If there’s any wet batter on it, continue baking in 5-minute increments until it comes out clean.
Cooling and Finishing Touches
Once your garlic butter keto bread is out of the oven, resist the urge to slice into it immediately! This is a crucial step for achieving the best texture. Let the bread cool in the pan for about 10-15 minutes. This allows it to set up properly. After this initial cooling period, carefully remove the loaf from the pan using the parchment paper and place it on a wire rack to cool completely. Letting it cool completely on the wire rack is essential for preventing a gummy interior. Patience here will be rewarded with a beautifully textured bread.
While the bread is still warm, but after it’s been removed from the pan, I love to brush the top generously with more melted butter. This is where the “garlic butter” really shines through, infusing even more delicious flavor and adding a lovely sheen. If you’re using fresh parsley, now is the perfect time to sprinkle it over the melted butter for a beautiful presentation. Allow the bread to cool completely before slicing. This is important because keto breads can sometimes be a bit more delicate when warm.
Once cooled, use a serrated knife to slice your garlic butter keto bread. It slices beautifully and holds its shape well. Enjoy this incredible bread as is, toasted, or as the perfect accompaniment to your favorite keto meals. It’s truly a wonderful addition to any low-carb kitchen!
Conclusion:
I hope you’ve enjoyed learning how to make this incredibly delicious Garlic Butter Keto Bread! This recipe is a game-changer for anyone following a ketogenic lifestyle, offering a satisfying, flavorful, and versatile bread option without the carbs. Its simplicity means you can whip it up in no time, making it perfect for a quick side dish or a special treat. The rich, garlicky butter flavor is truly irresistible, and the texture is surprisingly close to traditional bread. I highly encourage you to give this Garlic Butter Keto Bread a try; I’m confident it will become a staple in your keto kitchen!
This bread is wonderful served warm alongside your favorite keto meals, like stews, soups, or grilled meats. It’s also fantastic toasted and topped with avocado, cream cheese, or even as a base for mini keto pizzas. For variations, feel free to experiment with adding finely chopped fresh herbs like rosemary or chives to the butter mixture, or a sprinkle of Parmesan cheese before baking for an extra cheesy kick. The possibilities are endless!
Frequently Asked Questions:
Q: Can I make this Garlic Butter Keto Bread ahead of time?
Yes, you can bake the bread ahead of time and store it in an airtight container at room temperature for up to 2 days, or in the refrigerator for up to 5 days. Reheat it gently in a toaster oven or a warm oven for the best texture.
Q: What kind of flour is best for this keto bread?
This recipe typically uses almond flour and coconut flour for a great texture and flavor. Ensure your almond flour is finely ground for the smoothest result.
Q: My bread seems a bit dry. What can I do?
Sometimes keto breads can be a little drier. Ensure you’re not overbaking it. Also, generously brushing with the garlic butter mixture both before and after baking will add moisture and flavor. Adding an extra tablespoon of melted butter to the garlic butter mixture can also help.
Garlic Butter Keto Bread
A delicious and easy keto-friendly bread recipe made with almond flour and infused with garlic butter flavor. Perfect for low-carb diets.
Ingredients
-
1 1/2 cups almond flour
-
1/4 cup psyllium husk powder
-
1 teaspoon baking powder
-
1/2 teaspoon salt
-
1/4 cup melted butter
-
2 large eggs
-
1 tablespoon garlic powder
-
2 tablespoons chopped fresh parsley
Instructions
-
Step 1
Preheat your oven to 350°F (175°C) and grease a loaf pan. -
Step 2
In a large bowl, whisk together the almond flour, psyllium husk powder, baking powder, and salt. -
Step 3
In a separate bowl, whisk together the melted butter, eggs, and garlic powder. -
Step 4
Pour the wet ingredients into the dry ingredients and mix until a dough forms. Fold in the fresh parsley. -
Step 5
Transfer the dough to the prepared loaf pan and spread evenly. -
Step 6
Bake for 30-35 minutes, or until the bread is golden brown and a toothpick inserted into the center comes out clean. -
Step 7
Let the bread cool in the pan for 10 minutes before transferring to a wire rack to cool completely.
Important Information
Nutrition Facts (Per Serving)
It is important to consider this information as approximate and not to use it as definitive health advice.
Allergy Information
Please check ingredients for potential allergens and consult a health professional if in doubt.

Leave a Comment