
Gingerbread cookies have a special place in my heart, evoking memories of cozy holiday gatherings and the sweet aroma of spices wafting through the air. These delightful treats, with their rich history dating back to ancient Greece and their evolution into a beloved holiday staple, are more than just cookies; they are a symbol of warmth and togetherness. The combination of ginger, cinnamon, and molasses creates a flavor profile that is both comforting and festive, making them a favorite among friends and family alike.
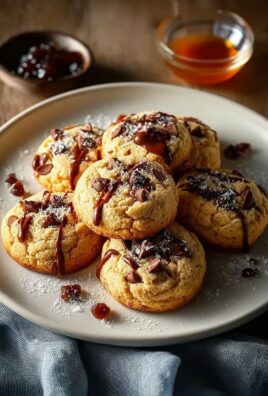
What I love most about gingerbread cookies is their versatility. Whether you prefer them soft and chewy or crisp and crunchy, theres a perfect recipe for everyone. They are not only delicious but also incredibly fun to decorate, turning baking into a creative activity that brings joy to all ages. So, lets dive into the world of gingerbread cookies and discover how to make these delightful treats that will surely become a cherished part of your holiday traditions!

Ingredients:
- 3 1/4 cups all-purpose flour
- 1 teaspoon baking soda
- 1 tablespoon ground ginger
- 1 tablespoon ground cinnamon
- 1/2 teaspoon ground cloves
- 1/2 teaspoon salt
- 1/2 cup unsalted butter, softened
- 1/2 cup brown sugar, packed
- 1/2 cup granulated sugar
- 1 large egg
- 1/2 cup unsulfured molasses
- 1 teaspoon vanilla extract
- Royal icing (for decorating, optional)
- Colored sugar or sprinkles (for decorating, optional)
Preparing the Dough
Lets get started on making these delightful gingerbread cookies! First, I like to gather all my ingredients and tools to make the process smooth and enjoyable.
- In a medium bowl, whisk together the flour, baking soda, ground ginger, ground cinnamon, ground cloves, and salt. This will be our dry mixture. Set it aside for now.
- In a large mixing bowl, cream together the softened butter, brown sugar, and granulated sugar using an electric mixer on medium speed. I usually mix until the mixture is light and fluffy, which takes about 2-3 minutes.
- Add the egg, molasses, and vanilla extract to the butter-sugar mixture. Beat on low speed until everything is well combined. The molasses gives the cookies that rich, dark color and deep flavor.
- Gradually add the dry mixture to the wet mixture, about a cup at a time, mixing on low speed until just combined. I like to use a spatula to scrape down the sides of the bowl to ensure everything is mixed evenly.
- Once the dough comes together, it will be a bit sticky. Divide the dough into two equal portions, shape them into discs, and wrap each in plastic wrap. This helps the dough chill and makes it easier to roll out later.
- Refrigerate the dough for at least 2 hours, or overnight if you have the time. Chilling the dough is crucial for the cookies to hold their shape while baking.
Rolling and Cutting the Cookies
After the dough has chilled, its time to roll it out and cut our cookies into fun shapes!
- Preheat your oven to 350°F (175°C). Line two baking sheets with parchment paper to prevent sticking.
- Take one disc of dough out of the refrigerator and let it sit at room temperature for about 5-10 minutes. This will make it easier to roll out.
- On a lightly floured surface, roll out the dough to about 1/4 inch thick. I like to use a rolling pin with guides to ensure an even thickness.
- Using cookie cutters, cut out shapes from the rolled dough. I love using gingerbread men, stars, and Christmas trees, but feel free to use any shapes you like!
- Transfer the cut-out cookies to the prepared baking sheets, leaving about 1 inch of space between each cookie. If you want to add any decorative elements, like candy pieces, now is the time to do it!
- Repeat the rolling and cutting process with the second disc of dough. If the dough becomes too soft, just pop it back in the fridge for a few minutes to firm up.
Baking the Cookies
Now that our cookies are cut and ready, its time to bake them to perfection!
- Place the baking sheets in the preheated oven and bake for 8-10 minutes, or until the edges are firm and the centers are slightly soft. Keep an eye on them, as baking times can vary depending on your oven.
- Once baked, remove the cookies from the oven and let them cool on the baking sheets for about 5 minutes. This allows them to set before transferring them to a wire rack.
- After 5 minutes, carefully transfer the cookies to a wire rack to cool completely. This step is important because it prevents the cookies from becoming soggy.

Conclusion:
In summary, these gingerbread cookies are an absolute must-try for anyone looking to add a touch of warmth and nostalgia to their baking repertoire. The perfect balance of spices, sweetness, and that delightful snap make them not just a treat, but a cherished holiday tradition. Whether you enjoy them plain, decorated with royal icing, or even dipped in chocolate, there are endless serving suggestions to suit every palate. You can also experiment with variations by adding nuts, dried fruits, or even a hint of citrus zest to elevate the flavor profile. I encourage you to roll up your sleeves and give this gingerbread cookie recipe a go! Trust me, the aroma that fills your kitchen will be worth it, and the smiles on your loved ones’ faces when they take that first bite will be priceless. Dont forget to share your experience and any creative twists you come up with; Id love to hear how your gingerbread cookies turn out! Happy baking! Print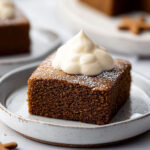
Gingerbread Cookies: The Ultimate Recipe for Festive Treats
- Total Time: 150 minutes
- Yield: 24 cookies
Description
These delightful gingerbread cookies feature a blend of warm spices and a soft, chewy texture, making them perfect for the holiday season. Decorate with royal icing and colorful sprinkles for a festive touch, and enjoy them fresh or stored for later!
Ingredients
- Gingerbread cookie dough
- Royal icing
- Colored sprinkles
Instructions
- Sprinkle colored sprinkles over the icing while its still wet for a festive touch.
- Let the decorated cookies sit at room temperature until the icing hardens completely.
Notes
- These gingerbread cookies can be stored in an airtight container for up to a week.
- They also freeze well, so you can make them ahead of time for the holidays!
- Prep Time: 20 minutes
- Cook Time: 10 minutes
Leave a Comment