
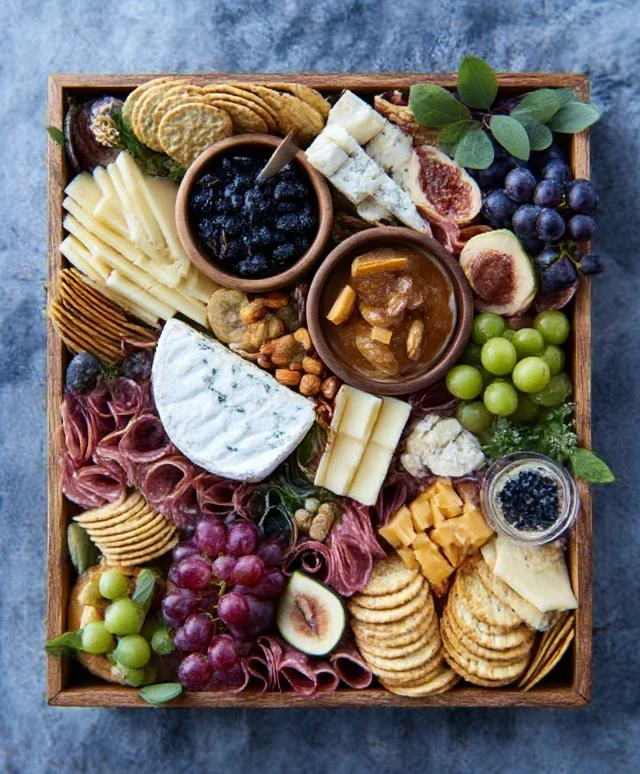
Gourmet graze boxes and cheese boards are more than just a meal; they’re an experience. Forget the fuss of formal dining and embrace the joyous, communal spirit of a beautifully curated spread. What’s not to love about a vibrant platter overflowing with a symphony of textures and flavors? It’s the ultimate expression of effortless entertaining, a delicious declaration that good food and good company are all you truly need. We adore them because they offer an irresistible blend of indulgence and personalization. Each element, from the creamy brie to the sharp cheddar, the sweet fig jam to the crunchy artisanal crackers, tells a story and invites playful exploration. Creating your own Gourmet graze boxes and cheese boards allows you to tailor the experience to any occasion, turning simple ingredients into edible art that’s as stunning to behold as it is delightful to devour.
Unlocking the Art of the Perfect Spread
Why Your Next Gathering Needs a Gourmet Graze Box

Gourmet Graze Boxes and Cheese Boards
Creating a show-stopping graze box or cheese board is less about rigid rules and more about a delightful exploration of textures, flavors, and colors. It’s the perfect way to entertain, celebrate a special occasion, or simply treat yourself to an indulgent spread. Today, we’re diving into how to assemble a truly gourmet experience, focusing on fresh, high-quality ingredients that sing together. Forget complicated cooking; this is all about artful arrangement and delicious pairings.
Ingredients:
Assembling Your Gourmet Graze Box/Cheese Board
The beauty of a graze box or cheese board is its versatility. You can tailor it to your guest’s preferences or the occasion. My approach is to build it in layers, starting with the anchors and then filling in the gaps with smaller, more colorful elements.
Phase 1: The Foundation – Cheese and Charcuterie
1. Begin extract by placing your cheeses directly onto your board or within your graze box. If using a larger board, strategically position the cheeses to create visual interest. I like to spread them out a bit so they don’t feel crowded. For a graze box, consider how they will fit with other components; sometimes placing them first helps visualize the remaining space. If your cheeses are straight from the fridge, I highly recommend taking them out about 30-60 minutes before serving. This allows them to come to room temperature, which is crucial for releasing their full flavor and achieving the best texture. A cold cheese can taste muted, while a slightly softened cheese is more luscious and spreadable.
2. Next, introduce your charcuterie. Arrange your cured meats artfully. For slices of beef prosciutto, you can gently fold or bunch them to create a more appealing visual. For beef salami or beef chorizo, fanning them out or creating small rosettes adds a touch of elegance. I often place the charcuterie near the cheeses, as they are natural companions. Don’t be afraid to let them overlap slightly; it adds to the abundant feel of the board.
Phase 2: Adding Texture and Sweetness
3. Now, it’s time to incorporate your crackers and bread. Arrange them around the cheeses and meats, leaving some space for other items. You can fan them out, stack them in small piles, or even stand some up vertically for added height and dimension. Having a variety of cracker textures, from crisp to slightly chewy, is a wonderful addition. If you’re using breadsticks, they can add a nice linear element to the composition.
4. This is where the color truly starts to pop! Introduce your fresh fruits. Clusters of grapes are a classic for a reason – they add beautiful greenery and a juicy bite. Berries, like raspberries, blueberries, and strawberries, bring vibrant reds and blues. Sliced apples or pears offer a crisp counterpoint to the richer elements. I like to arrange them in small mounds or cascading trails around the other ingredients. Don’t forget your dried fruits; they add concentrated sweetness and chegrape juicess, and can fill in any smaller gaps. Think of dried apricots, figs, or cranberries scattered throughout.
Phase 3: The Finishing Touches and Flavor Boosters
5. Fill in the remaining spaces with your nuts, olives, and cornichons. Nuts provide crucial crunch and can be placed in small clusters or sprinkled in. Olives and cornichons offer briny, acidic bursts that cut through the richness of the cheese and meats. I often use small bowls for these, especially if I have a variety, or if they have a lot of liquid. This prevents them from making other items soggy. If you have a favorite honey or a lovely fruit preserve, add a small ramekin of it to the board. This is especially perfect for pairing with cheeses or crackers. A drizzle of honey over a sharp cheddar or a dollop of fig jam with a creamy brie is pure bliss.
6. Finally, add a touch of freshness and aroma with your garnishes. Sprigs of rosemary or thyme not only look beautiful but also release a subtle, pleasing scent as guests mingle. Tuck them in between cheeses or around the edges of the board. This last step elevates your graze box or cheese board from simply delicious to truly gourmet and inviting. The goal is abundance, variety, and a feast for the eyes as well as the palate. Enjoy the process; it’s as much fun as the eating!
Conclusion:
Crafting your own Gourmet Graze Boxes and Cheese Boards is an incredibly rewarding experience. It’s not just about assembling delicious food; it’s about creating an edible work of art, a centerpiece for any gathering, or a luxurious treat for yourself. The beauty of these creations lies in their inherent versatility and the ability to cater to diverse tastes and dietary needs. Whether you’re hosting a sophisticated soirée, a casual get-together, or simply indulgin extractg in a quiet evening, a well-curated graze box or cheese board is guaranteed to impress.
The possibilities for serving are endless. Imagin extracte a vibrant board gracing your holiday table, a personalized graze box as a thoughtful host gift, or an intimate spread for a romantic picnic. Don’t be afraid to experiment! The true joy of this culinary adventure is in personalization. Feel free to swap cheeses, introduce seasonal fruits, incorporate artisanal charcuterie, or add unique accompaniments like spiced nuts or homemade dips. The key is to balance flavors, textures, and colors to create a visually stunning and palate-pleasing experience. I truly encourage you to dive in, get creative, and discover your own signature Gourmet Graze Boxes and Cheese Boards. It’s a simple yet elegant way to elevate any occasion!
Frequently Asked Questions:
Q1: How do I keep my cheese board fresh if I assemble it in advance?
To keep your cheese board fresh, it’s best to assemble most elements just before serving. However, hard cheeses can be pre-sliced and covered tightly with plastic wrap. Dips and spreads can be made ahead and stored in airtight containers in the refrigerator. Fruits can be washed and dried, and crackers can be arranged just before guests arrive to prevent soggin extractess.
Q2: What are some good non-dairy or vegan alternatives for a cheese board?
Absolutely! You can create stunning vegan graze boxes. Focus on a variety of marinated olives, roasted nuts, fresh and dried fruits (figs, dates, apricots are wonderful), artisanal crackers, hummus, baba ghanoush, and plant-based dips. For a “cheesy” element, consider cashew-based cheese alternatives or creamy avocado spreads.
Q3: How much food should I plan per person for a cheese board?
As a general guideline, aim for about 2-4 ounces of cheese per person if it’s a primary appetizer, and 1-2 ounces if it’s part of a larger spread. For other accompaniments like charcuterie, fruits, and crackers, plan for about 2-3 servings per person.
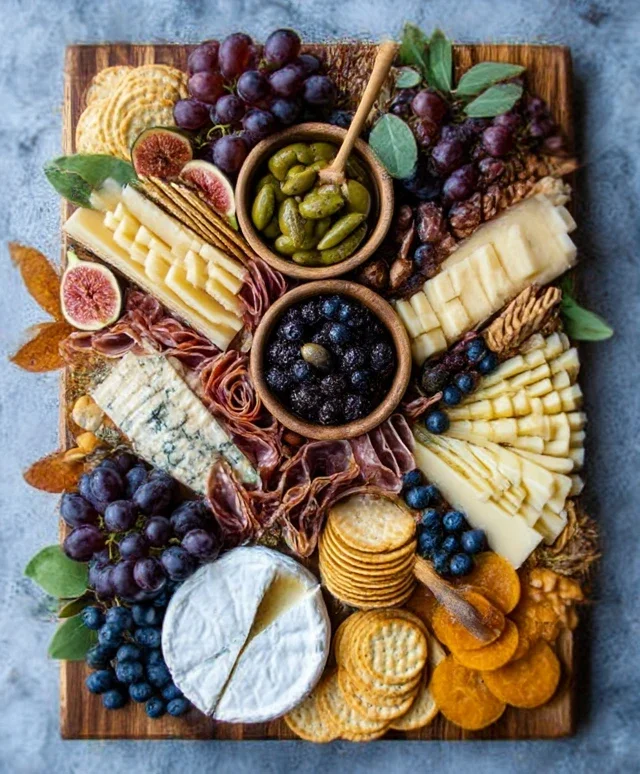
Gourmet Graze Boxes and Cheese Boards
An artfully curated selection of cheeses, charcuterie, fruits, nuts, and accouterments for an elegant grazing experience.
Ingredients
-
Assorted Artisanal Cheeses (e.g., brie, gouda, sharp cheddar, blue cheese)
-
Cured Meats (e.g., prosciutto, salami, soppressata)
-
Fresh Fruits (e.g., grapes, figs, berries)
-
Dried Fruits (e.g., apricots, dates)
-
Nuts (e.g., almonds, walnuts, pistachios)
-
Olives
-
Cornichons
-
Artisan Crackers and Bread
-
Honey or Fig Jam
-
Garnishes (e.g., fresh rosemary, edible flowers)
Instructions
-
Step 1
Select a variety of cheeses with different textures and flavors. Aim for at least three to five types. -
Step 2
Arrange the cured meats. You can fold them, roll them, or lay them flat. -
Step 3
Place the fresh and dried fruits around the board, creating colorful accents. -
Step 4
Add small bowls or piles of nuts, olives, and cornichons. -
Step 5
Incorporate crackers and bread, ensuring they are easily accessible. -
Step 6
Drizzle honey or place a small dish of fig jam for sweet accompaniments. -
Step 7
Garnish with fresh herbs or edible flowers for a professional finish.
Important Information
Nutrition Facts (Per Serving)
It is important to consider this information as approximate and not to use it as definitive health advice.
Allergy Information
Please check ingredients for potential allergens and consult a health professional if in doubt.


Leave a Comment