
Passion fruit buttermilk dessert: Prepare to be transported to a tropical paradise with every spoonful of this luscious and tangy treat! Imagine a dessert that perfectly balances the creamy richness of buttermilk with the vibrant, exotic flavor of passion fruit. It’s a symphony of textures and tastes that will leave you craving more.
Passion fruit, also known as maracuyá in many parts of South America, has a rich history deeply intertwined with the cultures of the regions where it thrives. It’s not just a fruit; it’s a symbol of passion, energy, and the vibrant spirit of the tropics. While the exact origins of combining passion fruit with dairy are harder to pinpoint, the pairing is a testament to culinary creativity, blending traditional ingredients with exciting new flavors.
What makes this passion fruit buttermilk dessert so irresistible? It’s the delightful contrast between the smooth, slightly tart buttermilk and the intensely aromatic, sweet-and-sour passion fruit pulp. People adore this dessert because it’s refreshing, light, and incredibly easy to make. Whether you’re looking for a show-stopping finale to a dinner party or a simple yet elegant treat for yourself, this dessert is guaranteed to impress. The creamy texture, the bright flavor, and the sheer simplicity of preparation make it a winner every time. Get ready to embark on a culinary adventure that will tantalize your taste buds and leave you feeling utterly satisfied!

Ingredients:
- 1 pound pasta (rotini, penne, or farfalle work great!)
- 1 cup cherry tomatoes, halved
- 1/2 cup black olives, sliced
- 1/2 cup green bell pepper, diced
- 1/2 cup red onion, finely chopped
- 1/2 cup mozzarella cheese, cubed
- 1/4 cup salami, diced (optional, but highly recommended!)
- 1/4 cup pepperoni, diced (optional, but adds a nice kick!)
- 1/4 cup fresh basil leaves, chopped
- 1/4 cup Parmesan cheese, grated
- 1/4 cup Italian dressing (store-bought or homemade)
- 2 tablespoons olive oil
- 1 tablespoon red wine vinegar
- 1 teaspoon dried oregano
- 1/2 teaspoon garlic powder
- 1/4 teaspoon red pepper flakes (optional, for a little heat)
- Salt and pepper to taste
Preparing the Pasta:
- Cook the pasta according to package directions. I like to cook mine al dente, which means “to the tooth” in Italian. It should be firm but not mushy. This usually takes about 8-10 minutes, but always check the package instructions for the specific type of pasta you’re using.
- Drain the pasta immediately. Don’t let it sit in the hot water, or it will continue to cook and become overdone.
- Rinse the pasta with cold water. This is a crucial step! Rinsing stops the cooking process and helps to cool the pasta down quickly. It also removes excess starch, which can make the salad sticky. I usually rinse it for about a minute, until the water runs clear.
- Drain the pasta thoroughly again. You don’t want any excess water diluting the dressing. I usually give it a good shake in the colander to get rid of any remaining water.
- Transfer the pasta to a large bowl. This is where all the magic will happen! Make sure the bowl is large enough to hold all the ingredients comfortably.
Preparing the Vegetables and Meats:
- Prepare the cherry tomatoes. Wash them thoroughly and then halve them. I find that halving them is the perfect size for this salad, but you can quarter them if you prefer smaller pieces.
- Slice the black olives. I usually buy pre-sliced olives to save time, but you can certainly slice them yourself. Just make sure they’re pitted first!
- Dice the green bell pepper. Remove the seeds and membranes, then dice the pepper into small, bite-sized pieces. I like to use green bell pepper for its slightly bitter flavor, but you can use red or yellow bell pepper if you prefer a sweeter taste.
- Finely chop the red onion. Red onion adds a nice sharpness to the salad, but it can be a bit overpowering if it’s not chopped finely. I usually chop it as small as I can. If you’re sensitive to the taste of raw onion, you can soak it in cold water for about 10 minutes to mellow it out.
- Cube the mozzarella cheese. I like to use fresh mozzarella balls (bocconcini) for this salad, but you can also use pre-cubed mozzarella cheese. If you’re using fresh mozzarella, make sure to drain it well before adding it to the salad.
- Dice the salami and pepperoni (if using). I usually buy pre-sliced salami and pepperoni and then dice them into small pieces. This adds a nice savory and spicy element to the salad.
- Chop the fresh basil leaves. Fresh basil is a must for this salad! It adds a wonderful aroma and flavor. I usually chop it right before adding it to the salad to prevent it from browning.
Making the Dressing:
- In a small bowl, whisk together the Italian dressing, olive oil, red wine vinegar, dried oregano, garlic powder, and red pepper flakes (if using). I like to use a store-bought Italian dressing for convenience, but you can certainly make your own. If you’re making your own, be sure to use a good quality olive oil and red wine vinegar.
- Taste and adjust the seasonings as needed. I usually add a pinch of salt and pepper to taste. If you like a sweeter dressing, you can add a teaspoon of sugar or honey. If you like a tangier dressing, you can add a little more red wine vinegar.
Assembling the Salad:
- Add the cherry tomatoes, black olives, green bell pepper, red onion, mozzarella cheese, salami, pepperoni, and fresh basil to the bowl with the pasta. Make sure all the ingredients are evenly distributed.
- Pour the dressing over the salad. Be sure to pour it evenly over all the ingredients.
- Gently toss the salad to combine. I like to use two large spoons to toss the salad. Be careful not to overmix it, or the pasta will break apart.
- Sprinkle with Parmesan cheese. I like to use freshly grated Parmesan cheese for the best flavor.
- Season with salt and pepper to taste. Give it a final taste and adjust the seasonings as needed.
- Cover the bowl and refrigerate for at least 30 minutes before serving. This allows the flavors to meld together and the salad to chill. I find that it tastes even better after it’s been refrigerated for a few hours or even overnight.
Tips and Variations:
- Use your favorite pasta shape. Rotini, penne, and farfalle are all great choices, but you can use any pasta shape you like. Just make sure it’s a shape that will hold the dressing well.
- Add other vegetables. You can add other vegetables to this salad, such as cucumbers, carrots, or artichoke hearts.
- Add different cheeses. You can use other cheeses in this salad, such as provolone, feta, or goat cheese.
- Add grilled chicken or shrimp. This salad is also delicious with grilled chicken or shrimp. Just add it to the salad after it’s been cooked and cooled.
- Make it vegetarian. To make this salad vegetarian, simply omit the salami and pepperoni.
- Make it vegan. To make this salad vegan, omit the mozzarella and Parmesan cheese and use a vegan Italian dressing.
- Make it gluten-free. To make this salad gluten-free, use gluten-free pasta.
- Add a touch of sweetness. Some people like to add a touch of sweetness to their Italian pasta salad. You can do this by adding a tablespoon of sugar or honey to the dressing.
- Spice it up. If you like a little heat, you can add more red pepper flakes to the dressing. You can also add a pinch of cayenne pepper.
- Make it ahead of time. This salad is perfect for making ahead of time. In fact, it tastes even better after it’s been refrigerated for a few hours or even overnight. Just be sure to store it in an airtight container in the refrigerator.
- Serve it as a side dish or a main course. This salad is delicious as a side dish or a main course. It’s perfect for potlucks, picnics, and barbecues.
Serving Suggestions:
I love serving this Italian Pasta Salad at summer barbecues and potlucks. It’s always a crowd-pleaser! It also makes a great light lunch or dinner. You can serve it on its own or with a side of grilled chicken or fish.
Storage Instructions:
Store leftover Italian Pasta Salad in an airtight container in the refrigerator for up to 3 days. The pasta may absorb some of the dressing over time, so you may need to add a little more dressing before serving.
Enjoy!
Conclusion:
This Italian Pasta Salad isn’t just another recipe; it’s a vibrant celebration of flavors that’s incredibly easy to throw together. From the tangy bite of the Italian dressing to the satisfying chew of the pasta and the burst of freshness from the vegetables, every bite is a delightful experience. I truly believe this recipe is a must-try because its the perfect balance of simplicity and deliciousness, making it ideal for busy weeknights, potlucks, or even a light and refreshing lunch.
But the best part? It’s incredibly versatile! Feel free to get creative and adapt it to your own tastes. For a heartier meal, consider adding grilled chicken, shrimp, or even some chickpeas for extra protein. If you’re a cheese lover (and who isn’t?), a sprinkle of freshly grated Parmesan or a few cubes of mozzarella will elevate the salad to a whole new level. And for those who like a little heat, a pinch of red pepper flakes or a drizzle of hot sauce will add a welcome kick.
Serving suggestions are endless! This Italian Pasta Salad is fantastic on its own, but it also pairs beautifully with grilled meats, sandwiches, or even as a side dish to your favorite pizza. I personally love serving it chilled on a hot summer day, but it’s equally enjoyable at room temperature any time of year. You can even pack it for picnics or take it to work for a satisfying and healthy lunch.
Don’t be afraid to experiment with different types of pasta too! While rotini is my go-to, penne, farfalle (bow tie), or even gluten-free pasta work just as well. The key is to cook the pasta al dente so it holds its shape and doesn’t become mushy. And remember, the quality of your ingredients matters! Use fresh, high-quality vegetables and a good Italian dressing for the best flavor.
I’ve made this Italian Pasta Salad countless times, and it’s always a crowd-pleaser. It’s the kind of recipe that everyone asks for, and it’s so easy to customize that you can make it your own signature dish. I’m confident that you’ll love it just as much as I do.
So, what are you waiting for? Gather your ingredients, put on some music, and get ready to create a culinary masterpiece! I promise you won’t be disappointed. And once you’ve tried it, I’d absolutely love to hear about your experience. Did you make any modifications? What did you serve it with? What did your family and friends think?
Please, share your thoughts and photos in the comments below! I’m always eager to learn new variations and see how you’ve made this recipe your own. Cooking is all about sharing and connecting, and I can’t wait to hear from you. Happy cooking, and enjoy your delicious Italian Pasta Salad! I hope this becomes a staple in your kitchen, just like it is in mine. It’s truly a recipe that brings joy and satisfaction with every single bite.
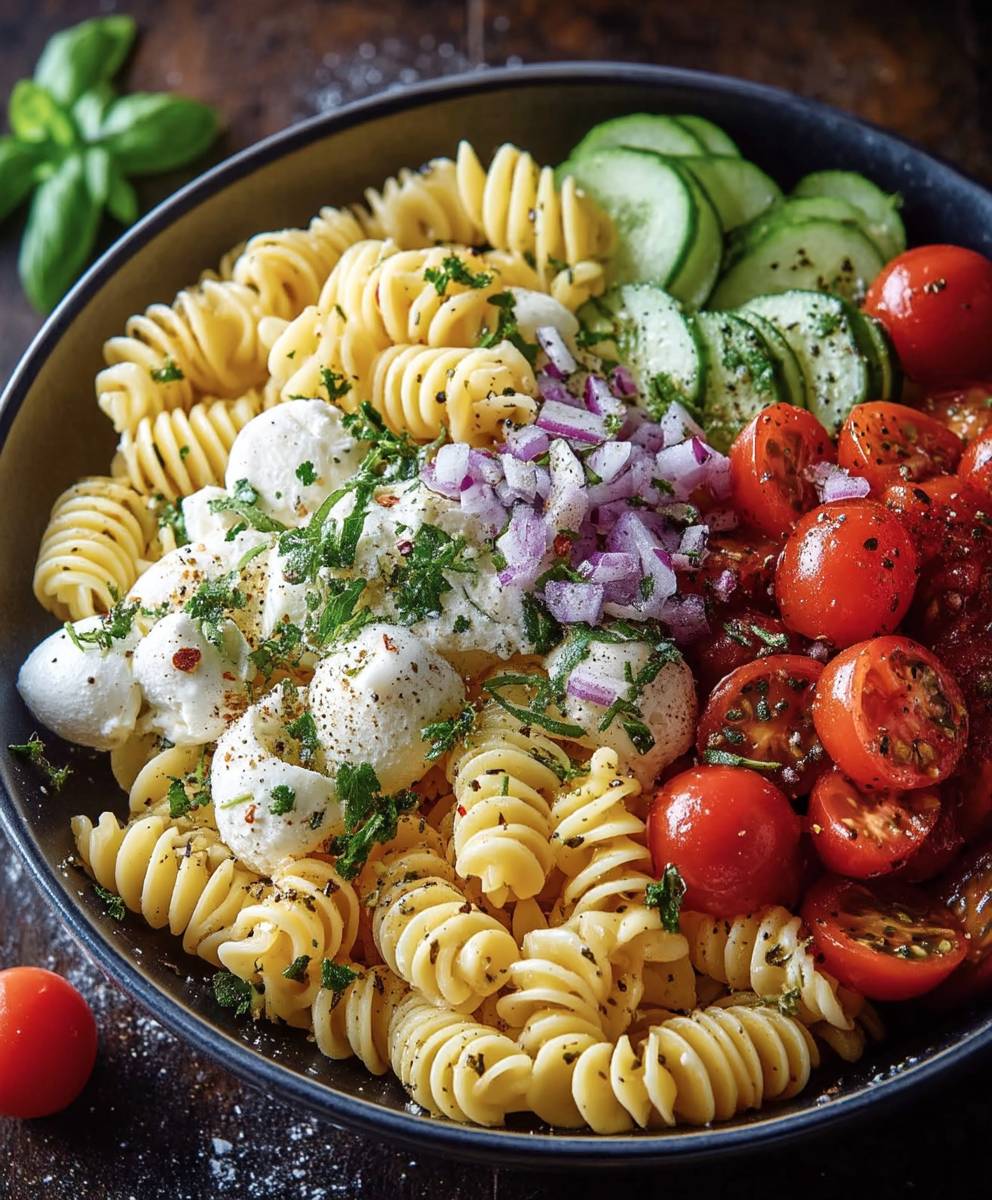
Italian Pasta Salad: The Ultimate Recipe Guide
A vibrant and flavorful pasta salad featuring cooked pasta, fresh vegetables like tomatoes, cucumbers, bell peppers, and olives, tossed in a tangy Italian dressing. Perfect as a side dish or light meal.
Ingredients
1 pound pasta
1/2 cup Italian dressing
1 cup cherry tomatoes, halved
1/2 cup black olives, sliced
1/2 cup mozzarella cheese, cubed
1/4 cup fresh basil, chopped
- 1 pound pasta
- 1/2 cup Italian dressing
- 1 cup cherry tomatoes, halved
- 1/2 cup black olives, sliced
- 1/2 cup mozzarella cheese, cubed
- 1/4 cup fresh basil, chopped
Instructions
- Cook pasta according to package directions.
- While pasta is cooking, whisk together olive oil, vinegar, Italian seasoning, garlic powder, salt, and pepper in a large bowl.
- Drain pasta and rinse with cold water.
- Add pasta to the bowl with the dressing.
- Add salami, tomatoes, mozzarella, olives, and red onion to the bowl.
- Toss everything together until well combined.
- Refrigerate for at least 30 minutes before serving.
Notes
- For a vegetarian option, omit the salami.
- Feel free to add other vegetables you enjoy, such as bell peppers, cucumbers, or cherry tomatoes.
- The salad can be made ahead of time and stored in the refrigerator for up to 3 days.
- If making ahead, add the dressing just before serving to prevent the pasta from becoming soggy.

Leave a Comment