
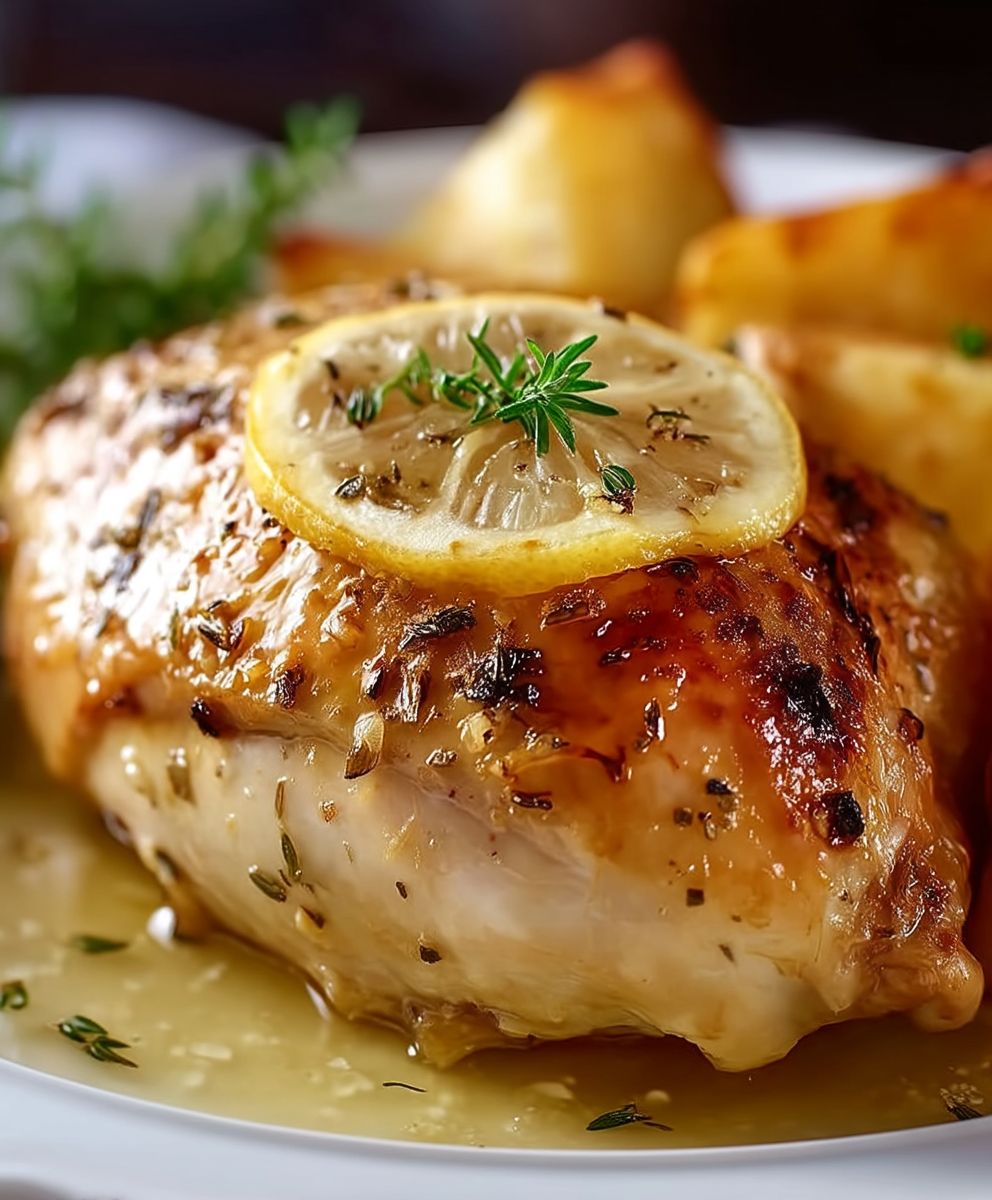
Grilled Chicken Thighs: Prepare to unlock the secret to unbelievably juicy and flavorful chicken that will have everyone begging for seconds! Forget dry, bland chicken we’re diving headfirst into a world of smoky goodness with this incredibly simple, yet utterly delicious recipe. Have you ever wondered how restaurants achieve that perfect char and succulent interior? The answer lies in the humble chicken thigh, and a few key grilling techniques that I’m about to share with you.
Chicken, in its various forms, has been a culinary staple across cultures for centuries. From ancient Roman banquets to modern-day backyard barbecues, it’s a protein that transcends borders and generations. But grilled chicken thighs, in particular, offer a unique advantage. Unlike their leaner breast counterparts, thighs boast a higher fat content, which translates to unparalleled moisture and flavor during the grilling process. This inherent richness makes them incredibly forgiving, even for novice grillers.
People adore this dish for a multitude of reasons. The smoky char, the crispy skin, and the tender, juicy meat create a symphony of textures and tastes that are simply irresistible. Plus, it’s incredibly versatile! Serve it with your favorite sides, from classic potato salad to vibrant grilled vegetables. And let’s not forget the convenience factor with minimal prep time and a relatively quick cooking process, these grilled chicken thighs are perfect for busy weeknights or relaxed weekend gatherings. Get ready to experience chicken like never before!

Ingredients:
- 1 whole chicken (about 4-5 lbs), giblets removed
- 1 large lemon, halved
- 6 cloves garlic, minced
- 2 tablespoons olive oil
- 1 tablespoon dried thyme
- 1 tablespoon dried rosemary
- 1 teaspoon salt
- 1/2 teaspoon black pepper
- 1/2 teaspoon paprika
- 1/4 teaspoon red pepper flakes (optional, for a little heat)
- 1 large onion, quartered
- 4 carrots, peeled and chopped
- 4 celery stalks, chopped
- 1 cup chicken broth
Preparing the Chicken:
- First things first, let’s get that chicken ready! Pat the chicken dry with paper towels. This is crucial for achieving crispy skin. Don’t skip this step!
- Now, in a small bowl, combine the minced garlic, olive oil, thyme, rosemary, salt, pepper, paprika, and red pepper flakes (if using). This is our flavor bomb!
- Rub the garlic-herb mixture all over the chicken, both inside and out. Make sure to get under the skin of the breast meat for extra flavor. This is where your hands get a little messy, but it’s totally worth it.
- Squeeze the juice from one lemon half all over the chicken. Then, place both lemon halves inside the chicken cavity. The lemon will infuse the chicken with a bright, citrusy flavor as it roasts.
Preparing the Vegetables:
- While the chicken is resting (even just for a few minutes while you prep the veggies helps the flavors meld!), let’s get the vegetables ready.
- In a large roasting pan, spread the quartered onion, chopped carrots, and chopped celery stalks. These vegetables will not only add flavor to the chicken but also create a delicious base for pan juices.
- Pour the chicken broth into the bottom of the roasting pan. This will help keep the vegetables moist and create a flavorful sauce.
Roasting the Chicken:
- Place the chicken on top of the vegetables in the roasting pan. Make sure the chicken is sitting comfortably and not overcrowded.
- Preheat your oven to 425°F (220°C). A higher temperature at the beginning helps to crisp up the skin.
- Roast the chicken for 15 minutes at 425°F (220°C).
- After 15 minutes, reduce the oven temperature to 375°F (190°C) and continue roasting for another 1 hour to 1 hour and 15 minutes, or until the internal temperature of the chicken reaches 165°F (74°C) in the thickest part of the thigh. Use a meat thermometer to ensure accuracy. This is the most important step to ensure the chicken is cooked through and safe to eat.
- Basting is key! Every 20-30 minutes, baste the chicken with the pan juices. This will help keep the chicken moist and flavorful, and it will also contribute to that beautiful golden-brown skin.
- If the chicken skin starts to brown too quickly, you can tent it loosely with aluminum foil. This will prevent it from burning while the inside continues to cook.
Resting and Carving:
- Once the chicken is cooked through, remove it from the oven and let it rest for at least 15 minutes before carving. This allows the juices to redistribute throughout the chicken, resulting in a more tender and flavorful bird. Don’t skip this step! It makes a huge difference.
- While the chicken is resting, you can prepare the pan sauce. Skim off any excess fat from the pan juices. Then, place the roasting pan on the stovetop over medium heat. Bring the pan juices to a simmer and cook for a few minutes, scraping up any browned bits from the bottom of the pan. This will create a rich and flavorful sauce. You can thicken the sauce with a cornstarch slurry (1 tablespoon cornstarch mixed with 2 tablespoons cold water) if desired.
- Carve the chicken and serve it with the roasted vegetables and pan sauce. Enjoy!
Tips and Variations:
- For extra crispy skin: After patting the chicken dry, you can let it sit uncovered in the refrigerator for a few hours (or even overnight). This will help to dry out the skin even further, resulting in a crispier roast.
- Add more vegetables: Feel free to add other vegetables to the roasting pan, such as potatoes, sweet potatoes, or Brussels sprouts. Just make sure to adjust the cooking time accordingly.
- Use different herbs: Experiment with different herbs, such as sage, oregano, or parsley.
- Make a gravy: For a richer gravy, you can add a tablespoon of flour to the pan juices after skimming off the fat. Cook for a minute or two to create a roux, then whisk in chicken broth until you reach your desired consistency.
- Spice it up: Add a pinch of cayenne pepper or a dash of hot sauce to the garlic-herb mixture for a little extra heat.
- Stuff the chicken: You can stuff the chicken with a bread stuffing or rice stuffing for a more complete meal. Just be sure to adjust the cooking time accordingly.
- Brining the chicken: For an even more moist and flavorful chicken, consider brining it before roasting. A simple brine can be made with water, salt, and sugar. Submerge the chicken in the brine for several hours (or overnight) before rinsing and patting it dry.
- Using a rotisserie: If you have a rotisserie, you can use it to roast the chicken. This will result in an evenly cooked and incredibly juicy bird. Follow the manufacturer’s instructions for your rotisserie.
- Leftovers: Leftover roast chicken can be used in a variety of dishes, such as chicken salad, chicken pot pie, or chicken soup. Store the leftovers in an airtight container in the refrigerator for up to 3-4 days.
Troubleshooting:
- Chicken is browning too quickly: Tent the chicken loosely with aluminum foil to prevent it from burning.
- Chicken is not cooking evenly: Make sure the oven temperature is accurate and that the chicken is not overcrowded in the roasting pan. You can also rotate the roasting pan halfway through cooking.
- Chicken is dry: Make sure to baste the chicken frequently with the pan juices. You can also try brining the chicken before roasting.
- Pan sauce is too thin: Thicken the sauce with a cornstarch slurry (1 tablespoon cornstarch mixed with 2 tablespoons cold water).
- Pan sauce is too salty: Add a squeeze of lemon juice or a splash of vinegar to balance the flavors.
Serving Suggestions:
- Serve with roasted potatoes, mashed potatoes, or rice.
- Serve with a side salad or steamed vegetables.
- Serve with crusty bread for soaking up the pan sauce.
- Pair with a crisp white wine or a light-bodied red wine.
Enjoy your delicious Lemon Garlic Roast Chicken!
Conclusion:
This Lemon Garlic Roast Chicken isn’t just another recipe; it’s a flavor explosion waiting to happen in your kitchen! From the zesty aroma that fills your home while it roasts to the juicy, tender meat that practically falls off the bone, this dish is guaranteed to impress. I truly believe this will become a new family favorite.
Why is this a must-try? Well, beyond the incredible taste, it’s surprisingly simple to make. We’re talking minimal prep time and maximum flavor payoff. The combination of bright lemon, pungent garlic, and savory herbs creates a symphony of tastes that perfectly complements the richness of the chicken. It’s a one-pan wonder that’s perfect for a weeknight dinner or a special weekend gathering. Plus, the crispy, golden skin is simply irresistible!
But the best part? This recipe is incredibly versatile. Feel free to get creative with your serving suggestions and variations. For a classic pairing, serve it alongside roasted potatoes and steamed green beans. The potatoes will soak up all those delicious pan juices, and the green beans provide a fresh, vibrant contrast. Alternatively, you could whip up a batch of creamy mashed potatoes and a simple salad for a comforting and satisfying meal.
Looking for some exciting variations? Consider adding some root vegetables like carrots, parsnips, and sweet potatoes to the roasting pan along with the chicken. They’ll roast alongside the chicken, absorbing all the flavorful juices and becoming incredibly tender and delicious. You could also experiment with different herbs. Rosemary, thyme, and sage all work beautifully with lemon and garlic. For a spicier kick, add a pinch of red pepper flakes to the herb mixture.
Another fantastic variation is to stuff the chicken with lemon slices, garlic cloves, and fresh herbs before roasting. This will infuse the chicken with even more flavor from the inside out. You could also try marinating the chicken overnight in a lemon-garlic marinade for an extra boost of flavor and tenderness.
Don’t be afraid to experiment and make this recipe your own! That’s the beauty of cooking it’s all about creating something that you and your loved ones will enjoy. I’ve made this Lemon Garlic Roast Chicken countless times, and I’m always amazed at how easy it is to create such a flavorful and impressive dish.
So, what are you waiting for? Grab a chicken, gather your ingredients, and get ready to experience the magic of this recipe. I promise you won’t be disappointed. And most importantly, have fun in the kitchen!
Once you’ve tried this recipe, I’d absolutely love to hear about your experience. Did you make any variations? What did you serve it with? What did your family think? Share your photos and comments below I can’t wait to see your culinary creations! Happy cooking! Let me know if you have any questions, and I’ll do my best to help. I’m confident that this will become a staple in your recipe collection.
Lemon Garlic Roast Chicken: The Ultimate Recipe for Flavorful Perfection
A flavorful and juicy roast chicken infused with bright lemon and savory garlic. Perfect for a simple yet elegant meal.
Ingredients
1 whole chicken (about 4-5 pounds)
1 lemon, halved
4 cloves garlic, minced
2 tablespoons olive oil
1 teaspoon dried thyme
1 teaspoon dried rosemary
1/2 teaspoon salt
1/4 teaspoon black pepper
- 1 whole chicken (about 4-5 pounds)
- 1 lemon, halved
- 4 cloves garlic, minced
- 2 tablespoons olive oil
- 1 teaspoon dried thyme
- 1 teaspoon dried rosemary
- 1/2 teaspoon salt
- 1/4 teaspoon black pepper
Instructions
- Preheat oven to 400 degrees F (200 degrees C).
- Remove giblets from chicken cavity; rinse chicken and pat dry.
- Place chicken in a roasting pan.
- In a bowl, mix lemon juice, garlic, olive oil, rosemary, salt, and pepper.
- Rub the lemon-garlic mixture all over the chicken.
- Roast chicken uncovered for 1 hour and 15 minutes, or until juices run clear when pierced with a fork. An instant-read thermometer inserted into the thickest part of the thigh, near the bone, should read 165 degrees F (74 degrees C).
- Let chicken stand for 10 minutes before carving.
Notes
- For best results, marinate the chicken for at least 4 hours, or preferably overnight.
- Adjust the amount of garlic and lemon to your preference.
- Serve with your favorite roasted vegetables or a simple salad.


Leave a Comment