
Oreo Pie: just the name conjures up images of creamy, chocolatey bliss, doesn’t it? Imagine sinking your fork into a slice of pure dessert heaven, a symphony of textures and flavors that dance on your palate. This isn’t just a pie; it’s an experience, a nostalgic trip back to childhood, and a guaranteed crowd-pleaser at any gathering.
While the exact origins of Oreo Pie are shrouded in a bit of mystery (unlike the iconic Oreo cookie itself, which has a well-documented history!), its popularity exploded in the latter half of the 20th century. It quickly became a staple at potlucks, family dinners, and bake sales across America. Its appeal lies in its simplicity and the universally loved flavor of Oreos. Who can resist that perfect combination of crunchy chocolate cookies and sweet, creamy filling?
People adore Oreo Pie for so many reasons. First, it’s incredibly easy to make, requiring minimal baking and readily available ingredients. Second, the taste is simply irresistible. The rich, chocolatey Oreo crust provides a delightful contrast to the smooth, often no-bake, creamy filling. The texture is also a winner the satisfying crunch of the crust against the velvety filling is pure perfection. Whether you’re looking for a quick and easy dessert to whip up for a weeknight treat or a show-stopping pie to impress your guests, Oreo Pie is always a winning choice. So, let’s get baking (or rather, assembling!) and create this timeless classic together!

Ingredients:
- 1 (14 ounce) can sweetened condensed milk
- 1 (12 ounce) package semi-sweet chocolate chips
- 1/2 cup (1 stick) unsalted butter, cut into pieces
- 1 teaspoon vanilla extract
- 10 Milky Way candy bars (fun size), cut into small pieces
- Pinch of salt
Preparing the Fudge Base
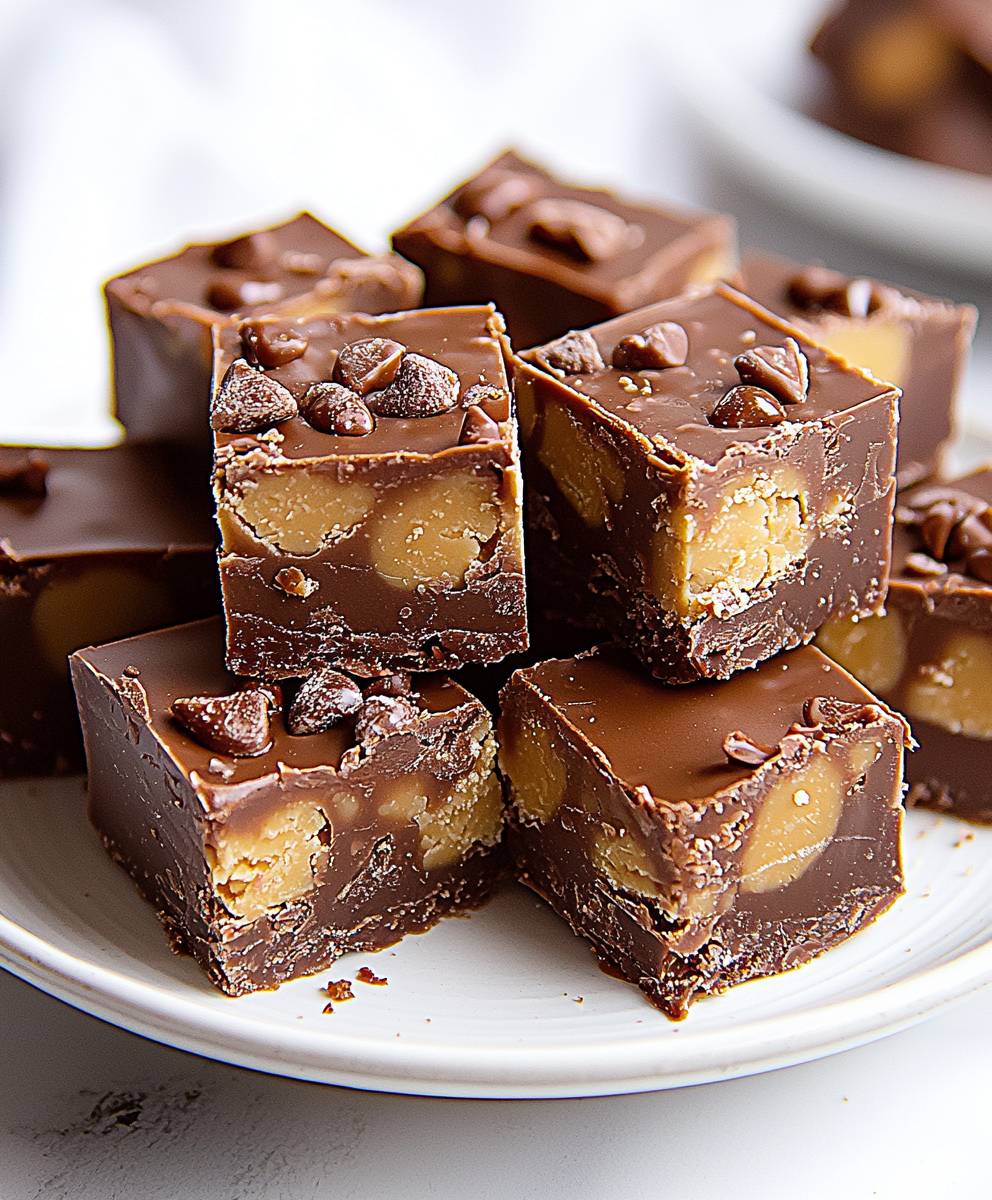
Okay, let’s get started! This Milky Way Fudge is seriously addictive, so be warned! The first step is creating that smooth, rich chocolate base that will hold all those delicious Milky Way pieces. Don’t worry, it’s super easy.
- Combine the Ingredients: In a large, microwave-safe bowl, combine the sweetened condensed milk, chocolate chips, and butter. Make sure your bowl is big enough to prevent any overflow when things get melty.
- Microwave in Intervals: Microwave the mixture on high for 1 minute. Then, take the bowl out and stir everything really well. It might not look completely melted at this point, and that’s perfectly fine.
- Continue Microwaving and Stirring: Microwave for another 30 seconds. Stir again. Repeat this process in 30-second intervals, stirring after each interval, until the chocolate chips and butter are completely melted and the mixture is smooth. This is crucial! You don’t want to overheat the chocolate, or it can seize up and become grainy. Patience is key here.
- Achieving a Smooth Consistency: Keep stirring until the mixture is perfectly smooth and glossy. If you still have a few stubborn chocolate chips that haven’t melted, just keep stirring! The residual heat from the other ingredients should melt them. If not, microwave for another 10 seconds, but be careful not to overdo it.
- Add Vanilla and Salt: Once the mixture is smooth, stir in the vanilla extract and a pinch of salt. The vanilla enhances the chocolate flavor, and the salt balances the sweetness. Don’t skip the salt! It really makes a difference.
Incorporating the Milky Way Candy Bars
Now for the fun part adding the Milky Way candy bars! This is what gives the fudge its signature flavor and texture. Make sure you’ve chopped them into small, manageable pieces so they distribute evenly throughout the fudge.
- Prepare the Milky Way Pieces: Before you even start melting the chocolate, chop your Milky Way candy bars into small pieces. I find that fun-size bars work best, but you can use regular-size bars too. Just make sure they’re chopped small enough so they don’t make the fudge too chunky. Aim for pieces about 1/2 inch in size.
- Gently Fold in the Candy: Add the chopped Milky Way pieces to the melted chocolate mixture. Gently fold them in until they are evenly distributed. Be careful not to overmix, as this can cause the chocolate to cool down too quickly. You want the candy pieces to be suspended in the chocolate, not completely melted.
- Ensure Even Distribution: Make sure the Milky Way pieces are evenly distributed throughout the fudge. This will ensure that every bite is packed with that delicious caramel and nougat flavor.
Setting the Fudge
Almost there! Now it’s time to let the fudge set and firm up. This is the hardest part, because you have to resist the urge to dig in right away! But trust me, it’s worth the wait.
- Prepare the Pan: Line an 8×8 inch square baking pan with parchment paper. Make sure the parchment paper overhangs the sides of the pan. This will make it much easier to remove the fudge later. You can also use aluminum foil if you don’t have parchment paper, but parchment paper works best.
- Pour the Fudge into the Pan: Pour the fudge mixture into the prepared pan. Use a spatula to spread it evenly into all the corners. You want the surface to be as smooth as possible.
- Optional: Add Extra Milky Way Pieces (for Decoration): If you want to make your fudge extra fancy, you can sprinkle some extra chopped Milky Way pieces on top. This is totally optional, but it adds a nice visual appeal.
- Chill in the Refrigerator: Cover the pan with plastic wrap and refrigerate for at least 2 hours, or preferably overnight. This will allow the fudge to set completely and become firm enough to cut. The longer you chill it, the easier it will be to cut into clean squares.
Cutting and Serving the Fudge
Finally, the moment you’ve been waiting for! It’s time to cut and serve your delicious Milky Way Fudge. Get ready for some serious compliments!
- Remove from the Pan: Once the fudge is completely set, remove it from the pan by lifting the parchment paper overhang. Place the fudge on a cutting board.
- Cut into Squares: Use a sharp knife to cut the fudge into squares. I usually cut it into 1-inch squares, but you can make them any size you like. For clean cuts, run the knife under hot water and wipe it dry between each cut. This will prevent the fudge from sticking to the knife.
- Serving and Storage: Serve the fudge immediately, or store it in an airtight container in the refrigerator for up to a week. You can also freeze it for longer storage. Just wrap it tightly in plastic wrap and then place it in a freezer bag. It will keep in the freezer for up to 2 months.
Tips and Variations
Want to customize your Milky Way Fudge? Here are a few ideas:
- Use Different Chocolate: Experiment with different types of chocolate chips. Milk chocolate chips will make the fudge sweeter, while dark chocolate chips will add a richer, more intense flavor. You could even use white chocolate chips for a completely different twist.
- Add Nuts: Add chopped nuts, such as pecans, walnuts, or almonds, to the fudge for extra crunch and flavor.
- Add Caramel Swirl: Drizzle some caramel sauce over the top of the fudge before it sets for a beautiful and delicious caramel swirl.
- Use Different Candy Bars: Get creative and use other candy bars instead of Milky Ways. Snickers, Twix, or even Reese’s Peanut Butter Cups would all be delicious in this fudge.
- Make it Vegan: Use vegan chocolate chips, vegan butter, and vegan sweetened condensed milk to make this fudge vegan-friendly.
Troubleshooting
Sometimes things don’t go exactly as planned. Here are a few common problems and how to fix them:
- Fudge is too soft: If your fudge is too soft, it probably wasn’t chilled long enough. Put it back in the refrigerator for a few more hours, or even overnight.
- Fudge is too hard: If your fudge is too hard, you may have overcooked the chocolate. Next time, be sure to microwave it in shorter intervals and stir frequently.
- Chocolate seized up: If your chocolate seized up and became grainy, it’s probably because it got too hot. Unfortunately, there’s not much you can do to fix it at this point. Just be more careful next time and microwave the chocolate in shorter intervals.
Enjoy!
I hope you enjoy this Milky Way Fudge as much as I do! It’s the perfect treat for any occasion. Let me know in the comments if you try it and what you think!
Conclusion:
This Milky Way Fudge recipe isn’t just another dessert; it’s a nostalgic trip down memory lane, reimagined with a creamy, decadent twist. The combination of rich chocolate, gooey caramel, and that unmistakable Milky Way flavor creates a symphony of textures and tastes that will leave you craving more. I truly believe this fudge is a must-try for any chocolate lover, and here’s why: it’s surprisingly simple to make, requires minimal ingredients, and delivers maximum flavor impact. Forget spending hours in the kitchen; this recipe is designed for busy lives without sacrificing quality or taste.
But the best part? It’s incredibly versatile! While the classic recipe is divine on its own, feel free to experiment and make it your own signature treat. For a richer, more intense chocolate experience, try using dark chocolate instead of semi-sweet. Or, if you’re a peanut butter fanatic (like me!), swirl in a tablespoon or two of creamy peanut butter into the melted chocolate mixture before adding the Milky Way pieces. The possibilities are endless!
Serving suggestions? Oh, where do I even begin? This fudge is perfect as a standalone dessert, a sweet ending to any meal. But it also shines as a component in larger dessert spreads. Imagine a platter featuring this Milky Way Fudge alongside fresh berries, whipped cream, and maybe even a scoop of vanilla ice cream. Talk about a crowd-pleaser!
For a festive touch, cut the fudge into small squares and arrange them on a decorative plate for holiday gatherings. Or, package individual pieces in small cellophane bags and tie them with ribbon for a thoughtful homemade gift. Trust me, anyone who receives this fudge will be eternally grateful.
And don’t limit yourself to just eating it straight! Crumble the fudge over ice cream sundaes for an extra layer of indulgence. Or, chop it into small pieces and add it to your favorite cookie dough recipe for a truly decadent treat. You could even melt it down and use it as a dipping sauce for pretzels or fruit. The only limit is your imagination!
I’m so excited for you to try this recipe and experience the magic of Milky Way Fudge for yourself. I’ve poured my heart and soul into perfecting this recipe, and I truly believe it’s a winner. So, gather your ingredients, put on your apron, and get ready to create a batch of fudge that will impress your friends, family, and even yourself.
Once you’ve made it, I’d absolutely love to hear about your experience! Did you stick to the original recipe, or did you add your own creative twist? What did your friends and family think? Share your photos and stories in the comments below. I can’t wait to see what you create! Happy baking, and enjoy every delicious bite! Don’t forget to tag me in your social media posts so I can see your amazing creations! Let’s spread the fudge love!
Milky Way Fudge: The Ultimate Recipe for Chocolate Lovers
Rich, decadent fudge featuring the classic Milky Way candy bar. Combines chocolate, caramel, and nougat for a sweet and satisfying treat.
Ingredients
- 1 cup (2 sticks) butter, divided
- 3 cups granulated sugar
- 3/4 cup unsweetened cocoa powder
- 1/4 teaspoon salt
- 3/4 cup milk
- 1 teaspoon vanilla extract
- 1 (7 ounce) jar marshmallow creme
- 12 ounces semi-sweet chocolate chips
- 12 Milky Way candy bars, cut into small pieces
Instructions
- Line an 8-inch square pan with foil, letting the foil hang over the sides.
- In a large microwave-safe bowl, combine the chocolate chips and sweetened condensed milk.
- Microwave on high for 1 minute. Stir. Microwave for another 30 seconds. Stir until smooth.
- Stir in the marshmallow creme and vanilla extract.
- Chop the Milky Way bars into small pieces.
- Stir the Milky Way pieces into the chocolate mixture.
- Pour the fudge into the prepared pan and spread evenly.
- Refrigerate for at least 2 hours, or until firm.
- Use the foil overhang to lift the fudge out of the pan. Cut into squares and serve.
Notes
- For best results, use a heavy-bottomed saucepan to prevent scorching.
- Be sure to stir constantly while the mixture is boiling to prevent burning.
- If you don’t have Milky Way bars, you can substitute with other chocolate caramel candies.
- The fudge needs to set completely before cutting, so be patient!
“`

Leave a Comment