
No Bake Oatmeal Cookies: the words alone conjure up images of childhood, of sneaking into the kitchen for a sweet treat, and of pure, unadulterated deliciousness. But what if I told you that you could recreate that nostalgic magic in just minutes, without even turning on your oven?
These aren’t just any cookies; they’re a testament to simple pleasures and ingenious resourcefulness. While the exact origins of no bake oatmeal cookies are shrouded in a bit of mystery, they likely emerged as a clever way to satisfy sweet cravings during times when baking resources were limited or simply as a quick and easy treat for busy families. Think of them as the original “energy bites,” providing a satisfying combination of oats, peanut butter, and chocolate to fuel your day.
What makes these cookies so universally loved? It’s a symphony of textures and flavors. The chewy oats provide a hearty base, perfectly complemented by the creamy peanut butter and the rich, decadent chocolate. The slight saltiness from the peanut butter balances the sweetness, creating an irresistible flavor profile that appeals to all ages. And let’s not forget the convenience! In a world where time is precious, these cookies offer a guilt-free indulgence that requires minimal effort and zero baking skills. So, are you ready to dive into a batch of these delightful treats? Let’s get started!

Ingredients:
- For the Crust:
- 2 1/2 cups all-purpose flour, plus more for dusting
- 1 teaspoon salt
- 1 cup (2 sticks) unsalted butter, very cold and cut into 1/2-inch cubes
- 1/2 cup ice water, plus more if needed
- 1 tablespoon apple cider vinegar
- For the Berry Filling:
- 4 cups mixed berries (strawberries, blueberries, raspberries, blackberries), fresh or frozen
- 1/4 cup granulated sugar, plus more for sprinkling
- 2 tablespoons cornstarch
- 1 tablespoon lemon juice
- 1/2 teaspoon lemon zest
- 1/4 teaspoon almond extract (optional, but delicious!)
- For the Egg Wash:
- 1 large egg
- 1 tablespoon milk or cream
Preparing the Dough:
- Combine Dry Ingredients: In a large bowl, whisk together the flour and salt. This ensures the salt is evenly distributed throughout the dough, which is crucial for flavor.
- Cut in the Butter: Add the cold, cubed butter to the flour mixture. Using a pastry blender or your fingertips (work quickly to prevent the butter from melting!), cut the butter into the flour until the mixture resembles coarse crumbs. You should still see some pea-sized pieces of butter these are what create flaky layers!
- Add Wet Ingredients: In a small bowl, whisk together the ice water and apple cider vinegar. The vinegar helps to tenderize the dough. Gradually add this mixture to the flour and butter, mixing gently with a fork until the dough just comes together. Be careful not to overmix! Overmixing develops the gluten in the flour, resulting in a tough crust.
- Form the Dough: Turn the dough out onto a lightly floured surface. Gently gather it into a ball. If the dough seems too dry, add a teaspoon or two more of ice water. Divide the dough into 6 equal portions. Flatten each portion into a disc.
- Chill the Dough: Wrap each disc tightly in plastic wrap and refrigerate for at least 30 minutes, or up to 2 days. This chilling period is essential! It allows the gluten to relax, making the dough easier to roll out, and it also allows the butter to firm up, which contributes to flakiness.
Preparing the Berry Filling:
- Combine Berries and Sugar: In a large bowl, gently toss together the mixed berries and granulated sugar. The sugar will draw out some of the juices from the berries, creating a delicious sauce.
- Add Cornstarch, Lemon Juice, and Zest: Sprinkle the cornstarch over the berries and toss gently to coat. The cornstarch will help to thicken the berry juices during baking. Add the lemon juice and lemon zest for a bright, fresh flavor. If using, stir in the almond extract.
- Let the Filling Sit: Allow the berry mixture to sit for about 15 minutes, stirring occasionally. This will give the cornstarch time to absorb some of the juices.
Assembling the Galettes:
- Preheat Oven: Preheat your oven to 400°F (200°C). Line a baking sheet with parchment paper. This will prevent the galettes from sticking and make cleanup easier.
- Roll Out the Dough: On a lightly floured surface, roll out one disc of dough into a circle about 6-7 inches in diameter. The dough doesn’t need to be perfectly round rustic is part of the charm!
- Transfer to Baking Sheet: Carefully transfer the rolled-out dough to the prepared baking sheet. You can use a spatula or your hands to gently lift and move it.
- Add the Berry Filling: Spoon about 2/3 cup of the berry filling into the center of the dough, leaving a 1 1/2-inch border.
- Fold the Edges: Gently fold the edges of the dough over the filling, pleating as you go. The pleats don’t need to be perfect just make sure they overlap slightly to create a secure border.
- Repeat: Repeat steps 2-5 with the remaining dough and filling.
Baking the Galettes:
- Prepare Egg Wash: In a small bowl, whisk together the egg and milk or cream.
- Brush with Egg Wash: Brush the edges of each galette with the egg wash. This will give them a beautiful golden-brown color and a slightly glossy finish.
- Sprinkle with Sugar: Sprinkle the edges of the galettes with a little extra granulated sugar. This adds a touch of sweetness and helps them to caramelize.
- Bake: Bake for 25-30 minutes, or until the crust is golden brown and the filling is bubbly. Keep an eye on them baking times may vary depending on your oven. If the crust starts to brown too quickly, you can tent the galettes with foil.
- Cool: Let the galettes cool on the baking sheet for a few minutes before transferring them to a wire rack to cool completely.
Serving Suggestions:
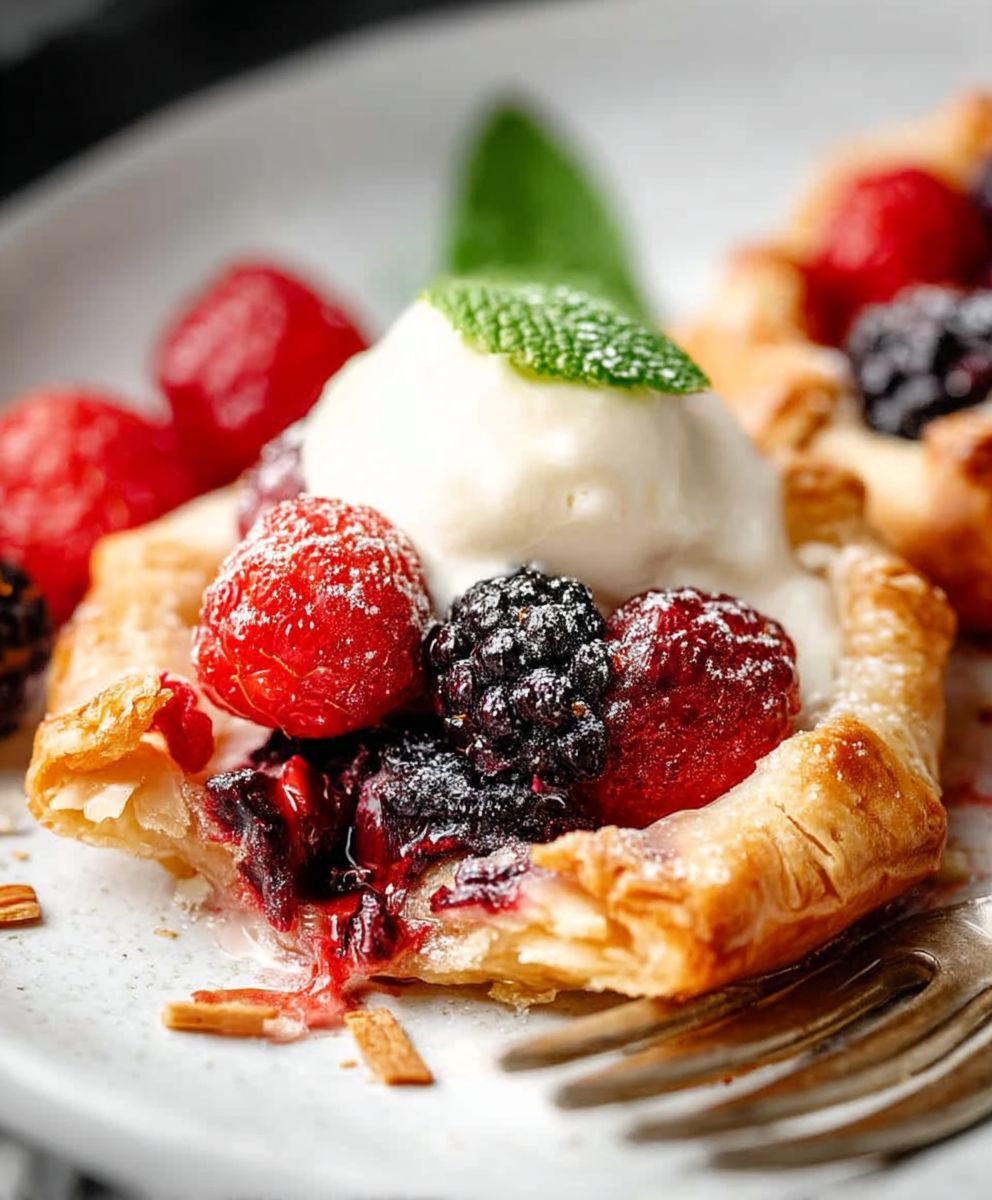
These mini berry galettes are delicious served warm or at room temperature. Here are a few serving suggestions:
- Plain: Enjoy them as is for a simple and satisfying treat.
- With Ice Cream: Top with a scoop of vanilla ice cream or your favorite flavor. The warm galette and cold ice cream are a perfect combination!
- With Whipped Cream: Serve with a dollop of freshly whipped cream.
- With a Dusting of Powdered Sugar: Dust with powdered sugar for an elegant touch.
- For Brunch: These galettes are a great addition to any brunch spread.
Tips for Success:
- Keep the Butter Cold: This is the most important tip for a flaky crust! Cold butter creates steam during baking, which separates the layers of dough.
- Don’t Overmix the Dough: Overmixing develops the gluten in the flour, resulting in a tough crust. Mix just until the dough comes together.
- Chill the Dough: Chilling the dough allows the gluten to relax and the butter to firm up, both of which contribute to flakiness.
- Use Fresh or Frozen Berries: You can use either fresh or frozen berries for this recipe. If using frozen berries, there is no need to thaw them first.
- Adjust Sugar to Taste: The amount of sugar you need will depend on the sweetness of your berries. Taste the berry mixture before adding it to the galettes and adjust the sugar accordingly.
- Don’t Be Afraid to Experiment: Feel free to experiment with different types of berries or add other flavorings to the filling, such as a pinch of cinnamon or nutmeg.
Make-Ahead Tips:
These mini berry galettes can be made ahead of time in several ways:
- Dough: The dough can be made up to 2 days in advance and stored in the refrigerator.
- Unbaked Galettes: The assembled galettes can be stored in the refrigerator for up to 24 hours before baking.
- Baked Galettes: The baked galettes can be stored at room temperature for up to 2 days. Reheat in a warm oven before serving, if desired.
Troubleshooting:
- Crust is Tough: You probably overmixed the dough. Be careful not to overmix next time.
- Crust is Not Flaky: The butter was probably not cold enough. Make sure to use very cold butter and keep it cold while you’re working with it.
- Filling is Too Runny: You may not have used enough cornstarch. Make sure to measure the cornstarch accurately.
- Crust is Burning: Tent the galettes with foil to prevent the crust from burning.
Conclusion:
And there you have it! These Mini Berry Galettes are truly a must-try for anyone looking for a simple yet stunning dessert that’s bursting with fresh, fruity flavor. From the flaky, buttery crust to the vibrant, juicy berry filling, every bite is a little slice of heaven. I know I’ve already made them three times this week!
What makes these galettes so special, you ask? It’s the perfect balance of rustic charm and elegant taste. They’re incredibly easy to make seriously, if I can do it, you can too! and they require minimal ingredients, most of which you probably already have in your pantry. Plus, they’re individual-sized, making them perfect for portion control (or not, I won’t judge if you eat two!). They are also a great way to use up any berries that are about to go bad.
But the real magic lies in the taste. The combination of sweet and tart berries, baked to perfection in a golden-brown crust, is simply irresistible. The berries soften and release their juices, creating a luscious sauce that soaks into the crust, making it even more flavorful. And the slight tang of lemon zest adds a bright, refreshing note that perfectly complements the sweetness of the berries.
Now, let’s talk serving suggestions and variations. While these Mini Berry Galettes are delicious on their own, they’re even better with a scoop of vanilla ice cream or a dollop of whipped cream. The cold, creamy topping provides a delightful contrast to the warm, fruity galette. You could also drizzle them with a little honey or maple syrup for extra sweetness.
Feeling adventurous? Try experimenting with different berry combinations. Blueberries and raspberries are a classic pairing, but you could also use strawberries, blackberries, or even a mix of all your favorite berries. You could even add a sprinkle of chopped nuts, like almonds or pecans, for added texture and flavor. For a richer flavor, brush the crust with melted butter before baking.
Another fun variation is to add a layer of almond paste or frangipane to the bottom of the galette before adding the berries. This will create a richer, more decadent dessert that’s perfect for special occasions. You could also add a sprinkle of cinnamon or nutmeg to the berry filling for a warm, spicy flavor.
Don’t be afraid to get creative and experiment with different flavors and ingredients. The beauty of these Mini Berry Galettes is that they’re incredibly versatile and forgiving. As long as you have a good crust and some delicious berries, you can’t go wrong.
So, what are you waiting for? Grab your ingredients, preheat your oven, and get ready to bake some seriously delicious Mini Berry Galettes. I promise you won’t be disappointed. They’re the perfect treat for any occasion, from a casual weeknight dessert to a fancy dinner party.
And when you do make them, please, please, please share your experience with me! I’d love to see your photos and hear about your variations. Tag me on social media or leave a comment below. I can’t wait to see what you create! Happy baking! I am sure that this recipe will become a family favorite.
Mini Berry Galette: A Delicious & Easy Dessert Recipe
Flaky, buttery mini galettes filled with a sweet and tart berry medley. Perfect for a quick and easy dessert or brunch treat.
Ingredients
For the Crust:
1 1/4 cups (150g) all-purpose flour
1/2 teaspoon salt
1/2 cup (1 stick/113g) cold unsalted butter, cut into cubes
3-5 tablespoons ice water
For the Filling:
1 1/2 cups mixed berries (such as blueberries, raspberries, and blackberries)
2 tablespoons granulated sugar
1 tablespoon cornstarch
1/2 teaspoon lemon zest
1 tablespoon lemon juice
1 tablespoon cold unsalted butter, cut into small pieces
For the Egg Wash (optional):
1 large egg, beaten
1 tablespoon milk or cream
- 1 1/4 cups (150g) all-purpose flour
- 1/2 teaspoon salt
- 1/2 cup (1 stick/113g) cold unsalted butter, cut into cubes
- 3-5 tablespoons ice water
- 1 1/2 cups mixed berries (such as blueberries, raspberries, and blackberries)
- 2 tablespoons granulated sugar
- 1 tablespoon cornstarch
- 1/2 teaspoon lemon zest
- 1 tablespoon lemon juice
- 1 tablespoon cold unsalted butter, cut into small pieces
- 1 large egg, beaten
- 1 tablespoon milk or cream
Instructions
- Preheat oven to 375 degrees F (190 degrees C).
- In a medium bowl, mix together the flour, sugar, and salt. Cut in the butter using a pastry blender or your fingers until the mixture resembles coarse crumbs. Stir in the water until the dough comes together. Form into a disc, wrap in plastic wrap, and chill for 30 minutes.
- On a lightly floured surface, roll the dough into a 12-inch circle. Transfer to a baking sheet lined with parchment paper.
- In a small bowl, combine the berries, sugar, lemon juice, and cornstarch.
- Spoon the berry mixture onto the center of the dough, leaving a 2-inch border. Fold the edges of the dough over the berries, pleating as you go.
- Brush the crust with the egg wash and sprinkle with sugar.
- Bake for 30-35 minutes, or until the crust is golden brown and the berries are bubbly.
- Let cool slightly before serving.
Notes
- For best results, use a mix of fresh, seasonal berries.
- Feel free to experiment with different types of nuts in the crust.
- Serve warm with a scoop of vanilla ice cream or a dollop of whipped cream.
“`


Leave a Comment