
Pumpkin Cheesecake Cake: Prepare to be amazed! Imagine the creamy decadence of cheesecake swirled together with the comforting warmth of pumpkin spice cake. It’s not a dream; it’s a reality, and it’s about to become your new favorite fall dessert. This isn’t just a cake; it’s an experience, a symphony of flavors and textures that will have everyone begging for seconds.
While the exact origins of combining cheesecake and pumpkin cake are a bit hazy, the concept draws upon the rich history of both desserts. Cheesecake, with roots tracing back to ancient Greece, has evolved into countless variations across the globe. Pumpkin pie, a staple of American Thanksgiving, reflects the bounty of the autumn harvest. Marrying these two beloved treats creates a dessert that feels both familiar and excitingly new.
People adore this Pumpkin Cheesecake Cake for its delightful complexity. The tangy cheesecake layer provides a beautiful contrast to the moist, spiced pumpkin cake. The combination of creamy and fluffy textures is simply irresistible. Plus, it’s surprisingly easy to make! Forget choosing between cheesecake and pumpkin cake now you can have the best of both worlds in one stunning dessert. Get ready to impress your friends and family with this show-stopping treat!

Ingredients:
- For the Cakes:
- 225g (1 cup) unsalted butter, softened
- 225g (1 cup + 2 tbsp) caster sugar (superfine sugar)
- 4 large eggs
- 1 teaspoon vanilla extract
- 225g (1 3/4 cups) self-raising flour
- 2 tablespoons milk
- Pinch of salt
- For the Marzipan Layer:
- 500g (1.1 lbs) marzipan
- Apricot jam, warmed and strained (about 2-3 tablespoons)
- For the Royal Icing:
- 3 large egg whites
- 675g (5 1/2 cups) icing sugar, sifted
- 1 tablespoon lemon juice
- Optional: Food coloring (gel or paste)
- For Decoration:
- Edible glitter
- Sprinkles
- Edible sugar decorations (stars, snowflakes, etc.)
- Optional: Small fondant figures (snowmen, Christmas trees)
Preparing the Cake Batter:
- Cream the Butter and Sugar: In a large mixing bowl, cream together the softened butter and caster sugar until light and fluffy. This is a crucial step, so take your time and ensure the mixture is well combined. I usually use an electric mixer for this, but you can also do it by hand if you’re feeling energetic! Scrape down the sides of the bowl occasionally to ensure everything is evenly mixed.
- Add the Eggs: Beat in the eggs one at a time, making sure each egg is fully incorporated before adding the next. If the mixture starts to curdle, add a tablespoon of flour from the measured amount to help bring it back together.
- Incorporate the Vanilla Extract: Stir in the vanilla extract. This adds a lovely aroma and enhances the flavor of the cakes.
- Sift in the Flour: Gradually sift in the self-raising flour and salt. Gently fold the flour into the wet ingredients until just combined. Be careful not to overmix, as this can result in tough cakes. Overmixing develops the gluten in the flour, which we want to avoid.
- Add the Milk: Add the milk and mix until the batter is smooth and has a dropping consistency. The milk helps to loosen the batter and ensures the cakes are moist.
Baking the Mini Cakes:
- Preheat the Oven: Preheat your oven to 180°C (350°F/ Gas Mark 4). Prepare your mini cake tins by greasing them well with butter or baking spray. You can also line the bases with circles of baking parchment for easy removal. I find that using muffin tins or mini bundt cake tins works perfectly for this recipe.
- Fill the Cake Tins: Spoon the cake batter into the prepared mini cake tins, filling each about two-thirds full. This allows room for the cakes to rise without overflowing.
- Bake the Cakes: Bake in the preheated oven for 15-20 minutes, or until the cakes are golden brown and a skewer inserted into the center comes out clean. The baking time will depend on the size of your mini cake tins, so keep a close eye on them.
- Cool the Cakes: Once baked, remove the cakes from the oven and let them cool in the tins for a few minutes before transferring them to a wire rack to cool completely. Make sure they are completely cool before you start decorating.
Preparing the Marzipan Layer:
- Prepare the Apricot Jam: Warm the apricot jam in a small saucepan or in the microwave until it’s runny. Strain it through a fine-mesh sieve to remove any lumps or pieces of fruit. This will give you a smooth, glossy glaze.
- Brush the Cakes with Jam: Once the cakes are completely cool, brush the tops and sides with the warmed apricot jam. This will help the marzipan adhere to the cakes.
- Roll Out the Marzipan: Lightly dust a clean work surface with icing sugar. Roll out the marzipan to a thickness of about 5mm (1/4 inch).
- Cut Out the Marzipan: Use a cookie cutter that is the same size as the top of your mini cakes to cut out circles of marzipan. You can also use a sharp knife to carefully cut out the shapes.
- Apply the Marzipan: Carefully place the marzipan circles onto the tops of the jam-coated cakes. Gently smooth the marzipan down to ensure it adheres well.
Making the Royal Icing:
- Whisk the Egg Whites: In a clean, grease-free bowl, whisk the egg whites until they form soft peaks. It’s essential that your bowl and whisk are completely clean, as any trace of grease can prevent the egg whites from whipping properly.
- Gradually Add the Icing Sugar: Gradually add the sifted icing sugar to the egg whites, one spoonful at a time, whisking continuously until the icing is thick and glossy. Sifting the icing sugar is crucial to avoid lumps in your royal icing.
- Add the Lemon Juice: Add the lemon juice and whisk until the icing is smooth and holds its shape. The lemon juice helps to stabilize the icing and gives it a bright, white color.
- Adjust the Consistency: If the icing is too thick, add a few drops of water at a time until you reach the desired consistency. If it’s too thin, add a little more sifted icing sugar. The ideal consistency for piping is when the icing holds its shape but is still easy to pipe.
- Color the Icing (Optional): If you want to color your royal icing, divide it into separate bowls and add a small amount of gel or paste food coloring to each bowl. Mix well until the color is evenly distributed. Remember that a little food coloring goes a long way, so start with a small amount and add more as needed.
Decorating the Mini Cakes:
- Prepare Piping Bags: Fill piping bags with the royal icing. If you’re using different colors, use separate piping bags for each color.
- Pipe the Icing: Pipe the royal icing onto the marzipan-covered cakes in your desired designs. You can create simple swirls, snowflakes, or more intricate patterns. Get creative and have fun with it!
- Add Decorations: While the icing is still wet, sprinkle with edible glitter, sprinkles, and edible sugar decorations. The wet icing will act as a glue to hold the decorations in place.
- Add Fondant Figures (Optional): If you’re using fondant figures, gently press them onto the wet icing.
- Let the Icing Set: Allow the royal icing to set completely before serving or storing the cakes. This usually takes several hours, or preferably overnight. The icing needs to be completely dry to prevent it from smudging.
Tips for Success:
- Use Room Temperature Ingredients: Make sure your butter and eggs are at room temperature for the best results. This helps them to emulsify properly and creates a smoother batter.
- Don’t Overmix the Batter: Overmixing can lead to tough cakes. Mix until just combined.
- Cool the Cakes Completely: Ensure the cakes are completely cool before decorating to prevent the icing from melting.
- Store Properly: Store the decorated cakes in an airtight container at room temperature. They will keep for several days.
- Practice Your Piping: If you’re new to piping, practice on a piece of parchment paper before decorating the cakes. This will help you get a feel for the icing and the piping bag.
Conclusion:
And there you have it! These Mini Vanilla Christmas Cakes are more than just a recipe; they’re a little bundle of holiday cheer ready to burst with flavor. I truly believe this is a must-try recipe this holiday season, and here’s why: they’re incredibly easy to make, even for beginner bakers. The simple vanilla flavor is universally loved, making them perfect for gifting or serving to a crowd. Plus, their miniature size makes them irresistibly cute and ideal for portion control (though, let’s be honest, you’ll probably want more than one!).
But the best part? They’re incredibly versatile! While I’ve shared my classic vanilla version, feel free to get creative. Imagine adding a hint of almond extract for a marzipan-like flavor, or stirring in some chopped cranberries and orange zest for a festive twist. You could even incorporate mini chocolate chips for a delightful surprise.
For serving suggestions, these little cakes are delightful on their own with a dusting of powdered sugar. But if you want to elevate them further, consider a simple glaze made with powdered sugar and milk, or a decadent cream cheese frosting. A dollop of whipped cream and a sprinkle of festive sprinkles always adds a touch of magic. They also pair beautifully with a warm cup of coffee, tea, or hot chocolate the perfect accompaniment to a cozy Christmas evening.
Think about serving them as part of a festive dessert platter alongside other holiday treats like cookies, fudge, and peppermint bark. Or, package them individually in small cellophane bags tied with ribbon for adorable homemade gifts. They’re also a fantastic addition to a Christmas brunch or afternoon tea.
Don’t be afraid to experiment with different toppings and decorations. Candied cherries, chopped nuts, edible glitter, and even miniature gingerbread men can add a personal touch and make each cake unique. Get the kids involved in decorating it’s a fun and festive activity that everyone will enjoy!
I’m so excited for you to try this recipe and experience the joy of baking these adorable Mini Vanilla Christmas Cakes. I poured my heart into creating a recipe that’s both delicious and easy to follow, and I truly believe you’ll love the results.
So, gather your ingredients, preheat your oven, and get ready to fill your kitchen with the sweet aroma of vanilla and Christmas cheer. I can’t wait to hear about your baking adventures!
And most importantly, please share your creations with me! Tag me in your photos on social media I’d love to see your versions of these mini cakes. Let me know what variations you tried, what toppings you used, and how much your family and friends enjoyed them. Your feedback is invaluable, and it helps me continue to create recipes that you’ll love. Happy baking, and Merry Christmas!
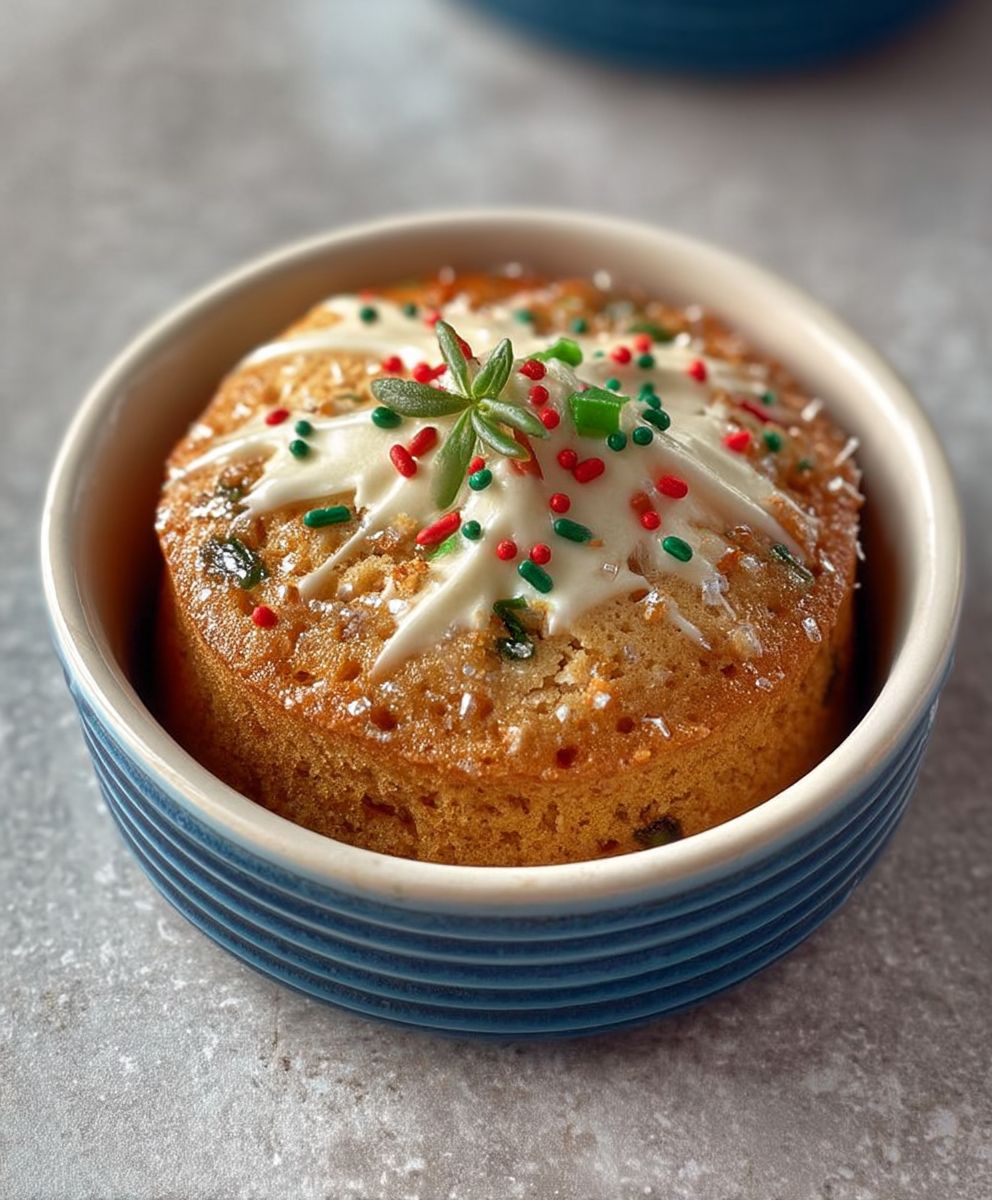
Mini Vanilla Christmas Cakes: The Perfect Holiday Treat
Festive mini vanilla cakes, perfect for holiday gifting or individual treats. Easy to bake and decorate with icing and sprinkles.
Ingredients
175g softened butter
175g golden caster sugar
3 large eggs
1 tsp vanilla extract
175g self-raising flour
1-2 tbsp milk
½ tsp icing sugar
Edible glitter stars, to decorate
- 175g softened butter
- 175g golden caster sugar
- 3 large eggs
- 1 tsp vanilla extract
- 175g self-raising flour
- 1-2 tbsp milk
- ½ tsp icing sugar
- Edible glitter stars, to decorate
Instructions
- Preheat the oven to 180°C (160°C fan/Gas Mark 4). Grease and line a 12-hole mini muffin tin with paper cases.
- In a large bowl, cream together the butter and sugar until light and fluffy.
- Gradually beat in the eggs, one at a time, then stir in the vanilla extract.
- In a separate bowl, whisk together the flour, baking powder, and salt.
- Gradually add the dry ingredients to the wet ingredients, mixing until just combined.
- Spoon the batter into the prepared muffin tin, filling each case about two-thirds full.
- Bake for 12-15 minutes, or until a wooden skewer inserted into the center comes out clean.
- Let the cakes cool in the tin for a few minutes before transferring them to a wire rack to cool completely.
- Once the cakes are cool, prepare the frosting. In a bowl, beat together the butter, icing sugar, and milk until smooth and creamy.
- Frost the mini cakes and decorate with sprinkles or other desired decorations.
“`
Notes
- Store in an airtight container.
Leave a Comment