
Nanaimo bars, oh, where do I even begin? Imagine sinking your teeth into a decadent, no-bake dessert that perfectly balances creamy custard, rich chocolate, and a delightful coconut-graham cracker base. It’s a symphony of textures and flavors that will leave you craving more. I’m thrilled to share my take on this classic Canadian treat with you!
These iconic squares hail from Nanaimo, British Columbia, and their history is as intriguing as their taste. While the exact origins are debated, the first printed recipe appeared in a cookbook in the early 1950s. Since then, Nanaimo bars have become a beloved national treasure, enjoyed in homes and bakeries across Canada and beyond. They’re a staple at potlucks, holiday gatherings, and any occasion that calls for a little bit of indulgence.
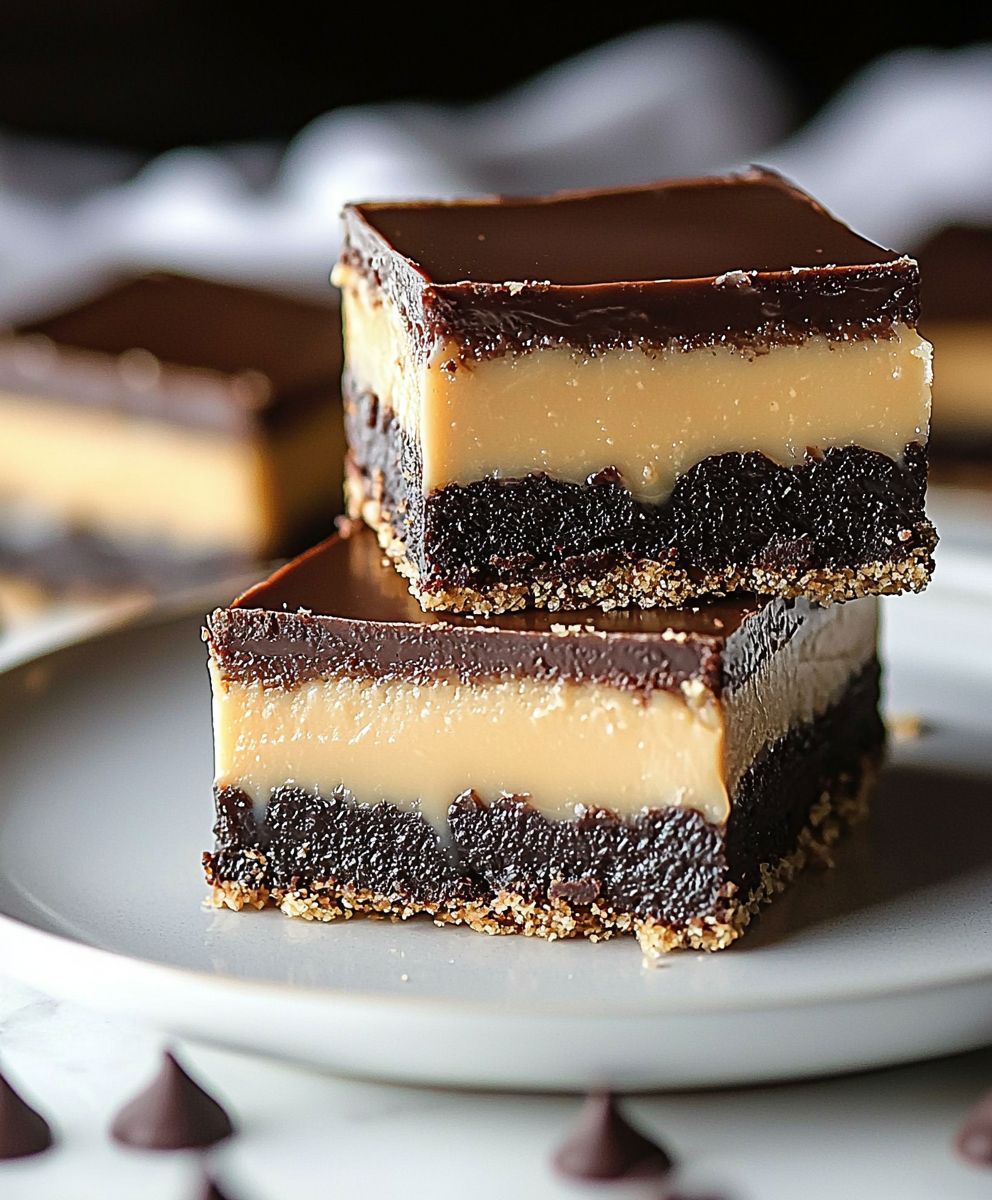
But what makes them so irresistible? It’s the harmonious blend of textures the crunchy base, the smooth custard filling, and the glossy chocolate topping. The taste is equally captivating, with the sweetness of the custard balanced by the slightly bitter chocolate and the nutty coconut. Plus, the no-bake aspect makes them surprisingly easy to prepare, even for novice bakers. Trust me, once you try this recipe, you’ll understand why Nanaimo bars have captured the hearts (and stomachs!) of so many.

Ingredients:
- For the Base:
- 1/2 cup (1 stick) unsalted butter
- 1/4 cup granulated sugar
- 5 tablespoons unsweetened cocoa powder
- 1 large egg, beaten
- 1 3/4 cups graham cracker crumbs
- 1/2 cup finely chopped almonds (or walnuts, if preferred)
- 1 cup shredded coconut
- For the Custard Filling:
- 1/2 cup (1 stick) unsalted butter, softened
- 3 tablespoons milk
- 2 tablespoons custard powder
- 4 cups powdered sugar
- For the Chocolate Topping:
- 4 ounces semi-sweet chocolate
- 2 tablespoons unsalted butter
Preparing the Base
- Melt the Butter, Sugar, and Cocoa: In a medium saucepan, combine the butter, sugar, and cocoa powder. Melt over low heat, stirring constantly until the butter is completely melted and the mixture is smooth. Be careful not to burn the mixture. Low and slow is the key here!
- Add the Egg: Remove the saucepan from the heat. Gradually pour in the beaten egg, stirring constantly and quickly to prevent the egg from scrambling. This step is crucial, so make sure you’re stirring vigorously!
- Incorporate Dry Ingredients: Add the graham cracker crumbs, chopped almonds (or walnuts), and shredded coconut to the saucepan. Stir until everything is well combined and the mixture is evenly moistened. It should resemble wet sand.
- Press into Pan: Line an 8×8 inch square baking pan with parchment paper, leaving an overhang on two sides for easy removal later. Press the base mixture firmly and evenly into the bottom of the prepared pan. I like to use the bottom of a measuring cup to really pack it down. This creates a solid foundation for our Nanaimo bars.
- Chill the Base: Place the pan in the refrigerator to chill for at least 30 minutes. This will allow the base to firm up while we prepare the custard filling. You can even chill it for longer, up to an hour, if you have the time.
Making the Custard Filling
- Cream Butter and Milk: In a large bowl, cream together the softened butter and milk using an electric mixer until light and fluffy. This usually takes about 2-3 minutes. Make sure your butter is truly softened, or you’ll end up with lumps!
- Add Custard Powder: Add the custard powder to the butter mixture and beat until well combined. The mixture will thicken slightly.
- Gradually Add Powdered Sugar: Gradually add the powdered sugar, one cup at a time, beating well after each addition. Continue until all the powdered sugar is incorporated and the filling is smooth and creamy. Be patient and scrape down the sides of the bowl as needed to ensure everything is evenly mixed.
- Spread Over Base: Remove the chilled base from the refrigerator. Spread the custard filling evenly over the base, making sure to reach all the edges. Again, I find the back of a spoon or an offset spatula works best for this.
- Chill Again: Return the pan to the refrigerator and chill for at least 30 minutes, or until the custard filling is firm. This is important for the bars to hold their shape when cut.
Creating the Chocolate Topping
- Melt Chocolate and Butter: In a heatproof bowl set over a saucepan of simmering water (double boiler), combine the chocolate and butter. Make sure the bottom of the bowl doesn’t touch the water. Stir constantly until the chocolate and butter are completely melted and the mixture is smooth and glossy. Alternatively, you can melt the chocolate and butter in the microwave in 30-second intervals, stirring in between, until melted and smooth.
- Pour Over Filling: Remove the chilled pan from the refrigerator. Pour the melted chocolate mixture evenly over the custard filling, spreading it to the edges of the pan.
- Create Swirls (Optional): If you want to create a decorative swirl pattern, use a toothpick or skewer to gently swirl the chocolate into the custard filling. Be careful not to dig too deep and mix the layers completely.
- Chill Until Set: Return the pan to the refrigerator and chill for at least 1 hour, or until the chocolate topping is completely set. This is the hardest part waiting! But trust me, it’s worth it.
Cutting and Serving
- Remove from Pan: Once the chocolate is set, use the parchment paper overhang to lift the Nanaimo bars out of the pan.
- Cut into Squares: Place the bars on a cutting board. Use a sharp knife to cut the bars into squares. For clean cuts, run the knife under hot water and wipe it dry between each cut. This helps prevent the chocolate from cracking.
- Serve and Enjoy: Serve the Nanaimo bars chilled. They can be stored in an airtight container in the refrigerator for up to a week. They are also freezer-friendly, so you can wrap them individually and freeze them for longer storage. Just thaw them in the refrigerator before serving.
Conclusion:
So there you have it! This Nanaimo bar recipe isn’t just another dessert; it’s a journey back to comforting flavors and a guaranteed crowd-pleaser. From the rich, chocolatey base to the creamy custard filling and the decadent chocolate ganache, every layer is a symphony of textures and tastes that will leave you wanting more. I truly believe this recipe captures the essence of what a perfect Nanaimo bar should be: rich, satisfying, and utterly irresistible. But why is this recipe a must-try? Beyond the incredible flavor profile, it’s about the experience. It’s about creating something special, something that will bring smiles to faces and create lasting memories. It’s about mastering a classic and putting your own personal touch on it. And trust me, the satisfaction of biting into a homemade Nanaimo bar, knowing you created that deliciousness from scratch, is unparalleled. Now, let’s talk serving suggestions and variations! While these Nanaimo bars are divine on their own, there are plenty of ways to elevate the experience. For a sophisticated touch, try serving them with a dollop of freshly whipped cream and a sprinkle of cocoa powder. Or, if you’re feeling adventurous, pair them with a scoop of vanilla bean ice cream for a truly decadent dessert. Looking for variations? The possibilities are endless! For a nutty twist, add chopped walnuts or pecans to the base layer. If you’re a coffee lover, incorporate a teaspoon of instant espresso powder into the custard filling for a mocha-infused delight. And for a truly indulgent experience, try using dark chocolate for the ganache the bitterness will perfectly complement the sweetness of the other layers. You could even experiment with different extracts in the custard, like almond or peppermint, to create unique and exciting flavor combinations. Consider adding a thin layer of raspberry jam between the base and the custard for a fruity surprise. Don’t be afraid to get creative and make this recipe your own!Serving and Storage Tips
These Nanaimo bars are best served chilled, so be sure to give them ample time to set in the refrigerator before slicing and serving. They can be stored in an airtight container in the refrigerator for up to a week, or in the freezer for up to a month. If freezing, wrap them individually in plastic wrap to prevent freezer burn.A Few Extra Tips for Success
* Use high-quality chocolate for the best flavor. * Don’t overbake the base layer, as it will become dry and crumbly. * Be patient when melting the chocolate for the ganache low and slow is the key to preventing it from seizing. * Allow the ganache to cool slightly before pouring it over the custard layer, as this will help it set more evenly. But most importantly, have fun! Baking should be an enjoyable experience, so relax, put on some music, and let your creativity flow. I’m confident that you’ll love this Nanaimo bar recipe as much as I do. So, what are you waiting for? Gather your ingredients, preheat your oven, and get ready to embark on a baking adventure. I can’t wait to hear about your experience! Please, try this recipe and share your creations with me! Let me know in the comments below what variations you tried, what you loved, and what you might do differently next time. Your feedback is invaluable, and I’m always eager to learn from fellow bakers. Happy baking! Print
Nanaimo Bars: The Ultimate Guide to This Canadian Dessert
- Total Time: 35
- Yield: 24 bars 1x
Description
A classic Canadian dessert with a no-bake chocolate crumb base, creamy custard filling, and rich chocolate ganache topping.
Ingredients
- 1/2 cup unsalted butter, softened
- 1/4 cup granulated sugar
- 5 tablespoons unsweetened cocoa powder
- 1 large egg, beaten
- 1 3/4 cups graham cracker crumbs
- 1/2 cup finely chopped walnuts
- 1 cup flaked coconut
- 1/2 cup unsalted butter, softened
- 3 tablespoons milk
- 2 tablespoons vanilla custard powder
- 2 cups confectioners’ sugar
- 4 ounces semi-sweet chocolate
- 2 tablespoons unsalted butter
Instructions
- Melt butter, cocoa and sugar in top of double boiler.
- Add egg and stir to cook.
- Remove from heat.
- Stir in wafer crumbs, coconut and nuts.
- Press firmly into an ungreased 9 x 13 inch pan.
- Cream butter, icing sugar, milk and custard powder until fluffy.
- Spread over base.
- Melt chocolate and butter over low heat.
- Cool slightly and spread over second layer.
- Chill.
Notes
“`html
- Line the pan with parchment paper for easy removal.
- The base layer needs to be firm before adding the custard layer.
- Chill thoroughly for clean cuts.
“`
- Prep Time: 20 minutes
- Cook Time: 10 minutes


Leave a Comment