
Thai Drunken Noodles, or Pad Kee Mao, are calling your name! Imagine perfectly chewy, wide rice noodles coated in a fiery, savory sauce, bursting with fresh herbs and vibrant vegetables. This isn’t just another noodle dish; it’s an explosion of flavor that will transport your taste buds straight to the bustling streets of Thailand.
While the exact origins of Pad Kee Mao are shrouded in a bit of mystery, legend has it that the dish was created as a late-night craving remedy, perhaps even by someone who had indulged in a bit too much of the local rice wine. The name “Drunken Noodles” certainly lends credence to this theory! Regardless of its precise beginnings, this dish has become a beloved staple in Thai cuisine, celebrated for its bold flavors and satisfying texture.
What makes Thai Drunken Noodles so irresistible? It’s the perfect balance of sweet, spicy, salty, and umami. The wide rice noodles offer a delightful chewiness, while the sauce, typically made with soy sauce, fish sauce, oyster sauce, and chili, delivers a powerful punch. The addition of holy basil, a key ingredient, adds a unique aromatic note that elevates the dish to another level. Whether you’re looking for a quick and easy weeknight meal or a dish to impress your friends, Pad Kee Mao is always a winner. Get ready to experience a culinary adventure!

Ingredients:
- 2 cups cooked rice, preferably day-old and cooled (long-grain or jasmine rice works best)
- 2 tablespoons vegetable oil
- 1 small onion, finely chopped
- 2 cloves garlic, minced
- 1 red chili, finely chopped (adjust to your spice preference)
- 1 inch ginger, grated
- 1/2 cup diced cooked chicken, shrimp, or tofu (or a combination!)
- 1/4 cup frozen peas and carrots
- 2 tablespoons sweet soy sauce (kecap manis)
- 1 tablespoon soy sauce
- 1 teaspoon fish sauce (optional, but adds great umami)
- 1/2 teaspoon ground turmeric
- 1/4 teaspoon white pepper
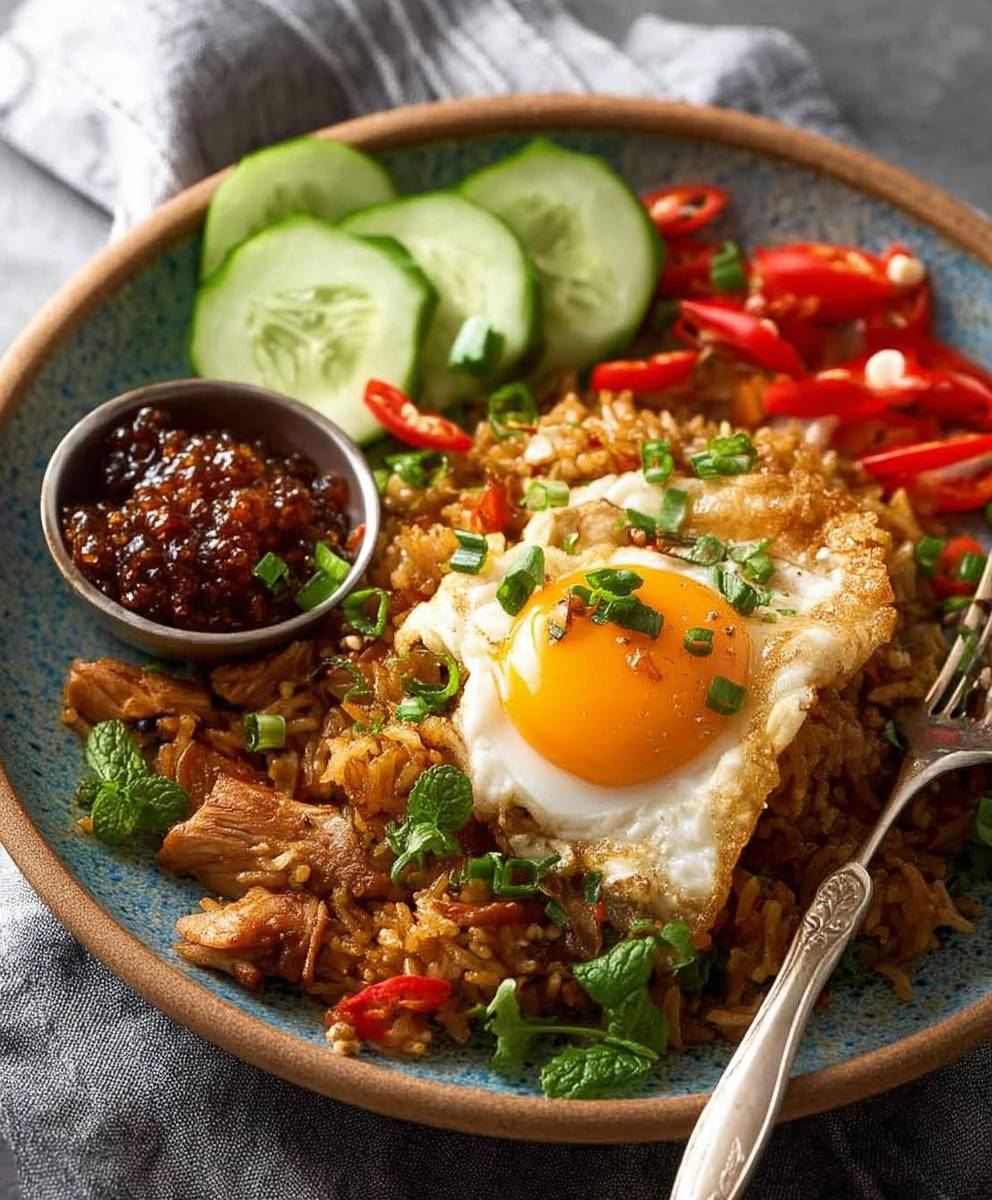
- 1 egg per serving
- Optional toppings: sliced cucumber, tomato wedges, fried shallots, prawn crackers (krupuk), pickled vegetables (acar)
Preparing the Nasi Goreng:
- Prep Your Ingredients: Before you even think about turning on the stove, make sure all your ingredients are prepped and ready to go. This is crucial for a quick and efficient stir-fry. Chop your onion, mince your garlic, grate your ginger, and dice your chili. Have your cooked rice ready, along with your protein and vegetables. Measure out your sauces and spices. Trust me, having everything at your fingertips will make the cooking process much smoother.
- Sauté the Aromatics: Heat the vegetable oil in a large wok or skillet over medium-high heat. Once the oil is hot, add the chopped onion and sauté until softened and translucent, about 2-3 minutes. Don’t let it brown too much! Then, add the minced garlic, chopped chili, and grated ginger. Stir-fry for another minute until fragrant. The aroma should be amazing at this point!
- Add Protein and Vegetables: Now it’s time to add your protein of choice. Whether it’s chicken, shrimp, tofu, or a combination, add it to the wok and stir-fry until heated through and slightly browned. If using shrimp, cook until pink and opaque. Next, add the frozen peas and carrots. Stir-fry for another 2-3 minutes until the vegetables are heated through and slightly softened.
- Incorporate the Rice: This is the most important step! Add the cooked rice to the wok. Break up any clumps with your spatula or spoon. Stir-fry the rice with the other ingredients, making sure everything is well combined. You want the rice to be evenly coated with the oil and aromatics.
- Add the Sauces and Spices: Pour in the sweet soy sauce (kecap manis), soy sauce, and fish sauce (if using). Sprinkle in the ground turmeric and white pepper. Stir-fry vigorously to distribute the sauces and spices evenly throughout the rice. The rice should start to take on a beautiful golden-brown color from the kecap manis. Taste and adjust the seasoning as needed. You might want to add a little more soy sauce for saltiness or kecap manis for sweetness.
- Continue Stir-Frying: Keep stir-frying the nasi goreng for another 5-7 minutes, or until the rice is heated through and slightly crispy in some spots. This is where the magic happens! The longer you stir-fry, the more flavorful the nasi goreng will become. Make sure to keep the rice moving to prevent it from sticking to the wok.
Frying the Egg (Optional but Highly Recommended):
- Heat the Oil: While the nasi goreng is cooking, heat a separate small skillet over medium heat. Add a tablespoon of vegetable oil.
- Fry the Egg: Once the oil is hot, crack an egg into the skillet. Cook the egg to your liking. I personally prefer a runny yolk, so I cook it for about 2-3 minutes, or until the whites are set but the yolk is still runny. You can also cook it longer if you prefer a firmer yolk.
Plating and Serving:
- Plate the Nasi Goreng: Spoon the nasi goreng onto a plate or bowl.
- Top with the Egg: Carefully place the fried egg on top of the nasi goreng. The runny yolk will add richness and flavor to the dish.
- Add Toppings (Optional): Garnish with your favorite toppings. Sliced cucumber, tomato wedges, fried shallots, prawn crackers (krupuk), and pickled vegetables (acar) are all popular choices.
- Serve Immediately: Serve the nasi goreng immediately while it’s hot and fresh. Enjoy!
Tips for the Best Nasi Goreng:
- Use Day-Old Rice: This is the key to preventing your nasi goreng from becoming mushy. Day-old rice has less moisture and will fry up nicely.
- High Heat is Your Friend: Nasi goreng is best cooked over high heat. This will help to create a slightly crispy texture and prevent the rice from sticking to the wok.
- Don’t Overcrowd the Wok: If you’re making a large batch of nasi goreng, it’s best to cook it in batches. Overcrowding the wok will lower the temperature and result in soggy rice.
- Adjust the Spices to Your Liking: Nasi goreng is a versatile dish, so feel free to adjust the spices to your preference. If you like it spicy, add more chili. If you prefer it sweeter, add more kecap manis.
- Get Creative with Toppings: The toppings are what really make nasi goreng special. Experiment with different toppings to find your favorite combination.
- Kecap Manis is Essential: Don’t skip the kecap manis! This sweet soy sauce is what gives nasi goreng its signature flavor and color.
- Don’t Be Afraid to Experiment: Nasi goreng is a forgiving dish, so don’t be afraid to experiment with different ingredients and techniques. The most important thing is to have fun and enjoy the process!
Variations:
- Seafood Nasi Goreng: Use a combination of shrimp, squid, and fish for a delicious seafood version.
- Vegetarian Nasi Goreng: Omit the meat and use tofu or tempeh for a vegetarian option. Add extra vegetables like mushrooms, bell peppers, and broccoli.
- Spicy Nasi Goreng: Add more chili or a few drops of chili oil for a spicier kick.
- Nasi Goreng Jawa: This version typically includes shrimp paste (terasi) for a more intense flavor.
- Nasi Goreng Kambing: Made with goat meat, this is a richer and more flavorful variation.
Serving Suggestions:
- Serve nasi goreng as a main course for lunch or dinner.
- It’s also a great dish to bring to potlucks or picnics.
- Nasi goreng can be served with a side of satay or gado-gado for a complete Indonesian meal.
- Leftover nasi goreng can be reheated in the microwave or stir-fried again.
Conclusion:
This Nasi Goreng recipe isn’t just another fried rice dish; it’s a vibrant explosion of flavor, a culinary adventure that transports you straight to the bustling streets of Indonesia. From the aromatic blend of spices to the perfectly cooked rice and the customizable mix-ins, every element works in harmony to create a truly unforgettable meal. I genuinely believe this is a must-try recipe for anyone looking to expand their culinary horizons and experience the authentic taste of Southeast Asia.
But what truly sets this recipe apart is its incredible versatility. While I’ve outlined my favorite combination of ingredients, the beauty of Nasi Goreng lies in its adaptability. Feel free to experiment with different proteins succulent shrimp, tender chicken, or even crispy tofu for a vegetarian option. Don’t be afraid to raid your vegetable drawer and toss in whatever you have on hand bell peppers, carrots, peas, and green beans all work wonderfully.
Serving Suggestions and Variations:
For a truly authentic experience, serve your Nasi Goreng with a fried egg on top. The runny yolk adds a richness and creaminess that perfectly complements the savory rice. A side of crispy prawn crackers (krupuk) is also a must-have for that satisfying crunch. And for those who like a little heat, a dollop of sambal oelek or sriracha will take things to the next level.
Looking for variations? Consider adding a touch of sweetness with a drizzle of kecap manis (sweet soy sauce) after cooking. Or, for a more complex flavor profile, try incorporating a homemade spice paste (bumbu) made with ingredients like galangal, turmeric, and lemongrass. You can even create a seafood-centric version by adding calamari and mussels. The possibilities are endless!
Why You Should Try This Recipe:
I know there are countless recipes out there, but I truly believe this one captures the essence of authentic Nasi Goreng. It’s relatively simple to make, requiring minimal cooking skills, and it’s a fantastic way to use up leftover rice. Plus, it’s a crowd-pleaser that’s sure to impress your family and friends.
This recipe is more than just a set of instructions; it’s an invitation to explore a new culture and create something truly delicious. It’s a chance to unleash your inner chef and customize the dish to your own personal preferences. And most importantly, it’s a way to bring a little bit of joy and excitement into your kitchen.
So, what are you waiting for? Gather your ingredients, fire up your wok (or frying pan!), and get ready to experience the magic of Nasi Goreng. I promise you won’t be disappointed.
I’m so excited for you to try this recipe! Once you’ve made it, please come back and share your experience in the comments below. I’d love to hear about your variations, your favorite ingredients, and any tips or tricks you discovered along the way. Let’s create a community of Nasi Goreng enthusiasts and share our culinary adventures together! Happy cooking!
Nasi Goreng: The Ultimate Guide to Making Perfect Fried Rice
A flavorful Indonesian fried rice dish with a sweet and savory sauce, typically including kecap manis (sweet soy sauce), shrimp paste, and chili. Often served with a fried egg, chicken, and vegetables.
Ingredients
- 2 cups cooked rice, day-old is best
- 1 tablespoon vegetable oil
- 1 egg, lightly beaten
- 1/2 cup diced cooked chicken, shrimp, or tofu (optional)
- 1/4 cup chopped onion
- 1 clove garlic, minced
- 1 tablespoon sweet soy sauce (kecap manis)
- 1 teaspoon soy sauce
- 1/2 teaspoon shrimp paste (terasi) or fish sauce (optional)
- 1/4 teaspoon chili paste or sambal oelek (optional)
- Salt and pepper to taste
- Optional garnishes: sliced cucumber, tomato, fried egg, fried shallots, shrimp crackers
Instructions
- Heat oil in a large wok or frying pan over medium-high heat.
- Add the sliced shallots, garlic, and chili. Stir-fry for about 1-2 minutes until fragrant.
- Add the cooked rice, kecap manis, soy sauce, and shrimp paste (if using). Break up any clumps of rice and stir-fry to combine all ingredients well.
- Push the rice to one side of the wok and crack the egg into the empty space. Scramble the egg and then mix it into the rice.
- Add the diced chicken, shrimp, or other protein, and the chopped vegetables (carrots, peas, green onions). Stir-fry for another 2-3 minutes until heated through.
- Season with salt and pepper to taste.
- Serve hot, garnished with fried egg, sliced cucumber, and fried shallots (optional).
“`
Notes
- Leftover cooked rice works best for this recipe.
- Feel free to add other vegetables like carrots, peas, or green beans.
- Adjust the amount of chili paste to your spice preference.
- Garnish with a fried egg for a more traditional presentation.
“`


Leave a Comment