
Stove Top Chili: the ultimate comfort food, ready in under an hour! Imagine a chilly evening, the wind howling outside, and the aroma of savory spices filling your kitchen. That’s the magic of a good chili, and this recipe delivers it all without the fuss. Forget spending hours simmering a complex concoction; this Stove Top Chili recipe is designed for busy weeknights without sacrificing flavor.
Chili, in its various forms, has a rich history rooted in the American Southwest, particularly Texas. While its exact origins are debated, it’s widely believed to have evolved from the hearty, meat-based stews prepared by early settlers and cowboys. Over time, chili became a symbol of Texan cuisine, a dish that embodies warmth, community, and simple, satisfying flavors.
What makes chili so universally loved? It’s the perfect combination of textures tender ground beef, soft beans, and a rich, slightly spicy sauce. The customizable nature of chili also adds to its appeal. You can adjust the heat level, add your favorite toppings, and tailor it to your dietary preferences. But most importantly, its the sheer convenience of a one-pot meal that makes this Stove Top Chili a winner. So, gather your ingredients, and let’s get cooking!

Ingredients:
- 1 pound radishes, preferably small to medium size, washed and trimmed
- 1 cup white vinegar (5% acidity)
- 1 cup water
- 2 tablespoons granulated sugar
- 1 tablespoon kosher salt
- 2 cloves garlic, peeled and smashed
- 1 teaspoon black peppercorns
- ½ teaspoon red pepper flakes (optional, for heat)
- 1 bay leaf
- Optional additions: fresh dill sprigs, mustard seeds, coriander seeds, thinly sliced ginger
Preparing the Radishes:
- Wash and Trim: Begin by thoroughly washing the radishes under cold running water. Remove the green tops and the root ends. You can leave a small portion of the green stem attached for a more rustic look, if you prefer.
- Slice or Quarter: Decide how you want to prepare your radishes. For smaller radishes, you can simply halve or quarter them. For larger radishes, slice them into ¼-inch thick rounds. The thinner the slices, the quicker they will pickle. I personally prefer slicing them into rounds as it allows for maximum surface area to absorb the pickling brine.
- Pack into Jars: Find a clean, sterilized glass jar or container with a tight-fitting lid. A pint-sized jar should be sufficient for this recipe. Pack the sliced or quartered radishes tightly into the jar, leaving about ½ inch of headspace at the top. Don’t be afraid to really pack them in there; they will shrink slightly as they pickle.
Making the Pickling Brine:
- Combine Liquids: In a medium saucepan, combine the white vinegar and water. The ratio of vinegar to water is crucial for achieving the right balance of tartness and acidity. Using only vinegar will result in an overly sour pickle, while using too much water will dilute the flavor.
- Add Sweetener and Salt: Add the granulated sugar and kosher salt to the saucepan. The sugar helps to balance the acidity of the vinegar and adds a subtle sweetness to the pickles. The salt acts as a preservative and also enhances the flavor.
- Incorporate Aromatics: Add the smashed garlic cloves, black peppercorns, red pepper flakes (if using), and bay leaf to the saucepan. These aromatics will infuse the pickling brine with flavor and add depth to the finished pickles. Feel free to experiment with other spices and herbs, such as mustard seeds, coriander seeds, or fresh dill sprigs.
- Bring to a Boil: Place the saucepan over medium-high heat and bring the mixture to a boil, stirring occasionally to ensure that the sugar and salt dissolve completely. Once the mixture is boiling, reduce the heat to low and simmer for 5 minutes to allow the flavors to meld together. This simmering process is essential for creating a well-balanced and flavorful pickling brine.
- Remove from Heat: After simmering for 5 minutes, remove the saucepan from the heat and let the pickling brine cool slightly for a few minutes. This will prevent the hot brine from cracking the glass jar when you pour it over the radishes.
Pickling and Storing:
- Pour Brine Over Radishes: Carefully pour the warm pickling brine over the radishes in the jar, making sure to completely submerge them. Use a clean spoon or chopstick to gently press down on the radishes to release any trapped air bubbles. Ensure that the radishes are fully covered by the brine, as any exposed radishes may spoil.
- Seal the Jar: Place the lid on the jar and tighten it securely. Make sure the lid is properly sealed to prevent any air from entering the jar.
- Cool and Refrigerate: Let the jar cool to room temperature on the counter before transferring it to the refrigerator. This cooling process helps to create a vacuum seal inside the jar.
- Refrigerate for at Least 24 Hours: Refrigerate the pickled radishes for at least 24 hours, or preferably longer, to allow the flavors to fully develop. The longer they sit, the more flavorful they will become. I find that they taste best after about 3 days in the refrigerator.
- Storage: The pickled radishes can be stored in the refrigerator for up to 2 weeks. Be sure to keep them submerged in the brine to prevent them from drying out.
Tips and Variations:
- Radish Variety: While any type of radish can be pickled, I find that smaller, round radishes, such as cherry belle or French breakfast radishes, work best. These varieties tend to have a milder flavor and a more tender texture.
- Spice Level: Adjust the amount of red pepper flakes to your liking. If you prefer a milder pickle, omit the red pepper flakes altogether. For a spicier pickle, add more red pepper flakes or a pinch of cayenne pepper.
- Sweetness: You can adjust the amount of sugar to suit your taste. If you prefer a less sweet pickle, reduce the amount of sugar. You can also use other sweeteners, such as honey or maple syrup, in place of granulated sugar.
- Vinegar Options: While white vinegar is the most common choice for pickling, you can also use other types of vinegar, such as apple cider vinegar or rice vinegar. These vinegars will impart a slightly different flavor to the pickles.
- Herb and Spice Combinations: Get creative with your herb and spice combinations! Try adding fresh dill sprigs, mustard seeds, coriander seeds, thinly sliced ginger, or even a few slices of jalapeno pepper to the pickling brine.
- Quick Pickling: If you’re short on time, you can make a quick version of these pickled radishes by simply pouring the warm pickling brine over the radishes and refrigerating them for just a few hours. While they won’t be as flavorful as the longer-pickled version, they will still be delicious.
- Serving Suggestions: Pickled radishes are a versatile condiment that can be used in a variety of ways. Serve them as a side dish with grilled meats or fish, add them to salads or sandwiches, or use them as a topping for tacos or nachos. They also make a great addition to a cheese board or charcuterie platter.
- Sterilizing Jars: While not strictly necessary for refrigerator pickles, sterilizing your jars will help to prevent the growth of mold and bacteria and extend the shelf life of your pickles. To sterilize your jars, wash them thoroughly with hot, soapy water and then place them in a boiling water bath for 10 minutes. Alternatively, you can sterilize them in the oven by placing them on a baking sheet and baking them at 250°F for 20 minutes.
Troubleshooting:
- Radishes are too spicy: Some radishes can be quite spicy. If you find your radishes are too spicy, you can soak them in cold water for 30 minutes before pickling to help mellow out their flavor.
- Pickles are too sour: If your pickles are too sour, you can add a little more sugar to the pickling brine. Start with a small amount, such as 1 teaspoon, and taste the brine before adding more.
- Pickles are too salty: If your pickles are too salty, you can add a little more water to the pickling brine. Again, start with a small amount and taste the brine before adding more.
- Pickles are not crunchy: To ensure that your pickles stay crunchy, use fresh, firm radishes and avoid overcooking them during the pickling process. You can also add a grape leaf or a small piece of horseradish root to the jar, as these contain tannins that help to keep the pickles crisp.
- Brine is cloudy: A cloudy brine is usually caused by starch released from the radishes. This is perfectly normal and does not affect the safety or flavor of the pickles.
Nutritional Information (Approximate, per serving):
- Calories: 20-30
- Fat: 0g
- Sodium: 200-300mg
- Carbohydrates: 4-6g
- Fiber: 1-2g
- Protein: 0-1g
Enjoy your homemade pickled radishes! They are a delightful and tangy addition to any meal.
Conclusion:
So, there you have it! These Pickled Radishes are truly a revelation. They’re not just a side dish; they’re a flavor explosion waiting to happen, a crunchy, tangy, and slightly sweet addition that will elevate so many of your meals. I know, I know, radishes might not be the first thing that springs to mind when you’re thinking about pickling, but trust me on this one. The pickling process mellows out that sometimes overpowering radish bite and transforms them into something utterly addictive.
Why is this recipe a must-try? Well, first and foremost, it’s incredibly easy. We’re talking minimal effort for maximum flavor payoff. Secondly, it’s versatile. You can use these pickled gems in so many different ways. Think about adding them to tacos for a zesty crunch, layering them onto sandwiches for a tangy kick, or even using them as a vibrant garnish for salads. They’re also fantastic alongside grilled meats or fish, providing a refreshing counterpoint to richer flavors.
But the real magic lies in the taste. The combination of the radish’s natural peppery notes with the sweet and sour brine is simply divine. It’s a flavor profile that’s both familiar and exciting, and it’s guaranteed to wake up your taste buds. Plus, the beautiful pink hue of the radishes after pickling makes them a visually appealing addition to any plate.
Need some serving suggestions? I’m full of ideas! Try chopping them up and adding them to your favorite tuna or chicken salad for a surprising burst of flavor. They’re also amazing in banh mi sandwiches, adding a delightful tang that complements the other ingredients perfectly. And if you’re a fan of charcuterie boards, these Pickled Radishes are an absolute must-have. They pair beautifully with cheeses, cured meats, and crackers.
Looking for variations? Go wild! You can experiment with different spices in the brine. Add a pinch of red pepper flakes for a little heat, or a few cloves of garlic for a more savory flavor. You could even try adding some fresh herbs like dill or thyme to the jar for an extra layer of complexity. Another fun variation is to use different types of vinegar. Rice vinegar will give you a milder, sweeter flavor, while apple cider vinegar will add a bit more tang. The possibilities are endless!
I truly believe that these Pickled Radishes will become a staple in your kitchen. They’re a simple, delicious, and versatile condiment that will add a touch of magic to so many of your meals. So, what are you waiting for? Grab some radishes, whip up a batch of brine, and get pickling!
I’m so excited for you to try this recipe. Once you do, please, please, please come back and let me know what you think! Share your photos, your variations, and your serving suggestions in the comments below. I can’t wait to hear about your experience with these delightful Pickled Radishes. Happy pickling! I am sure you will love this recipe as much as I do.
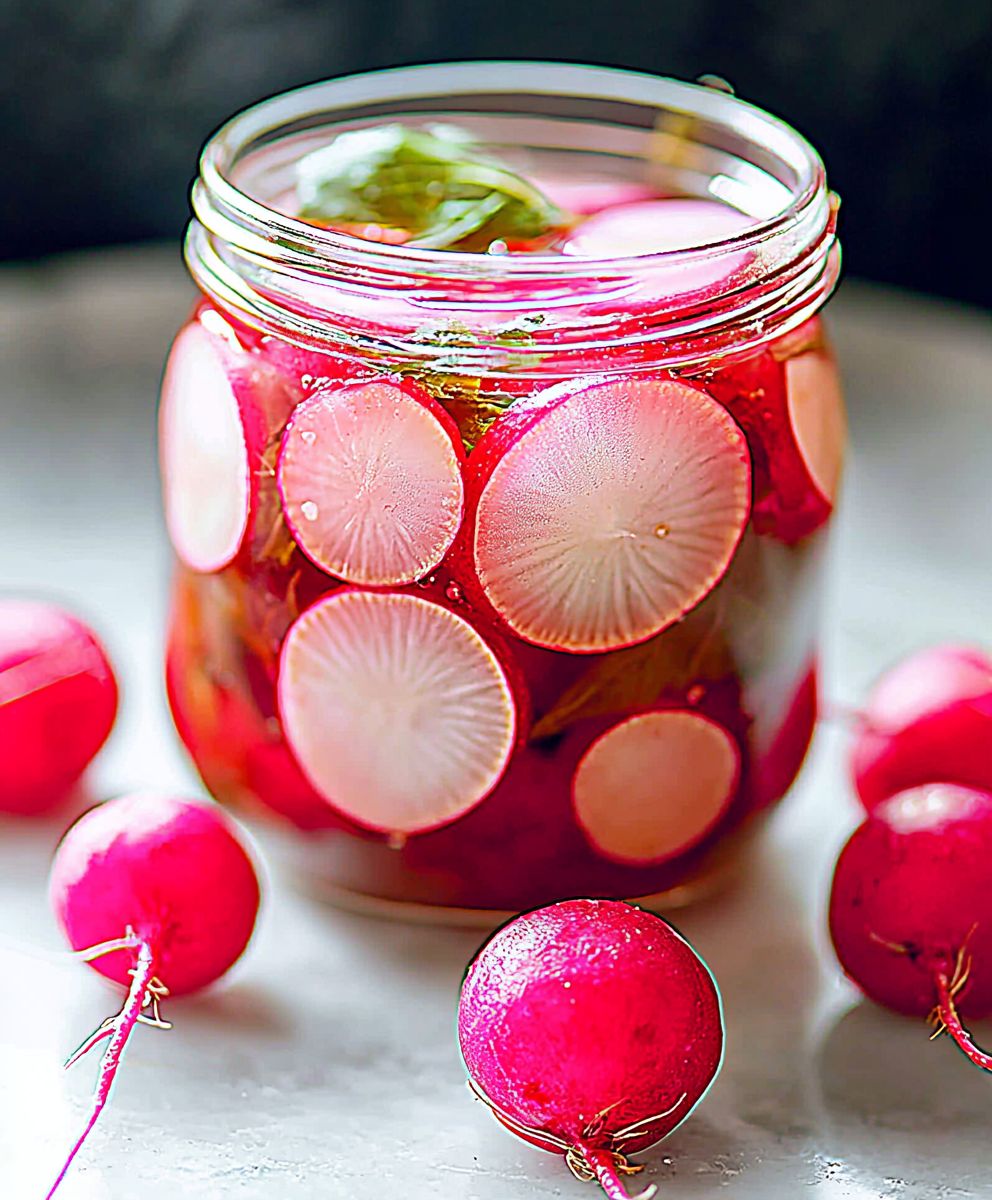
Pickled Radishes: The Ultimate Guide to Pickling Radishes
Tangy, crunchy, and vibrant pickled radishes. A quick and easy way to add a burst of flavor to salads, tacos, sandwiches, or enjoy as a snack.
Ingredients
- 1 bunch radishes, thinly sliced
- 1/2 cup white vinegar
- 1/4 cup water
- 2 tablespoons sugar
- 1 teaspoon salt
- 1/2 teaspoon red pepper flakes (optional)
Instructions
- Wash and trim the radishes.
- Thinly slice the radishes using a mandoline or sharp knife.
- Place the sliced radishes in a jar or container.
- In a saucepan, combine the vinegar, water, sugar, and salt.
- Bring the mixture to a boil, stirring until the sugar and salt are dissolved.
- Pour the hot brine over the radishes, making sure they are submerged.
- Add garlic cloves and peppercorns to the jar.
- Let the radishes cool to room temperature, then cover and refrigerate.
- The pickled radishes will be ready to eat in about 2 hours, but they taste best after a few days.
Notes
- For best results, use fresh radishes.
- You can adjust the amount of sugar and vinegar to suit your taste.
- These pickled radishes will keep in the refrigerator for up to 2 weeks.
“`


Leave a Comment