
Olive oil chocolate chip cookies: prepare to have your world rocked! Forget everything you thought you knew about this classic treat because we’re about to elevate it to a whole new level of deliciousness. Imagine sinking your teeth into a cookie that’s not only perfectly chewy and studded with melty chocolate chips, but also boasts a subtle, sophisticated flavor thanks to the magic of olive oil.
While the traditional chocolate chip cookie is a relatively modern invention, dating back to the 1930s, the use of olive oil in baking has a rich history, particularly in Mediterranean cultures. For centuries, olive oil has been a staple ingredient, lending its unique character to everything from breads to cakes. Now, we’re bringing that tradition to the beloved chocolate chip cookie, creating a delightful fusion of old and new.
So, why are olive oil chocolate chip cookies so irresistible? It’s all about the texture and taste. The olive oil creates a wonderfully tender crumb and a slightly nutty flavor that complements the sweetness of the chocolate perfectly. Plus, many find that using olive oil results in a cookie that’s less greasy and more satisfying than those made with butter. Get ready to experience a chocolate chip cookie that’s both familiar and utterly unique you won’t be disappointed!

Ingredients:
- For the Sweet Tart Crust:
- 1 1/2 cups (192g) all-purpose flour, plus more for dusting
- 1/2 cup (100g) granulated sugar
- 1/4 teaspoon salt
- 1/2 cup (1 stick, 113g) unsalted butter, cold and cubed
- 1 large egg yolk
- 2-4 tablespoons ice water
- For the Matcha Pastry Cream:
- 2 cups (473ml) whole milk
- 1/2 cup (100g) granulated sugar
- 1/4 cup (30g) cornstarch
- 1/4 teaspoon salt
- 4 large egg yolks
- 2 tablespoons unsalted butter
- 1 tablespoon matcha powder, sifted
- 1 teaspoon vanilla extract
- For the Raspberry Topping:
- 1 pint (about 2 cups) fresh raspberries
- 1/4 cup raspberry jam, for glazing
- Optional: powdered sugar, for dusting
Preparing the Sweet Tart Crust:
- Combine Dry Ingredients: In a large bowl, whisk together the flour, sugar, and salt. This ensures the salt and sugar are evenly distributed throughout the flour, which is crucial for a consistent crust.
- Cut in the Butter: Add the cold, cubed butter to the flour mixture. Using a pastry blender or your fingertips, cut the butter into the flour until the mixture resembles coarse crumbs. The key here is to work quickly so the butter stays cold. Cold butter creates flaky layers in the crust. If using your fingertips, rub the butter between your thumb and fingers, breaking it down into smaller pieces.
- Add the Egg Yolk: In a small bowl, lightly whisk the egg yolk. Add the egg yolk to the flour and butter mixture. The egg yolk adds richness and helps bind the dough together.
- Add Ice Water: Gradually add the ice water, one tablespoon at a time, mixing until the dough just comes together. Be careful not to overmix. Overmixing develops the gluten in the flour, resulting in a tough crust. The dough should be slightly shaggy but hold together when pressed.
- Form the Dough: Gently gather the dough into a disc. Wrap it tightly in plastic wrap and refrigerate for at least 30 minutes, or up to 2 hours. This chilling period allows the gluten to relax, making the dough easier to roll out and preventing it from shrinking during baking.
- Roll Out the Dough: On a lightly floured surface, roll out the dough to about 1/8 inch thickness. Rotate the dough as you roll to ensure an even thickness and prevent it from sticking to the surface. If the dough becomes too warm and sticky, return it to the refrigerator for a few minutes.
- Shape the Tartlets: Using a cookie cutter or a knife, cut out circles of dough slightly larger than the tartlet molds. Gently press the dough into the tartlet molds, ensuring it fits snugly against the sides and bottom. Trim any excess dough from the edges.
- Dock the Crusts: Prick the bottom of each tartlet crust several times with a fork. This prevents the crust from puffing up during baking.
- Chill Again: Place the tartlet molds in the refrigerator for another 15 minutes. This helps the crusts hold their shape during baking.
- Bake the Crusts: Preheat your oven to 375°F (190°C). Line the tartlet crusts with parchment paper and fill with pie weights or dried beans. This prevents the crusts from shrinking or losing their shape. Bake for 15-20 minutes, or until the edges are lightly golden brown.
- Remove Weights and Bake Further: Remove the parchment paper and pie weights. Bake for another 5-10 minutes, or until the crusts are golden brown all over. Keep a close eye on them to prevent burning.
- Cool Completely: Let the tartlet crusts cool completely in the molds before removing them. This prevents them from breaking.
Preparing the Matcha Pastry Cream:
- Infuse the Milk: In a medium saucepan, heat the milk over medium heat until it just begins to simmer. Do not boil.
- Whisk Egg Yolks and Sugar: In a separate bowl, whisk together the egg yolks, sugar, cornstarch, and salt until pale and smooth. This mixture is the base of your pastry cream and needs to be thoroughly combined to prevent lumps.
- Temper the Egg Yolks: Slowly pour a small amount of the hot milk into the egg yolk mixture, whisking constantly to prevent the eggs from scrambling. This process is called tempering and gradually raises the temperature of the egg yolks.
- Combine and Cook: Pour the tempered egg yolk mixture back into the saucepan with the remaining milk. Cook over medium heat, whisking constantly, until the mixture thickens and comes to a boil. Continue to cook for 1-2 minutes, whisking vigorously, to ensure the cornstarch is fully cooked and the pastry cream is thick and stable.
- Remove from Heat: Remove the saucepan from the heat. Stir in the butter, sifted matcha powder, and vanilla extract. The butter adds richness and shine, while the matcha powder provides the signature flavor and color. Sifting the matcha prevents clumps.
- Strain the Pastry Cream: Pour the pastry cream through a fine-mesh sieve into a clean bowl. This removes any lumps and ensures a smooth, silky texture.
- Cool and Chill: Cover the surface of the pastry cream with plastic wrap, pressing it directly onto the cream to prevent a skin from forming. Refrigerate for at least 2 hours, or preferably overnight, to allow the pastry cream to cool completely and thicken further.
Assembling the Raspberry Matcha Tartlets:
- Fill the Tartlet Crusts: Once the pastry cream is chilled and the tartlet crusts are cooled, spoon or pipe the matcha pastry cream into the tartlet crusts. Fill them evenly, leaving a little space at the top for the raspberries.
- Arrange the Raspberries: Arrange the fresh raspberries on top of the pastry cream in a decorative pattern. You can arrange them in concentric circles, rows, or any design you like.
- Glaze the Raspberries: In a small saucepan, gently heat the raspberry jam over low heat until it is melted and smooth. Brush the melted jam over the raspberries to give them a glossy shine and help them adhere to the pastry cream.
- Chill (Optional): Refrigerate the assembled tartlets for at least 30 minutes to allow the jam to set and the flavors to meld.
- Dust with Powdered Sugar (Optional): Just before serving, dust the tartlets with powdered sugar for an extra touch of elegance.
- Serve and Enjoy: Serve the raspberry matcha tartlets chilled and enjoy! These are best enjoyed within a day or two of assembly to maintain the freshness of the raspberries and the crispness of the tart crusts.
Conclusion:
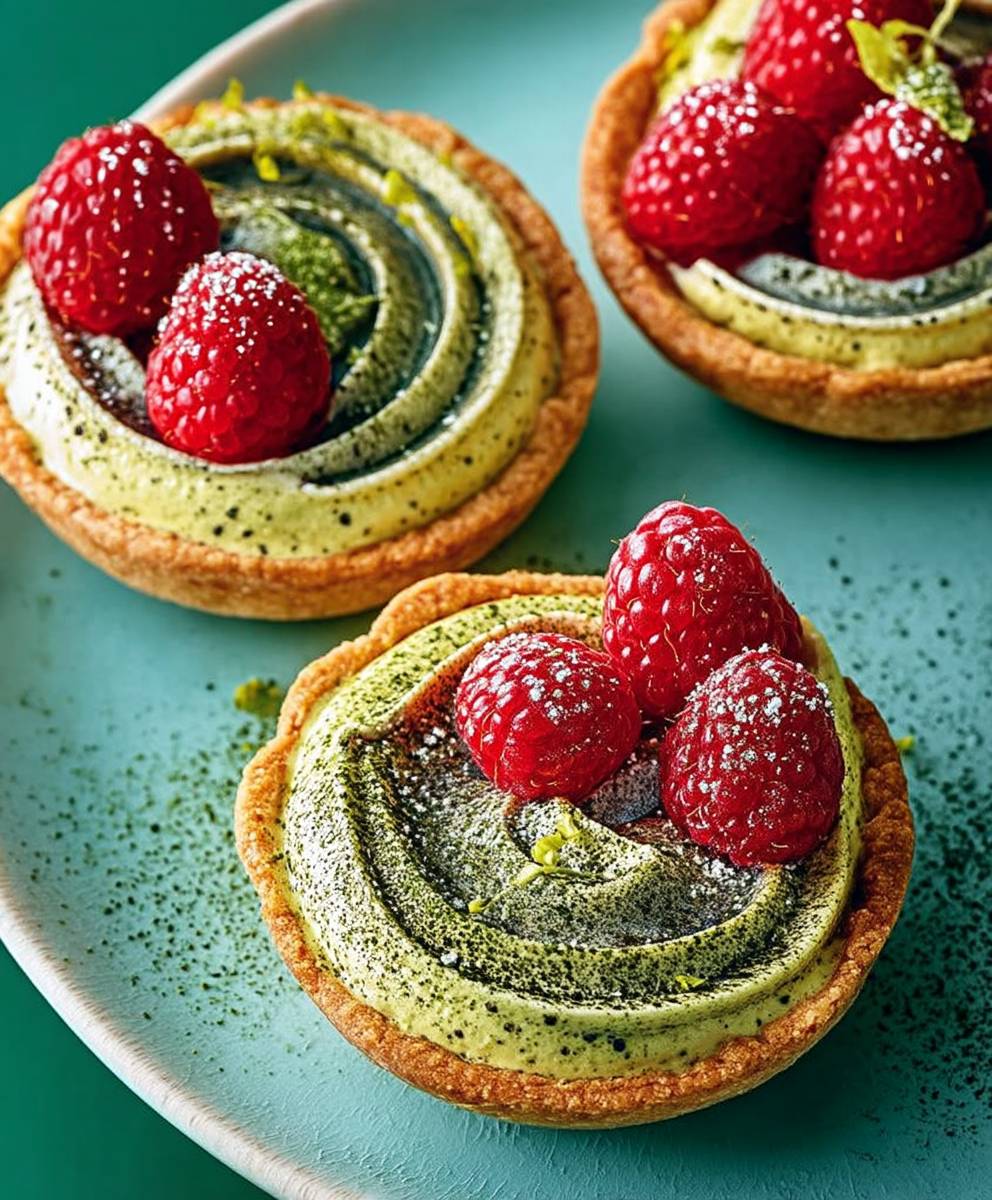
These Raspberry Matcha Tartlets are truly something special, and I wholeheartedly believe you need to try them. The delicate balance of sweet raspberries, the earthy depth of matcha, and the buttery, crumbly crust create a symphony of flavors and textures that will tantalize your taste buds. They’re not just a dessert; they’re an experience! The vibrant green of the matcha against the ruby red of the raspberries makes them visually stunning, perfect for impressing guests or simply treating yourself to something beautiful and delicious.
But beyond the aesthetics and the delightful taste, these tartlets are surprisingly easy to make. Don’t let the fancy name intimidate you! The recipe is straightforward, and I’ve included plenty of tips and tricks to ensure your success. From the simple press-in crust to the no-fuss matcha filling, each step is designed to be manageable, even for beginner bakers. And the best part? You can easily adapt them to your own preferences.
Think of these Raspberry Matcha Tartlets as a blank canvas for your culinary creativity. Want to amp up the raspberry flavor? Add a layer of raspberry jam to the bottom of the crust before pouring in the matcha filling. Craving a bit of crunch? Sprinkle chopped pistachios or almonds over the top before baking. For a richer, more decadent experience, try using white chocolate in the matcha filling instead of regular chocolate. The possibilities are endless!
Serving suggestions? These tartlets are perfect on their own, but they also pair beautifully with a scoop of vanilla ice cream or a dollop of whipped cream. A dusting of powdered sugar adds an elegant touch, and a few fresh raspberries scattered around the plate complete the presentation. They’re ideal for afternoon tea, a light dessert after dinner, or even a special brunch treat. Imagine serving these at your next gathering your guests will be raving about them for days!
And speaking of gatherings, these tartlets are also incredibly portable. They travel well, making them perfect for picnics, potlucks, or even a thoughtful gift for a friend. Just be sure to keep them cool to prevent the filling from melting.
I’ve poured my heart and soul into perfecting this recipe, and I’m confident that you’ll love it as much as I do. The unique combination of flavors and the ease of preparation make these Raspberry Matcha Tartlets a true winner. So, what are you waiting for? Gather your ingredients, preheat your oven, and get ready to embark on a delicious baking adventure.
I’m so excited for you to try this recipe and discover the magic of raspberry matcha tartlets for yourself. Once you’ve made them, I’d absolutely love to hear about your experience! Share your photos and stories on social media using [Your Hashtag Here], and let me know what variations you tried. Did you add pistachios? Did you use white chocolate? I’m eager to see your creations and learn from your culinary adventures. Happy baking!
Raspberry Matcha Tartlets: A Delicious & Easy Recipe
Mini matcha tartlets filled with a creamy matcha filling and topped with fresh, juicy raspberries.
Ingredients
- 1 1/2 cups all-purpose flour
- 1/2 cup almond flour
- 1/2 cup powdered sugar
- 1/4 teaspoon salt
- 1/2 cup (1 stick) cold unsalted butter, cut into cubes
- 1 large egg yolk
- 2 tablespoons ice water
- 1 cup heavy cream
- 3 large egg yolks
- 1/4 cup granulated sugar
- 2 tablespoons matcha powder
- 1 teaspoon vanilla extract
- 1 pint fresh raspberries
Instructions
- Preheat oven to 350°F (175°C).
- Make the crust: In a food processor, pulse together flour, sugar, and salt.
- Add cold butter and pulse until the mixture resembles coarse crumbs.
- Add egg yolk and cold water, and pulse until the dough just comes together.
- Press the dough into tartlet molds.
- Bake for 15-20 minutes, or until golden brown.
- Let cool completely.
- Make the matcha filling: In a bowl, whisk together heavy cream, sugar, matcha powder, and vanilla extract.
- Pour the matcha filling into the cooled tartlet shells.
- Refrigerate for at least 2 hours to allow the filling to set.
- Top with fresh raspberries before serving.
Notes
- For best results, use fresh, high-quality raspberries.
- Matcha powder can be adjusted to taste. Start with a smaller amount and add more if desired.
- The tartlets can be stored in the refrigerator for up to 2 days.
“`
Leave a Comment