
Focus Keyword: Homemade Chocolate Chip Cookies
“`html
Homemade Chocolate Chip Cookies: Is there anything more comforting than the aroma of warm, freshly baked cookies wafting through your home? I think not! These aren’t just any cookies; they’re a little piece of happiness, a sweet memory in the making, and the perfect treat to share (or not!) with loved ones.
The history of the chocolate chip cookie is surprisingly recent, dating back to 1938 when Ruth Graves Wakefield of the Toll House Inn in Massachusetts accidentally invented them. Legend has it she was trying to make chocolate butterscotch nut cookies, but when she ran out of baker’s chocolate, she substituted chopped Nestle semi-sweet chocolate, expecting it to melt. It didn’t, and the rest, as they say, is delicious history!
But why are homemade chocolate chip cookies so universally loved? It’s a combination of things, really. The satisfying crunch of the edges, the soft, chewy center, and the pockets of melted chocolate create a symphony of textures and flavors that’s simply irresistible. Plus, they’re incredibly versatile! You can customize them with different types of chocolate, nuts, spices, or even a sprinkle of sea salt for that perfect sweet-and-salty balance. And let’s be honest, the process of making them, from mixing the dough to watching them bake in the oven, is therapeutic in itself. So, grab your apron, preheat your oven, and let’s get baking the best chocolate chip cookies you’ve ever tasted!
“`

Ingredients:
- For the Cake:
- 2 ½ cups (300g) all-purpose flour
- 1 teaspoon baking soda
- 1 teaspoon baking powder
- 1 teaspoon salt
- 2 tablespoons unsweetened cocoa powder
- 1 ½ cups (300g) granulated sugar
- ½ cup (120ml) vegetable oil
- 1 cup (240ml) buttermilk, room temperature
- 2 large eggs, room temperature
- 2 teaspoons vanilla extract
- 1 ounce (28g) red food coloring (liquid or gel)
- 1 teaspoon white vinegar
- For the Cream Cheese Frosting:
- 8 ounces (226g) cream cheese, softened
- ½ cup (113g) unsalted butter, softened
- 4 cups (480g) powdered sugar, sifted
- 2 teaspoons vanilla extract
- 2-4 tablespoons milk or heavy cream (optional, for consistency)
Preparing the Cake Batter:
- Preheat and Prepare: First things first, preheat your oven to 350°F (175°C). Grease and flour two 9-inch round cake pans. You can also line the bottoms with parchment paper rounds for extra insurance against sticking. This step is crucial for easy cake removal later!
- Combine Dry Ingredients: In a large bowl, whisk together the flour, baking soda, baking powder, salt, and cocoa powder. Make sure everything is evenly distributed. This ensures a consistent texture and flavor throughout the cake.
- Cream Wet Ingredients: In a separate large bowl (or the bowl of your stand mixer), combine the granulated sugar and vegetable oil. Beat them together until well combined and slightly lightened in color. This usually takes about 2-3 minutes.
- Add Eggs and Vanilla: Add the eggs one at a time, beating well after each addition. Then, stir in the vanilla extract. The eggs should be fully incorporated into the sugar and oil mixture.
- Alternate Wet and Dry: Gradually add the dry ingredients to the wet ingredients, alternating with the buttermilk. Begin and end with the dry ingredients. So, add about one-third of the dry ingredients, then half of the buttermilk, then another third of the dry ingredients, the remaining buttermilk, and finally the last third of the dry ingredients. Mix until just combined after each addition. Be careful not to overmix! Overmixing develops the gluten in the flour, which can result in a tough cake.
- Add Color and React: In a small bowl, whisk together the red food coloring and white vinegar. This step is important because the vinegar reacts with the baking soda to create a light and fluffy texture. Add this mixture to the batter and mix until evenly colored.
Baking the Cake:
- Divide and Bake: Divide the batter evenly between the prepared cake pans. Spread the batter evenly in each pan.
- Bake: Bake for 30-35 minutes, or until a wooden skewer inserted into the center comes out clean. The baking time may vary depending on your oven, so keep an eye on the cakes.
- Cool in Pans: Let the cakes cool in the pans for 10-15 minutes before inverting them onto a wire rack to cool completely. This prevents the cakes from breaking while they are still warm and delicate.
Preparing the Cream Cheese Frosting:
- Cream Cheese and Butter: In a large bowl (or the bowl of your stand mixer), beat the softened cream cheese and butter together until smooth and creamy. Make sure the cream cheese and butter are truly softened; otherwise, you’ll end up with lumps in your frosting.
- Add Powdered Sugar: Gradually add the sifted powdered sugar, one cup at a time, beating well after each addition. Sifting the powdered sugar is essential for a smooth, lump-free frosting.
- Add Vanilla: Stir in the vanilla extract.
- Adjust Consistency: If the frosting is too thick, add milk or heavy cream, one tablespoon at a time, until you reach your desired consistency. The frosting should be smooth, creamy, and easy to spread.
Assembling the Cake:
- Level the Cakes (Optional): If your cakes have a dome on top, use a serrated knife to carefully level them. This will ensure that your cake is even and stable.
- First Layer of Frosting: Place one cake layer on a serving plate or cake stand. Spread a generous layer of cream cheese frosting evenly over the top.
- Second Layer: Carefully place the second cake layer on top of the frosting.
- Frost the Cake: Frost the entire cake with the remaining cream cheese frosting. You can create a smooth finish or add swirls and decorative touches with a spatula or piping bag.
- Chill (Optional): For best results, chill the cake in the refrigerator for at least 30 minutes before serving. This allows the frosting to set and makes the cake easier to slice.
- Garnish (Optional): Garnish with red velvet cake crumbs, fresh berries, or chocolate shavings, if desired.
Tips for Success:
- Room Temperature Ingredients: Using room temperature ingredients, especially the buttermilk, eggs, cream cheese, and butter, is crucial for a smooth and well-emulsified batter and frosting. Room temperature ingredients combine more easily and create a more stable emulsion, resulting in a better texture.
- Don’t Overmix: Overmixing the cake batter develops the gluten in the flour, which can lead to a tough cake. Mix until just combined after each addition.
- Sift Powdered Sugar: Sifting the powdered sugar is essential for a smooth, lump-free frosting.
- Adjust Sweetness: If you prefer a less sweet frosting, you can reduce the amount of powdered sugar slightly.
- Storage: Store the cake in the refrigerator for up to 3 days. Let it come to room temperature before serving for the best flavor and texture.
- Cake Flour Substitute: If you don’t have cake flour, you can make your own substitute. For every cup of all-purpose flour, remove 2 tablespoons of flour and replace it with 2 tablespoons of cornstarch. This will help to create a more tender cake.
- Buttermilk Substitute: If you don’t have buttermilk, you can make your own substitute. Add 1 tablespoon of white vinegar or lemon juice to a liquid measuring cup, then fill the cup with milk to the 1-cup line. Let it sit for 5 minutes before using.
Variations:
- Chocolate Chips: Add chocolate chips to the cake batter for an extra touch of chocolate flavor.
- Nuts: Add chopped nuts, such as pecans or walnuts, to the cake batter or frosting for added texture and flavor.
- Red Velvet Cupcakes: This recipe can also be used to make red velvet cupcakes. Simply fill cupcake liners about two-thirds full and bake for 18-20 minutes, or until a wooden skewer inserted into the center comes out clean.
- Different Frosting: If you’re not a fan of cream cheese frosting, you can use a different frosting, such as vanilla buttercream or chocolate ganache.
- Ombre Cake: Create a stunning ombre effect by dividing the frosting into three bowls and tinting each bowl a different shade of pink or red. Then, frost the cake with the different shades, creating a gradient effect.
Troubleshooting:
- Cake is Dry: If your cake is dry, it could be due to overbaking or using too much flour. Make sure to measure the flour accurately and bake the cake until a wooden skewer inserted into the center comes out clean.
- Cake is Dense: If your cake is dense, it could be due to overmixing the batter or not using enough leavening agents (baking soda and baking powder). Make sure to mix the batter until just combined and use fresh baking soda and baking powder.
- Frosting is Lumpy: If your frosting is lumpy, it could be due to using cold cream cheese or butter. Make sure the cream cheese and butter are softened to room temperature before using. Sifting the powdered sugar also helps to prevent lumps.
- Frosting is Too Thin: If your frosting is too thin, add more powdered sugar, one tablespoon at a time, until you reach your desired consistency.
- Frosting is Too Thick: If your frosting is too thick,
Conclusion:
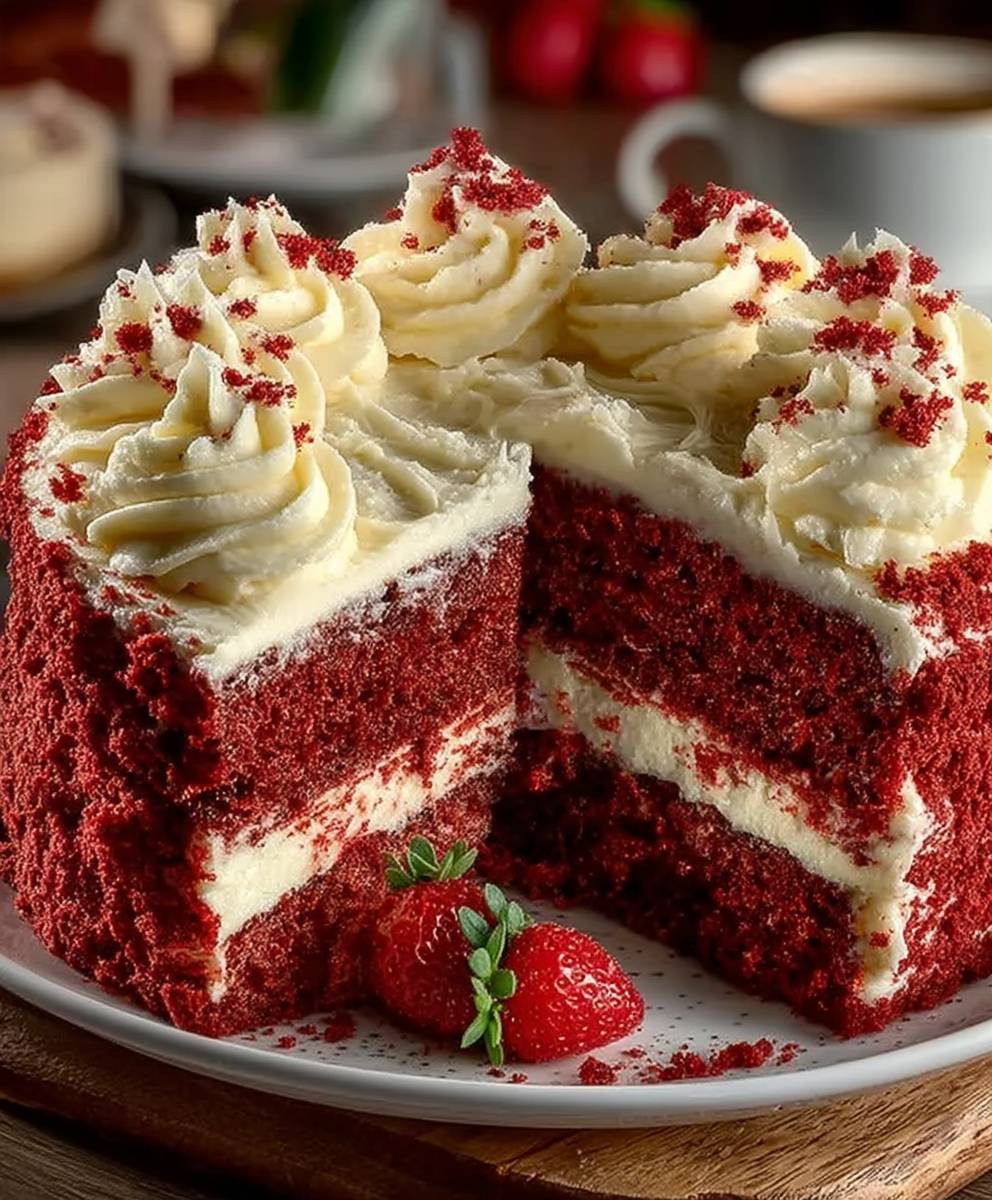
This Red Velvet Buttermilk Cake isn’t just another cake recipe; it’s an experience. The incredibly moist crumb, the subtle tang of buttermilk perfectly balanced with the cocoa, and that iconic red hue all come together to create a dessert that’s both comforting and impressive. Trust me, once you take that first bite, you’ll understand why I’m so passionate about this recipe. It’s a showstopper that’s surprisingly easy to make, making it perfect for both seasoned bakers and those just starting their baking journey.
But what truly elevates this cake is its versatility. While the classic cream cheese frosting is a match made in heaven, don’t be afraid to experiment! For a lighter touch, try a simple vanilla glaze. Or, if you’re feeling adventurous, a tangy lemon buttercream would provide a delightful contrast to the richness of the cake.
Serving suggestions are endless! This Red Velvet Buttermilk Cake is, of course, fantastic on its own with a cup of coffee or tea. But you can also dress it up for special occasions. Consider adding fresh berries like raspberries or strawberries for a pop of color and flavor. A dusting of cocoa powder or a sprinkle of edible glitter can also add a touch of elegance. For a truly decadent treat, serve it warm with a scoop of vanilla ice cream or a dollop of whipped cream.
And don’t limit yourself to just cake! The batter can also be used to make cupcakes, perfect for parties or individual desserts. Simply adjust the baking time accordingly. You could even use the cake layers to create a stunning trifle, layering them with whipped cream, berries, and chocolate shavings.
I’ve poured my heart and soul into perfecting this recipe, and I’m confident that you’ll love it as much as I do. It’s more than just a cake; it’s a celebration of flavor, texture, and tradition. It’s the kind of cake that brings people together, sparks conversations, and creates lasting memories.
So, what are you waiting for? Preheat your oven, gather your ingredients, and get ready to bake the most delicious Red Velvet Buttermilk Cake you’ve ever tasted. I promise you won’t regret it!
And most importantly, I want to hear about your experience! Did you try the classic cream cheese frosting, or did you opt for a different variation? Did you add any special touches of your own? Share your photos, tips, and stories in the comments below. I can’t wait to see your creations and hear how this recipe has become a part of your baking repertoire. Happy baking! Let me know if you have any questions, I’m always happy to help. I am sure that this recipe will become a family favorite.
Red Velvet Buttermilk Cake: The Ultimate Recipe & Baking Guide
A moist and tangy red velvet cake made with buttermilk and a hint of cocoa, topped with a classic cream cheese frosting.
Ingredients
- 2 1/2 cups (315g) all-purpose flour
- 1 teaspoon baking soda
- 1 teaspoon baking powder
- 1 teaspoon salt
- 2 tablespoons unsweetened cocoa powder
- 1 1/2 cups (300g) granulated sugar
- 1/2 cup (120ml) vegetable oil
- 1 cup (240ml) buttermilk
- 2 large eggs
- 2 teaspoons vanilla extract
- 1 teaspoon white vinegar
- 1 ounce (28g) red food coloring
Instructions
- Preheat oven to 350°F (175°C). Grease and flour a 9×13 inch baking pan.
- In a large bowl, whisk together flour, sugar, cocoa powder, baking soda, and salt.
- In a separate bowl, combine buttermilk, oil, eggs, and vanilla extract.
- Add the wet ingredients to the dry ingredients and mix until just combined.
- In a small bowl, mix together vinegar and red food coloring. Add this mixture to the batter and stir until well combined.
- Pour the batter into the prepared baking pan and bake for 30-35 minutes, or until a wooden skewer inserted into the center comes out clean.
- Let the cake cool in the pan for 10 minutes before inverting it onto a wire rack to cool completely.
- While the cake is cooling, prepare the cream cheese frosting. In a large bowl, beat together cream cheese and butter until smooth and creamy.
- Gradually add powdered sugar, beating until smooth.
- Stir in vanilla extract.
- Once the cake is completely cool, frost it with the cream cheese frosting.
Notes
- For best results, use room temperature ingredients.
- Cake layers can be baked a day ahead, cooled, wrapped tightly, and stored at room temperature.
- Frosting can be made a day ahead and stored in the refrigerator. Let come to room temperature and rewhip before using.

Leave a Comment