
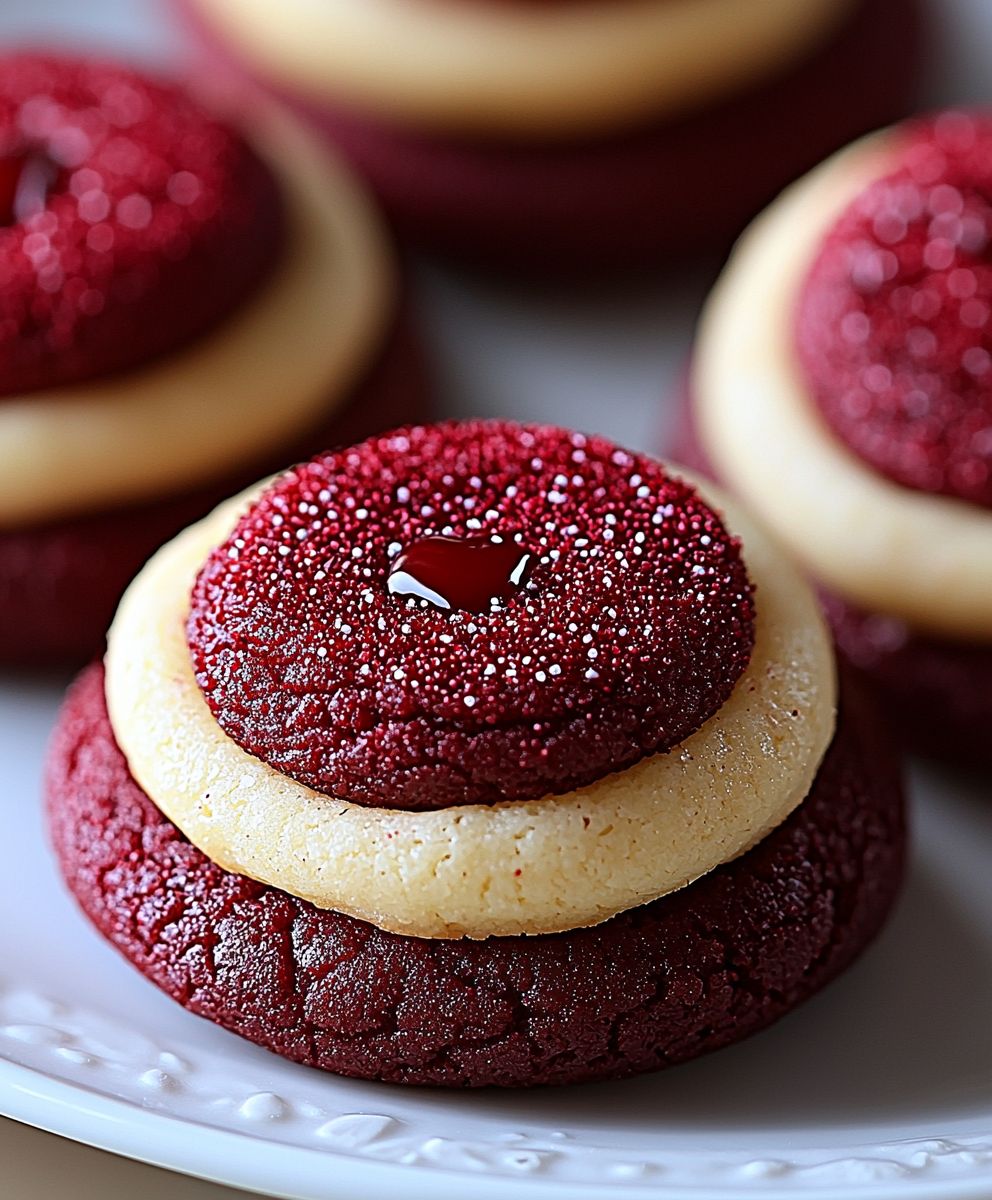
Red Velvet Cookies: Prepare to fall in love with the most decadent, melt-in-your-mouth cookies you’ve ever tasted! Imagine sinking your teeth into a soft, chewy cookie with a subtle cocoa flavor, a hint of tanginess, and that iconic vibrant red hue. These aren’t just cookies; they’re a delightful experience.
The allure of red velvet extends far beyond cakes, and these cookies perfectly capture that magic. While the exact origins are debated, red velvet’s popularity soared in the early 20th century, often associated with upscale hotels and restaurants. The distinctive color was originally achieved through a chemical reaction between cocoa powder and acidic ingredients like buttermilk, creating a reddish-brown tint. Today, we often enhance the color with food coloring, but the essence remains the same: a touch of elegance and a whole lot of deliciousness.
What makes red velvet cookies so irresistible? It’s the perfect balance of flavors and textures. The slight tang from the buttermilk or vinegar cuts through the richness of the chocolate, creating a complex and satisfying taste. The soft, almost cake-like texture is incredibly comforting, making them perfect for a cozy night in or a special occasion. Plus, they’re surprisingly easy to make, meaning you can whip up a batch whenever the craving strikes. Get ready to bake some happiness!

Ingredients:
- 2 1/4 cups all-purpose flour
- 1 teaspoon baking soda
- 1 teaspoon baking powder
- 1/2 teaspoon salt
- 1 cup (2 sticks) unsalted butter, softened
- 1 1/2 cups granulated sugar
- 2 large eggs
- 1 teaspoon vanilla extract
- 1 ounce (2 tablespoons) red food coloring
- 1 tablespoon unsweetened cocoa powder
- 1 teaspoon white vinegar
- 1 cup buttermilk
- 1 cup white chocolate chips
Preparing the Dough:
- Combine Dry Ingredients: In a medium bowl, whisk together the flour, baking soda, baking powder, and salt. Make sure everything is evenly distributed. This ensures that the cookies will rise properly and have a consistent texture. Set aside for later.
- Cream Butter and Sugar: In a large bowl (or the bowl of a stand mixer), cream together the softened butter and granulated sugar until light and fluffy. This usually takes about 3-5 minutes. The mixture should be pale and airy. Scraping down the sides of the bowl occasionally helps to ensure even mixing. This step is crucial for creating a tender cookie.
- Add Eggs and Vanilla: Beat in the eggs one at a time, mixing well after each addition. Then, stir in the vanilla extract. Make sure the eggs are fully incorporated before adding the vanilla.
- Make the Red Velvet Mixture: In a small bowl, whisk together the red food coloring, cocoa powder, and white vinegar. This creates a vibrant red color and helps to activate the cocoa powder, enhancing the flavor. The vinegar also reacts with the baking soda to create a slightly tangy flavor that is characteristic of red velvet.
- Add Red Velvet Mixture to Butter Mixture: Add the red velvet mixture to the creamed butter and sugar, and beat until well combined. The mixture should be a uniform red color.
- Alternate Adding Dry and Wet Ingredients: Gradually add the dry ingredients to the wet ingredients, alternating with the buttermilk. Begin and end with the dry ingredients. So, add about 1/3 of the dry ingredients, then 1/2 of the buttermilk, then another 1/3 of the dry ingredients, then the remaining buttermilk, and finally the remaining dry ingredients. Mix until just combined. Be careful not to overmix, as this can result in tough cookies. Overmixing develops the gluten in the flour, leading to a less tender cookie.
- Stir in White Chocolate Chips: Gently fold in the white chocolate chips. Make sure they are evenly distributed throughout the dough.
- Chill the Dough: Cover the bowl with plastic wrap and chill the dough in the refrigerator for at least 1 hour, or preferably 2-3 hours. Chilling the dough helps to prevent the cookies from spreading too much during baking and allows the flavors to meld together. You can even chill the dough overnight for an even better flavor and texture.
Baking the Cookies:
- Preheat Oven: Preheat your oven to 350°F (175°C). Line baking sheets with parchment paper or silicone baking mats. Parchment paper prevents the cookies from sticking and makes cleanup easier. Silicone baking mats provide even heat distribution and also prevent sticking.
- Scoop Dough: Use a cookie scoop or spoon to drop rounded tablespoons of dough onto the prepared baking sheets, leaving about 2 inches between each cookie. This allows the cookies to spread without running into each other.
- Bake: Bake for 9-11 minutes, or until the edges are set and the centers are still slightly soft. The baking time may vary depending on your oven, so keep a close eye on the cookies.
- Cool: Remove the baking sheets from the oven and let the cookies cool on the baking sheets for a few minutes before transferring them to a wire rack to cool completely. This prevents the cookies from breaking apart while they are still warm and soft.
Tips and Tricks for Perfect Red Velvet Cookies:
- Use Room Temperature Ingredients: Make sure your butter and eggs are at room temperature. This helps them to emulsify properly, resulting in a smoother batter and a more tender cookie.
- Don’t Overmix: Overmixing the dough can develop the gluten in the flour, leading to tough cookies. Mix until just combined.
- Chill the Dough: Chilling the dough is essential for preventing the cookies from spreading too much during baking. It also allows the flavors to meld together.
- Use High-Quality Food Coloring: For a vibrant red color, use a high-quality gel food coloring. Liquid food coloring may not provide as intense of a color.
- Adjust Baking Time: The baking time may vary depending on your oven. Keep a close eye on the cookies and adjust the baking time as needed.
- Storage: Store the cookies in an airtight container at room temperature for up to 3 days.
- Freezing: You can freeze the cookie dough for up to 2 months. Scoop the dough onto a baking sheet and freeze until solid. Then, transfer the frozen dough balls to a freezer bag. When ready to bake, bake from frozen, adding a few extra minutes to the baking time. You can also freeze the baked cookies for up to 2 months. Wrap them tightly in plastic wrap and then place them in a freezer bag.
Variations:
- Cream Cheese Frosting: For an extra decadent treat, frost the cookies with cream cheese frosting.
- Nuts: Add chopped pecans or walnuts to the dough for a nutty flavor and texture.
- Chocolate Chunks: Substitute some of the white chocolate chips with dark chocolate chunks for a richer flavor.
- Red Velvet Crinkle Cookies: Before baking, roll the dough balls in powdered sugar for a classic crinkle cookie look.
Troubleshooting:
- Cookies are too flat: This could be due to using butter that is too soft, not chilling the dough enough, or overmixing the dough. Make sure your butter is softened but not melted, chill the dough for at least 1 hour, and avoid overmixing.
- Cookies are too dry: This could be due to overbaking or using too much flour. Make sure to bake the cookies for the correct amount of time and measure the flour accurately.
- Cookies are too tough: This is usually caused by overmixing the dough. Mix until just combined.
- Cookies are not red enough: Use a high-quality gel food coloring for a vibrant red color. You may also need to add a little more food coloring than the recipe calls for.
Why These Cookies Are the Best:
These red velvet cookies are the perfect combination of soft, chewy, and slightly tangy. The vibrant red color and the sweet white chocolate chips make them a visually appealing and delicious treat. The chilling step is key to preventing excessive spreading, and the use of buttermilk and vinegar gives them that signature red velvet flavor. I’ve made these cookies countless times, and they always disappear quickly! They’re perfect for holidays, parties, or just a special treat for yourself. The recipe is easy to follow, and the results are always impressive. Plus, the variations allow you to customize the cookies to your liking. Whether you’re a seasoned baker or a beginner, you’ll be able to make these cookies with ease. The secret is in the details: using room temperature ingredients, not overmixing the dough, and chilling it properly. Follow these tips, and you’ll have perfect red velvet cookies every time!
Enjoy your delicious homemade Red Velvet Cookies!
Conclusion:
So there you have it! These Red Velvet Cookies are more than just a treat; they’re an experience. The perfect balance of that subtle cocoa flavor, the tangy cream cheese frosting, and the vibrant red hue makes them utterly irresistible. Honestly, if you’re looking for a cookie that’s both visually stunning and incredibly delicious, you absolutely have to give this recipe a try. Why are these a must-try? Well, beyond the amazing taste, they’re surprisingly easy to make. I know red velvet can sometimes seem intimidating, but this recipe breaks it down into simple, manageable steps. Plus, they’re a guaranteed crowd-pleaser. Whether you’re baking for a holiday gathering, a birthday party, or just a cozy night in, these cookies are sure to disappear fast. They’re also incredibly versatile. Speaking of versatility, let’s talk serving suggestions and variations! For a classic presentation, serve them chilled with a tall glass of milk or a steaming mug of hot chocolate. The cold cookies against a warm drink? Perfection! But don’t stop there. You could crumble these cookies over ice cream for a decadent dessert topping. Or, get creative and use them as the base for mini red velvet cheesecakes in individual ramekins. If you’re feeling adventurous, try these variations: * White Chocolate Chips: Add a handful of white chocolate chips to the dough for an extra touch of sweetness and creaminess. The white chocolate complements the red velvet flavor beautifully. * Nuts: Chopped pecans or walnuts would add a delightful crunch and nutty flavor. Toast them lightly before adding them to the dough for an even richer taste. * Espresso Powder: A teaspoon of espresso powder enhances the cocoa flavor and adds a subtle depth to the cookies. * Different Frostings: While the cream cheese frosting is a classic, feel free to experiment with other frostings. A vanilla buttercream or even a chocolate ganache would be delicious alternatives. You could even tint the frosting a different color for a fun twist! * Cookie Sandwiches: Make cookie sandwiches by filling two cookies with a generous layer of frosting. This is a fun and festive way to serve them. I truly believe that baking is all about sharing joy, and these Red Velvet Cookies are the perfect way to do just that. They’re a little bit of happiness in every bite. I’ve poured my heart into perfecting this recipe, and I’m so excited for you to try it. So, what are you waiting for? Preheat that oven, gather your ingredients, and get ready to bake some magic! I’m confident that you’ll love these cookies as much as I do. And please, please, please let me know how they turn out! Share your photos, your variations, and your baking stories in the comments below. I can’t wait to hear about your experience making these delicious treats. Happy baking! I hope you enjoy this Red Velvet Cookies recipe as much as I do! Print
Red Velvet Cookies: The Ultimate Guide to Baking Perfection
- Total Time: 90 minutes
- Yield: 24 cookies 1x
Description
Soft, chewy red velvet cookies with sweet white chocolate chips. Perfect for holidays, parties, or a special treat!
Ingredients
- 2 1/4 cups all-purpose flour
- 1 teaspoon baking soda
- 1 teaspoon baking powder
- 1/2 teaspoon salt
- 1 cup (2 sticks) unsalted butter, softened
- 1 1/2 cups granulated sugar
- 2 large eggs
- 1 teaspoon vanilla extract
- 1 ounce (2 tablespoons) red food coloring
- 1 tablespoon unsweetened cocoa powder
- 1 teaspoon white vinegar
- 1 cup buttermilk
- 1 cup white chocolate chips
Instructions
- Combine Dry Ingredients: In a medium bowl, whisk together the flour, baking soda, baking powder, and salt. Set aside.
- Cream Butter and Sugar: In a large bowl, cream together the softened butter and granulated sugar until light and fluffy (3-5 minutes).
- Add Eggs and Vanilla: Beat in the eggs one at a time, mixing well after each addition. Stir in the vanilla extract.
- Make the Red Velvet Mixture: In a small bowl, whisk together the red food coloring, cocoa powder, and white vinegar.
- Add Red Velvet Mixture to Butter Mixture: Add the red velvet mixture to the creamed butter and sugar, and beat until well combined.
- Alternate Adding Dry and Wet Ingredients: Gradually add the dry ingredients to the wet ingredients, alternating with the buttermilk. Begin and end with the dry ingredients. Mix until just combined.
- Stir in White Chocolate Chips: Gently fold in the white chocolate chips.
- Chill the Dough: Cover and chill the dough in the refrigerator for at least 1 hour (preferably 2-3 hours).
- Preheat Oven: Preheat your oven to 350°F (175°C). Line baking sheets with parchment paper.
- Scoop Dough: Use a cookie scoop or spoon to drop rounded tablespoons of dough onto the prepared baking sheets, leaving about 2 inches between each cookie.
- Bake: Bake for 9-11 minutes, or until the edges are set and the centers are still slightly soft.
- Cool: Remove from oven and let cool on baking sheets for a few minutes before transferring to a wire rack to cool completely.
Notes
- Use room temperature ingredients for best results.
- Don’t overmix the dough.
- Chilling the dough is essential to prevent spreading.
- Use high-quality gel food coloring for a vibrant red color.
- Store cookies in an airtight container at room temperature for up to 3 days.
- Freeze cookie dough or baked cookies for up to 2 months.
- For an extra decadent treat, frost the cookies with cream cheese frosting.
- Add chopped pecans or walnuts to the dough for a nutty flavor and texture.
- Substitute some of the white chocolate chips with dark chocolate chunks for a richer flavor.
- Before baking, roll the dough balls in powdered sugar for a classic crinkle cookie look.
- Prep Time: 20 minutes
- Cook Time: 9 minutes


Leave a Comment