
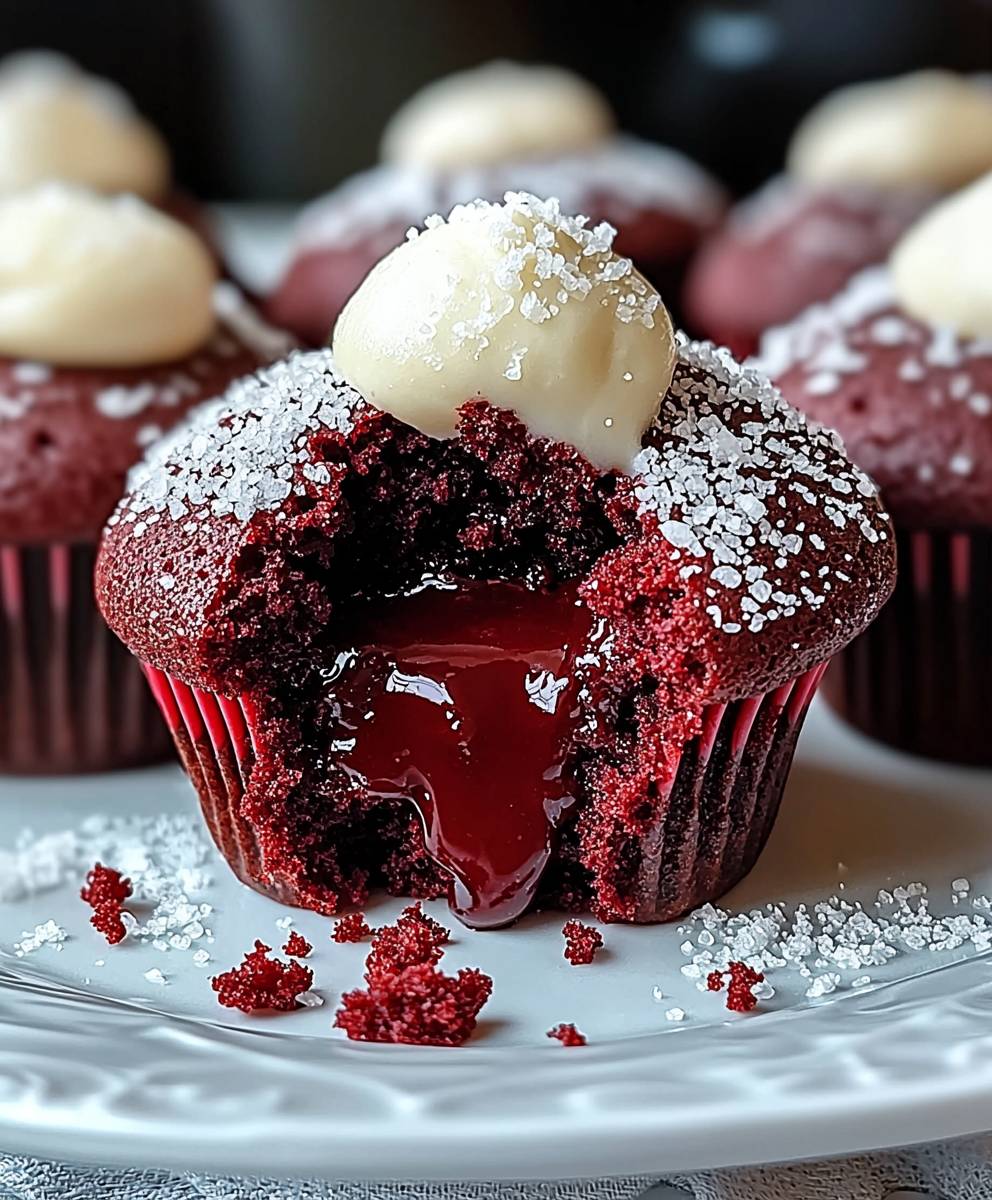
Red Velvet Lava Cupcakes: Prepare to be utterly seduced! Imagine sinking your spoon into a warm, intensely chocolatey red velvet cupcake, only to be met with a molten river of creamy, decadent filling. It’s a dessert experience that’s both visually stunning and incredibly satisfying, and trust me, it’s easier to make than you might think!
Red velvet, with its intriguing history, has always held a special place in the hearts (and stomachs) of dessert lovers. Some trace its origins back to the Depression era, where bakers used beet juice to enhance the color and moisture of their cakes. Others believe it originated in the South, becoming a symbol of elegance and indulgence. Regardless of its exact beginnings, the combination of cocoa, buttermilk, and a hint of tang creates a flavor profile that’s uniquely captivating.
But what makes these red velvet lava cupcakes so irresistible? It’s the delightful contrast of textures and temperatures. The slightly tangy, moist cupcake provides the perfect vessel for the warm, flowing lava center. People adore this dish because it offers a touch of elegance without requiring hours in the kitchen. It’s the perfect treat for a special occasion, a cozy night in, or simply when you need a little something to brighten your day. The rich, velvety texture and the burst of molten chocolate are a guaranteed crowd-pleaser. So, let’s get baking and create some magic!

Ingredients:
- For the Red Velvet Cupcakes:
- 1 1/2 cups all-purpose flour
- 1 teaspoon baking soda
- 1 tablespoon unsweetened cocoa powder
- 1/2 teaspoon salt
- 1 cup granulated sugar
- 1/2 cup (1 stick) unsalted butter, softened
- 2 large eggs
- 1 teaspoon vanilla extract
- 1 cup buttermilk
- 1 tablespoon red food coloring
- 1 teaspoon white vinegar
- For the Molten Chocolate Lava Center:
- 4 ounces bittersweet chocolate, finely chopped
- 4 tablespoons (1/2 stick) unsalted butter
- 2 large egg yolks
- 2 tablespoons granulated sugar
- 1 tablespoon all-purpose flour
- Pinch of salt
- For the Cream Cheese Frosting (Optional):
- 4 ounces cream cheese, softened
- 1/4 cup (1/2 stick) unsalted butter, softened
- 2 cups powdered sugar
- 1 teaspoon vanilla extract
- 1-2 tablespoons milk or cream (for desired consistency)
Preparing the Molten Chocolate Lava Center:
- Melt the chocolate and butter: In a heatproof bowl set over a saucepan of simmering water (double boiler), combine the chopped bittersweet chocolate and butter. Make sure the bottom of the bowl doesn’t touch the water. Stir occasionally until the chocolate and butter are completely melted and smooth. Remove from heat and let it cool slightly for about 5 minutes.
- Whisk in the egg yolks and sugar: In a separate bowl, whisk together the egg yolks and granulated sugar until pale and slightly thickened. This usually takes about 2-3 minutes of vigorous whisking.
- Combine the chocolate mixture and egg yolk mixture: Gradually pour the slightly cooled melted chocolate mixture into the egg yolk mixture, whisking constantly to prevent the eggs from cooking. Make sure to incorporate everything evenly.
- Add the flour and salt: Sift the all-purpose flour and salt over the chocolate mixture. Gently fold it in until just combined. Be careful not to overmix, as this can make the lava center tough.
- Chill the lava center: Cover the bowl with plastic wrap, pressing it directly onto the surface of the chocolate mixture to prevent a skin from forming. Refrigerate for at least 30 minutes, or up to 2 hours. This will make it easier to scoop and place into the cupcakes.
Preparing the Red Velvet Cupcakes:
- Preheat the oven and prepare the cupcake pan: Preheat your oven to 350°F (175°C). Line a 12-cup muffin tin with cupcake liners.
- Combine dry ingredients: In a medium bowl, whisk together the all-purpose flour, baking soda, cocoa powder, and salt. Set aside.
- Cream butter and sugar: In a large bowl, cream together the softened butter and granulated sugar until light and fluffy. This usually takes about 3-5 minutes with an electric mixer.
- Add eggs and vanilla: Beat in the eggs one at a time, then stir in the vanilla extract. Make sure each egg is fully incorporated before adding the next.
- Alternate adding dry ingredients and buttermilk: Gradually add the dry ingredients to the wet ingredients, alternating with the buttermilk, beginning and ending with the dry ingredients. Mix until just combined. Do not overmix. Start by adding about 1/3 of the dry ingredients, then 1/2 of the buttermilk, then another 1/3 of the dry ingredients, the remaining buttermilk, and finally the last 1/3 of the dry ingredients.
- Add red food coloring and vinegar: In a small bowl, combine the red food coloring and white vinegar. This will create a chemical reaction that enhances the red color and adds a slight tang to the cupcakes. Add this mixture to the batter and mix until evenly colored.
Assembling and Baking the Cupcakes:
- Fill the cupcake liners: Fill each cupcake liner about halfway full with the red velvet batter.
- Add the lava center: Remove the chilled chocolate lava center from the refrigerator. Use a small cookie scoop or spoon to scoop out a generous tablespoon of the lava center. Gently place one scoop of the lava center into the middle of each cupcake, pressing it down slightly.
- Top with remaining batter: Spoon the remaining red velvet batter over the lava centers, covering them completely. Fill the cupcake liners to about 2/3 full.
- Bake the cupcakes: Bake in the preheated oven for 18-22 minutes, or until a toothpick inserted into the cupcake (not the lava center) comes out clean. The baking time may vary depending on your oven, so keep a close eye on them.
- Cool the cupcakes: Remove the cupcakes from the muffin tin and let them cool on a wire rack for at least 15 minutes before frosting (if using).
Preparing the Cream Cheese Frosting (Optional):
- Cream the cream cheese and butter: In a large bowl, cream together the softened cream cheese and butter until smooth and creamy. Make sure there are no lumps.
- Add powdered sugar: Gradually add the powdered sugar, one cup at a time, beating on low speed until combined.
- Add vanilla extract and milk: Stir in the vanilla extract. Add milk or cream, one tablespoon at a time, until you reach your desired consistency. The frosting should be smooth and spreadable.
- Frost the cupcakes: Once the cupcakes are completely cooled, frost them with the cream cheese frosting using a piping bag or a knife. You can decorate them with sprinkles, chocolate shavings, or fresh berries.
Tips for Success:
- Don’t overmix the batter: Overmixing can develop the gluten in the flour, resulting in tough cupcakes. Mix until just combined.
- Chill the lava center: Chilling the lava center makes it easier to scoop and prevents it from melting too quickly during baking.
- Don’t overbake the cupcakes: Overbaking will dry out the cupcakes and prevent the lava center from being molten.
- Let the cupcakes cool completely before frosting: Frosting warm cupcakes will cause the frosting to melt and slide off.
- Use high-quality chocolate: The quality of the chocolate will greatly impact the flavor of the lava center. Use a good quality bittersweet chocolate for the best results.
Variations:
- White Chocolate Lava Center: Substitute the bittersweet chocolate with white chocolate for a sweeter lava center.
- Espresso Powder: Add a teaspoon of espresso powder to the red velvet batter for a deeper, richer flavor.
- Chocolate Chips: Fold in some chocolate chips into the red velvet batter for added texture and flavor.
- Different Frostings: Experiment with different frostings, such as chocolate buttercream or vanilla buttercream.
Conclusion:
And there you have it! These Red Velvet Lava Cupcakes are more than just a dessert; they’re an experience. The combination of the classic red velvet flavor with that molten, gooey center is simply irresistible. I truly believe this recipe is a must-try for anyone who loves baking, or just loves a good, decadent treat. The slight tang of the buttermilk in the cake perfectly complements the rich, dark chocolate lava, creating a symphony of flavors that will have you reaching for another bite. But why is this recipe a must-try, you ask? Well, beyond the incredible taste, it’s surprisingly easy to make. Don’t let the “lava” part intimidate you! The secret is all in the timing and the quality of your chocolate. And the best part? You get individual servings, perfect for portion control (or not, I won’t judge!). These cupcakes are guaranteed to impress at your next gathering, or simply brighten up a weeknight. Now, let’s talk serving suggestions and variations because the possibilities are endless! For a classic touch, a dusting of powdered sugar is all you need. The stark white against the deep red is visually stunning and adds a touch of sweetness. But if you’re feeling a little extra, a dollop of whipped cream or a scoop of vanilla ice cream takes these cupcakes to a whole new level. Imagine the warm cupcake melting the ice cream pure bliss! Looking for variations? You could try adding a teaspoon of espresso powder to the batter for a mocha twist. Or, for a festive touch, fold in some chopped pecans or walnuts. If you’re a white chocolate lover, you can substitute the dark chocolate in the lava center with white chocolate for a sweeter, creamier filling. Another fun idea is to add a swirl of cream cheese frosting on top after they’ve cooled slightly. The tanginess of the cream cheese complements the red velvet beautifully. These Red Velvet Lava Cupcakes are also incredibly versatile. They’re perfect for Valentine’s Day, birthdays, anniversaries, or any occasion that calls for a little bit of indulgence. You can even bake them in mini muffin tins for bite-sized treats. Just adjust the baking time accordingly. I’m so excited for you to try this recipe! I know you’ll love it as much as I do. The satisfaction of seeing that molten lava flow out when you take your first bite is truly unparalleled. It’s a showstopper dessert that’s surprisingly simple to create. So, what are you waiting for? Preheat your oven, gather your ingredients, and get ready to bake some magic! And most importantly, don’t forget to share your experience with me! I’d love to see your creations and hear about any variations you try. Tag me in your photos on social media, or leave a comment below. I can’t wait to see your Red Velvet Lava Cupcakes come to life! Happy baking! I am confident that you will love this recipe and it will become a staple in your baking repertoire. Print
Red Velvet Lava Cupcakes: The Ultimate Decadent Recipe
- Total Time: 67 minutes
- Yield: 12 cupcakes
Description
Decadent red velvet cupcakes with a molten chocolate lava center and optional cream cheese frosting. A perfect combination of classic flavors and a delightful surprise inside!
Ingredients
- All-purpose flour: 1 1/2 cups
- Baking soda: 1 teaspoon
- Unsweetened cocoa powder: 1 tablespoon
- Salt: 1/2 teaspoon
- Granulated sugar: 1 cup
- Unsalted butter, softened: 1/2 cup (1 stick)
- Large eggs: 2
- Vanilla extract: 1 teaspoon
- Buttermilk: 1 cup
- Red food coloring: 1 tablespoon
- White vinegar: 1 teaspoon
- Bittersweet chocolate, finely chopped: 4 ounces
- Unsalted butter: 4 tablespoons (1/2 stick)
- Large egg yolks: 2
- Granulated sugar: 2 tablespoons
- All-purpose flour: 1 tablespoon
- Salt: Pinch
- Cream cheese, softened: 4 ounces
- Unsalted butter, softened: 1/4 cup (1/2 stick)
- Powdered sugar: 2 cups
- Vanilla extract: 1 teaspoon
- Milk or cream: 1-2 tablespoons (for desired consistency)
Instructions
- In a heatproof bowl set over a saucepan of simmering water (double boiler), combine the chopped bittersweet chocolate and butter. Make sure the bottom of the bowl doesn’t touch the water. Stir occasionally until the chocolate and butter are completely melted and smooth. Remove from heat and let it cool slightly for about 5 minutes.
- In a separate bowl, whisk together the egg yolks and granulated sugar until pale and slightly thickened. This usually takes about 2-3 minutes of vigorous whisking.
- Gradually pour the slightly cooled melted chocolate mixture into the egg yolk mixture, whisking constantly to prevent the eggs from cooking. Make sure to incorporate everything evenly.
- Sift the all-purpose flour and salt over the chocolate mixture. Gently fold it in until just combined. Be careful not to overmix, as this can make the lava center tough.
- Cover the bowl with plastic wrap, pressing it directly onto the surface of the chocolate mixture to prevent a skin from forming. Refrigerate for at least 30 minutes, or up to 2 hours. This will make it easier to scoop and place into the cupcakes.
- Preheat your oven to 350°F (175°C). Line a 12-cup muffin tin with cupcake liners.
- In a medium bowl, whisk together the all-purpose flour, baking soda, cocoa powder, and salt. Set aside.
- In a large bowl, cream together the softened butter and granulated sugar until light and fluffy. This usually takes about 3-5 minutes with an electric mixer.
- Beat in the eggs one at a time, then stir in the vanilla extract. Make sure each egg is fully incorporated before adding the next.
- Gradually add the dry ingredients to the wet ingredients, alternating with the buttermilk, beginning and ending with the dry ingredients. Mix until just combined. Do not overmix. Start by adding about 1/3 of the dry ingredients, then 1/2 of the buttermilk, then another 1/3 of the dry ingredients, the remaining buttermilk, and finally the last 1/3 of the dry ingredients.
- In a small bowl, combine the red food coloring and white vinegar. This will create a chemical reaction that enhances the red color and adds a slight tang to the cupcakes. Add this mixture to the batter and mix until evenly colored.
- Fill each cupcake liner about halfway full with the red velvet batter.
- Remove the chilled chocolate lava center from the refrigerator. Use a small cookie scoop or spoon to scoop out a generous tablespoon of the lava center. Gently place one scoop of the lava center into the middle of each cupcake, pressing it down slightly.
- Spoon the remaining red velvet batter over the lava centers, covering them completely. Fill the cupcake liners to about 2/3 full.
- Bake in the preheated oven for 18-22 minutes, or until a toothpick inserted into the cupcake (not the lava center) comes out clean. The baking time may vary depending on your oven, so keep a close eye on them.
- Remove the cupcakes from the muffin tin and let them cool on a wire rack for at least 15 minutes before frosting (if using).
- In a large bowl, cream together the softened cream cheese and butter until smooth and creamy. Make sure there are no lumps.
- Gradually add the powdered sugar, one cup at a time, beating on low speed until combined.
- Stir in the vanilla extract. Add milk or cream, one tablespoon at a time, until you reach your desired consistency. The frosting should be smooth and spreadable.
- Once the cupcakes are completely cooled, frost them with the cream cheese frosting using a piping bag or a knife. You can decorate them with sprinkles, chocolate shavings, or fresh berries.
Notes
- Don’t overmix the batter: Overmixing can develop the gluten in the flour, resulting in tough cupcakes. Mix until just combined.
- Chill the lava center: Chilling the lava center makes it easier to scoop and prevents it from melting too quickly during baking.
- Don’t overbake the cupcakes: Overbaking will dry out the cupcakes and prevent the lava center from being molten.
- Let the cupcakes cool completely before frosting: Frosting warm cupcakes will cause the frosting to melt and slide off.
- Use high-quality chocolate: The quality of the chocolate will greatly impact the flavor of the lava center. Use a good quality bittersweet chocolate for the best results.
- Prep Time: 45 minutes
- Cook Time: 22 minutes
Leave a Comment